The familiar “six”
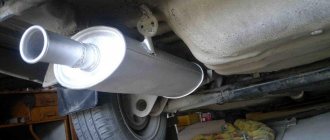
VAZ 2106 has rear-wheel drive. The transmission of this classic car consists of a dry single-plate clutch, a gearbox with synchronizers in all forward gears, a cardan drive with 2 driveshafts and a rear axle with a removable gearbox.
Malfunctions of the VAZ 2106 gearbox mainly arise due to untimely replacement of transmission oil in the rear axle housing of the car. The presence of problems is indicated by a special noise that appears only at certain vehicle speeds. This noise signals increased friction of the gears of the mechanism.
If you hear a noise like this, first try checking for oil in the rear axle housing and the tightness of all holes and connectors. If necessary, add oil and replace worn gaskets. If the noise does not stop after this, you will have to open the rear axle and repair or change the gearbox. Replacing the gearbox is an easy task. It can be performed without the help of specialists in any clean, lighted room where there is an inspection hole or a hydraulic lift.
Have you changed the gearbox on your VAZ 2106?
The familiar “six”
VAZ 2106 has rear-wheel drive. The transmission of this classic car consists of a dry single-plate clutch, a gearbox with synchronizers in all forward gears, a cardan drive with 2 driveshafts and a rear axle with a removable gearbox.
Malfunctions of the VAZ 2106 gearbox mainly arise due to untimely replacement of transmission oil in the rear axle housing of the car. The presence of problems is indicated by a special noise that appears only at certain vehicle speeds. This noise signals increased friction of the gears of the mechanism.
If you hear a noise like this, first try checking for oil in the rear axle housing and the tightness of all holes and connectors. If necessary, add oil and replace worn gaskets. If the noise does not stop after this, you will have to open the rear axle and repair or change the gearbox. Replacing the gearbox is an easy task. It can be performed without the help of specialists in any clean, lighted room where there is an inspection hole or a hydraulic lift.
The design and principle of operation of the VAZ 2106 steering mechanism
The design of the VAZ 2106 steering mechanism is very complex. However, it is precisely this that allows the driver to confidently control the car in a variety of situations. All elements of the control system are shown in the figure below.
The control system of the “six” is very complex and consists of many elements
Here it should be said about the ease of control of the “six”. To turn the steering wheel, the driver makes a minimum of effort. And therefore, less tired on long trips. The steering of the “six” also has one more feature: play. It is very minor and is not a sign of a problem with the steering system. Play in the “six” steering wheel is a common occurrence; it occurs due to the abundance of various rods and small elements in the control system. Finally, in the latest models of the “sixes” they began to install injury-proof steering columns, which could fold in the event of a strong impact, increasing the driver’s chances of surviving a serious accident. The VAZ 2106 steering mechanism works as follows:
- The driver turns the steering wheel in the desired direction.
- A worm shaft begins to move in the steering gear, driven by a system of hinges.
- The gear mated to the worm shaft also begins to rotate and moves the double-ridge roller.
- Under the action of the roller, the secondary shaft of the steering gear begins to rotate.
- The bipod is attached to this shaft. When moving, they set the main steering rods in motion. Through these parts, the driver’s force is transmitted to the front wheels, which rotate to the required angle.
Diagnosis of gearbox failures
Accurate diagnosis of the rear axle of a VAZ 2106 is only possible while the vehicle is moving. Malfunctions are detected by sound.
This is the car part
First you need to find a flat, straight section of a country highway without holes or potholes. It is better to carry out tests early in the morning, while there is no heavy traffic. First you need to remove all noisy things from the trunk and interior.
- First we set off and reach a speed of 20 km/h, after which we move at this speed and 1st gear for several minutes. We remember the noises that appear.
- Then, at a normal pace, we accelerate to 90 km/h, gradually switching from low to high gear. We listen to the sounds that the car makes when driving in different gears and speeds.
- We release the gas pedal and, without pressing the brake, sequentially shift gears from 4 to 3.2, 1 and then to neutral. We roll until the car comes to a complete stop, monitoring the noise that occurs in different gears and speeds when decelerating.
- After stopping the car completely, we accelerate from standstill to 100 km/h, move the gearshift lever to neutral and turn off the engine. It is important not to lock the steering wheel.
- After turning off the engine, we roll in neutral until the car comes to a complete stop.
If the sounds emanating from the car during the first test fully correspond to the noises that appeared during the second, then the rear axle gearbox of the VAZ classic is working. If during the first test noises are detected that were not present during the second test, remember them and continue diagnostics while parked.
- Set the gearshift lever to neutral and start the engine.
- Slowly increase the engine crankshaft speed at idle to 4500.
- We compare the sound from the engine with the sound that arose during road tests.
If the sound noted after the first 2 tests corresponds to the noise of the motor, we stop the diagnosis, there is no breakdown. If the noise is not related to the engine, we carry out the last test.
- We hang up the rear wheels and put the car on supports.
- We start the engine, put it in high gear and listen to the noise at various speeds.
If the noise noticed during the first test does not repeat during the remaining tests, then it is time to remove the gearbox.
Dismantling a faulty unit
In most cases, if a malfunction is detected, the manufacturer recommends replacing the VAZ classic rear axle gearbox assembly. The reason is that after replacing individual parts, precise adjustment of this mechanism is required, which is almost impossible to perform without special tools.
Dismantling the VAZ classic gearbox is performed as follows.
- First, we lift the rear of the car with a jack and put the car on supports. We place stops under the front wheels.
- Lower the handbrake all the way down.
- Drain the oil from the rear axle housing.
- Remove the wheels and drums.
- We rotate the axle shaft flange so that the large holes in it coincide with the 2 nuts securing the oil deflector.
- We unscrew these nuts along with washers.
- In the same way, unscrew 2 more nuts securing the reflector.
- Now we unfold the brake drums and screw them with the convex side to the flanges of the axle shafts, using 2 wheel bolts for the right and 2 for the left.
- We grab the drum with both hands and with a strong jerk we pull the right axle shaft out of the bridge beam by about 25-30 cm.
- We repeat the procedure with the left axle shaft.
- After this, unscrew the brake drums and calmly remove the axle shafts completely.
- Holding the rear cardan from turning with a pry bar, unscrew the nuts of the bolts securing the cardan joint flange to the drive gear flange of the gearbox.
- We disconnect the hinge flange from the gearbox flange using a pry bar.
- We unscrew all the bolts securing the gearbox to the beam.
- We take out the gearbox.
That's all - the dismantled mechanism can be sent for repair or replaced with another. When purchasing a new gearbox, it is important to make sure that its markings are the same as the old one. The marking with the number of the final drive is located on the toothless side of the driven gear. When installing a new or repaired gearbox, it is important not to forget to install all the gaskets, coat the fastening bolts with sealant and pour transmission oil into the rear axle housing.
When installing both axle shafts, the oil deflectors should be turned with the screws down. The bolts securing the reflectors to the rear axle beams must be screwed with the short part of the cap to the axle shaft.
How to remove the shank oil seal on a VAZ 2106:
To make it convenient to change the tail seal, place the car in an inspection hole or on an overpass. Pre-prepare new tail seals. The old oil seal has a worn appearance and excess oil. It must be removed immediately. To do this, proceed with the following steps:
1) Unscrew the drain plug on the gearbox housing using a hexagon. Here you need to place a container for oil;
2) Wait until the lubricant has completely drained from the gearbox. Screw the plug back in;
3) Disconnect the reverse drive gear flange and the driveshaft;
4) Put the car on the handbrake;
5) Using a 24mm , begin to unscrew the nut that holds the tail flange.
It is not necessary to use a hand brake to prevent the flange from rotating.
6) Insert several bolts into the hole in the final drive gear flange;
7) Using special tools, try to hold the flange by these bolts. At the same time, unscrew the nut;
8 ) Take a two-jaw puller and use it to remove the tail flange from the splines;
9) If you do not have a puller, remove the flange by hand. This will require some effort, but it is not difficult to remove;
10) Remove the washer and flange from the tail of the main gear at the same time as the dirt deflector;
11) Take a flathead screwdriver and pry off the seal. Remove it from the hole in the gearbox housing using a bracket. The oil seal has been removed and you can begin replacing.
Important : Before you begin installing a new tail seal, you should check the surface of the flange that is in direct contact with the seal. It must be undamaged and free of rust. If any defects are found, eliminate them by polishing the surface.
Why does oil leak from the rear axle gearbox of VAZ 2107, 2106?
It is important to understand when the seal is leaking and when there is simple fogging. If after using the machine no drops of oil are visible near the oil seal, we can assume that the oil seal is simply sweating. In a situation where drops of oil or a trail followed by a drop are visible, we can assume that the oil seal is leaking.
Causes of leakage of the rear gear axle seal of VAZ 2107, 2106:
- Wear of oil scraper elements of the oil seal.
- Rupture of the compression spring of the oil seal.
- Oil seal defect.
- Development on the flange.
- Faulty or clogged gearbox breather.
Replacing the rear axle oil seal on a VAZ 2107 with your own hands.
First, let's prepare spare parts and tools. Of the new parts we will need:
- The seal itself.
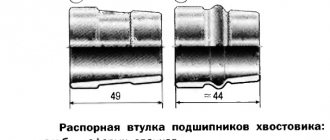
- Spacer sleeve.
- Oil deflector washer.
- New gear oil.
You will need 1.35 liters of oil. According to Murzilka, it is recommended to change it together with the oil seal. Ideally you need:
- Head 24
- The key is 17 (you can have a head) .
- A dynamometer (can be replaced with spring scales up to 15 kg) or a torque wrench of at least 150 N*cm.
- Open-end wrench 13.
- A good, thick flathead screwdriver.
- Mandrel for oil seal.
- Hammer or mallet.
- Container for old oil.
- Rags.
- Marker.
- Jack.
We've prepared everything and are starting the replacement!
Preparing and dismantling the gearbox oil seal.
We drive the car into a pit or overpass and drain the oil from the bridge (do not forget to immediately screw the drain plug back). We make a mark with a marker at the junction of the cardan with the gearbox (so as not to throw off the balancing during installation). We take a 13 mm wrench and a strong screwdriver or some kind of mounting tool and unscrew the nuts securing the cardan to the gearbox.
We disconnect the driveshaft from the gearbox and see the 24 nut, but do not unscrew it. This is where a torque wrench or dynamometer comes in handy. We need to measure the force at the input to the gearbox until the suspended wheel begins to spin. Use a jack to jack up any rear wheel and then proceed according to the situation:
- If you have a torque wrench, then simply turn the nut 24 degrees until the wheel starts spinning and look at the readings on the wrench at this moment. We remember them because When assembling, we will tighten with the same force.
- If you have a dynamometer (or scales), then we hook it onto the bolt and pull until the suspended wheel moves. We remember the readings because When assembling, we will tighten the nut until we achieve the same readings.
- if you have nothing at all, then make a mark on the flange, nut and gearbox and count how many turns you unscrew the nut to tighten it the same number of turns.
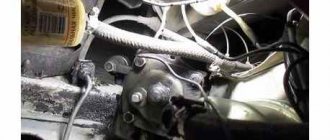
We remove the wheel from the jack (but do not remove it far) and unscrew the nut by 24. To unscrew it, we place bricks under the wheels as stoppers, or we screw in 2 bolts and make a stop from a mounting or pipe as shown in the photo below.
Next, use a mallet or hammer to knock down the gearbox flange through a wooden spacer.
Now you can see the oil seal itself and you can remove it with a screwdriver or wrench.
Installing a new oil seal in the rear axle gearbox.
Wipe the oil seal installation area from dust and debris. Check the flange for wear or rust. Before installation, lubricate the outer part of the oil seal with lithol. Press the new oil seal through the mandrel to a depth of 1.7-2mm from the edge of the gearbox. If there is a large hole on the flange , then it is better to drive the oil seal a little deeper or, conversely, slightly undercut it. Focus only on the outer edge of the oil seal, otherwise you may damage it.
After installing the oil seal, use an oil can to lubricate its inside with oil. And install the flange.
How to tighten the flange nut of the rear gearbox of a classic.
We tighten the nut based on what you had in order to measure the force with which it was tightened. After tightening, check that there is no play either axial (forward-backward), up-down, left-right.
We assemble further in the reverse assembly process. Don't forget to add oil to the gearbox.
Have smooth roads!
Still have questions for the author? Ask them in the comments!
How to disassemble the steering gear of the “six”
If the driver decides not to change the gearbox on his “six”, but only replace the seals or bearings in it, then the gearbox will have to be almost completely disassembled. To do this, you need the following things:
- large socket head 30;
- puller for gearbox bipods;
- flat screwdriver;
- hammer;
- vice.
Sequence of work
It should be said right away that a puller and a vice are the main tools when disassembling the gearbox. It is better not to start disassembling without them, since it will not be possible to replace these tools with anything.
- There is a fastening nut on the gearbox bipod. It is unscrewed with an open-end wrench. After this, the gearbox is installed in a vice, a puller is put on the bipod as shown in the photo, and the rod is carefully moved from the shaft with the puller.
- The plug is unscrewed from the oil filling hole. The oil from the gearbox housing is drained into some empty container. Then the adjustment nut is unscrewed from the gearbox, and the lock washer located under it is also removed.
- There are 4 mounting bolts on the top cover of the gearbox. They are unscrewed with a 14 key. The cover is removed.
- The traction shaft and its roller are removed from the gearbox.
- Now remove the cover from the worm gear. It is held on by four 14mm bolts, under it there is a thin sealing gasket, which should also be carefully removed.
- There is nothing holding the worm shaft anymore and it is carefully knocked out with a hammer from the gearbox housing along with the ball bearings.
- There is a large rubber seal in the worm shaft hole. It is convenient to remove it using a regular flat-head screwdriver.
- Using a hammer and a large 30mm wrench, knock out the second worm shaft bearing located in the gearbox housing.
- After this, all gearbox parts are inspected for breakdowns and mechanical wear. Worn parts are replaced with new ones, then the gearbox is assembled in the reverse order.
Typical malfunctions of the rear gearbox
Most often, the breakdown of this element of the car transmission is associated with the exhaustion of the service life of some parts that require subsequent replacement. The main causes of malfunctions of the rear axle gearbox are:
- wear of the shank oil seal;
- wear of the shank or differential bearings;
- breakdown of differential elements;
- wear or breakdown of parts of the main pair.
Signs of a breakdown of the rear axle gearbox of the VAZ 2106 cannot be ignored. An oil leak from the gearbox or a characteristic “howling” sound emanating from this unit when driving immediately reveals the cause of the malfunction. And if transmission oil leakage can be easily eliminated by simply replacing the shank oil seal, then the noise emanating from a broken transmission is not so easy to deal with.
First, you need to check whether the noise disappears when the car coasts. If it disappears, then the reason is certainly in the main gearbox pair. If the noise or hum remains, the cause of the malfunction is most likely a failure of the shank or differential bearings. The principle of this simplest diagnosis is that when coasting there is no forceful contact between the elements of the main pair, and, accordingly, their condition does not affect the hum emanating from the car.
First of all, it should be noted that most often the main pair is subject to increased wear due to low oil levels. Insufficiently lubricated gearbox parts are naturally subject to severe thermal and frictional overloads. In turn, a drop in the oil level occurs when the oil seal is faulty, which becomes unusable when the shank nut is loosely tightened. The second reason that often leads to replacing the VAZ 2106 gearbox is the increased load on the transmission that occurs during long-term operation of the vehicle with heavy overload. Thirdly, we cannot exclude a factory defect in the parts installed on the rear gearbox, the price of which is unreasonably high.
Filling oil into the steering gear
As mentioned above, the steering gear housing is sealed. Oil is poured inside, which can significantly reduce friction of parts. Any GL5 or GL4 class oil is suitable for a VAZ gearbox. The viscosity class should be SAE80-W90. Many owners of “sixes” fill in the old Soviet TAD17 oil, which also has an acceptable viscosity and is cheaper. To fill the gearbox completely, you will need 0.22 liters of gear oil.
How to check the oil level in the steering gear
In order for the steering gear parts to last as long as possible, the driver must periodically monitor the oil level in this device and, if necessary, add lubricant.
- The gearbox cover has a hole for filling oil, closed with a plug. The plug is unscrewed using an 8-mm open-end wrench.
- A thin long screwdriver or oil dipstick is inserted into the hole until it stops. The oil should reach the bottom edge of the oil drain hole.
- If the oil level is normal, the plug is returned to its place, screwed in, and any oil leaks on the cap are wiped off with a rag. If the level is low, add oil.
Oil filling sequence
If the driver needs to add a little oil to the gearbox or change the oil completely, he will need an empty plastic bottle, a piece of plastic tube and a medical syringe of the largest volume. It should be noted here that the operating instructions for the machine say: the oil in the steering gear should be changed once a year.
- The oil plug on the gearbox cover is unscrewed. A plastic tube is placed over the syringe. The other end of the tube is inserted into the drain hole of the gearbox, the oil is drawn out into a syringe and poured into an empty plastic bottle.
- After complete drainage, new oil is poured into the gearbox using the same syringe. Fill until oil begins to drip from the drain hole. After this, the plug is screwed into place, and the gearbox cover is thoroughly wiped with a rag.
Rear axle repair and gearbox replacement
Depending on the cause of the breakdown, the following repair work may be necessary to restore the transmission’s functionality:
- replacing the VAZ 2106 gearbox oil seal;
- replacement and adjustment of the main pair;
- Troubleshooting differential and shank bearings and replacing them if necessary;
- replacement of VAZ 2106 gearbox.
Repair with replacement of bearings and (or) elements of the main gearbox pair is very difficult in technical terms. It requires special knowledge and tools in the process of adjusting the VAZ 2106 gearbox. As a rule, this unit is adjusted either at the factory or in specialized workshops. By watching a video about repairing a VAZ 2106 gearbox, you can see this for yourself. Meanwhile, in order to prevent damage to this transmission element, it is necessary to monitor whether the shank nut is tightened and whether there is any oil leakage from the seals.
Replacing the VAZ 2106 gearbox oil seal is necessary in case of transmission oil leaking from under it. Simply tightening the nut is not enough. Therefore, before we learn how to adjust the VAZ 2106 gearbox, we will learn how to replace a leaking oil seal. To carry out repair work you will need:
- a set of open-end wrenches and socket heads;
- puller for removing the oil seal;
- Litol-24 lubricant;
- mandrel for installing a new oil seal;
- hex wrench for unscrewing the drain plug;
- hammer;
- container for draining oil;
- transmission oil.
It is best to carry out work on replacing the rear axle gearbox oil seal in the inspection pit.
Replacement is carried out in the following order:
- We unscrew the plug to drain the oil, and, replacing the container, drain it.
- Unscrew the driveshaft from the rear axle gearbox flange.
- Unscrew the flange nut, counting the exact number of turns, and write down the value.
- Remove the flange. It usually comes off easily, but you can easily tap it with a hammer once it's firmly in place.
- If there are shells on the surface of the flange, or wear in the place where the oil seal fits, it must be replaced.
- Using a puller, remove the worn oil seal of the VAZ 2106 rear axle gearbox.
- Lubricate the new oil seal with Litol-24 grease to facilitate its installation.
- Using a mandrel, lightly hammer the oil seal into place.
- We install the flange and tighten the nut exactly the same number of turns that we wrote down.
- We attach the driveshaft to the rear axle.
- Fill the VAZ 2106 gearbox with oil to the level of the filler neck. It is recommended to use gear oil from well-known manufacturers. It would be useful to add a molybdenum additive to it to reduce friction between parts.
After repairs, it is also necessary to check the condition of the breather and, if necessary, clean it. If there is a need to completely replace this unit, then you need to know that the gear ratio of the VAZ 2106 gearbox is 3.9, and the car’s speedometer readings are guaranteed. Read about how to remove a VAZ 2106 gearbox in other articles on our website.
Failure of the steering mechanism
When the gearbox finally fails, the ability to drive the vehicle is completely or significantly lost. How to timely determine the “quick end” of the steering mechanism of a VAZ 2106 car, so as not to encounter this at the most inopportune moment? There are several “warning lights” that indicate that the mechanism in question needs replacement.
| Problem | Causes and consequences |
| 1. Extraneous squeaks are heard when turning the steering wheel | This may indicate that a foreign substance of an abrasive type has entered the gearbox, or an internal breakage of the worm or gear. Possible jamming of the unit, loss of control over vehicle control functions |
| 2. Significant play in the steering wheel | In most cases, play is caused by loosening the adjustment bolt and is eliminated by tightening it. If such a measure does not produce results, therefore, the gearbox of the VAZ 2106 car must be replaced |
| 3. Oil leak | This may mean either a rupture of the sealing gasket or a crack or hole in the housing. This is fraught with high oil consumption, insufficient lubrication of the steering mechanism and acceleration of its inevitable failure. |
| 4. Difficulty turning the steering wheel | The reason is insufficient lubrication, displacement of the engagement angle of the worm and gears, partial jamming of moving parts and mechanisms. It is fraught with increased driver fatigue during a long trip, complete jamming of the unit, loss of control over vehicle control functions |
| 5. Knocks and vibrations in the gearbox, which are felt through the steering wheel | The reasons may be: a loose adjustment bolt, failure of sealing couplings and gaskets, or wear and tear of mechanisms moving in mesh. Possible jamming of the unit, loss of control over vehicle control functions |
Replacing a vehicle gearbox is not a particularly difficult task, but this does not mean that it does not require careful preliminary preparation. First of all, you need to decide on the tools that will be used for the removal: which ones are available and which ones need to be prepared or purchased.
In order to replace the steering mechanism on a VAZ 2106 car, you need to acquire a set of wrenches, pliers, pliers, and a device for pressing out the pins of ball joints. Without the latter, the replacement process will become quite noticeably more complicated, which may affect the quality of the work performed. Therefore, you should not save at the expense of your own safety and comfort.
Because due to poor installation of the control mechanisms of the VAZ 2106 car, they can fail at the most inopportune moment, which will expose the lives of the driver, passengers and other road users to unreasonable danger. Next, it is necessary to carry out a superficial inspection of the gearbox housing for damage and assess the external condition.
It is located in the engine compartment, under the main brake cylinder of the car. In case of significant contamination, it is advisable to clean it from dust, dirt and oil stains. This will increase the speed and convenience of replacement work.
Device
In order for the car to move, it is necessary to transfer the rotation of the engine to the wheels. But the engine speed is too high, and in order to correctly distribute the torque, a mechanism is needed that changes the gear ratio. Due to the gearbox and different engine speeds, the speed of movement changes, and the main pair of the rear axle takes over the rotation and transmits it to the wheels through gears.
- flange, it is fixed on the drive gear (shank) of the RZM, and is an intermediate link between the driveshaft and this gear;
- the shank of the main pair, at one end of which there are splines for pressing the flange, at the other end there is a bevel gear with a small number of teeth;
- driven gear (planet gear), it is in mesh with the drive gear, and it is with it that it forms the main gear;
- center differential, allowing the rear wheels to spin at different angular speeds.
The differential design is very simple - the mechanism consists of two axle gears, two satellites and a satellite pin. From the gearbox, the movement is transmitted to the axle shafts, on which the wheels are mounted.
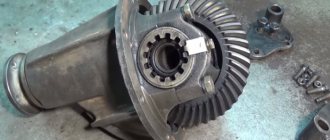
Gearbox device
The main structural elements of the “six” REM are:
- main couple;
- cross-axle differential.
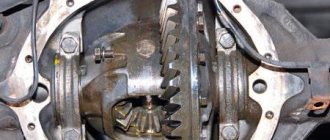
VAZ 2106 gearbox design: 1 - drive gear; 2 — driven gear; 3 — satellite; 4 - axle gear; 5 — satellite axis; 6 — differential box; 7 — bolts securing the differential box bearing cover; 8 — differential box bearing cover; 9 — locking plate; 10 — bearing adjusting nut; 11 — gear housing
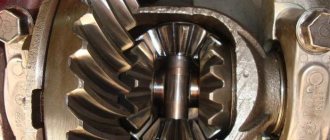
Main couple
Structurally, the main gearbox pair is made of two gears - a drive (spike) and a driven (planet) with hypoid (spiral) tooth engagement. The use of hypoid transmission provides the following advantages:
- quiet operation;
- increased resource;
- increased clearance.
However, this design also has its own nuances. The main gears come only in pairs and are adjusted using special equipment. During this process, all gear parameters are monitored. The main pair is marked with the serial number, model and gear ratio, as well as the date of manufacture and signature of the master. Then the final drive set is formed. Only after this the spare parts go on sale. If one of the gears breaks down, the entire main pair must be replaced.
The main pair consists of two gears - driven and driven
Differential
Through the differential, torque is distributed between the drive wheels of the rear axle, ensuring their rotation without slipping. When the car turns, the outer wheel receives more torque, and the inner wheel receives less. Without a differential, the torque distribution described would not be possible. The part consists of a housing, satellites and semi-axial gears. Structurally, the unit is installed on the driven gear of the main pair. The satellites connect the side gears to the differential housing.
The presence of a differential in the gearbox eliminates slipping of the rear wheels at different torques on them
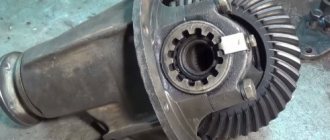
Other details
There are other elements in REM that are an integral part of the design:
- housing - eliminates damage to the differential;
- flange - the part is fixed on the bevel gear of the main pair and is intended to connect the cardan to this gear;
- lip seal - is responsible for the tightness of the unit, preventing lubricant from leaking out;
- bearings - provide rotation of the bevel gear and differential.
Differences in VAZ rear axle gearboxes
RZMs differ in the gear ratio of the main pair; in total, there are four types of gearboxes on the VAZ classic:
The slowest one is the RZM 2102, its drive gear has 9 teeth, and the driven gear has 40 teeth. To calculate the gear ratio, you need to divide the number of planetary gear teeth by the number of teeth on the drive shaft; for the VAZ 2102 the drive gear is equal to 4.44.
The “penny” gearbox (2101) accordingly has the number of teeth on the gears 10/43, so its IF is 4.3. The next, faster one is RZM 2103 - it has a ratio of 1041, which means the gear ratio is 4.1. And finally, the “fastest” will be the 2106 gearbox, with the number of teeth 11/43 and an inverter frequency of 3.9, respectively.
Many VAZ 2101-07 owners strive to install the fastest gearbox, but this is not always necessary. If the car often carries cargo, that is, the car is a “workhorse”, high speed is of no use, but high-torque power will be very useful. It should be noted that RZM 2102 was not supplied as spare parts; it was installed only on station wagons.
Replacing the gearbox type
Changing the gear ratio also entails changes in the dynamics of the car; you may not like the new characteristics of the chassis. Lowering the gear ratio will increase the vehicle's speed, but will reduce its power. An engine with a small cylinder capacity may not accelerate the vehicle to the desired speed.
You can find out whether a spare part fits your car at VAZ service centers or from the consultants of our store website.
Cars of the VAZ 2101-2107 family have not been produced for several years. There are seven “classic” models in total, and there are four types of gearboxes for them. We are talking about the rear axle gearbox, which is replaced when it starts making a noise. Note that the cause of the hum can be not only the gearbox, but also the driveshaft, and if it is not possible to determine the cause, you can replace both of these components.
Varieties and designations
Gearboxes designed for “classic” VAZ cars have the following gear ratios:
- 3.9 – for VAZ-2106
- 4.1 – VAZ-2103
- 4.3 – VAZ-2101
- 4.44 – VAZ-2102
A digital designation is applied to the unit body. For example, a sequence like “2101 1043” indicates that the gear ratio is 43/10 = 4.3.
We took the number made up by the last two digits and divided by the first two digits.
The transmission configuration of classic VAZ cars produced at different times is difficult to predict. For example, in the 70s, station wagon cars were equipped with gearboxes with a gear ratio of 4.44. The next generation station wagons, VAZ-2104, contained a “2106” gearbox in their transmission design, as strange as it may seem. When replacing a unit, it is better to leave the gear ratio the same as it was “from the factory”.
Common Mistake
Let’s say the factory stipulated that the car’s design should contain the “2103” unit. Then, replacement with a “2101” gearbox can be considered legitimate. At the same time, it is not recommended to use a smaller gear ratio, that is, it is impossible to install a “2106” gearbox in this case. Having made such a replacement, we will get a car with worse dynamic performance than was typical before.
If you simply change the gear ratio of the rear axle gearbox, the speedometer readings will no longer correspond to reality. To fix this, you will need to correctly select and replace the speedometer drive gear located in the gearbox assembly. Usually they don’t change anything, and for all-wheel drive VAZ cars sometimes they even use different gearboxes, which is unacceptable.
Replacing the rear axle gearbox of VAZ 2106, 2107
The main disease of REM is increased noise (hum), and the gearbox can hum for various reasons:
- there is insufficient oil in the bridge, or it is completely missing;
- the gap between the gears of the main pair is not adjusted;
- the gears are worn out, they have chips and other damage;
- the main pair has a manufacturing defect, the gears are not ground in from the factory;
- the shank nut has become unscrewed or loosened;
- bearings are worn out.
The main malfunction of the center differential is the wear of the gears of the axle shafts and satellites, when the surfaces of the parts are heavily worn, play forms between the differential gears, but the rear axle usually does not make noise due to wear of the differential gears.
Defects in the gearbox
Increased play in the RZM can be formed due to wear of the differential pinion pin - if you grab the driveshaft and rotate it clockwise and counterclockwise, this play can be felt. Also, increased clearance can be formed due to wear of the splines inside the differential housing itself.
If the gaps in the main pair of gearboxes are not adjusted, a characteristic noise occurs when the car moves:
- when the load increases (sharp acceleration), a characteristic howl is heard in the bridge;
- When I let off the gas the noise goes away.
The engine can hum in a different way, but the characteristic feature described above can most often be heard on VAZ classic cars. Worn teeth of the main pair are clearly visible on the planetary gear - they become rounded, and they often show traces of rust.
Adjusting the VAZ rear axle gearbox
If the main pair in the gearbox is worn out, it must be replaced. But you can’t just put the gears back in place; the gaps in them must be adjusted. In total, two types of basic adjustments are made:
- The thickness of the adjusting sleeve (washer) is selected for the shank (drive gear). The washer can have a thickness from 2.6 mm to 3.5 mm;
- The gap between the gears of the main pair is adjusted using two adjusting nuts of the differential housing.
The washer for the shank is selected in such a way that the shaft with the drive bevel gear rotates in the gearbox housing without backlash with a force by hand (0.3-0.4 kg). In this case, the shank nut should be tightened with a force of 12 to 26 kg, usually 18-19 kg are tightened.
After installing the shank, the differential housing with the planetary gear attached to it is put in place. The housing is secured with two covers (4 bolts, a knob with a 17mm head). The adjusting nuts are tightened from the sides of the bearings, the differential is installed so that there is play between the gears of the main pair, and the planetary gear should not be clamped. By moving the adjusting nuts to the right and left, the shank gear is brought to the planetary gear. By adjusting, you select the moment when the gap between the gears practically disappears.
The last stage is to adjust the preload of the differential bearings; the adjusting nuts are tightened from the sides. This work must be done with an indicator; the device should show from 0.14 to 0.18 mm, the gap between the gears should be within 0.08-0.13 mm. After the operation, the adjusting nuts are fixed with plates so that they do not turn.
It should be noted that adjusting the VAZ rear axle gearbox is a very difficult matter, and it is better to trust it to professionals.
↑ Adjusting the gaps
We adjust the gap in the main pair and preload the differential bearings simultaneously, in several stages:
- tighten the nut from the side of the driven gear until the gap in the mesh is completely eliminated;
- Using a caliper we measure the distance between the covers;
- screw the second nut until it stops and tighten it by 1-2 teeth of the nut. The distance between the covers should increase by approximately 0.1 mm;
- By rotating the first nut, we set the required gap in engagement of 0.08–0.13 mm. This is minimally noticeable play in the engagement, accompanied by a slight knock of tooth against tooth;
- We control the constancy of the gap in the engagement with our hands and gradually tighten both nuts until the distance between the covers increases by 0.2 mm. This will ensure the necessary bearing tension.
Slowly turn the driven gear three turns and at the same time feel the play in the meshing of each pair of teeth.
If it is uniform in all gear positions, then install locking plates.
A decrease (increase) in play in any sector indicates deformation of the differential housing and the need to replace it or trim it on a lathe.
There are two types of locking plates: single-claw or double-claw.
Depending on the position of the nut slot, we install one of them.
Repair or replacement, which is better?
Car owners of VAZ classics often cannot decide what is best to do - buy a complete ready-made REM assembled or purchase individual parts and repair the gearbox. It’s really difficult to decide here - the price of a new gearbox, of course, is higher, but the owner of the car is freed from the headache of adjustment. The thing is that it’s not so easy to find a good specialist in VAZ gearboxes, and there is no guarantee that the new main pair will not hum.
If a car owner buys a new gearbox, but it hums, the part can be exchanged under warranty, but the car owner loses money on removing and installing the gearbox. If you purchase a defective main pair, the repair itself will be more expensive - you will have to pay a technician for a secondary overhaul of the gearbox.