An additional pump for the stove is one of the options for solving the problem with the low performance of the cooling system of domestic cars.
While operating normally in moderate operating conditions, it fails in high or low ambient temperatures. In the first case, the engine overheats; in the second, the heater fails and cannot provide an acceptable air temperature in the cabin.
In what cases should you consider installing an additional pump?
It is recommended to install an additional pump in the cooling system if:
- At air temperatures above 28-30 ° C, the engine reaches a critically high temperature (provided that the cooling system is working properly);
- During the cold season, the furnace emits fresh air at idle speed at normal engine operating temperature.
The problems described above most often occur on the VAZ-2109, VAZ-2114, VAZ-2110, rear-wheel drive “classic”, and all GAZ Volga models, with the exception of the GAZ-31105. In the latter case, a malfunction may occur even under normal temperature conditions. This is due to the large volume of coolant in the system and an insufficiently powerful pump. “alt=””> It is worth noting that there is no need to install an additional pump if overheating of the power unit or failure of the stove occurs at temperatures normal for central Russia (-25 - 25 ° C). A proper standard system will operate correctly in this thermal regime. Therefore, if it does not work properly, you should look for the fault.
Video with installation example
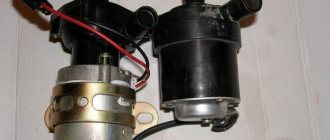
Additional electric pump for the “nine”
Now the cold weather has arrived and the owner of the VAZ 2109, living in Russia, will again have to face the problem of the stove. Indeed, either the domestic manufacturer initially did not take care of its normal functioning, or this car should have such a system, but the VAZ 2109 with an electric pump, which is installed independently, is more suitable in winter in our country. On a VAZ 2109, installing an electric pump will not take much time and it is enough to know the basic algorithm for carrying out the operation, which will be discussed in our article.
Why and where to install an electric pump on a VAZ 2109
It is clear that no owner wants to freeze in his car all winter. And passengers are unlikely to want to sit in a kind of “refrigerator”, where instead of warming up, you freeze completely. The standard stove of this car, of course, warms, but it does it reluctantly and as if on debt. It's all about its low efficiency, especially at idle, when you're stuck, for example, in traffic jams. Installing an additional electric pump, in this case, solves the problem immediately. In fact, there are many ways to make the interior of your “nine”, but modifying the car’s cooling system by installing an electric pump is the most rational solution.
Which pump to choose
Unlike the standard VAZ and GAZ pump, which has a mechanical belt or chain drive, an electric pump is used as an additional driving force. Very often, motorists use an electric pump, which is standard equipment on the Gazelle car.
The unit has high performance, but the quality of its manufacturing leaves much to be desired. Therefore, before installing such a pump, it is recommended to disassemble it, lubricate all seals with automotive sealant, reassemble it and let it dry for 24 hours.
Note. The above applies to older pumps. New GAZ pumps have good build quality. However, over time they begin to leak.
An alternative to GAZ products is to install an additional pump manufactured by Bosh. These units are distinguished by high build quality and a different operating principle. The blade rotates under the action of a magnetic coupling, and not an electric motor, as in the first case. “alt=””> Thanks to the use of such a scheme, the manufacturer managed to abandon the sealing of joints and almost completely eliminate the possibility of leaks. The disadvantages of the imported unit include its high cost and relatively low productivity (700 liters versus 1200 liters per hour for the GAZ unit).
How to install an additional pump
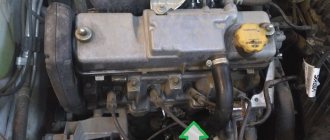
Installation of an additional pump on a VAZ stove can be done in the engine compartment or under the interior panel. The first option is preferable, since the sound of the pump does not penetrate into the interior and there is also no risk of flooding the interior with antifreeze in the event of leaks. Depending on the installation location, the unit can be installed at the place where the sound insulation is attached to the standard engine compartment or on additional brackets.
Installation of an additional water pump on the VAZ-2110 and other models of the domestic automobile industry is carried out on the heater supply pipe. In this way, it is possible to achieve a more active injection of coolant into the “furnace” radiator and increase heat transfer.
Note: Increased pressure in the cooling system can cause loose pipes to rupture or the radiator to rupture. Therefore, before installing additional equipment, it is recommended to conduct a complete diagnostics of the CO.
Before installing an additional pump, drain the antifreeze. After this, the pipe is cut in half at the intended installation location using a sharp blade, and the resulting ends are placed on the pump outlets. It is important to make sure that the arrow drawn on one of the outlets indicating the direction of fluid circulation is directed towards the radiator. The pipes located at the outlets are fixed with clamps. It is best to use Norma screw clamps as lesser known brands often have sharp edges and will cut the pipe.
The connection diagram to the on-board electrical network may differ depending on the tasks that the car owner sets for himself. If the pump is installed for more efficient cooling, it makes sense to connect it in such a way that it runs constantly when the ignition is on. The unit can be connected directly from the battery, but the circuit must be closed through a relay, which is activated after turning the ignition key.
If you plan to install an additional pump in the heating system to improve the operation of the stove at XX, it is better to connect it via a button. In this case, the power circuit will include a relay, a fuse, a pump button and a battery. Electricity is supplied via a single-wire circuit. The “minus” in this case is the body. Using such a scheme, the car owner has the opportunity to turn on the pump only when necessary. Note: it is advisable to install an additional pump according to the second power supply connection scheme, since in extremely cold conditions its prolonged operation can lead to overheating of the engine and related malfunctions.
Let's sum it up
Taking into account the above information, it becomes clear that an electric pump for a stove is a fairly simple and convenient solution that allows you to increase comfort and safety when operating a car.
In practice, after installing such a pump, it is possible to warm up the interior faster, which is important when making short trips over short distances or while driving fast on the highway in winter. The glass warms up faster and sweats less during a trip, it is easier and faster to remove snow and ice from them, etc.
As for the choice of the pump itself and its installation, the additional GAZelle pump is in demand, primarily due to its low cost. At the same time, we are not talking about quality.
Finally, we note that an additional pump in a VAZ 2109, 2114 or on a budget foreign car can significantly increase the level of comfort, save on warming up the car, etc. If the installation is done correctly and the pump is working properly, the interior will heat up faster compared to the standard heating system.
The only thing is that you should periodically check the tightness of the cooling system, since even standard elements can leak. If we are talking about additional non-standard elements, in this case the connection points require separate control.
What does water injection into an engine provide, the principle of operation, the main advantages and disadvantages. How to inject water into the engine yourself, available methods.
Checking the car cooling system pump. Main symptoms of malfunctions. Diagnostics of the water pump without removal, troubleshooting with removal from the engine.
How to check the car engine cooling system for leaks and operability of all components. Diagnostics of the pump, thermostat, pipes, etc.
Common engine cooling system failures: water pump, thermostat, radiator, cooling fan and others. How to determine the reasons yourself.
Pump device. The operating principle of a centrifugal pump, an engine cooling system with two pumps and a switchable pump. Pump malfunctions and repairs.
Expected results
After installing and connecting all the necessary elements, it is necessary to conduct a road test, during which the pump must run continuously for at least an hour. In this case, it is necessary to carefully inspect all points of its connection with the cooling system to eliminate leaks.
After inspection, check the moving machine. It may happen that a unit that is working properly at idle will fail when the pressure in the pipelines increases.
If everything is done correctly, the heater begins to supply warmer air and the engine cools down effectively even under heavy loads.
Domestic cars in winter in Russia are not very comfortable. And Gazelle is no exception to this rule. Drivers mainly complain about the heat supply to the cabin. Simply put, this car is quite cold in winter and the heater does not create a comfortable temperature in the cabin. To solve this problem, there is an additional pump for the Gazelle stove.
Additional heater pump on Gazelle - installation recommendations
Many vehicles, especially domestic ones and those in the budget price category, are equipped with a weak and ineffective stove. As a result, the interior warms up poorly and not as quickly as we would like. Expensive solutions are also sold on the market, but not every one of our car owners is ready to spend money on purchasing them. Therefore, an additional pump for the Gazelle cooling system could be the most optimal way out of the situation.
Summer is the best time to think about winter
Life goes on as usual. And if it’s still warm outside now, winter will come sooner or later. Many pages have been written about how to warm up the Gazelle again, but it seems that there is simply no better solution than installing an additional pump.
Therefore, this additional pump is necessary to improve the circulation of refrigerant in heating and cooling systems. As for the principles of working with this system, here an additional pump for the Gazelle stove is mounted on the section of the hose to the radiator after the thermostat. In this way, the speed at which the hot coolant mixture passes through the heater can be significantly increased.
How a new pump in the cooling system will help the driver
It is the pump for the Gazelle stove that is in high demand among car enthusiasts due to its practicality and low cost. It can even be installed on other makes and models of vehicles. Experienced drivers who have been using Gazelle for years are not lazy to disassemble the new pump and coat it with sealant. Particular attention should be paid to the area where the impeller and rubber sealing ring are located. Antifreeze leaks often appear in these places.
Where should I put the new heater pump? Typically, such installation is carried out in a gap created using a pipe going to the interior heater radiator. To do this, you can remove and cut the standard pipe. Using connecting hoses, a new heater pump is built into the gap.
The main reason why drivers think about an auxiliary pump is that there is little heating coming into the cabin at idle. The air becomes truly hot only after the engine speed increases. Additional equipment will help antifreeze circulate intensively through the radiator.
Disadvantage of the Gazelevsky pump
This device has a serious drawback. Since its design is not fully thought out, after some use the pump leaks. It leaks through the seal. This problem can be solved, but the device will need to be disassembled and disassembled. Treatment consists of lubricating the gaskets with silicone or hot melt adhesive. And then the lid with gaskets is fixed.
No such deficiencies were found in Bosh pumps. This unit is assembled almost perfectly and there are no spacers. There is nowhere to lose.
Direct installation
Allow the engine to cool before starting installation. It is better to let it cool naturally. Then you need to drain the coolant into a previously prepared and clean container. It will still be useful, so it's best to keep it as clean as possible.
Next, take a new additional pump for the Gazelle stove and unscrew the screws from the impeller side. The rubber gasket that you will definitely find there must be covered with a silicone-based sealant to prevent leakage. Then assemble this structure, but throw away the screws and instead install long thin bolts under regular nuts. This way you can make the connection as tight as possible.
Now let's move on to the next step. It consists of finding the installation location of the device. There are several options. This could be the location on the pin where the washer fluid reservoir is mounted, on the pin next to the battery.
Most car enthusiasts used the second method when installing an additional pump on the Gazelle stove. This is described in the instructions for the pump. For this reason, the devices must be positioned so that the pump nozzle is directed towards the block. To do this, you need to unlock the iron clamp.
Ready? Then secure the pump and begin installing the pipes. To do this, you need to remove them from the stove and from the pipe coming out from under the manifold. Now take a piece of pre-prepared reinforced tube. It should be long enough so that you can reach the pump through the brass manifold tube without unnecessary kinks.
An adapter is useful for attaching the tube. The corner works well in this role. You can attach the part to the corner with clamps.
Connecting the pump and hose from a standard stove is much easier. There is no need to install adapters here. You just need to stretch it to the size you need and then put it all together. Also secured with clamps. Finally, to complete all the fastenings, aluminum corrugated pipe can be inserted onto the mounted pipes. This is necessary to prevent the tubes from melting. Now everything can be reliably repaired. Next we will deal with the electrical part.
Installation instructions
Direct installation work can begin when the auxiliary pump, fastening and additional elements that are required according to the diagram have been purchased. The procedure for adding another pump to the factory system will be approximately as follows:
- First, a single structure is assembled, which includes a pair of hoses and a new pump. Particular attention should be paid to reliable fastening of hoses and fittings.
- The following work will be carried out on the car. It is put on the handbrake and the terminals are removed from the battery.
- Now you need to find the hoses leading from the existing stove and carefully disconnect them. The assembled structure will be connected to this place.
- To mount the pump itself, you should find a specific place.
- The output from the thermostat should be connected to the top pipe, and this will be the input. We attach a side pipe to the stove, which will act as an outlet.
- Once the entire system is assembled, you can pour coolant into it and observe the tightness (no leaks, stains, etc.)
- Now we supply power to the pump and check the functionality of the complete system. Don’t forget that to do this you need to connect the terminals to the battery. These are the main stages of the process of how to install an additional pump to the heater on a Gazelle.
To avoid losing coolant from the system, it should be drained through the lower hose of the expansion tank. To do this, you need to remove the hose and place a suitable container under the tank (for example, any plastic canister). Antifreeze or other coolant from the hose will also be poured here. After this has been done, you can remove the supply pipe - you can find it on the side of the power unit.
During dismantling, we must not forget that the coolant is under pressure in the system and may be hot for a certain time after the engine is stopped. It is better to prepare the drain container in advance and make sure that the motor has cooled down sufficiently. Many people sequentially flush the cooling and heating system before connecting new equipment to it.
For washing, you can use a regular mixture of warm water and citric acid, which effectively removes deposits. The solution is poured from above, directly from the container, and the pump must be connected to a 12 Volt power source. Next, it will pass through the hoses through the system radiator. After the radiator, the remaining dirty antifreeze along with deposits will be drained into a bucket through another hose. The cycle must be completed several times.
Electricity
Before connecting an additional pump to the Gazelle stove, you need to look at the connection diagram for the overhaul. There are several options. One of the easiest ways is to move the button to two positions inside the machine. It's simple: on / off. For example, if it’s cold you can turn it on, if you heat it up you can turn it off.
This is a simple method, and it has a drawback. If you forget to turn off the additional pump, then the next time you start the car for heating from the alarm remote control, the pump will start and absorb heat from the cold engine. This will extend the engine warm-up time.
Professionals advise using a more complex, but more effective method. There will be a dual control system. This button is only intended to be turned on in winter and turned off in spring. This is done to ensure that the pump does not work unnecessarily.
When the button is turned on, the pump for the additional heater of the Gazelle stove will turn on/off completely automatically when the engine starts and the car moves. This circuit requires a two-position relay. The pump has a certain power, so the relay needs a current of 3 A.
What can be improved
- A diode is connected in parallel with the relay winding in the “back to front” direction, thereby extending the service life of the button;
- Connecting to the battery directly is bad. It’s better to find another point with a “plus”;
- The engine drive of the faucet is used on many cars, including the VAZ-2114, and it is this (the engine itself) that must turn on the additional pump. If anyone can implement something like this, it would be nice to leave your answer in the comments. By the way, a regular limit switch will not help here.
If you find an error, please select a piece of text and press Ctrl+Enter.
Pumps: descriptions and technical specifications
Among domestic manufacturers, products can be distinguished. This company has been producing heat pumps for a long time. The products include devices for gazelles and modifications.
For Gazelles, the company offers a series of devices based on pump No. 47.3780. This is a household additional pump for the Gazelle stove. Technical characteristics allow you to work efficiently in the heating system. The device is powered by 12 V. The operating current required for this pump is 4.2 A. The pump works with antifreeze or antifreeze. The device is connected to the network via a single-wire connector. The nozzle size here is 20mm.
You can see another pump from the same manufacturer. It has a smaller nozzle diameter. Here this size is 18 mm.
Additional pump for the Gazelle Business stove differs from the usual one in the presence of two wires instead of one.
Operating principle of the additional heater pump
Many domestic car enthusiasts first try to solve the issue of raising the air temperature in the cabin using traditional methods. They seal the dashboard and doorways with insulation, change the heater radiator or install a motor with greater performance. When the effects of all such tricks are not enough, then the only effective solution may be an additional pump for the stove.
The operating principle of this technique boils down to the following: the electric pump drives antifreeze through the system within a small circle even at those moments when the power unit is not running. The auxiliary pump also helps out in situations where you have to stand in traffic jams for a long time in a Gazelle. Idle speed does not allow for an influx of well-heated air, and instead only warm air comes in.
By acquiring an additional pump, the driver receives a lot of advantages - these also include ease of installation, which does not require a significant investment of time and money. Of course, you will need a connection diagram, but the second pump is mounted into the standard electrical system of the car. The kit usually includes connectors, fasteners, adapters, etc.
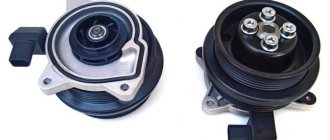
Foreign pump
Imported devices have a number of advantages over domestic ones. One of them is weight. For example, the Bosch device is lightweight, so it can be freely connected directly to pipes. The difference in the design is that the Gazelle pump is an oil seal. At high speeds it creates increased pressure in the system and leaks. The imported device has a non-contact design and the electric motor is in no way connected to the pump.
As for performance, it is better to purchase an additional imported pump for the Gazelle stove. Its description shows that it is superior in quality and efficiency to its domestic counterpart. Its parameters are the same as those of the domestic version. The device is powered by 12V and the tube size is 18mm.
As for the reviews about the operation of this additional pump, those who updated the heating in the Gazelle in this way were satisfied. In the harsh Russian winters, the car interior became warm and comfortable.
It would seem that now is not the time for pomp. But, as they say, prepare your sleigh in the summer. It also makes a difference in the summer in the sun, poking around under the hood, draining coolant, or during the first frost. By the way, I managed to dig around in the cold, well, first of all.
There are a lot of descriptions for installing an additional pump; there is something to compare with, if anything. In addition, there is always the opportunity to choose what to be guided by. I will not argue whether this modification is necessary or unnecessary. Let's say the reader of this post comes to the conclusion that you need to install a pump in your car. I will describe my experience, the difficulties I encountered and how I solved them.
1. Pump selection. GAZelle standard pump. Well, what should one do with such a fool?
When I went to buy it, I recommended it as a “new sample”, without an oil seal. And the size was smaller and the price was decent.
I took it, installed it, skated it for a month and went to shoot in the cold. Firstly, it’s not a thing without a gland. There is a rubber ring and there is a ceramic ring, which for some reason burst. The antifreeze worked, it flooded the pump motor, it stalled, and in short there was nothing to it.
What should I do? Those who like to save always pay twice. Actually, I opted for a new pump, only I had already decided to get a good, branded, imported one. Well-known manufacturer.
And this device is on my desk. Connectors, including original ones for some car brands (obviously for foreign cars) or standard ones. As a connecting connector, I simply took a connector from a VAZ brake fluid level sensor, etc. It could have been made simpler and better by purchasing a native connector. It is the same as the knock sensor or VAZ injectors, etc. But he wasn't in the store. So I still go with this connector. This pump basically cannot leak. It does not have an oil seal, an impeller drive shaft, or a magnetic system.
The new Bosch pump costs a little more than the so-called GAZelle pump. But you can save money. Everyone in the cities is having troubles. Let's go there and buy a used one from some Mercedes or Boomer, or from a minivan. My son-in-law, for example, inherited a 124 Mercedes. It was removed from the car, embedded in the ground. I took it home, tried to plug it in, it wouldn’t boot. Disassembled, cleaned, lubricated with Teflon grease. And that’s it, she earned it for two seasons and worked without complaints.
2. The choice has been made, now installation. There's not much to talk about or color in here. Everyone has their own imagination, everyone has their own preferences for the state of the engine compartment. I placed mine on the left cup, on the washer reservoir mounting pin. She settled in very well there. Brother-in-law is hanging right on the pipes. The trick is that it is very light, unlike our bandura. And my son-in-law didn’t even have to answer the phone. They simply cut the hose at a convenient location and connected it directly to the pump. I changed the tube and bought a piece of tube with an internal diameter of 18mm. I stuck it all into the heater radiator supply hose. The photo below shows where it is located and also shows how it is connected.
I agree, it's not very pleasant. But this was a temporary option, hastily.
3. Electrical connection. I talked about the connector, and such components were purchased.
Recirculation button. Relay ZPTF 23.3777 (self-locking). Expensive, but, again, the showdown has everything. Button connector. Air fuse. Unfortunately, I didn’t find the ZPTF relay connector in the store and didn’t go for disassembly. I had to improvise. Clips are also visible in the background. I never recommend anyone to use them. Only twists (according to science are of high quality) or welds. Thin wires, terminals, shrink film.
Remove the excess tails from the button connector. I tore everything up. New terminals crimped. Edit button. It must not have been repaired. Remove the marked bracket.
I also quickly connected it to the ZPTF relay. After that, I changed the connector for the power window buttons, which, unfortunately, I didn’t photograph.
Then we connect everything according to the following diagram.
1 relay 23.3777. Pinout: 1 Constant +12 volts. I ran the fuse directly from the battery. 2 Not used. +3 Land, wherever your heart desires, there’s a lot in the salon, I think there’s something for everyone. 4 Worker (consumer is authorized). In my case, a relay, from which, in turn, the pump is powered. 5 Signal, signal to turn on or off. It is operated by pressing a non-fixed button once. 6 + 12 volts from the ignition switch, from anywhere on the mounting block. The ignition signal is easily triggered by a multimeter or test. 2. Our button itself has changed and is not fixed. 3. A relay that does not need to be installed at all. But I made sure that the pump was closer to the power source. 4. And the pump itself. 5. Fuse. 15 amps is enough. Tested when turning off “our” leaking pump.
Well, in the end, all these connections are needed, the snot from the threads needs to be put in order and you can use it. The scheme is suitable for any car.
How does it all work? The ignition is turned on, and you can use the pump. Turn it on with one click of a button. Tired of heating up, turn it off with one click. Also, when you turn off the ignition, it also turns off. And the next time you turn on the ignition it does not turn on. Comfortable.
Notes: The Bosch pump is completely quiet, unlike ours. Ours hums like crazy, so the engine is inaudible (well, figuratively, of course). The system worked for me for three seasons. There are no cons. The only positive thing is that, at a minimum, the stove is fried, as if the glass begins to melt earlier when moving. At 40 degrees hot air is already blowing, at 80 degrees the hand at the terminals of the heating element begins to burn.
Replacing the water pump on VAZ 2108 and 2109
Even an inexperienced car enthusiast can repair and replace the pump on a VAZ 2108/09. You will need a standard set of tools - open-end and socket wrenches (10 and 17), screwdrivers, etc. If you plan to replace the pump, you should purchase a kit consisting of the pump assembly itself and a sealing gasket, and silicone sealant. In addition, for work you will need rags, acetone solvent and a canister of fresh antifreeze.
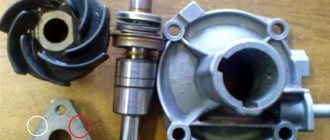
The repair kit for the water pump must contain a new gasket
As already noted, the pump is built into the bore of the engine cylinder block. The pump drive pulley is rotated by the timing belt. Therefore, to dismantle the pump, you must first remove the belt protective cover and the belt itself. But before this you need to perform a number of preparatory operations.
- The negative terminal of the battery is disconnected.
- The coolant is completely drained into a pre-prepared ten-liter container. In working condition, about 8 liters of antifreeze circulates in the cooling system of the VAZ 2108/09. If the fluid has been changed recently, it can be reused. It is prohibited to drain coolant onto the ground, as it is poisonous to plants and animals.
- The generator belt is removed. To do this, the fixing nut on the tension bar is loosened, and the generator is moved towards the engine. The belt sags and is easily removed.
- To ensure that the settings are not lost after removing the timing belt, the drive pulleys should be aligned to the marks. It is not difficult. The right front wheel is lifted with a jack. Then fifth gear is engaged. By slowly rotating the wheel, the mark on the camshaft pulley is aligned with the stationary mark on the engine.
- The timing belt tension roller becomes loose. To do this, the fastening screw is unscrewed and the roller is moved away from the belt gear.
After removing the belt, you can proceed directly to dismantling the pump. Using a 10mm wrench, unscrew the three mounting bolts and remove the pump. This is not always easy to do. The pump may “stick” to the landing site. In this case, you will need a chisel and a hammer, with the help of which the layer of old sealant in the socket is carefully torn off. After this, the pump can be easily removed.
The pump is secured with three bolts to the cylinder block body
It is impossible to completely remove the pump in the normal position of the car - the body gets in the way. You need to raise the motor slightly. To do this, the right side of the car is lifted on a jack - the engine is tilted.
If you have an assistant, you can do without hanging the body. One person forcefully pulls the motor in the direction opposite to the direction the pump exits the socket. Another person pulls out the pump at this time.
After removing the water pump, the impeller blades are inspected. They may break off or crack. This happens if the engine has been severely overheated, or the impeller is made of poor quality material. Small blade fragments usually fall out of the drain valve.
Chips on the impeller sharply reduce pump performance
To be completely sure that the cooling system is clean, it is recommended to flush it using the following algorithm.
- Remains of sealant, dust and debris are removed from the engine surface with a rag and solvent.
- The mounting bolts are cleaned of grease, rust and debris. Before installing the new pump, apply a thin layer of sealant to the threads.
- The gasket is lubricated with waterproof sealant and the new pump is carefully installed in place. Sometimes it may be necessary to press the pump using a wooden spacer.
- The bolts are tightened first by hand, then using wrenches. In this case, it is strictly forbidden to overtighten the threads - the pump housing may crack.
- Assembly is carried out in reverse order.
- Fresh (or previously drained) coolant is added.
- Air pockets are removed from the system.
- The engine starts and the cooling system is checked for leaks.
Professionals recommend replacing the tension roller along with the water pump. To check the serviceability of the roller, rotate it by hand. If the roller rotates with difficulty or a crunching sound is heard, it needs to be replaced.
It is generally accepted that the water pump should be changed every 90 thousand km of the car. However, this figure is conditional, depending on the operating conditions of the vehicle. Obviously, in the city cycle with constant traffic jams and limited speed, the cooling system will wear out faster than on the highway. Therefore, the need to replace the pump should be assessed based on its actual condition.