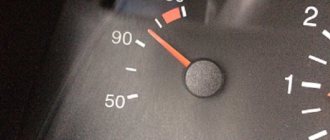
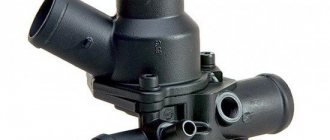
LADA 110 and Priora
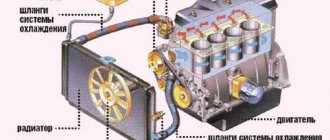
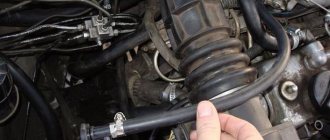
1 — heater radiator; 2 — coolant drain hose from the heater radiator; 3 — coolant supply hose to the heater radiator; 4 — coolant pump hose; 5 — expansion tank hose; 6 — steam removal hose of the heater radiator; 7 - expansion tank; 8 — liquid level sensor in the expansion tank; 9 — thermostat; 10 — coolant drain hose from the engine radiator; 11 liquid supply hose to the throttle assembly; 12 — steam exhaust hose of the engine radiator; 13 — hose for supplying fluid to the engine radiator; 14 — engine radiator; 15 — radiator drain plug; 16 — electric engine radiator fan; 17 — coolant pump; 18 — supply pipe to the coolant pump; 19 — coolant drain hose from the throttle body
On the old 110, a thermostat 2110-1306010 (“three-hole”) was installed.
The Priora and the new 110 use a thermostat 21082-1306010-10 (“six-hole”) with its classic circuit, similar to the Samara of the latest releases.
On newer models (FL), a system based on the 2190 thermostat is also installed.
There is an additional steam removal hose leading from the heater to the expansion tank.
Thermostats used on VAZ cars
| Photo | Name | Popular name | Description | Application |
| 2108-1306010 | "Four-hole" | The basic thermostat with which the VAZ-2108 began production. The expansion tank is included in a large circle. Installed via coupling and outlet pipe. | Samara | |
| 2110-1306010 | "Three-hole" | Thermostat for VAZ-2110. The expansion tank is connected to the heater return hose, so the system is a complete analogue of the “six-hole” thermostat circuit. Installed via coupling and outlet pipe. | 110, Samara-2 | |
| 21082-1306010 | "Five-hole" | Modernized, collapsible thermostat. The expansion tank is included in the common part, and not in a large circle. | Samara, 110, Priora | |
| 21082-1306010 | "Six-hole" | Modernized, collapsible thermostat. Compared to the “five-hole” one, a pipe has been added to the expansion tank. The bypass hole is smaller than in 2108. There is also an opinion that it is smaller than in the “five-hole” one. The expansion tank is included in the common part, and not in a large circle. | Samara, 110, Priora | |
| 1118-1306010 | For Kalina | Thermostat for LADA Kalina. Functionally, it is a complete analogue of the basic thermostat VAZ-2108. | Kalina | |
| 21900-1306010 | For Grants | Thermostat for LADA Granta. A fundamentally different thermostat closes the inlet to the radiator, not the outlet. When the thermostat is closed, all coolant flows through the heater core. | Priora, Granta, Kalina 2, Vesta |
Checking at home
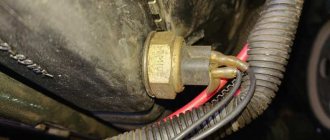
Sometimes the electric motor turns on too late, when the antifreeze temperature is already high. This may be caused by a malfunction of the valve in the radiator cap or abnormal parameters of the switch on sensor. You can check the device’s response temperature at home using a multimeter and thermometer.
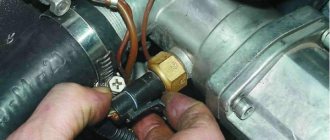
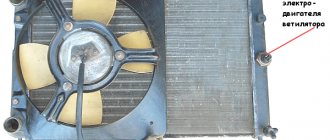
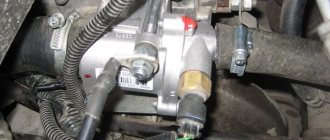
After disconnecting the electrical connector, the sensor is unscrewed with a key. To avoid burns, remove the device only from a cold engine, after draining the antifreeze. When reinstalling, it is advisable to use a new sealing copper washer and not apply too much force when tightening.
The switching temperature is engraved on the end; it can be from 92 to 95 degrees. To check, you need to connect the multimeter in resistance measurement mode and immerse the threaded part in a container of water.
While heating the water and monitoring the readings of the multimeter, we use a thermometer to record the moment it turns on, and when it cools down, the temperature it turns off. Standardly, these are 92 and 87 degrees; with significant deviations, late operation is especially critical, the device requires replacement.
To improve cooling, it is possible to install a double fan from Niva. There are two modifications for placement: after the radiator or in front of it.
On the VAZ 2110, any of the options can be installed with minimal modifications to the fasteners on site. When electric motors are connected in parallel, the current consumption increases to 40 amperes, which requires replacement of the wiring.
Monitor the engine temperature. If you notice overheating too late, then in addition to boiling of the antifreeze and a forced stop, more serious consequences are possible: deformation of the cylinder head, jamming of the camshaft. If there are defects in the operation of the cooling system fan of the VAZ 2110, the faults can be diagnosed independently by checking the thermostat, electric motor, relay, and switch sensor.
Sources
- https://aveni-r.ru/datchik-temperatury-vaz-21083-skhema.html
- https://vazweb.ru/desyatka/ohlazhdenie/datchik-vklyucheniya-ventilyatora.html
Check and replacement
If the thermostat fails, it should be replaced immediately. It is impossible to say that the device has failed only on the basis of an initial check.
If the engine overheats during operation or does not warm up to operating temperatures quickly enough, the condition of the unit is checked. Based on the results obtained, replacement or repair is carried out.
The most effective way to check the thermostat is to remove it. The procedure is performed as follows:
- Unscrew the crankcase protection mounting bolts, after which the protection must be removed and placed aside for a while.
- Remove the cap from the expansion tank where the coolant is located.
- Place a clean container under the drain hole (if you plan to pour the same coolant back into the system), unscrew the drain plug from the cylinder block and remove all coolant from the cylinder block.
- Place a container under the drain hole of the cooling radiator, unscrew the plug and drain the antifreeze or antifreeze.
- Loosen the clamps holding the hoses.
- Disconnect the three hoses that are connected to your thermostat housing.
- Loosen the tension on the clamps and remove the thermostat along with the hose. The short hose is disconnected from the thermostat.
- Place the dismantled device in a container of water, which must be preheated to 78-80 degrees Celsius.
- Start heating the water, stirring the liquid occasionally. The water needs to be heated to approximately 87 degrees Celsius.
- If the thermostat is working properly, when the temperature reaches 87 degrees with an error of plus or minus 2 degrees, the main valve should open. If this does not happen, the device is faulty and requires replacement.
Replacement process
To replace the thermostat, it is enough to remove the old one in accordance with the specified dismantling instructions, and reassemble the unit with an already working device in the reverse order.
What to choose?
Many owners of a VAZ 2109 with a carburetor complain that the factory thermostat is insufficiently efficient. Because of this, especially in winter, you have to suffer from slow heating, when it is difficult to achieve even 60 degrees.
To solve this problem, it is recommended to install a thermostat from an injection VAZ 2110 with 8 valves for the winter and for the entire period of operation of the nine. This is an improved element that has obvious advantages compared to the original thermostat for the carburetor VAZ 2109.
- You should install an injection thermostat starting from tens, taking into account the fact that we are not talking about the first versions of the VAZ 2110, but later, modernized ones.
- On 8-valve engines, dozens of thermostats have become dismountable, unlike the 16-valve VAZ 2110 and those devices that were initially installed from the factory on the VAZ 2109. This allows, in the event of a unit breakdown, to disassemble it and partially repair it without completely replacing the device.
- To repair a new thermostat, borrowed from a VAZ 2110 with an injector and 8 valves, it is often enough to disassemble the device and replace the thermoelement there.
- The new unit turned out to be 50 millimeters shorter, which allows for more free space.
- The new element has lost many of the clamps that are relevant for thermostats from the VAZ 2109.
- The component has undergone quite a serious modification, which allows it to effectively maintain a stable temperature inside the engine cooling system.
Device from tens
When replacing the thermostat on a VAZ 21099, make sure that you choose the device from the 8-valve “ten”. Cars with 16 valve engines use different devices in which the circulation system does not work the same way. Therefore, the elements will simply be incompatible.
Connection
To connect a new element from an 8-valve VAZ 2110 to a VAZ 2109, you will need to perform the following steps:
- Remove the old element from its seat according to the instructions given above;
- Be sure to disconnect the return pipe of the heater radiator, and do not spill the coolant;
- To install a new device, you will need to connect according to the standard scheme, but with the addition of a new tube. This is the so-called saxophone, through which the coolant can be directed back to the pump;
- The main nuance of using a thermostat on nine from ten is that when starting a cold engine, the cooling liquid will now circulate through a small circuit. First, the heater radiator will heat up, the interior will warm up as quickly as possible;
- When the required temperature is reached, the new unit will open and the liquid from the cooling system will begin to move along a large circuit through the main radiator.
Replacing the thermostat is a useful solution for those who do not want to suffer from the long warm-up of the interior in the winter. Plus, a new element, borrowed from the VAZ 2110 on the VAZ 2109, will allow the engine to warm up faster, and therefore hit the road faster, even in severe frost.
What is a thermostat?
As the name of the device suggests, it does something with temperature. More specifically, it helps switch fluid flows in the cooling system. Moreover, the thermostat, carburetor or injector are at the heart of the gasoline injection system and have the same composition and housing design. When operating any engine, it is necessary to ensure heating of the throttle assembly. And it is present in any injection system: both in the carburetor and in the injector.
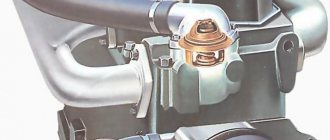
The basis of any thermostat is a special plate, which is made of a material called bimetal. It reacts to temperature changes and is capable of deformation because of this. The switching of air flows is based on this effect: the plate moves the valve, which is fixed by springs. Having overcome their force, the plate moves the valve, opening the path for liquid flow to the main radiator to ensure effective cooling.
Ways to solve problems
Possible solutions to the problem include:
1. If the coolant temperature exceeds the norm (provided the thermostat is working and it is correctly selected), it is necessary to replace the device, but with a higher opening temperature. As a rule, this step is recommended for motorists who operate cars in the mountains and in regions with hot climates.
2. When opening the thermostat late, it is important to ensure that there are no plugs and that the system is completely filled. If the problem is caused by a plug (coolant stagnation), then the best solution is to make a small hole in the plate (2-3 mm). As a result, the coolant flow around the thermostat is normalized, and the engine warm-up time increases.
3. Early opening of the thermostat is possible due to excessive pressure in the system. Zones of different pressure often appear around the device, which leads to its early operation. There are several reasons:
- failure of the cooling system;
- The thermostat spring has weakened;
- The engine runs at higher speeds during the warm-up period.
4. The engine takes too long to warm up.
- incomplete closing of the thermostat;
- violation of the integrity of the valve plate (for example, a gap has appeared);
- Incorrect position (possibly changing the location of the air valve).
5. The engine heats up above normal even in a situation where the thermostat is fully open:
- traffic jams or low coolant level;
- failure of the radiator (clogging of its cells);
- failure of the cooling pump or fan;
- contamination of the cooling system.
The principle of operation of the VAZ 2113 thermostat
In a car's engine cooling system, a thermostat automatically opens and closes a large cooling circuit for antifreeze.
Let's try to explain this in a nutshell. The engine cooling system consists of a small and a large circuit. In the engine warm-up mode, the antifreeze is driven by the system pump only through the engine cooling jacket and the heater. This allows you to quickly heat the cylinder block to operating temperature. But further on we can’t do without additional cooling.
When a certain temperature is reached, the thermostat opens a channel into a large circuit - the coolant enters the main radiator, equipped with an additional highly efficient electric fan operating at several speeds. By opening and closing the valve, the thermostat not only maintains the set antifreeze temperature, but also ensures the energy efficiency of the power plant.
Using the VAZ 2113 car as an example, I will now show how it works:
- When the car is not warmed up, the thermostat valve is closed, as in the photo. In this case, the coolant moves in a small circle, as in the photo below.
- When the machine warms up to operating temperature (87-90 degrees), the temperature-sensitive element slowly begins to heat up, as a result of which the spring compresses, the main valve opens and the liquid flows in a large circle.
How to check the thermostat without removing it from the car
The thermostat is a key component of the cooling system, which is responsible for high-quality engine warm-up by timely redirecting coolant flows in a small or large circle.
Failure of this unit inevitably leads to a number of problems - overheating of the power unit or the inability of it to reach the desired temperature.
That's why a car enthusiast needs to know how to check the thermostat and what malfunctions of this device exist.
We replace the thermostat on a VAZ-2115 ourselves
According to experts, the procedure for replacing a thermostat takes about an hour if tools and consumables are available. Therefore, you should take care of this before carrying out this operation. You will need the following:
- Tools:
- standard car mechanic kit (screwdrivers of various sizes and configurations);
- capacity of more than 7 liters for draining liquid waste.
- Materials:
- new thermostat;
- heat-resistant sealant;
- set of gaskets for repair;
- antifreeze or antifreeze (as a coolant).
Now you can begin the procedure for replacing the failed thermostat element, which consists of the following steps.
- Preliminary – stage of preparing the vehicle for the repair procedure:
- the car is installed on an inspection hole or on a flat surface;
- the engine is turned off;
- put on the handbrake;
- the engine is cold.
- Removing the old thermostat element:
- unscrew the expansion tank cap;
- open the radiator tap to drain the coolant from it;
- drain the coolant into a prepared container;
- remove the air filter (at the same time carry out a visual inspection for any malfunctions of this part);
- loosen the clamps of the radiator pipes;
- disconnect the hoses from the radiator and from the thermostat element;
- unscrew the fastening bolts (4 pieces);
- remove the thermostat (it is removed together with the seal ring).
- Installation of a new thermostat:
- lubricate the perimeter of the circuit with heat-resistant sealant;
- install a new sealing ring;
- put a new gasket;
- install a new thermostat;
- connect all hoses;
- tighten the clamps tightly;
- screw the plug on the drain valve at the bottom of the radiator;
- fill with coolant.
- Verification stage:
- start the vehicle;
- check for possible leaks;
- warm up the car to the optimal temperature - more than 90 degrees (this operation is necessary for the large circle of the cooling system to start);
- We check all hoses and pipes in operating mode - they should be hot.
A nuance of a working thermostat on a VAZ-2115: when starting a still cold engine, the lower pipe on the radiator will begin to heat up already at 85 degrees of coolant. This can be determined by touch.
To fully ensure that the newly installed thermostat element is functioning at the proper level, you should also turn on the heating element - the stove. If there are no failures or leaks in this mode, then the thermostat is installed correctly and without errors.
If you are not confident in your abilities, then to replace this part you should seek help from qualified specialists, that is, to the nearest car service center.
Welcome, friends, to the DIY car repair website. While everything is working, the car enthusiast thinks little about the design of his car and the purpose of certain elements.
But already at the first breakdown you have to look under the hood, and then on the Internet to expand your knowledge.
In particular, the bewilderment of most drivers is caused by engine overheating or, conversely, slow warming up of the power unit.
One possible reason is a thermostat malfunction. What to do in such a situation? How to check the device? Is it possible to replace the thermostat of a VAZ 2114 with your own hands?
How to check a thermostat when purchasing
When purchasing a new thermostat, blow into the fitting. This will ensure that the fitting is closed as tightly as possible when cooled.
Although this does not guarantee 100% quality, it will at least partially protect you from defects. Unfortunately, there are many defective thermostats on the market now.
Knowing how to check a thermostat, you can always identify a malfunction and avoid damage to the power unit.
Please remember that ignoring failures of this device can lead to engine overheating and failure. The result is even greater costs.
Tuning VAZ 2108: increasing the power of the power unit
Most often, tuning a VAZ 2108 engine includes operations of boring and polishing the intake and exhaust channels, and this ultimately leads to a certain increase in volume. It is widely known that if you bore the power unit to a volume of 1.8 liters, you can develop a power of only 170 hp. However, thanks to the development of technology, today it has become possible to increase power to 200 horsepower. This can be achieved by installing a turbine.
You can also install a reliable Walbro fuel pump. It is designed for power units with a capacity of about 600 hp. Taking into account the peculiarities of the placement of the VAZ 2108 engine, the turbine should be installed directly above the exhaust windows. You can also use a block from Subaru - IHI VF10 - as a turbine. It is of very high quality and not very expensive. As an exhaust manifold, you can use a part made by yourself from stainless steel. After all tuning operations are completed, if everything is done correctly, the car will be able to show impressive dynamics. He will be able to compete with cars even on the fast track.
Technical tuning of cars can significantly improve their characteristics compared to factory ones. This topic is especially relevant for owners of domestic cars, such as the VAZ-2109, so this article is dedicated to them. The object of modernization will be the VAZ-2109, equipped with a carburetor internal combustion engine model 21083. The main task of this improvement is to convert the carburetor engine into an injection engine by replacing the cylinder head with a VAZ-2112 unit.
“Nine” with an engine converted to a sixteen-valve head, even without properly configured settings, behaves significantly better compared to the basic configuration. In this case, a slight deterioration in the car’s parameters is possible at a rotation speed of up to 2,000 rpm, but this is more than compensated by an increase in traction when the engine is revved up to high speeds. Many drivers are impressed by the fact that the car, provided the road surface is smooth, can freely reach 5,000 rpm.
LADA Samara
2108 (carburetor)
1 – expansion tank plug; 2 – expansion tank; 3 – radiator supply hose; 4 – hose from the radiator to the expansion tank; 5 – radiator outlet hose; 6 – left radiator tank; 7 – aluminum radiator tubes; 8 – sensor for turning on the electric fan; 9 – right radiator tank; 10 – drain plug; 11 – radiator core; 12 – electric fan casing; 13 – electric fan impeller; 14 – electric motor; 15 – pump gear pulley; 16 – pump impeller; 17 – camshaft drive toothed belt; 18 – heater radiator outlet pipe; 19 – pump supply tube; 20 – hose for draining fluid from the heating of the inlet pipe to the carburetor heating block; 21 – carburetor heating block; 22 – exhaust pipe; 23 – heater supply pipe; 24 – hose for draining fluid from the heating of the inlet pipe and the carburetor heating unit; 25 – thermostat; 26 – hose from expansion tank to thermostat
2114, 2115 (injector, thermostat from 110)
1 – expansion tank plug; 2–expansion tank; 3–coolant drain hose from the throttle pipe; 4–hose from the radiator to the expansion tank; 5–radiator outlet hose; 6–left radiator tank; 7–aluminum radiator tubes; 8–plug; 9–right radiator tank; 10–drain plug; 11 – radiator core; 12–electric fan casing; 13–electric fan impeller; 14–electric motor; 15-tooth pump pulley; 16–pump impeller; 17-tooth camshaft drive belt; 18–engine cylinder block; 19–pump supply tube; 20–radiator supply hose; 21–heater radiator outlet hose; 22–coolant supply hose to the throttle pipe; 23–exhaust pipe; 24–filling hose; 25–heater radiator supply hose; 26–thermostat; 27–engine management system coolant temperature sensor
Self-replacement of the VAZ-2109 thermostat
How to check and replace the VAZ-2109 thermostat (8 or 16 valves)? This procedure is not very complicated, and even a less experienced car owner can handle it without much difficulty. What needs to be done is described in this article.
The thermostat itself is a mechanical device whose operation is based on purely physical principles. Inside it is wax that is sensitive to temperature changes. When the coolant heats up, the substance melts and, as a result, the damper opens, allowing it to enter the cooling system.
From the VAZ-2109 to the relatively new Granta, thermostats work exactly the same, and moreover, they are interchangeable. True, the new units are somewhat shorter than the old ones, but this in no way prevents them from being installed.
Often, from the above-mentioned more modern model, a thermostat is installed if the stove does not “fry” too much.
Reasons to install a thermostat from “ten”
The 6-hole unit has been modified, when compared with the device installed in the “nine”, its advantages over the 5-hole version from 2109 are as follows:
- The device from the “ten” is 5 cm shorter than the standard version of the “nine”, so there will be more space under the hood.
- A more modern 6-hole thermostat works more stably, as a result, the temperature remains unchanged.
- In the event of a breakdown, you do not have to change the entire device, since it is dismountable, and if necessary, you can only change the thermoelement.
- When servicing, you won’t have to struggle with a large number of clamps, since the 6-hole version is secured with a rubber tube.
- It should be noted that until 2003, VAZ 2110s were also equipped with a device with five holes, so you need to buy a version from later releases.
Signs of breakdown
What could be the first sign that the VAZ-2109 thermostat is faulty? Of course, the engine overheats even when driving at a high constant speed. The reason is that the liquid continues to circulate in a small circle, not a drop gets into the radiator. And even turning on the electric fan won’t help, because doing so is simply useless. The only thing that can slightly correct the situation is opening the heater tap and turning on the interior airflow at maximum speed.
But such an action will not bring comfort in hot weather. The most common thermostat breakdown is the sensing element jamming in its original position (the liquid moves in a small circle). If this suddenly happens, then you need to try all methods of elimination. Even a few light blows to the body can open the valve. If such an emergency occurs on the road, you will have to drain the liquid and break all the insides of the thermostat so that the liquid circulates only in a large circle. But it won’t boil, and you can get to the repair site.
Purpose, design and principle of operation of the thermostat
The coolant circulating through the working channels of the engine blocks, its main purpose is to remove excess heat accumulated in the power unit due to the friction of the working elements of the engine and the impact of the high temperature of the exhaust gases passing through the exhaust circuit.
The main elements of the cooling system of the VAZ 2114, which are responsible for lowering the temperature of the antifreeze, are the electric cooling radiator fan and the thermostat.
To understand the principle of its operation, you need to see what the thermostat on a VAZ 2114 looks like. Structurally, it is designed in such a way that the valve that regulates the coolant flow is located inside a housing with three pipes:
- two inputs - from the engine and radiator;
- one day off - to the pump.
The main working element of the valve itself, located inside the thermostat, is a solid heat-sensitive filler, which, when heated, through a rubber insert, acts on the piston that moves the main valve. When it heats up, it opens it, when it cools down, on the contrary, it closes the hole, preventing the flow of antifreeze.
The thermostat is attached to the engine through a pipe to the cylinder head on the left side, under the air filter. It is connected to the radiator and pump using rubber pipes. On a cold engine, the valve of this coolant flow regulator is closed and after starting, the liquid that begins to be pumped by the pump forces moves along a “small circuit” or “in a small circle.” Both of these expressions are used among motorists. When moving in a small circle, the antifreeze passes through the heater radiator, intake manifold and throttle assembly. Liquid is not supplied to the radiator; the valve cuts off this path.
As the engine heats up, the coolant takes away some of the heat, heats up and, passing in a “small circle” through the thermostat, heats the temperature-sensitive element. The piston begins to move and open the main valve. This begins to happen when the liquid temperature reaches 87 degrees. In this case, part of the coolant begins to circulate through the radiator. When the temperature reaches 102 degrees, the valve opens completely, moving eight millimeters. In this mode, the entire coolant flow rushes in a “large circle” through the cooling radiator.
Experts recommend checking the operation of the thermostat without removing it from the car. To do this, after starting the engine, you need to touch the lower pipes coming from the radiator with your hands. They should be cold until the temperature rises above eighty degrees. As soon as the temperature rises above 85 degrees, the tubes should begin to heat up and after a while you can feel that the “large circle” circulation is working. The tubes should get quite hot.
If the lower pipes leaving the radiator continue to remain cold, it means the main valve has not opened and the thermostat is faulty. A malfunction of this regulator may also be indicated by the fact that the lower tubes begin to heat up almost immediately after starting the engine. This indicates that the valve is open and does not close when cold.
In both cases, a thermostat failure does not bring anything good for the engine. In the case when the valve is open, the antifreeze, passing in a “large circle,” does not have the opportunity to heat up to working condition. This reduces engine power and other performance parameters. In the case when the main valve is closed, the engine has a high risk of overheating the blocks. This is the most dangerous condition for the power unit. If you drive in this mode for some, even not very long, time, you can damage the engine, even to the point of breaking the shafts. And this, at a minimum, is a major overhaul of the entire internal combustion engine.
There is a different way to check the thermostat on a VAZ 2114. To do this, you need to pour water into a pan and, placing it on the stove to heat, immerse the thermostat there. Knowing at what temperature the thermostat on the VAZ 2114 opens, use a thermometer to monitor the heating of the water in the pan. At about 87 degrees the valve should open. If this happens, then the device is fully operational. It is better to check it in this way before installing it in place of a failed one.
Many car enthusiasts often ask specialists whether it is possible to repair the thermostat.
There is only one fairly reliable way to help the valve work. To do this, lightly hit the device body with a screwdriver several times. The impact should open the valve.
If this does not happen, then the thermostat on the VAZ 2114 needs to be replaced.
Check and replacement
If the thermostat fails, it should be replaced immediately. It is impossible to say that the device has failed only on the basis of an initial check.
If the engine overheats during operation or does not warm up to operating temperatures quickly enough, the condition of the unit is checked. Based on the results obtained, replacement or repair is carried out.
The most effective way to check the thermostat is to remove it. The procedure is performed as follows:
- Unscrew the crankcase protection mounting bolts, after which the protection must be removed and placed aside for a while.
- Remove the cap from the expansion tank where the coolant is located.
- Place a clean container under the drain hole (if you plan to pour the same coolant back into the system), unscrew the drain plug from the cylinder block and remove all coolant from the cylinder block.
- Place a container under the drain hole of the cooling radiator, unscrew the plug and drain the antifreeze or antifreeze.
- Loosen the clamps holding the hoses.
- Disconnect the three hoses that are connected to your thermostat housing.
- Loosen the tension on the clamps and remove the thermostat along with the hose. The short hose is disconnected from the thermostat.
- Place the dismantled device in a container of water, which must be preheated to 78-80 degrees Celsius.
- Start heating the water, stirring the liquid occasionally. The water needs to be heated to approximately 87 degrees Celsius.
- If the thermostat is working properly, when the temperature reaches 87 degrees with an error of plus or minus 2 degrees, the main valve should open. If this does not happen, the device is faulty and requires replacement.
Replacement process
To replace the thermostat, it is enough to remove the old one in accordance with the specified dismantling instructions, and reassemble the unit with an already working device in the reverse order.
What to choose?
Many owners of a VAZ 2109 with a carburetor complain that the factory thermostat is insufficiently efficient. Because of this, especially in winter, you have to suffer from slow heating, when it is difficult to achieve even 60 degrees.
To solve this problem, it is recommended to install a thermostat from an injection VAZ 2110 with 8 valves for the winter and for the entire period of operation of the nine. This is an improved element that has obvious advantages compared to the original thermostat for the carburetor VAZ 2109.
- You should install an injection thermostat starting from tens, taking into account the fact that we are not talking about the first versions of the VAZ 2110, but later, modernized ones.
- On 8-valve engines, dozens of thermostats have become dismountable, unlike the 16-valve VAZ 2110 and those devices that were initially installed from the factory on the VAZ 2109. This allows, in the event of a unit breakdown, to disassemble it and partially repair it without completely replacing the device.
- To repair a new thermostat, borrowed from a VAZ 2110 with an injector and 8 valves, it is often enough to disassemble the device and replace the thermoelement there.
- The new unit turned out to be 50 millimeters shorter, which allows for more free space.
- The new element has lost many of the clamps that are relevant for thermostats from the VAZ 2109.
- The component has undergone quite a serious modification, which allows it to effectively maintain a stable temperature inside the engine cooling system.
Installing the 2108 engine on a classic
First, we need to free the engine compartment of our car from everything unnecessary, namely from the old engine; from it we only need the starter and the mounting brackets for the engine mounts. After this, we can move on to our new heart, and first we will have to disassemble it a little and remove the crankshaft from it in order to press the support bearing of the input shaft 2101 into it as much as the original one sticks out, it must be cut off and the bearing pressed in its place. A turner will help you with this for a small price.
This drawing can also help you with this.
After that we put our crankshaft back. At the same time, you can immediately grab the flywheel to sharpen it under the classic crown for pressing. The turning work is done, now we need to rearrange the brackets from our old motor; there are special holes on the side of the figure-eight block. Then you will need to slightly knead the engine shield, just as in the case of a 16 valve engine. We put a flywheel on the engine with a crown already pressed onto it, and attach a classic clutch basket to it.
Engine cooling system.
You should start with the rear thermostat, as you probably already understood that you will have to make the entire cooling system yourself. It needs to be made at a maximum angle to the side so that it does not rest against the engine shield. This is roughly what it will look like, this one is made from an old eight-point thermostat, if you want you can make a metal one, it’s up to you.
After this, you can put the motor in its place, having first replaced the old pillows with new ones; I recommend using pillows from the Niva. To ensure that your oil pan does not touch the lower beam, I recommend placing a thick washer on each pad; with this you can win a few precious mm. When the motor is in place, you can continue with the cooling system; you will need to make pipes like this.
This is how they will look on the car.
The thermostat is a classic one. With the cooling system, I think I have more or less clarified the picture for you, of course it will not be possible to describe everything, but I told you the main thing.
Final work on installing the VAZ 2108 engine.
Model 2108 is considered one of the most popular models in the domestic automobile industry. Like the VAZ 2108 engine, other components of the car are made with high quality and detail.
- 65 hp and volume 1.3 liters;
- carburetor, displacement 1.5 liters, power reached 78 hp. (VAZ 21083);
- injection engine with a displacement of 1.5 liters (VAZ 21083i)
To find out the condition of the engine, you can subject it to special diagnostics. To do this, you will need a diagnostic wire for the VAZ “family”. Next you need to connect it under the glove compartment. Then we connect it to the computer and scan the injector for errors. Next, we look through the list of errors and, if possible, eliminate them ourselves.
Removal and installation
Before you begin installing a new device, you must remove the old one from the engine. Let's look at the sequence of work using the fourteenth model as an example. To carry out this operation, you will need a minimum set of tools:
- Two screwdrivers: flat and Phillips.
- Set of wrenches.
- Sealant.
- Steel clamps (4 pieces).
- New thermostat from Lada Granta.
Work begins by draining the coolant from the system. Next, in order to free access to the part, you need to remove the air filter. Now that the element we need is in sight, it must be carefully removed. First of all, loosen the fastening clamps located on the thermostat pipes. It is necessary to remove the pipes themselves sequentially, starting with the lower ones, connecting the radiator and expansion tank.
After the pipes are disconnected, unscrew the fastening nuts on the device itself. This completes the dismantling. Before installing a new spare part, make sure there are no defects on the pipes and the device itself.
Installing a thermostat on VAZ 2114, 2109, etc. done in exactly the reverse order. A thin layer of sealant must be applied to all holes of the new part.
Pay special attention to the fact that the sealant is silicone based and can easily withstand temperatures up to 130 degrees
Place the thermostat in place and secure it with bolts. Next, put on the pipes: first the upper ones (from the stove and cylinder block), and then the lower ones (from the radiator and expansion tank). The mounting clamps must be completely replaced. Also, there is no need to tighten them right away, since they can squeeze the sealant inside the cooling system of VAZ 2114, 2109, etc. First, simply attach the clamps, and they should be fully tightened after 30 - 40 minutes.
After completing the procedure, do not rush to fill in the coolant. In order for the sealant to fully settle and not allow liquid to pass through, it must be allowed to dry for about 3 - 4 hours.