Removing the door trim
First remove the window handle. To do this, insert a thin flathead screwdriver between the two decorative plastic washers under the handle. Lift the top washer until the retaining tooth disengages from the bottom washer. Slide the top washer and remove it from the handle. Next, remove the handle from the splines and then remove the lower washer.
Also, use a thin screwdriver to remove the plugs from the armrest handle. Use a Phillips screwdriver to remove the screws and remove the handle. Be careful not to lose the backing under the top of the handle.
Using a long Phillips screwdriver, remove the screws securing the plastic pocket on the bottom of the door. Next, unscrew the door lock button.
Using a thin screwdriver, press the decorative trim under the inside door handle to disengage the latch on the trim. Then pull the handle towards you and remove the decorative trim.
To remove the door trim, use a wide, thin steel plate, such as a knife blade. Carefully place the blade under the trim opposite the latch and press the trim to disengage the latch. Do this operation in turn with each latch. To release the upper latches, bend the edge of the rubber glass seal.
Step-by-step instructions for replacing the outer and inner door handles on a VAZ 2114
The elements that open and close the door structures on your car wear out over time. Replacing the VAZ 2114 door handle from the inside or outside may be required due to abrasions, scratches, and deformation. The procedure for removing and installing a new part is different for the rear and front doors, so separate instructions are provided for each situation.
Causes of malfunction
Before replacing a part, you should find out the cause of the failure. The main ones:
- damage after an accident;
- mechanical damage to internal elements;
- Hacking attempt;
- failure of the external door opening manipulator;
- pressing hard on the handle.
Most often, the plastic part breaks or breaks as a result of constant opening.
Replacing the inner handle
If the internal door handle of a VAZ 2114 is broken, then cosmetic repairs are impossible. To repair, you will need a standard set of tools: several types of screwdrivers, a sharp knife and a 8mm wrench. It is better to change the part while in the salon. Algorithm for replacing a part:
- The lining is removed. It is pryed off with the thin end of a screwdriver. It is important to remove all fragments of decor.
- The door card is being dismantled.
- The rod is disconnected.
- To remove the remains of the broken opening device, the fasteners are unscrewed.
- A new element is installed. It should be attached to the rod, and then the facing elements should be reassembled.
The trim on the VAZ is fixed with special clips. To remove them, you can pry up the edge with a screwdriver. Proceed with caution as they are plastic and may break. This is affected by rough handling, material wear or cold.
Replacing the outside door handle
Replacing the inner door handle of a VAZ 2114 is not as difficult as dismantling the outer element. First you need to determine the fastening method, which is specified in the technical document for the car. It will not be possible to get to the fasteners without removing the casing. Armed with screwdrivers and a 8mm wrench, it is important to follow the step-by-step instructions:
- Remove trim.
- Remove the thrust rods from the closing mechanism.
- Unscrew the external fastening screw.
- Remove the rubber seals and remove the handle.
- Inspect and clean the installation site of the new structure.
Assembly is carried out in reverse order.
Handle selection
Repair will require a new part. The mechanism is sold for the driver's or passenger's door. When purchasing, you should pay attention to:
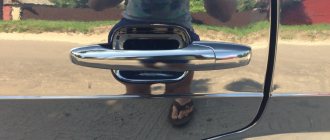
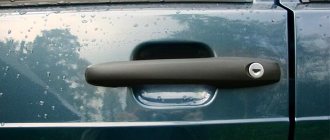
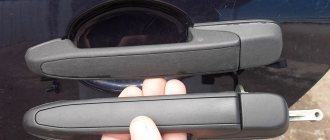
- Appearance of the product. Experts recommend taking a closer look at Euro pens.
- Manufacturer.
- Material of manufacture. The standard version is made of plastic, but there may be products with additional elements. Some manufacturers add chrome strips.
It is better to purchase AvtoVAZ products. Factory articles: 2109-6105180 – for internal, 2108-6105177 – for external product.
Installing euro handles on a VAZ 2114
The installation of European handles is slightly different. Dismantling is carried out according to the standard scheme. Installation algorithm:
- A Euro handle is inserted into the hole and screwed on.
- The wire rod is connected.
- The door card and facing material are installed. To do this, the fastening clips are detached.
If you cannot fix the opening mechanism yourself, it is better to contact a car service.
Replacing the inner handle
After removing the door trim, you can proceed to replacing the handles. To remove the interior door handle, use a Phillips screwdriver to remove the two mounting screws. Next, push the handle inside the door and pull it out through the window in a rigid manner. Remove the remains of the old handle from the rod and thread the rod into the hole in the new handle. Insert the handle into the landing window and secure with screws.
Check the operation of the handle. If adjustment is necessary, the handle can be moved forward or backward in the seats. After checking and adjusting, finally tighten the screws.
Checking work
We check the unlocking and locking: everything must work. We are preparing the second rod for attachment to the lock. We lubricate the joint space for better fitting. The length is adjusted by twisting or unscrewing the plastic tip. We combine the hole with the hinge, do a test opening and closing. Everything works, now you can put traction on the space. We collect everything else in reverse order. This completes the installation of the Euro handles.
Source: xn—-21-43dabppn4d4dn.xn--p1ai
Replacing the outer handle
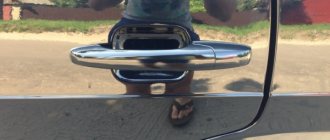
Using a flat-head screwdriver, disconnect the plastic ends of the outer handle rods from the lock mechanism. Unscrew the two nuts securing the handle to the door, then carefully remove the handle along with the rods.
Using pliers, remove the pin from the end of the rod placed on the lock cylinder. Remove the locking spring, then insert the key and remove the lock cylinder from the handle. Install the lock into the new handle. After this, install a new handle, adjust the length of the rods if necessary by rotating the plastic tip. After adjustment, snap the rod end into place using pliers.
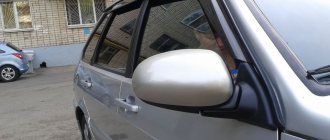
Hello. Are you tired of that annoying sound when you open the door? Are you tired of the handle sticking when open? Then feel free to exchange your stock pen for a new euro pen! With Euro handles, the appearance of the car will also improve! I will tell you how to install Euro handles on a VAZ 2109, 2114 in this article.
The third nuance
After installing and fixing the handle in the door, one of the most labor-intensive processes begins—adjustment. I first remembered how many turns the plastic was twisted on the old rod, and having twisted the new one completely, I wound it by the same number. Got it right away.
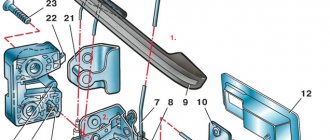
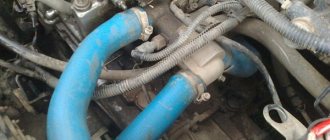
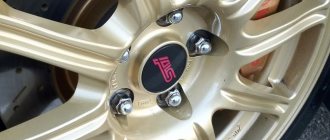
But despite all this, after opening the door, the second part of the handle (in diagram 2) did not return to its original position and bulged. Lithol came to the rescue. Lubricate and slam/open the door until the entire mechanism is lubricated. At the same time, I lubricated the entire lock mechanism inside the door.
How to remove the door handle of a VAZ 2109, 2114.
So, we'll start by removing the door card. To do this, unscrew the pin that closes the door from the inside. Next, we take out the plugs from the door handle and unscrew the bolts that secure the handle.
Now, perhaps, the most difficult thing that will have to be done, and at this stage many people have a question about how to remove the window lifter handle of the VAZ 2109, 2114. To do this, take a thin, narrow minus screwdriver. We insert it between the latch and the washer and carefully press out the jammed handle latch. Next, pull it towards you and take it out completely.
I hope the photo makes everything clearer.
We unscrew the bolts securing the door card from the bottom (if you have a VAZ 2114 with electric windows, then unhook the pads from the window buttons) and take out the rubber seal from the top. Remove the decorative trim of the interior door handle by prying it off with a screwdriver or knife. Now nothing prevents us from removing the door trim and pulling it out from the bedbugs.
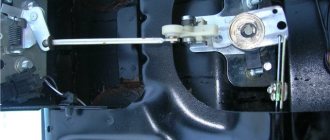
We pull out the rods coming from the handle lock and from the handle itself. It is more convenient to do this by grasping the plastic part of the rod with pliers. Or you can try to pry them off with a screwdriver.
The handle is held on by two nuts. We unscrew them and pull out the handle.
Work process
Before installing the handles, be sure to pay attention to the condition of your doors; if they are sagging, the fasteners should be adjusted. Check the size of the gaps; they should not exceed 6 mm.
Then you need to remove the door trim (it is attached with screws and plastic pistons and clips). Before installing the Euro handles, I strongly recommend that you purchase a small number of plastic pistons (this is necessary in order to replace doors that are broken during the removal of the door trim).
After unscrewing the bolts, loosen the lock slightly and press it approximately 0.5 cm inside the door (this action is necessary in order to be able to insert the socket key).
Unscrew the screws holding the handles from the inside using a long and narrow screwdriver with a magnetized tip.
Next, take out the old handle, clean the inside, if necessary, treat it with a special anti-corrosion compound. If you have door handle lights installed, turn off their power.
Install the newest Euro handle and put 2 nuts on the bolts, apply a light amount of sealant to the threads. If the old bolts have traces of rust, then replace them with new ones.
The bolts must be of the exact diameter indicated in the annotation. A deviation in diameter may subsequently lead to loosening of the handles. The bolts must be tightened so that the handle and tongue of the lock coincide together.
Check the amount of grip of the door edge clamps. If the mechanism works flawlessly, tighten the nuts all the way. And in the same sequence, install the remaining three handles without the help of others.
It is better to do all work with cotton gloves; they protect your hands from possible damage.
The following video demonstrates the process of installing Euro-handles on a seven-year-old VAZ Samara car.
Source: club2108.ru
How to insert the cylinder into the euro handle of a VAZ 2109, 2114.
In order to insert the old lock cylinder into the Euro handle of the VAZ 2109, you first need to remove it from the old one. To do this, use a thin screwdriver to press the stopper (if it does not press on one side, try it on the other).
We pull out the stopper with pliers.
We insert the key into the lock and use a screwdriver to remove the spring from the inside of the handle. The larva is pulled out and thoroughly wiped.
We take out the sealing ring from the set with the euro handle and pull it onto the cylinder.
Take lithol and lightly coat the larva. After which, the larva is inserted into a new handle.
We install the spring on the lock cylinder. We install the lock release rod on the cylinder and insert the stopper. Lubricate all rubbing parts.
How to install euro handles
We begin dismantling the old parts:
- We remove the decorative door plug, using a knife.
- Remove the decorative trim of the opening handle.
- Unscrew the fastening screws.
- We remove the handle.
- Unscrew the screws of the door pocket and remove it.
- Disconnect the power window keys.
- We dismantle the speaker.
- We remove the casing that is installed on the hedgehogs.
Now all the insides have been revealed to us, so it’s easier to act:
- Remove the lock release rods.
- We disconnect the plastic attachments from the lock.
- Then unscrew the screws securing the outer door handle. We save the washers and nuts, they will be useful to us later.
- We remove the old handle and disconnect the small rod from it, which goes to opening and closing the lock.
We carefully wipe everything down and find a small part called a stopper. We take a small screwdriver and press it so that the stopper comes out with one side out. We take pliers and pull out the stopper. We put everything in a box so that parts don't get lost. We remember how the rod was placed, take it out and also put it in the box.
How to install euro handles on a VAZ 2109, 2114.
To install the Euro handle on a VAZ 2109, 2114, we squeeze it out and try to insert it into the socket. The fit is a little tight. After installing the handle in the technological hole, you need to push it a little in the direction of travel of the car and the handle completely sits in place. Now you can screw it on
Door opening rods are included with the Euro handles. Two short ones go to the rear doors, two long ones to the front ones. We put on the required rod and adjust it by unscrewing or screwing the plastic attachment onto the rod. We try to open and close the door. If the door does not open, then unscrew the plastic cap a few turns; if the door does not close, then tighten it.
All! Euro pen installed! Now all that remains is to assemble the door card. It is assembled in the reverse order of disassembly.
How to install Euro handles on a VAZ 2109, 2114 is no longer a secret for you!
On the Nine, as on any other car, the lock that closes the door is controlled by the interior and exterior handles. In addition, each door can be locked from the passenger compartment by pressing a plastic button associated with the rod, located at the top of the door.
Lada 2109 Mysha › Logbook › Installing Euro handles
I’ve been wishing for a long time, otherwise I’m sick of it - all ordinary cars have Euros, but what’s worse?
I wasn’t happy with the trip to the store - I wanted to get it in color right away, although they have it in their online store, for some reason they don’t have it on the storefront... Usually, if something isn’t in the store, it looks like this: “There is, but for the sake of such bullshit I don’t want it look in the ass of a Nigritat Papuan in the warehouse and waste your time, puppy!” Yes, this is the unadulterated truth, okay, let’s leave it out. We are going to the market (hereinafter referred to as “Iskra”), we approach the first one and as we ordered - it’s not perfect to match the color of the car, but the chrome goes with everything) The handles were all packed (thinking to ourselves, or did the Chinese supply a press for packaging resale parts? I force the boxes to be assembled and painted, but apparently it’s easier to buy from wholesalers, and cheaper). All you need is rods, even bolts, and of course the handles themselves! I took it and drove home to celebrate to find a manual for removing and installing Euro handles!
I looked, remembered approximately how and for what... and suddenly, at one moment, my friend calls - it’s a bit boring at home, I stay I) Well, without thinking for a long time, I take him to the garage and show him this beauty! He had nowhere to go, and so they decided - he’s in the front passenger, I’m in the right. He doesn’t know shit about cars, he showed him how to take pictures and how to remove them like a kid! It came to the rods... YOU WON'T BELIEVE IT - HOW EASY IT WAS TO REMOVE THEM
The entire garage cooperative heard our oohs and ahs... mixed with curses and roars, as if you were about to lift a 200kg barbell! And this is also the two of us... I can’t imagine, it seems like I was gasping and groaning there on the 1st) But we are men
and after just an hour you tore off those damn tags! There is nothing difficult in unscrewing the handle from its place, although for some reason in my driver’s window the window lifter does not rise to the very end and I had to twist around to disconnect the stupid nut...
It's time to insert the old medicine into the new driver's EURO handle. Remember the cartoon Winnie-the-Pooh and Eeyore, so here’s the thing: “going in and out” is not our way) The medicine didn’t want to be pushed through... And we went to take it all back to Iskra And we took out a round file and how he muttered to me the interior given to us is made of plastic shavings... yes, yes, the handles are plastic, it will count down how long they will last) They were wasted, now it’s just like that of the IA ^__^ it’s really a little tight to turn, but that’s not important) Let’s omit the details of inserting the larvae, let’s move on to the new rods. They came with their own fasteners, which are screwed onto the rods and inserted into the lock... So, I was able to turn these crap only with a key of 8 and only in a vice - only Lada, only Hardcore!
After 4 hours of taking it off, putting it on, adjusting it and hooking it up, oh magic, it works!
Time is getting dark, let's go for a ride and pick up girls, but it turns out that because of the unreplaced rear door openers, the chicks categorically refuse to even come close, and the front is occupied %)
The next morning, I called my sidekick and went to install the rear handles. We got done in 30 minutes, but the buddy got so excited that when he tightened the right rear handle with the words: “SOMETHING IT WON’T TIGHTEN,” he tore the fastening to hell... Further, if we were shown on television, then not counting the sound “piiiiiii.” you wouldn't hear anything, I guarantee