This story began a couple of months ago, when I assembled a combat box for myself... Namely: the rubber bands on the reaction rod of the front levers began to tear. The first time I changed it - it lasted for a week, the second time - for 2 weeks, after the third time - I got tired of it! I started looking for wishbones on the Internet and found them for 4,500 rubles. After thinking about it for a week, I decided to try making them myself.
The first experiment was not a success - I greatly simplified the design taken from the Internet, because of this the tube cracked in one place near the seam...
Having analyzed the weak points, I sawed everything down and brewed everything anew... I’m very pleased with the result! I received all the improvements advertised by lever manufacturers relative to standard levers)
Hello. Today at VAZ Repair there is another photo report on repairs. In this article you will learn how to install wishbones on a Lada Priora at home. Step-by-step installation instructions will allow you to understand how to properly perform this work so that you can do the same yourself.
To work you need to prepare:
- New brace nuts on “24”;
- Extended bolts (in some cases necessary, depending on the manufacturer);
- Caster adjusting washers (also just in case there is a gap between the lever axis and the beam);
- A set of keys;
- Puller for ball joint.
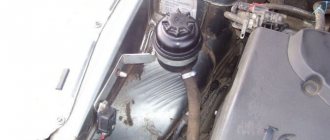
Wishbones on Priora - disassembly
- We drive into a pit or lift the car on a lift. If you have a hole, jack up the front end and start disassembling it. We remove the wheels to provide access to the levers.
Note: To avoid problems during assembly, I recommend taking measurements of the control points (between the levers) and writing them down on paper. This will avoid confusion with setting gaps, castor and camber.
- In order for the fastening nuts to unscrew without problems, we treat the threaded connections with WD-40 penetrating fluid or an equivalent.
- One by one, unscrew the nuts securing the lever (ball, stabilizer link, etc.), marked in the photo.
How to adjust the rocker on a Priora
The gearbox of the car performs the function of blocking spontaneous changes in the gear ratio. It is very important that this component of the transmission is clearly adjusted, because the condition of the gearbox as a whole depends on it. With a precisely adjusted rocker, gear shifting will occur in a timely manner, clearly and with the correct position of the handle. An incorrectly fixed or loose linkage causes a number of unpleasant consequences: loss of gears, inaccurate shifting, free movement and rattling of the gearbox lever.
The gearbox of the car performs the function of blocking spontaneous changes in the gear ratio. It is very important that this component of the transmission is clearly adjusted, because the condition of the gearbox as a whole depends on it. With a precisely adjusted rocker, gear shifting will occur in a timely manner, clearly and with the correct position of the handle. An incorrectly fixed or loose linkage causes a number of unpleasant consequences: loss of gears, inaccurate shifting, free movement and rattling of the gearbox lever.
Adjusting the rocker on a VAZ-2110, as on any other car, is a fairly simple procedure that will not take too much time. First of all, you need to drive the car onto an overpass or bring it to a pit. The second option is preferable, and more common: there is a pit in the garage of every car enthusiast. In order for the car to be clearly fixed, not to dangle or move away, you need to set up wheel chocks. Adjustment of the rocker can be done in three ways: with first gear engaged, in neutral gear and, finally, with reverse gear engaged. The easiest way is to adjust in reverse gear. First, the clamp is loosened, and then the lever is turned to position R.
Next, you need to set the gearshift knob to a comfortable and correct position. After this, the clamp is tightened, and the operation of the rocker is checked by re-engaging the reverse gear. If the handle continues to wobble, you can repeat the procedure or use the following method.
Adjusting the rocker on a VAZ 2110 in first gear
The gear lever is turned to position “1”. As in the previous case, you need to loosen the rocker clamp to allow free play for adjustment.
The rocker is adjusted by turning the drive until it stops against the locking latch. You need to turn it counterclockwise. As soon as the drive is fixed at the reverse gear stopper, the clamp is tightened until it stops. If the rocker is fixed, the gears will be engaged more accurately, and the handle will stop moving from side to side.
If there is no plastic reverse gear delimiter and, accordingly, the stop cannot be reached when turning the drive, then the adjustment of the rocker on the VAZ-2110 is carried out in neutral gear. To adjust, you will also need to loosen and tighten the rocker clamp. However, in order to do everything correctly, you will need to determine the depth of the linkage extension to the cardan.
With the correct calculation of the depth of removal, it will be possible to adjust the operation of the lever and eliminate rattling. And, the last piece of advice: it’s better to do the work with a partner - it will be easier to both fix and check the slide. These were the main recommendations for adjusting the scenes on the VAZ-2110. If no positive result can be achieved, then either professional help or a complete replacement of the backstage will be required.
Installation of wishbones on Lada Priora
- If the ball is “live”, you can fill it with new grease and install it in place; if not, be sure to replace it.
- We install the new lever in the following sequence: “halve” the lever (separate the two halves of the lever), install the part that acts as a stretcher, then into the beam, after that we assemble the lever, and at the end we insert the lever into the ear of the body.
- The right lever is more difficult to install, since the wheel drive interferes. In addition, installing the lever bolt required the help of a jack, which had to be used to jack up the steering knuckle.
- Many people have great problems installing stabilizer links, there are problems with the bolts, which is why I initially indicated that new longer bolts would be required. Also, often, due to the design of the levers, the bolts in the lever mount are skewed; a slight distortion is allowed, but if it is too large, you will have to think about something (adjust, add washers, etc.).
- Before tightening, all bolts must be lubricated with copper grease, “Litol”, or preferably worked off, this will simplify the disassembly process in the future. After everything is assembled, we check the distances between the control points with a tape measure, as you remember, we first took measurements. If everything matches everywhere, then most likely you won’t even have to do a wheel alignment. We tighten all the bolts and check that nothing is loose anywhere.
Now you can check the operation of the levers in practice. We go out onto the road, preferably where there are fewer cars, and enjoy the work done.
Results: the car responds better to the steering wheel, you can now take turns at a higher speed than before, and overall stability and controllability have improved.
In this article you will learn how to install wishbones on a Lada Priora at home. Step-by-step installation instructions will allow you to understand how to properly perform this work so that you can do the same yourself.
Adjusting and installing a short-stroke rocker on a Priora
The rocker is an integral part of any car with a manual gearbox (MT). The comfort and safety of driving depends on its condition. Therefore, every owner of a Lada Priora should know where the Priora checkpoint gate is located and how it works.Wishbones on Priora - disassembly
- We drive into a pit or lift the car on a lift. If you have a hole, jack up the front end and start disassembling it. We remove the wheels to provide access to the levers.
Note: To avoid problems during assembly, I recommend taking measurements of the control points (between the levers) and writing them down on paper. This will avoid confusion with setting gaps, castor and camber.
- In order for the fastening nuts to unscrew without problems, we treat the threaded connections with WD-40 penetrating fluid or an equivalent.
- One by one, unscrew the nuts securing the lever (ball, stabilizer link, etc.), marked in the photo.
- Once the lever has been successfully removed, assembly can begin.
Also check out
- Install the Kalinovsky cardan by applying lithol to its inner surface. Since the bolt is cone-shaped, screwing in is not difficult.
- The thrust should be installed through the interior. It's good if you have an assistant nearby. He will hold it by the elastic band in the cabin, at this time you need to stretch the traction.
Assembly is performed in reverse order
- First, we put the rod on the cardan shaft.
- Then you can begin assembling the reverse gear locking mechanism. Lubricate the spring ball.
- Adjust the gearshift lever.
- Tighten the clamp on the rod.
Installation of wishbones on Lada Priora
- If the ball is “live”, you can fill it with new grease and install it in place; if not, be sure to replace it.
- We install the new lever in the following sequence: “halve” the lever (separate the two halves of the lever), install the part that acts as a stretcher, then into the beam, after that we assemble the lever, and at the end we insert the lever into the ear of the body.
- The right lever is more difficult to install, since the wheel drive interferes. In addition, installing the lever bolt required the help of a jack, which had to be used to jack up the steering knuckle.
- Many people have great problems installing stabilizer links, there are problems with the bolts, which is why I initially indicated that new longer bolts would be required. Also, often, due to the design of the levers, the bolts in the lever mount are skewed; a slight distortion is allowed, but if it is too large, you will have to think about something (adjust, add washers, etc.).
Preparing to adjust the rocker
On an old car, it is better to lubricate the linkage mounting assembly with a penetrating compound in advance.
Before starting adjustment work, you need to prepare the place and carry out the following preparatory measures:
- The car needs to be parked in a pit.
- The handbrake must be tightened all the way.
- It is mandatory to install wheel chocks.
For a faster and better adjustment process, it is better to perform all work with an assistant. The process itself can occur in several ways.
First adjustment method
To adjust, you need to loosen the clamp connecting the rocker drive to the cardan.
This method is the simplest. In this case, the gearbox linkage is adjusted according to the reverse speed . First of all, you need to loosen the clamp, after which the reverse gear is engaged. Then you need to position the lever in the position you need. After this, the clamp is tightened and the operation of the entire mechanism is checked.
If you don't succeed the first time, you need to listen for knocks and crackles when switching . They must either decrease or increase. In accordance with this, you need to position the lever in the desired direction. If all manipulations do not lead to the desired effect, you need to resort to another adjustment method.
Second adjustment method
The gear shift lever should rest against the locking plate (in the photo it is made of light plastic).
This method is used if the first one did not lead to the desired results. When using it, you can more clearly position the gearshift lever. This method is as follows:
- The gearshift lever switches to first speed.
- The backstage clamp is completely loosened.
- Next, you need to turn the drive of the rocker itself counterclockwise until the lever rests against the reverse speed stop.
- The backstage clamp is tightened.
Tighten the clamp fastening nut, eliminating the shift of the rod during operation.
It happens that some VAZ-2110 cars do not have a plastic limiter retainer, so the adjustment in this case is carried out not in first gear, but in neutral.
Third adjustment method
This method is quite complicated , as it involves calculating the depth of the gearbox linkage to the cardan. Due to this, the position of the lever in the neutral position can be accurately calculated and adjusted. It happens that if the calculation is not accurate enough, all manipulations only lead to the appearance of rattling when changing gears.
If adjustment by any of the above methods does not lead to the desired results, several options are possible to solve the problem:
- Carry out diagnostics at a service station to make sure that the problem is in the gearbox linkage.
- You can replace the gearbox linkage.
- You can contact specialists who will adjust the slide themselves.