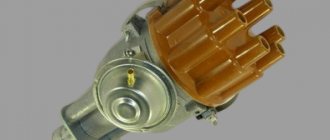
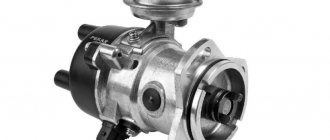
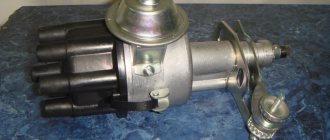
The ignition system is contactless. Consists of a distribution sensor, switch, ignition coil, spark plugs, ignition switch and high and low voltage wires.
The ignition distributor sensor 3810.3706 is a four-spark type, with a contactless control pulse sensor and built-in vacuum and centrifugal ignition timing regulators.
The initial ignition timing angle at a crankshaft speed of 750–800 rpm should be 1±1° BTDC.
The distribution sensor performs two main functions: firstly, it sets the moment of spark formation depending on its initial setting, the number of revolutions of the crankshaft and the load on the engine, and secondly, it distributes high voltage pulses (“spark”) among the cylinders in accordance with the order of their operation - a rotor (runner) is used for this.
In order to avoid mistakes during assembly, the slider is installed on the support plate of the centrifugal regulator in only one position.
The slider has a 1 kOhm noise suppression resistor.
The operation of a contactless sensor is based on the Hall effect.
When the ignition is turned on, power supply is supplied to the sensor. When the sensor-distributor roller rotates, a steel screen with rectangular cutouts passes through the sensor gap.
While there is a screen plate in the gap, the voltage is removed from the control terminal of the sensor; as soon as there is a cutout in the gap, the voltage at the control terminal drops sharply.
Thus, the contactless sensor produces four rectangular pulses (according to the number of cutouts in the screen) for each revolution of the distributor shaft, which corresponds to the ignition moment in each of the engine cylinders.
You can check the functionality of the contactless sensor by assembling the circuit shown in the figure.
Slowly rotating the ignition distributor shaft, monitor the voltmeter readings.
The voltage should change sharply from the minimum (no more than 0.4 V) to the maximum (no more than 3 V less than the supply voltage).
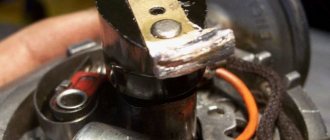
A faulty sensor cannot be repaired (except for a break in the wires between the sensor itself and the block on the sensor-distributor housing).
If a steel screen with slots touches the sensor (determined by slight jamming or a scratching sound when the roller rotates, as well as visually after partial disassembly of the distributor sensor), check the axial play of the roller and the fit of the screen.
If necessary, replace the distributor sensor. The centrifugal regulator increases the ignition timing with increasing engine speed, coming into operation at 900–1400 rpm.
When the sensor-distributor roller rotates, the regulator weights diverge under the action of centrifugal forces, overcoming the resistance of the springs, and shift the support plate of the centrifugal regulator clockwise relative to the roller.
For optimal operation of the regulator, the springs have different stiffnesses.
A stiffer (thicker) spring comes into operation later, approximately in the middle of the full stroke of the plate - therefore it is put on the stand with a gap, while a softer (thin) spring is always tense.
The maximum movement of the support plate is limited by the cutout in it and is about 12° along the distributor, which corresponds to an ignition timing angle of about 24° along the crankshaft.
Removing and sealing the distributor
It is necessary to remove the terminal from the battery and disconnect the high-voltage wires. You need to remember how the wires were located on the distributor.
Next action: disconnect the hose from the distributor. Next, you need to unscrew the nut holding the distributor power wire. This can be done using pliers or a No. 6 wrench. Using a No. 13 wrench, loosen and then unscrew the nuts that hold the distributor in a fixed position.
Installation of the distributor is performed in the reverse order.
We have already figured out how the distributor on the Niva should be installed; it is also recommended to carry out additional sealing. First of all, you should decide whether you need sealing. If you often spend time off-road, then you have encountered a situation where the ignition system is completely flooded. Before each ford, the driver thinks for a long time whether it is worth going there. Some motorists use special water-repellent compounds that should protect the system from liquid ingress. As numerous reviews say, there is no particular benefit from these mixtures.
You need to put a cut plastic bottle on the distributor. Next, you should prepare holes for the hoses of the vacuum corrector, ventilation and wires. All openings through which hoses and wires pass should be insulated with sealant.
To make working ventilation, you need to take an air hose and connect it to a snorkel, which is used for forced ventilation. The result looks like this: If you have extensive experience in repairing and modernizing the Niva, then try the complex method. The distributor is sealed as follows: The ignition system cover must be placed on the sealant. It is important that the glue is fresh, you need to completely isolate the ignition system. The junction with the drive should also be covered with this glue. The sealant should be applied along the edge of the connection . A fitting should be installed in the cover. Pressure must be created inside the Niva system, so an air supply must be made to the fitting.
Source
Why did it happen so?
Perhaps the automatic requests do not belong to you, but to another user accessing the network from the same IP address as you. You need to enter the characters into the form once, after which we will remember you and be able to distinguish you from other users exiting from this IP. In this case, the page with the captcha will not bother you for quite a long time.
You may have add-ons installed in your browser that can make automatic search requests. In this case, we recommend that you disable them.
It is also possible that your computer is infected with a virus program that is using it to collect information. Maybe you should check your system for viruses.
If you have any problems or would like our support team, please use the feedback form.
It is clear to anyone, not even a car owner, that without the ignition the car will not start or drive (criminal options are not considered). Depending on the car manufacturer, repairs or replacement of parts occur at a car service center or independently. Installing the ignition on a VAZ 21213 NIVA carburetor is one of those processes that the owner can carry out himself. This approach will save money and give you personal experience in repairs.
Lada 4×4 3D Niva 96 › Logbook › BSZ distributors for engines 2106 and 21213
On the previous Niva, in the first year of operation, problems arose with the ignition (the contacts burned out, for some reason my engine was 2106). Cleaned it up and it worked. A trifle, of course, but it clearly had to happen again. Immediately on the Internet I came across an article “how to install contactless ignition in a classic car.” I read everything, I liked the idea and the expected bonuses, so I need to apply it to my car. It must be so. I took a pinch of money and wandered around the shops in search of the necessary ingredients. There were no problems with the purchase of wires and a switch, but there was a problem with the distributor; distributors for motors 21213 with the index 038.3706-10 are lying around on the shelves, but for the motor 2106 I need them with the index 038.3706. I had little understanding of what exactly the difference was at that time, so I simply relied on the competence of the seller, who, in response to my request for a BSZ distributor for the 2106 engine, with a deft movement, took out the distributor I supposedly needed from under the counter. Then, back in 2010, I touched the ignition with caution and didn’t really understand what and why, and as a result I installed what later turned out to be a distributor from engine 21213, somehow set up the UOZ and drove off somehow. The car seemed to be driving, but I didn’t come across other Nivas with a similar engine and BSZ to compare and understand that something was wrong in my car. The matter did not get much worse when I installed HBO. This is all an introduction, but the essence was revealed to my braking mind a couple of years later and problems that arose in the ignition system helped. While I was eliminating them “by scientific poking” (replacing parts one by one), I discovered a discrepancy in the markings of the installed distributor - mine was numbered 038.3706-10 from engine 21213!
I went to the Internet for information and dug up final arguments for myself. The difference in distributors results from the difference in engines, and not so much due to the difference in volumes, but rather due to the compression ratio (2106 - 8.5 units, 21213 - 9.3 units). Hence, these distributors have different operating characteristics of centrifugal and vacuum regulators, which control the time of spark formation on the spark plugs. As can be seen from the graphs, the vacuum regulator 2106 has a maximum advance angle of 6 degrees (along the crankshaft)
The vacuum regulator 21213 has a maximum advance angle of 9 degrees (along the crankshaft)
The centrifugal regulator 2106 has a maximum advance angle of 15 degrees (along the crankshaft)
The centrifugal regulator 21213 has a maximum advance angle of 11 degrees (along the crankshaft)
The total ignition timing angle for the 2106 distributor is 21 g (along the crankshaft) The overall ignition timing angle for the 21213 distributor is 20 g (along the crankshaft) This is why I had a failure when pressing the gas pedal, there was a small ignition timing angle. Attempt number two, armed with knowledge, I went to buy the required distributor. Auto market. Lots of shops. A bunch of competent, cunning sellers. And all of them, in response to my request for a BSZ distributor for 2106, are trying to sell me a Niva. In response to my attempts to explain why I don’t want to buy what they give, they grinned sarcastically, saying that they take everything and don’t complain, and here you are being clever... and you don’t know what you’re looking for now. True, one seller listened to my explanation with interest and said that he had only seen such distributors on sale in the form of BSZ kits for classics and had not seen them separately, which upset me a little. But my stubbornness took its toll and in a normal store, from the first request they gave me what I asked for - a BSZ distributor with the index 038.3706 for the 2106 engine.
How to set the ignition on a Niva 21213 carburetor
I won’t go into too much detail about the advantages of a contactless ignition system over a conventional contact one. This has already been done well before me. Therefore, in order to avoid repetition of already known truths, I first suggest that you take a walk through the links below and read them carefully. Everything is quite complete and well presented there:
So, let's go to the store to buy components. At the same time, let’s carefully remember the number of the contactless ignition distributor for the “classic” indicated in the above links, or even better, write it down on a piece of paper so as not to forget. This number is indicated on the distributor body. Let’s not rely on the “competence” of sellers who can easily sell you a Niva distributor, assuring you that it must be installed on a six-wheel engine.
Also, when purchasing components, it is advisable to immediately take a spare switch and Hall sensor, since these devices have the unpleasant property of suddenly and for no apparent reason malfunctioning or breaking down, after which your car can only go further in tow. Remember that the commutator and Hall sensor are VITAL SPARE PARTS THAT MUST ALWAYS BE IN YOUR CAR! If you are a master yourself, then without much difficulty you can, if necessary, replace them, and if not, then someone who knows how to do this will replace them for you, for example the same “Angels”. But for this, the switch and sensor MUST BE AT YOUR HANDS, otherwise you will have to frantically rush around either looking for them or looking for the tractor.
When purchasing a Hall sensor, make sure that it matches the distributor you are purchasing. To do this, remove the distributor cover and compare the sensors. They must be absolutely identical. In addition, the “correct” sensor should have two ears on the sides for mounting screws, and not one in front - this is a sensor, in my opinion (I don’t know for sure), for 2108. It can also be adapted to the distributor, but the description of this work is beyond the framework of the present story.
The ignition coil must be taken for the VAZ-2108. Better than the regular type, oil-filled. I don’t presume to say for sure, but there seems to be an opinion that a “dry” type coil has a number of disadvantages, due to which the use of a conventional coil seems to be preferable.
It is also worth paying attention to the wiring harness. You need to get an ignition harness for the Niva - there are some on sale. The colors of the wires in it correspond to the colors of the wires indicated in the electrical diagram 21213, so in order to know what to connect and where, you need to have this diagram with you. When buying a harness, pay attention to how well the terminals hold in the sockets of the blocks, because when putting the blocks on the connectors of the switch and Hall sensor, the terminals, under the influence of the applied force, can jump out of the sockets and the car simply will not start. It is quite advisable to somehow better fix these terminals yourself before installing the harness.
Regarding high-voltage wires, we can say that their choice is quite large. More details about this can be found in this FAQ section. I used blue Tesla silicone wires and after replacing the engine I switched them over to it. I've been traveling with them for almost three years now.
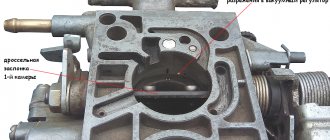
There is no need to buy an electronic control unit for the forced idle economizer (EPHH), since the carburetor 2107-1107020 “Ozone”, which is equipped with the 2106 engine, does not have an electronic control system for the idle speed solenoid valve. This block may be required only if the carburetor 2107-1107020 “Ozone” is replaced on the engine of your car with the carburetor 21073-1107010 “Solex”, which is standardly equipped with the engine 21213, and you want to equip your car with this block, so to speak, for complete set. In my opinion, this need not be done, since this unit is mainly designed to meet the environmental safety requirements of the machine, and the fuel economy obtained thanks to it can rather be considered symbolic - about 0.5 l/100 km.
But the components have been purchased and now you can start installing them. Anyone who will not do this themselves and contact a car service center may not read further, since this article is intended mainly for those who will do all the work with their own hands.
What should you pay attention to when performing work? What's important here?
1. The negative terminal from the battery must be removed.
2. When working, as already mentioned, check the electrical diagram of the VAZ-21213.
3. The best place to install the switch is the inclined part of the wall of the engine compartment, behind the battery, next to the body number (the switch should not cover the number!). Holes are drilled in this wall for self-tapping screws that will mount the switch.
4. Before removing the old distributor, remove the cover from it and look at which cylinder the contact of the slider is directed towards. We install the new distributor with the cover removed and in the same position of this contact. If this is not done, then there may be problems with starting the engine, even to the point that the engine will not start at all.
5. The wiring harness (installed last), although it is believed to be for the Niva, the part that goes to the distributor is such a length that it would probably be enough for the engine compartment of a bus. Therefore, when laying the harness, we drag it behind the air supply box, and fold the excess part 2-3 times so that the harness can freely reach the distributor, fix this fold in several places with electrical tape and screw the entire harness in 3-4 places, again with electrical tape , to the spare tire support, from its lower side. When connecting the harness, you must try to connect the terminals so that the terminals fit tightly onto the connectors, otherwise there may be problems.
How to set the ignition on a VAZ Classic yourself.
Creator: Valera Potapenko vk.com/id66558974 Send videos by email Or contact.
– start the unit and direct the flashing strobe light at the mark on the pulley; If the ignition timing is correct, then when the engine is idling, the position of the mark on the pulley should correspond to the data in Appendix 3.
To adjust the ignition timing, stop the engine, loosen the nut securing the ignition distributor sensor and turn it to the desired angle. To increase the ignition timing , the sensor-distributor housing should be turned counterclockwise, to decrease - clockwise. Next, again determine the ignition timing produced.
For the convenience of adjusting the ignition timing, there are divisions and “” and “–” signs on the flange of the ignition distributor. One crushing on the flange corresponds to eight degrees of crankshaft rotation.
If you have a diagnostic panel with an oscilloscope, then when using it, you can also simply check the ignition timing setting, guided by the instructions for using the panel.
Install the ignition distributor sensor removed from the engine to the area in the following order:
– turn the crankshaft right before the start of the compression stroke in the first cylinder, and then, continuing to turn the crankshaft, align mark 1 with mark 4; – remove the cover from the ignition sensor-distributor and turn the rotor to a position where its outer contact becomes oriented towards the contact of the first cylinder on the cover of the ignition sensor-distributor; – holding the sensor-distributor shaft from turning, insert it into the socket on the cylinder block so that the center line passing through the spring latches appears to be parallel to the center line of the engine; – fix the distributor sensor on the cylinder block, install the cover, connect the wires, determine and adjust the ignition timing setting. Niva VAZ 21213 ignition adjustment Next page»»»»»»
We change the distributor on our own | Repair of Niva VAZ 2121
In order to remove and subsequently replace the distributor on a VAZ 2121 Niva, we will need the following tool:
The procedure for performing work when replacing a distributor on a Niva VAZ 2121
First, we disconnect all the high-voltage spark plug wires from the cover, simply by pulling them up with a little force:
Then we immediately disconnect the hose from it, which goes to the carburetor, simply by grasping it with a little force and pulling it to the side:
After this, you can begin to unscrew the Niva distributor fastening nut, which is located at the bottom of the engine, as shown in the photo below:
Then we remove the metal plate that regulates the ignition by simply lifting it up with your hand:
And after all this, you can safely remove the distributor from its seat:
And don’t forget to use pliers or a 6mm wrench to unscrew the nut that secures the power cable. All this can be done after removal:
Now everything is definitely ready, you can remove everything and install the new part in place, in the reverse order of removal:
The entire work will take you no more than 15 minutes of time, I think everything was clearly shown and explained. If you have any questions, you can ask below in the comments.
Checking the quality of the ignition switch installation
It is logical that errors are possible when connecting contacts or incorrect installation of the lock itself. Therefore, it is necessary to test the protection in the installed state. You will need an ohmmeter and a voltmeter. Performance diagnostics:
The last case is especially unpleasant, since you will have to check almost all the wiring, contact elements, etc. If there are possible suspicions about the electrical network, it is better to take the car to a professional auto electrician. Repairing it requires a thorough knowledge of the circuit and experience in finding defects.
Features of replacing the ignition switch
First of all, it is important to make sure that the problem is in the lock. Therefore, the spark plugs, distributor and ignition coil are inspected. Often these parts of the internal combustion engine become the reason for failures of correct operation. If breakdowns in them are excluded, then the ignition switch (IZ) should be replaced. Removal order:
- Disconnect battery.
- Remove the steering column.
- Mark the wires going to the 3Z contact area. Using a flat-head screwdriver, unscrew the bolts securing the switch to the steering column (left and right).
- Insert the key into position 0. By pressing the screwdriver, press the lock slightly through the hole (do not touch the key).
- Lightly pull the 3Z towards you and dismantle it. The ignition switch Niva 21213 is switched off according to the wiring diagram (the contact part is changed if required). To do this, be sure to remove the retaining ring with a screwdriver.
- Remove the key, install the contact part so that the wide protrusions of the body and the parts coincide.
- The remaining parts are assembled in the reverse order.
Repair of the ignition distributor sensor of a VAZ-2121 car
We remove the ignition distributor sensor (see the article on removing the distributor sensor).
Checking the distributor sensor can be found in the article - “Features of the ignition system”.
1. Using a screwdriver, unscrew the two screws securing the rotor.
2. Remove the rotor. When installing the rotor in place, the square protrusion should fit into the slot, and the round one into the hole in the support plate.
3. Using a thin beard, knock out the pin.
4. Remove the oil deflector and washer from the roller.
5. Remove the roller from the distributor body.
6. Using a thin screwdriver, remove the locking washer of the vacuum ignition timing regulator rod.
7. Remove the rod from the rotary plate pin.
8. Unscrew the two screws securing the vacuum ignition timing regulator
9. One of the screws has an extension to secure the sensor wiring.
10. Remove the vacuum regulator.
How does the ignition system of the VAZ 21213 (Niva) work?
Ignition problems lead to interruptions in engine operation, so it is necessary that the person fixing it has good knowledge and skills. The quality of the work done depends on this. In some cases, when there are no such specialists nearby, there is a need to replenish one’s own knowledge.
The ignition system can become operational with self-repair.
Device
Purpose
The ignition system of the Niva 21213 car is designed for high-quality ignition of the combustible mixture. The concept of quality includes the following properties:
The occurrence of a spark on the spark plug at the right time is ensured by synchronizing the operation of the ignition system with the angle of rotation of the crankshaft of the Niva 21213 car. The rate of fuel ignition depends on the quality of the spark and its position in the combustion chamber. The larger the area of contact between the spark and the mixture, the faster it will ignite. Smooth operation means uninterrupted supply of voltage to the spark plugs and formation of a spark.
System elements
Understanding the operating principle of individual components will help in troubleshooting. From the unit they move on to a specific part, which is replaced with a new one.
All components can be divided into several groups:
Ignition Niva 21213
A spark occurs due to electrical breakdown of the gap between the electrodes of the spark plug. To do this, the voltage on it must be sufficient. A number of elements are involved in the process of creating this tension:
The pulses generated by the commutator are supplied to the primary winding of the ignition coil, and as a result of a decrease in the current, a self-induction emf occurs. The secondary winding has many turns and many times the resistance of the primary.
High voltage is supplied to the central contact of the distributor. The rotating slider distributes voltage to the spark plug of the corresponding cylinder, in which ignition occurs. Synchronization of the ignition system is implemented using a Hall sensor. It sends pulses to the switch without any mechanical contact, so the 21213 ignition system is non-contact. The metal screen, passing through the Hall sensor, creates an impulse for the switch. In this way, the moment when the high voltage begins to be created is recognized. The screen is mechanically connected to the camshaft and rotates synchronously with it. So, synchronization is carried out by the following elements:
Electrical diagram Niva 21213
In addition to the above elements, the 21213 ignition system is equipped with advance angle regulators. They change the angle under certain conditions. The engine operation is being corrected. This is necessary in order to ensure optimal speed at different loads. The vacuum regulator is activated by the vacuum in the carburetor diffuser, this depends on the throttle position and engine speed. The centrifugal governor changes the angle depending on the speed. Its action is based on centripetal acceleration; the greater it is, the greater the angle of advance.
Peculiarities
The operation of the Niva 21213 system depends on the condition of its parts. High-voltage wires must have a distributed resistance, the value of which is in a certain range. Too much resistance will result in the ignition coil not having enough power to cause a breakdown. Low resistance increases interference. Although, some install just such wires. Of course, the spark power will increase and engine performance will improve. Spark plugs can lose their properties over time. The electrodes melt and carbon deposits appear.
The high temperature inside the cylinders greatly heats the spark plugs. Therefore, even when the ignition is turned off, ignition occurs from heated spark plugs.
It is important that all spark plugs have the correct gap between the electrodes. This will ensure high-quality ignition of the mixture. The distributor cover must be clean from dirt, since its presence can lead to current leakage.
Ignition: with and without contacts
The unsatisfactory condition of the parts of the breaker-distributor can greatly affect the operation of the engine
Malfunctions of ignition systems cause a lot of trouble, leading to loss of power and even sudden engine stop. The most complex and unreliable component of the ignition system is its distributor-distributor. In outdated car models with a contact system, the distributor is the most capricious. Burning or contamination of its contacts, a “walking” gap between them due to large wear of the bearing, a malfunction of the capacitor or resistor cause loss of power, interruptions in engine operation, difficult starting and unstable operation in all modes. If the power drops sharply at high speeds and the muffler starts firing, the centrifugal ignition advance machine is most likely to blame: perhaps the weights are stuck on the axles. Breakage or weakening of at least one of the springs of this machine can cause detonation at medium and high speeds. A faulty vacuum regulator manifests itself only in transient conditions: it will not be possible to draw conclusions about its performance based on engine operation at full load.
There is an alternative
The vast majority of modern cars are equipped with contactless ignition systems. Their main feature is the presence of an electronic switch and a Hall sensor instead of a contact group. Such units provide a more powerful spark, and also eliminate the need to constantly monitor the gap and condition of the contacts. Even the wear of the distributor shaft bearing is not so bad in this case.
The breaker-distributor of a contactless ignition system with a Hall sensor is much less demanding on maintenance
If desired, a similar system can be installed on cars of earlier designs: for example, the contactless distributor from BA3-21213 is perfect for the VAZ “classic”.
Don't make a mistake when choosing
| The standard classic distributor can most often be replaced with a more advanced analogue |
When choosing a new distributor, please note that for one car model different distributors may be produced, differing in the characteristics of the ignition timing devices (for engines of different displacement or compression ratios). UZAM has been especially successful in this: for Moskvich vehicles there are as many as four outwardly identical units on sale, intended for different “engines”. An error in choosing a distributor does not lead to catastrophic consequences, but most likely the engine efficiency will decrease somewhat, and detonation may occur in some modes. True, the same can happen with the “native” distributor - not all manufacturers bother to accurately select the elasticity of the springs, and the parameters of the device often “vary” within wide limits. Judging by the reviews of sellers of auto parts stores, first of all you should be wary of products from neighboring countries (not to mention the specimens you encounter without “identification marks”). The majority of returns occur precisely at such nodes.
Video
How to disassemble the ignition distributor sensor of a VAZ 2121 Niva 2131
Disassembly of the ignition distributor sensor on a VAZ 2121 and Niva 2131 is carried out to repair it in order to replace failed elements. To carry out repair work, remove the distributor, wipe it thoroughly from dirt and dust, then place it on a workbench and begin disassembly. Prepare a standard set of tools and perform the following sequence of actions:
At this point, the repair work on disassembling the ignition distributor sensor on the VAZ 2121 and Niva 2131 has been completed. Make the necessary repairs, then reassemble in reverse order.
VAZ 21213 | Firing order
The efficiency of recoil and the overall performance of the power unit depend on the correct sequence of ignition of the air-fuel mixture in the engine cylinders - to avoid such violations, disconnect the explosive wiring one by one, carefully marking each wire.
| 90 posts on previous pages | |
| The switch does not receive voltage pulses from the contactless sensor: | Do the following: |
| – a break in the wires between the ignition distributor sensor and the switch | – check the wires and their connections; replace damaged wires |
| – contactless sensor is faulty | – check the sensor using an adapter connector and a voltmeter; faulty sensor replace |
| No current pulses are supplied to the primary winding of the ignition coil: | Do the following: |
| – a break in the wires connecting the switch to the switch or to the ignition coil | – check the wires and their connections; replace damaged wires |
| – switch is faulty | – check the switch with an oscilloscope; replace faulty switch |
| – the ignition switch does not work | – check and replace the faulty contact part of the ignition switch |
| High voltage is not supplied to the spark plugs: | Do the following: |
| – the tips of the high voltage wires are loose or oxidized; they are not seated tightly in the sockets; the wires are heavily soiled or their insulation is damaged | – check and restore connections, clean or replace wires |
| – wear or damage to the contact carbon, its hanging in the cover of the ignition sensor-distributor | – check and, if necessary, replace the contact angle |
| – current leakage through cracks or burnouts in the cover or rotor of the ignition distributor, through carbon deposits or moisture on the inner surface of the cover | – check, clean the cover from moisture and carbon deposits, replace the cover and rotor if they have cracks |
| – burnout of the resistor in the rotor of the ignition sensor-distributor | – replace the resistor |
| – the ignition coil is damaged | – replace the ignition coil |
| The spark plug electrodes are oily or the gap between them is not normal | Clean the spark plugs and adjust the gap between the electrodes |
| Spark plugs are damaged (cracked insulator) | Replace the spark plugs with new ones |
| The order of connecting high voltage wires to the terminals of the ignition sensor-distributor cover is violated | Connect the wires in firing order 1–3–4–2 |
| Incorrect ignition timing setting | Check and adjust ignition timing |
| Engine ignition too early | Check and adjust ignition timing |
| Large gap between spark plug electrodes | Check and adjust the gap between the electrodes |
| The springs of the weights of the ignition timing regulator in the ignition distributor sensor have weakened | Replace the springs, check the operation of the centrifugal regulator on the stand |
| The wires in the ignition system are damaged, the fastening of the wires is loose or their tips are oxidized | Check the wires and their connections. Replace damaged wires |
| Wear of electrodes or oiling of spark plugs, significant carbon deposits; cracks in spark plug insulator | Check the spark plugs, adjust the gap between the electrodes, replace damaged spark plugs |
| Wear or damage to the contact carbon in the ignition sensor-distributor cover | Replace the contact angle |
| Severe burning of the central contact of the ignition sensor-distributor rotor | Clean the center contact |
| Cracks, contamination or burns in the rotor or cover of the ignition distributor sensor | Check, replace rotor or cover |
| The switch is faulty - the shape of the pulses on the primary winding of the ignition coil does not correspond to the norm | Check the switch using an oscilloscope, replace the faulty switch |
| Incorrect ignition timing setting | Check and adjust ignition timing |
| Sticking weights of the ignition timing regulator, weakening of the springs of the weights | Check and replace damaged parts |
| The switch is faulty - the shape of the pulses on the primary winding of the ignition coil does not correspond to the norm | Check the switch using an oscilloscope, replace the faulty switch |
The ignition order and direction of rotation of the distributor for various models is shown in the illustrations.
Ignition order and direction of distributor rotation on models 1.5 l (4g15 engine) and 1.8 l (4g93 engine) 1993 ÷ 1996 issue
content .. 91 92 100 ..VAZ-21213 (Niva).
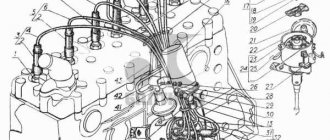
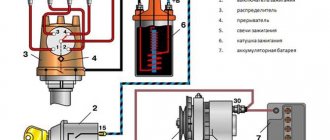
Ignition system 1 – ignition switch; 2 – ignition relay; 3 – switch;
| 4 – ignition coil; 5 – ignition distributor sensor; 6 – spark plugs |
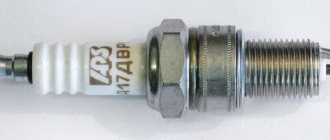
The ignition system is contactless. It consists of an ignition distribution sensor 5, a switch 3, an ignition coil 4, spark plugs 6, a switch 1 with an ignition relay 2 type 113.3747-10 and high voltage wires. The power supply circuit for the primary winding of the ignition coil is interrupted by an electronic switch. Control pulses are supplied to the switch from a contactless sensor located in the ignition sensor-distributor 5. Ignition distributor sensor - type 3810.3706, four-spark, unshielded, with vacuum and centrifugal ignition timing regulators, with a built-in microelectronic control pulse sensor. Switch - type 3620.3734, or 76.3734, or RT1903, or PZE4022, or K563.3747. It converts the sensor control pulses into current pulses in the primary winding of the ignition coil. Ignition coil - type 8352.12, or 27.3705, or 027.3705, or 27.3705-01 - oil-filled, sealed with an open magnetic circuit. Spark plugs - type A17DVRM, or A17DVRM1 with noise suppression resistors. Ignition switch - type 2101-3704000-11 with anti-theft locking device. Warning
The vehicle uses a high energy ignition system with extensive use of electronics.
Therefore, in order to avoid injury or damage electronic components, the following rules must be observed. With the engine running, do not touch the elements of the ignition system (switch, ignition coil and high-voltage wires). Do not start the engine using the spark gap and do not check the functionality of the ignition system “for spark” between the tips of the spark plug wires and ground. Do not lay low voltage wires of the ignition system in the same bundle with high voltage wires. Ensure that the connection to the commutator ground is secure through the fastening screws. This affects its smooth operation. When the ignition is on, do not disconnect the wires from the battery terminals and do not disconnect the plug connector from the switch, as this may cause increased voltage on individual elements of its circuit and it will be damaged. VAZ-21213 (Niva). Possible malfunctions of the ignition system, their causes and methods of elimination
| CAUSE | REMEDY METHOD |
| Engine won't start | |
| The switch does not receive voltage pulses from the contactless sensor: | Do the following: |
| – a break in the wires between the ignition distributor sensor and the switch | – check the wires and their connections; replace damaged wires |
| – contactless sensor is faulty | – check the sensor using an adapter connector and a voltmeter, replace the faulty sensor |
| No current pulses are supplied to the primary winding of the ignition coil: | Do the following: |
| – a break in the wires connecting the switch to the relay or to the ignition coil | – check the wires and their connections; replace damaged wires |
| – switch is faulty | – check the switch with an oscilloscope; replace faulty switch |
| – the ignition switch or relay does not work | – check and replace the faulty contact part of the switch or ignition relay |
| High voltage is not supplied to the spark plugs: | Do the following: |
| – the tips of the high voltage wires are loose or oxidized; they are not seated tightly in the sockets; the wires are heavily soiled or their insulation is damaged | – check and restore connections, clean or replace wires |
| – wear or damage to the contact carbon, its hanging in the cover of the ignition sensor-distributor | – check and, if necessary, replace the contact angle |
| – current leakage through cracks or burnouts in the cover or rotor of the ignition distributor, through carbon deposits or moisture on the inner surface of the cover | – check, clean the cover from moisture and carbon deposits, replace the cover and rotor if they have cracks |
| – burnout of the resistor in the rotor of the ignition sensor-distributor | – replace the resistor |
| – the ignition coil is damaged | – replace the ignition coil |
| The spark plug electrodes are oily or the gap between them is not normal | Clean the spark plugs and adjust the gap between the electrodes |
| Spark plugs are damaged (cracked insulator) | Replace the spark plugs with new ones |
| The order of connecting high voltage wires to the terminals of the ignition sensor-distributor cover is broken | Connect the wires in firing order 1–3–4–2 |
| Incorrect ignition timing setting | Check and adjust ignition timing |
| The engine runs rough or stalls at idle | |
| Engine ignition too early | Check and adjust ignition timing |
| Large gap between spark plug electrodes | Check and adjust the gap between the electrodes |
| The engine runs unevenly and unsteadily at high crankshaft speeds | |
| The springs of the weights of the ignition timing regulator in the ignition distributor sensor have weakened | Replace the springs, check the operation of the centrifugal regulator on the stand |
| Interruptions in engine operation in all modes | |
| The wires in the ignition system are damaged, the fastening of the wires is loose or their tips are oxidized | Check the wires and their connections. Replace damaged wires |
| Wear of electrodes or oiling of spark plugs, significant carbon deposits; cracks in spark plug insulator | Check the spark plugs, adjust the gap between the electrodes, replace damaged spark plugs |
| Wear or damage to the contact carbon in the ignition sensor-distributor cover | Replace the contact angle |
| Severe burning of the central contact of the ignition sensor-distributor rotor | Clean the center contact |
| Cracks, contamination or burns in the rotor or cover of the ignition distributor sensor | Check, replace rotor or cover |
| The switch is faulty - the shape of the pulses on the primary winding of the ignition coil does not correspond to the norm | Check the switch using an oscilloscope, replace the faulty switch |
| Sticking weights of the ignition timing regulator, weakening of the springs of the weights | Check the switch using an oscilloscope, replace the faulty switch |
| The engine does not develop enough power and does not have sufficient throttle response | |
| Incorrect ignition timing setting | Check and adjust ignition timing |
| Sticking weights of the ignition timing regulator, weakening of the springs of the weights | Check and replace damaged parts |
| The switch is faulty - the shape of the pulses on the primary winding of the ignition coil does not correspond to the norm | Check the switch using an oscilloscope, replace the faulty switch |
content .. 91 92 100 ..
Setting the ignition
The last step that a car enthusiast can perform in setting up the ignition system after installing the lock. You can take the car to a specialist, but this fairly simple procedure is unreasonably expensive. Display instructions:
The final check takes place on the go. You will need to warm up the engine to 80 degrees. Then accelerate to 60 km/h (or go to 4th gear, as some experts advise). Press the gas pedal sharply. If the ignition is adjusted correctly, the engine may briefly detonate.
Source