I’ll start with the seal... I’ll say right away that the photos are not mine, but everything will look the same for everyone. There was no opportunity to take photos.
I’ll say right away, it’s easier to find this spare part in a store and buy it. Easier and cheaper
Installing a seal from a Priora on a VAZ 2110 - 12
A very useful modification. Many have probably already noticed that in rainy weather, the side windows on dozens of cars are always dirty. So here’s a solution to the problem. The seal is from Priora. But that’s where the advantages end... The well-known native seal of the VAZ 2110 wipes through the paint while driving , water accumulates and the roof literally rots through.
At Priora, this issue was corrected and the seal there does not touch the paint in any way, much less rub it.
I corrected the consequences quite recently.
ATTENTION! To install this seal, the car must have either a new type frill or a frill from Priora!
With an old-style VAZ 2112 frill, the seal will rest against the frill and simply won’t go into place!
Installation.
According to the instructions, this seal is placed on the removed windshield and then glued in. I didn’t want to change my original windshield just because of the seal and pay 3k for it. There was also our favorite collective farm version.
For simplicity, I’ll show you in the photo:
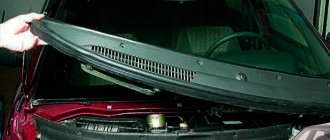
Refinement of gutters on the windshield from Priora
In order to install gutters from LADAPriora on a VAZ 2110 without modifications, two conditions must be met:
If there is rust under the windshield rubber on your VAZ 2110, then the process of removing it can be combined with installing gutters.
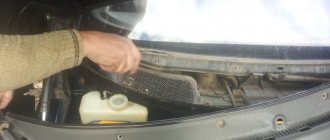
If you are not inclined to remove the windshield from your ten, then to install drains you will need to make minor adjustments to the car:
- First, you need to remove the standard rubber side seals of the windshield;
- Secondly, you will need to trim at a slight angle that part of the drain that will later extend behind the glass (shown in the figure below);
- The next step is to apply silicone sealant to the inside of the drain, extending behind the glass;
- At the last stage, we snap the gutters from LADAPriora.
If necessary, in order to avoid detachment of the upper corner of the edging, it may be necessary to trim or glue in certain places (depend on the situation).
If your VAZ 2110 car has an old frill installed, then the bottom of the drain will rest and it will need to be cut in place (although it is better to replace the old frill with a new frill - no alterations are required for this).
Causes of the problem
As soon as it is discovered that the windshield is leaking, find out why this is happening:
- Incorrect installation. A leak may appear if during installation the technician slightly moves the glass from its normal position. In this case, even with a high-quality sealant, the seam will experience significant loads, and over time, cracks will appear in the sealed layer.
- Violation of body geometry. The body gradually bends due to corrosion of the bottom, pillars and immediately after an impact or collision. As a result, the seam also deteriorates. You can fix the problem yourself if the driver is an experienced straightener and has the necessary tool (laser level) in the garage.
- Poor quality sealant. If the windshield comes off without deformation, they solve the problem themselves or contact a service station.
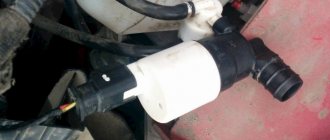
- The drain is clogged. If debris has accumulated in the drain hole, the leak can be fixed by simply cleaning it.
- Mechanical damage. A crack or hole in the seal or glass is one of the most common causes.
Tools and materials
In order for the replacement of the VAZ 2110 windshield to be as high-quality as possible, you should prepare a set of necessary tools, as well as some chemicals.
To work, you will definitely need a new glass to replace the damaged one, and a mounting string with two handles. You should also prepare a repair kit - it is necessary for gluing the windshield. This kit must contain a special glue - “Sicaflex”, “Dinitrol” or “Terasol”. You will also need a primer, without which special glue cannot be used - this is a primer. An activator is also needed. It is used to glue glass. Additionally, for degreasing you will need white spirit, a plastic spatula and plumbing tools. It should be noted that replacing the windshield of a VAZ 2110 alone is almost impossible - experts recommend using help.
Preparing for work
The seal needs to be replaced as it wears out. If it has dried out or lost its seal in places, you will need to pay close attention to the defect. Access to the work site is open: there is no need to remove the hood or dashboard, and the procedure itself will take about two hours, so there is no need to go to a car service center to replace the seal. It is better to change the windshield sealing edging at home, but only if you have a garage or shed: during the work you will need reliable shelter from the rain. You will need a set of slotted screwdrivers of different sizes, a pair of utility knives, a plastic spatula, nitro paint solvent and a special sealant. Regarding the last point, it is impossible to give any recommendations, since the range of adhesives and sealants is quite diverse. In addition, you may need a unique product for use in a specific car brand.
Dismantling works
The entire glass replacement process should begin by removing the damaged glass. First, using a plastic spatula, remove all decorative elements, as well as panels located in the car interior. It is necessary to remove the windshield wipers from the outer part, as well as the frill - for this, the plugs and fasteners are removed. At this stage, the VAZ 2110 windshield washer nozzles can also be replaced.
Next, open the hood and remove the rubber glass seal. To easily remove the sealing element, you need to lightly pull the molding by its edge. Once the molding is removed, it will be possible to remove the rubber triangular gaskets. During the installation of new glass, the rubber band on the windshield of the VAZ 2110 will be replaced.
When water gets under the passenger mat of a VAZ
If moisture appears in the car interior, then the driver has no peace of mind until he figures out what’s wrong and fixes the leak. Most often, such a nuisance happens after rain. The most common cause is a windshield that is not sealed properly, which allows raindrops to enter the cabin.
It happens that you have to disassemble the door in order to make sure that the plastic screens, whose function is to close the technological windows, are in order. You can check the windshield by having someone spray it while watching from below what is happening.
The following can happen if the channels are clogged: the water flow will split, one part will go to the driver's side, the other to the passenger's seat. Then, under the hood, the water will go into the drain hole, and through the body it will begin to flow to the stove pipes.
But in VAZ 2114, 2107, water can accumulate on the floor if the rubber seals, which are located on the inside along the perimeter of the door, are worn out. Worn seals, which now do not fit tightly, can be identified immediately - the rubber becomes torn and shrunken.
So it's time to replace them. In this case, professionals advise installing double seals, so before disassembling half the machine in search of the cause, you need to check if there are any cracks that allow moisture to pass through. During assembly, they can also make a mistake and install them incorrectly, therefore, even if the car is completely new and water appears in the cabin, the seals should be checked first. The main thing is that the glass and the body are one.
Clogged drainage holes in the bottom may leak water. In this case, it is enough to clean them. Previously, they were made of rubber, but now they are using plastic, which allows water to pass through.
The cause of moisture may also be in the door if it is warped.
It happens that it is poorly adjusted, then, especially during a trip in rainy weather, it is very easy to get water into the cabin through the resulting gaps.
How a windshield is cut
This way you can get to the adhesive layer that holds the glass to the body. To remove the windshield, the layer of glue is literally cut out using a special tool - a string with handles. The most effective tool will be one that has a square cross-section.
The sawing process is performed in a special way. The layer of old hard glue is pierced with any sharp object. One end of the string is inserted into the hole, and the other is pulled into the car interior. Handles are then attached to this tool.
Two people are more effective
One person must be outside and the other person must be inside the vehicle. To effectively cut glass, you need to remember a two-handed saw - this is how you should run a string along the edge of the glass. In this case, it must be pulled at an angle to the cutting site. The second person should move his end of the tool slightly upward - this will not only allow you to safely remove the glass, but also not damage the paintwork of the car body. The glass is cut from below under the hood. Here you should show maximum attention and accuracy so as not to damage the torpedo in the process of sawing the glue.
When the old adhesive layer is cut off along the entire surface of the edges, the window is completely dismantled. You can begin the process of preparatory work on the now free opening. Then, after preparation, the windshield will be replaced on a VAZ 2110 car.
Why does water get under the passenger's carpet?
Water may appear under the rug if the heater leaks, and then moisture will pass through the engine into the cabin.
The air intake of the stove can also bring a lot of trouble, since in order to eliminate constant puddles under your feet, you will have to clean the technical drain holes, which are located in the niche under the hood. Then it will be necessary to carry out additional repair work - seal the joints of the air duct and the body with high-quality sealant. It’s better not to waste money on it so that it lasts a long time.
When moisture constantly appears in the direction where the stove is located, it is advisable to figure out whether it is ordinary water or antifreeze. In this case, a damaged faucet is often to blame, and this can be determined by the steam that appears in the cabin; the antifreeze level sensor will also indicate a breakdown - it will definitely light up. Here are other reasons why puddles may form:
Air conditioning is good to have in the cabin, but it can affect the accumulation of water under the passenger mat. The air conditioner has such a device - a condensate drain pipe, and sometimes it can simply fall out of its place, and then water will begin to get behind the seat trim. The consequences are not noticeable - constant dampness, you have to remove the seat, change the upholstery and seal.
A crack may appear in the fuse box, causing water to appear under the mats. You need to check the pedal from which the cable runs to the motor.
In any case, the leak must be eliminated, otherwise corrosion of the body will begin, which will be difficult to stop.
Preparatory work in the opening
Now that the old broken windshield has been completely removed, you can begin installing a new one in its place. However, the opening must first be prepared. First, it is recommended to remove the old and heavily dried glue that used to hold the glass. If rust has formed under it, it must be removed immediately using sandpaper or any other convenient method. The area that has been stripped to bare metal must be primed. This operation should be performed very carefully. When cleaning glue, experts recommend not removing the entire layer. It will be good if a thin layer remains, which will subsequently help the new composition to better connect to the mounting parts.
After cleaning the glass surface from glue is completed, everything that remains should be very thoroughly degreased. It is also recommended to treat the edge on new glass. After the white spirit has dried, an activator is applied to the grease-free areas. In the future, it will contribute to better adhesion. Before applying the glue, you need to warm it up slightly - then it will become softer and more comfortable. Thus, replacing the windshield on a VAZ 2110 car will be much easier. The glue is packaged in a tube - by lightly pressing the tube, it is applied along the edge of the frame of the car. As for the thickness of the layer, there are no specific recommendations - it all depends on the manufacturer and brand of glue. This is usually indicated in the instructions for the product.
Installation of a new
On VAZ 2110 cars, replacing the windshield can be done using a special tool - these are suction cups, but you can do without them. Before you begin installation work, it is important to remember: it is strictly forbidden to disturb the layer of just applied glue. New glass is laid on any surface so that its outer side faces up. Then the VAZ 2110 windshield seal is replaced: the seal itself, as well as the molding, is very carefully placed on the edge. Usually these parts are replaced, but it happens that these elements are preserved in good condition. Then they can be used with new glass. If the seal adheres to the glass with insufficient density, it can be additionally secured with tape.
Then the glass is turned over and laid so that its inner side is at the top. The edges of the panel are thoroughly degreased using white spirit. Before installing the glass in its place, the edge must dry thoroughly.
Removing the seal
First of all, you need to remove all decorative elements: plastic or metal corners, frames and other decorations. It wouldn't hurt to remove the wipers so they don't interfere. The seal needs to be pryed off in one place with a thin screwdriver. If there is a joint, you need to start there. When you have managed to free about twenty centimeters, you can gently pull with a little force: the seal will come out of the groove on its own, even if it sits very tightly. If a special glue was previously used to fix the rubber on the edge of the glass and in the grooves, the windshield will have to be removed completely.
Advised by professionals
To ensure that the installation process is carried out efficiently and is as convenient as possible for those who perform it, it is recommended to open the hood slightly and lower the front door windows. Hold the bottom of the panel with one hand, and pull it inside the cabin with the other and calmly control the installation process. Then the glass is brought with its lower part onto the frame of the opening and carefully lowered onto the frame with the edges treated with glue. Next, special stops are installed under the lower edge. They will help fix the correct position of the windshield and give it the most symmetrical position. It is also recommended to make sure that the element is installed as level as possible in the vertical and horizontal planes. You can check this by looking at the gaps. If replacing the windshield of a VAZ 2110 with your own hands is done correctly, then they will be the same on all sides. If the glass is positioned correctly, you need to fix its position with tape. You need to pull the glass to the roof of the car. As for the glue, it is important to remember that it dries completely only in 12-15 hours, not earlier. Only after this can you operate the car.
Necessary tool
To ensure that the replacement of the VAZ 2110 windshield goes smoothly, you should get a gluing kit. When purchased through an online store, the TEROSON PU kit will cost approximately 1,150 rubles, but it will quickly pay for itself. Its composition:
- adhesive-sealant 8596;
- cartridge nozzle;
- primer;
- applicator;
- surface cleaning cloth;
- cutting string;
- instructions for use.
In addition, you need to have other devices on hand:
- a set of flat screwdrivers and spatulas;
- several stationery knives;
- solvent for nitro paint;
- new consumable.
With an assistant, changing a part is easier and faster.
Price is not a guarantee of quality! But you shouldn’t take the cheapest materials either: fakes are not uncommon.
Types of damage
The structure of the windshield is triplex - an impact-resistant material in which there are two layers of glass and a thin film in the middle. This allows the spare part not to crumble upon impact.
Masters divide damage into two types:
- Chips. Only the top layer was damaged. No immediate replacement is needed.
- Cracks. In this case, supply new material as quickly as possible. The film holds the fragments, but not as firmly as before, and in case of potholes, which are not uncommon on our roads, they will fly apart. This will lead to an accident.
If you can’t change it soon, you can resort to several tricks:
- Make perpendicular cuts along the edges of the “web”.
- Drill holes with a diameter of 5 mm along the edges of the crack.
- “Brew” the damage.
All measures will give a temporary effect, and the spare part will still need to be replaced.
How to remove and install
We have everything we need, we can get to work. We remove everything unnecessary: wipers, trims, etc. Accessories will interfere with the dismantling of damaged material.
Windshield
We start removing the windshield from the top. From any angle, carefully squeeze it out along with the rubber bands. From inside the passenger compartment we pry up the seal with a screwdriver - this makes it easier to dismantle the front glass on the VAZ 2110.
We work with gloves! If the glass shatters, you will need to remove the shards manually. Take precautions!
We clean the grooves from dirt and small fragments. We put a rubber seal on the new glass. If it has dried out and cracked in places, it is better to buy another one.
Removing old glass
Before removing the old windshield from your VAZ, you need to dismantle the mechanisms that interfere with this:
- Remove the frills and wipers so that they do not bother you.
- Remove the plugs and glass fasteners.
- Find two nuts near the ventilation grille and unscrew them.
- Start removing the rubber seal from the engine compartment. Do this carefully. Remove the screws that hold the sound insulation and windshield seal.
- There is a lock in the center of the seal - your task is to pull out the rubber so that it remains in place.
- Under the frill there is a washer hose and a clamp. You need to cut the hose in an inconspicuous place, and then you will mark the adapter there.
- Now you can completely remove the seal, because nothing is holding it in place.
- All that remains is to remove the decorative molding and the glass is ready to be removed.
It is best to dismantle the glass with a partner who will sit in the cabin. You should not knock it out, even if it is almost completely covered with cracks. It's best to use it in a safe way. Remove the handle from the string and push one of its ends into the interior (to do this, use any suitable gap).
You should cut the glass, placing the string at an angle to it. The person on the outside will guide the cutting string, and the person on the inside will pull it through with rhythmic movements. To do this, you need to install handles on the string. Once you have gone all the way around the glass, work with an assistant to carefully pull it out. If you handle the edge, wear thick gloves.
Direct replacement begins with preparing the seat and the glass itself. For this:
- Remove most of the old adhesive, leaving only a thin and rough layer of it for better adhesion of the installation agent.
- Inspect the frame. If you notice traces of rust on it, you will need to remove it and apply a primer to the cleaned area.
- The edge of the new glass and the seat must be degreased. After this, you can apply the activator.
The glass itself must also be prepared before installation: wipe off dust, degrease, and clean its edge with fine-grained sandpaper. You have to install the molding, and if it does not fit tightly, secure it with tape. Mark along the entire length of the molding the places where the glue will be applied.
Door seals VAZ 2110
When developing domestic cars, due attention was not paid to their comfort; extraneous sounds are often heard in the cabin and moisture leaks are possible during precipitation. By replacing the door seals of the VAZ 2110 and slightly modifying them, you can achieve better sound insulation performance. Serial rubber products intended for sealing the interior, as a rule, are not of high quality. Often the problem arises not only with the double-circuit seals of the doors themselves, but also of the lowered side windows. This is due to the low quality of polymer materials and rubber from which these elements are made. Errors during their installation on the conveyor, as well as deformation during prolonged and intensive use, are also possible. The work of restoring the tightness of the interior is simple and will not require much time even for an untrained worker.
Some information about the design of the body as a whole and the doors of the VAZ 2110
Unlike previous models of the Volzhsky car, there is no drain protruding above the doors. This makes the car more attractive and modern, but raises a number of problems associated with the need for better insulation of the interior volume from external adverse influences.
Implementation of a set of measures to restore the tightness of doors
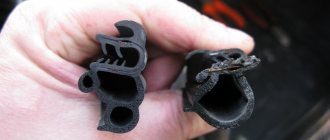
As experience in operating machines of the “tenth” series shows, the rubber elements used are not very reliable and require additional refinement. The official repair instructions provide for the replacement of these parts when deformations and damage occur. Most often, such phenomena are observed in the lower part at the threshold. To perform the operations you will need the following spare parts, tools and accessories:
- three-chamber seal with a fixing insert made of steel strip,
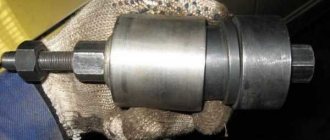
- disposable pistons for fixing elements,
- silicone or polyurethane tube with a diameter of 8 mm,
- screwdriver with flat and figured slots,
- shaped self-adhesive profile gasket.
You can purchase everything you need at any automotive spare parts store; nowadays you can choose between products from different companies. Seals are mainly sold by the meter or in ready-made kits. Before going to the store, you should measure the length of the openings of the front and rear doors of the car, and buy the required quantity.
Replacing the sealing element on a VAZ 2110
Preparation for interior sealing work
The front and rear doors of the VAZ 2110 have a similar design of the points of contact with the openings and, for the purpose of unification, they use the same sealing rubber profiles. Before starting repair work, you should prepare all the necessary materials and accessories . The order of preparatory operations is as follows:
- We clean the doorway from dirt, especially in its lower part; this can be done using water and detergent or dry using a stiff polymer brush.
- Using a flat-head screwdriver, remove the plastic facing panel from the threshold; perform this action carefully so as not to accidentally break the fastening caps.
- We dismantle the old seal, simply removing it from its expired place using improvised means.
- We repeat the operation to remove dirt and debris, which invariably accumulates in hidden cavities during intensive use of the machine.
- The shaped side sealing element is glued, and it should be removed as carefully as possible without damaging the paint layer.
- Degreasing of expired areas is carried out using special solvents that do not harm coatings.
The working surfaces are prepared, and you can begin to perform the basic operations of installing the seal. These are fairly simple actions, but they also require a certain skill. If you are not confident in your abilities, then you can entrust their implementation to professional craftsmen. You can watch the video and try to do the work shown on your own.
Installation of sealing elements
First of all, you need to perform a few simple steps to modify the standard seal. As already mentioned, factory parts have a short lifespan and quickly deform. Introduction of an additional shock-absorbing part into the cavity. The sequence of work is as follows:
- Using a tape measure, measure the length of the seat and cut off the required amount of seal with a small margin.
- We insert a polymer tube inside along the entire length without tension and also cut off the excess. This element will give greater elasticity to the structure.
- We begin to put the seal on the edge from the starting point, which should be located 25-35 cm from the bottom of the threshold. Installation can be carried out either clockwise or in the opposite direction.
- We push the figured profile down using a wooden or rubber hammer until it stops. Having walked around the entire circle, we will see that part of the seal turns out to be redundant.
- We cut off the unnecessary remainder so that the joint is without a gap and at the same time causes deformation of the adjacent areas.
- We install the piston in place and mount the plastic lining in place.
- The second contour is glued along the edge of the door. We carry out this action with all possible care so as not to have any peeling or irregularities in shape.
The installation is completed and if it is done correctly, then when the doors are closed, a change in the nature of the sound is noted, it becomes more dull. In addition, metallic knocking in locks and aerodynamic noise when driving at high speeds disappear.
Advice: As practice shows, VAZ spare parts with such an improvement provide reliable sealing of the interior.