Repair of Contactless Distributor VAZ 2107
Repair of distributor for VAZ 2101-VAZ 2107
Welcome! The tram is an integral part of the car, even if you remove the cover, the car simply will not start, so this unit is definitely needed on the car’s carburetor, although it has already abandoned the injection and crankshaft systems, and instead used a position sensor, in this case the car also breaks down won't start.
The note! To repair this device, take: a set of wrenches, also two types of screwdrivers, a set of flat probes, which you still buy at the auto store, or you need to purchase probes for 0.35, 0.40, 0.45, you will have you need them, another hammer and one compression mandrel and take one out to attach the distributor bearings, and grab the pliers (if you have them)!
Result:
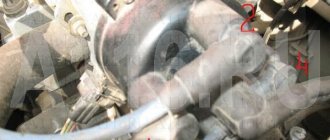
Where is the distributor located? It is located in the engine department, if you open the hood of the car and look to the left towards the car, you will immediately find this block, 5 more high-voltage wires are connected to it (more precisely, to its cover)), see. Photo to obtain additional information about the location of the distributor at the bottom, on which it is indicated by an arrow.
When do I need to have my distributor repaired? In general, this block contains a huge number of things, such as a vacuum regulator, a centrifugal regulator and almost everything else about how these parts were aggravated or not, we wrote in this article for us, and you will find all this as you read and previously things, for example, should go wrong on the distributor if the car starts to stomp, in other words, it accelerates too much, locks up, and friction and detonation, among other things, can still be the result of incorrect ignition timing (which is detonation) and how to adjust the ignition time, you will find in the article: “Adjusting the ignition on a VAZ”), apart from the full power, the engine will not develop, but accordingly, it will be difficult to start the engine, because these are the main tasks of the distributor, of course, there is a turn, it does the main task of distributing the ignition for each spark plug, so that if something happens to it, the engine is already starting to fail.
The note! In addition to these problems that happen to the car, there are some that we have not indicated, but the engine itself can overheat, this can still happen if one of the regulators (there are only two regulators, centrifugal and vacuum) does not respond; the engine will still consume more fuel, and the detonation will look great, and the power will decrease accordingly, checking the operation of these 2 regulators is either not entirely simple, but a special device called a strobe will be useful for you, so that it will be easier for you to check it so that you cannot take it (if you don’t have one) specifically before the arrival of service centers, ask them to pay for their installation for you, if you are unlikely to give up! (To find out how to check the malfunction of these 2 regulators, read the article: “Checking ignition timing using a strobe light”, you will definitely study this article inside and out, it simply outlines what common problems can be caused by a faulty ignition and explains what errors should go wrong)
How to repair a distributor on a VAZ 2101-VAZ 2107?
The note! We will describe the repair process on the ignition timer, but do not touch the contactless timer (we will also call it a distributor, because it is the same), because it lasts a long time, and secondly, if something goes wrong with In all this, either the room sensor is impractical, or the distributor cap is broken, or the rotor is calling the rotor, and the vacuum regulator, in fact, will no longer break, but in the shaking of the contacts, the contacts are constantly oxidized (especially if your machine is constantly outside or in an unheated garage, in which the bull is very bad) because of this you will have to disassemble and clean it (the contacts can be cleaned using an ordinary school bandage, some of which are also sandpaper, they are called clean contacts, but we do not recommend this to you because it spoils them and leaves a mess, well, you can still use the file, and, by the way, it is completely suitable for everyone)!
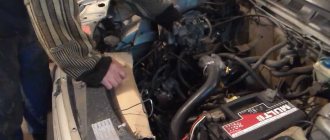
Dismantling: 1) First, remove the unit itself from the machine and be sure to prepare the space where you will work, there should not be dirt and especially water in it, if it comes into contact, they will simply become unusable, and then the removal process will be To obtain the most For detailed information, contact your distributor in the article entitled “Replacing a car’s ignition distributor.”
2) Now that you have removed the distributor, to do this, remove the top cover; two side clamps that connect it (lift the screwdriver with a screwdriver, they are not constantly turned off by hand), after disconnecting, look at the contacts (there are only four of them, to visualize several arrows in a small photo) they should not oxidize, and they should be of a narrow color, and By the way, check the central core, click on it a couple of times, it should not break and should go carefully without any jam, that's the blue arrow in the small set of photos.
The note! In addition, the lid itself does not have to be cracked, it must be undamaged, in other words, not have any hollows or dents, besides, for clarity, the lid from a completely different machine is shown a little lower, but there is a line below, look at its contacts , these contacts are oxidized, so you can already understand what it looks like, they can be lubricated with a file (about 10-15 minutes) and it will start working again, or you can just go to the extreme one if the contacts are no longer cleaned!
Source: vivauto.ru
Octane corrector
It's no secret that the gasoline we buy at gas stations often does not meet the standards provided by the car manufacturer for normal engine operation. As a result of using such fuel, clogging of the fuel system, an increase in the amount of deposits on piston parts, and a decrease in engine performance may occur. But the most dangerous thing for the power unit is detonation, which occurs due to the use of low-octane gasoline.
In cars with an electronic control system, detonation is eliminated using a special sensor and control unit. Such elements are found in injection “sevens”. The computer receives the signal from the sensor, processes it and automatically adjusts the ignition timing, increasing or decreasing it. The carburetor VAZ 2107 does not have such equipment. Drivers have to do this manually, turning the distributor in the manner described above.
The electronic unit is installed in the engine compartment
But there is a special electronic device that makes it possible not to adjust the ignition angle after each refueling. It's called an octane corrector. The device consists of two parts: an electronic unit, which is installed in the engine compartment, and a control panel located in the car interior.
The panel is installed inside the car, in a convenient and easily accessible place
Noticing that the piston fingers begin to “ring”, the driver turns the knob on the control panel of the device, making the ignition later or earlier. Such a device costs approximately 200–400 rubles.
The “seven” distributor is indeed a complex device, but if you understand the design and operating principle, you can easily maintain, repair and adjust it yourself.
Distributor diagram and principle of its operation
On all VAZ cars, the distributor has the same design and operating mechanism. Thus, our VAZ 2107 is no exception.
The main principle of its operation is the connection between the distributor and the crankshaft or simply the crankshaft. As the piston of the first cylinder reaches top dead center (or TDC for short), the contacts in the breaker open. That is why voltage arises in the coil, transmitted through the slider of the cover, which the distributor has, to the spark plug of the first cylinder. Meanwhile, combustion of the fuel-air mixture begins, and the rotation of the crankshaft “turns on” the breaker cam. It also starts to spin. The same thing happens with another cylinder and spark plug.
Applicability
|
Required spare parts and tools
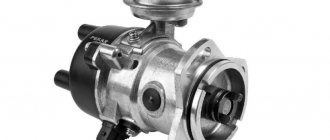
It goes without saying that at first you need to purchase a “contactless ignition kit” for the VAZ 2107. When purchasing it, it is very important to know what the size of the engine is and its brand. Remember this and do not believe careless traders who assure you that this data does not matter at all. The cost of such a set ranges from 2-3 thousand rubles.
You will also need a set of high-voltage wires and four spark plugs (they must have DVRM written on them).
The tools you will need are a couple of screws, a set of wrenches, drills, and various screwdrivers.
Typical faults
The ignition breaker on the VAZ 2107 may need repair as a result of mechanical damage, wear of structural elements, and also due to moisture getting inside the device.
Distributor repair occurs when:
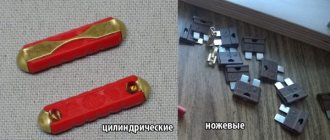
- the appearance of cracks and other damage on the cover of the device, usually the contacts burn out in this part of the structure;
- breakage of the runner;
- failure of the Hall sensor;
- wear of shaft bearing parts;
- broken contact of the regulator;
- broken diaphragm of the vacuum regulator.
Removing the replacement part
Be sure to remove the terminal from the battery! After this, we disconnect the various wiring from the coil, the main high-voltage wire. Now we remove the cap from the distributor.
You need to try to set the slider so that it is at an angle of 90 degrees towards the engine.
Draw a mark in advance (most conveniently on the cylinder block) so that you screw the new part to its original position.
We unscrew the nuts from the old distributor and remove it.
We install the latest spare parts
We disconnect the cap from the new distributor, set the slider at an angle of 90 degrees, and only later begin installing the part.
Now we match the marks and tighten the distributor.
Having attached the cover, we connect the spark plug wires and the main wire of the ignition coil itself.
After this we begin to change the ignition coil. Remove every single wiring from the old spare part, unscrew the bolts, dismantle it.
We connect the wiring (including high-voltage) from the distributor to the spark plugs to the new spare part.
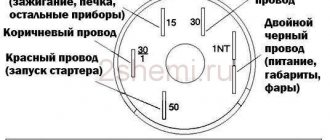
We will connect two coffee-colored wires to the first contact, usually designated “K,” and two blue wires to the other (contact “B”).
A connector with 3 contacts must be inserted into an empty socket that has a distributor.
To install the switch, you will need to make a couple of holes and attach it with screws. We recommend placing it next to the washer barrel and the left headlight.
Let's plug the most basic connector into the switch, twist the wires into a bundle, and attach them side by side so that they don't interfere.
After these steps, you will be able to relax and start the VAZ 2107 car and hit the road.
Source: 7vaz.ru
Switch
The commutator is necessary to create an electrical impulse by interrupting the constant supply of current from the battery to the primary winding of the coil. The BSZ VAZ 2107 uses a switching device of type 3620.3734. The working elements in it are ordinary bipolar transistors, which open the circuit when a signal is received from the Hall sensor.
Switch 3620.3734 is built according to a simple single-wire circuit, in which the device body is connected to the vehicle ground and, accordingly, to the negative terminal of the battery. The advantages of using this unit instead of a traditional breaker include:
- no need for maintenance or adjustment;
- high spark energy, which makes it easier to start the engine in the cold season, as well as the ability to use gasoline with a lower octane number;
- the presence of a stabilization system that protects the Hall sensor from voltage surges.
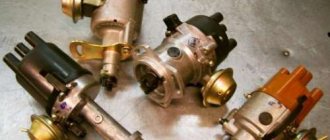
Ignition distributor VAZ “classic” - disassembly and repair
Despite the increased reliability of contactless ignition systems on cars of the traditional AvtoVAZ line, and specifically those favorite, until recently, models such as the VAZ 2106, VAZ 2107, etc., time takes its toll and sooner or later the moment comes when such a fundamental unit as a distributor starts pick and choose. Obviously, you can go with the more conventional method and simply replace the failed part with the newest one. In general, practice shows that if you try and spend a little free time and apply a certain skill, you can almost always return the distributor to working capacity and force it to work for more than one year.
In general, repairing a VAZ 2107 (VAZ 2106) distributor consists of partially disassembling the unit and replacing its individual parts that have worn out during use.
To perform disassembly operations you will need: wrenches (7, 10 and 13), flat and Phillips screwdrivers, tweezers, a set of feeler gauges and additional equipment that allows you to press out and press in bearings.
The disassembly procedure itself is carried out in the following sequence:
- The screws holding the rotor to the distribution plate are unscrewed, after which the rotor is removed;
- After removing the rotor, you need to carefully mark all the weights and springs of the centrifugal regulator so that nothing is confused during the assembly process. At the end of the marking process, carefully remove the springs by slightly prying them with a screwdriver;
- Next, by unscrewing the fastening nut, the wires of the ignition coil and capacitor are disconnected;
- After removing the corresponding fastening screw, the capacitor is disconnected from the distributor body;
- In the next step, the contact group is dismantled by unscrewing two mounting screws. When disassembling the contact group itself, the locking and insulating washers are removed, as well as the movable contact mounted on the axis;
- By prying the rod with a screwdriver, the lock washer of the vacuum ignition timing regulator is removed from the axis of the ignition distributor plate, after which it becomes possible to remove the vacuum regulator itself (after unscrewing the fastening screws);
- Having secured the distributor in a bench vice, press the pin holding the oil-holding clutch out of the distributor shaft. The coupling is removed together with the washer, then the roller is disconnected from the distributor body;
- At the end of the disassembly process, the movable plate (along with the bearing) is dismantled. It is most convenient to remove locking plates with washers using tweezers.
The basis of distributor repair is the inspection and defectiveness of its individual parts with the replacement of worn parts with new ones.
For the most effective control, you need to have a combined multimeter with the ability to measure capacitance on hand. Namely, first, you should check the condition of the capacitor, the capacitance of which must be in the range from 0.2 to 0.25 μF. However, if the distributor has a fairly long service life, then, for prevention, it is recommended to change the capacitor in any case. Moreover, it costs a penny...
It is imperative to carry out an external inspection of the distributor shaft. Its surface should not have traces of excess wear. If there are obvious flaws, the roller is replaced with a new one.
To check the integrity of the vacuum regulator diaphragm, press the rod and plug the fitting. If the diaphragm is in good condition, the rod remains pressed.
Particular attention is paid to the condition of the contacts, which should be smooth, without burrs and without traces of scorching. It is possible to clean the contacts using a needle file (it is not recommended to use sandpaper). After cleaning, the contacts are carefully washed with gasoline or alcohol.
If damage and play are detected, the bearing and bushing in the distributor housing are also changed. To perform pressing and pressing, use a tool for mandrel of the appropriate diameter.
After replacing parts that have exhausted their service life, the distributor is assembled in the reverse order, with the newest lubricant applied to the bearing assembly and the shaft spline.
Upon completion of assembly, the gap of the breaker contacts is adjusted.
Source: www.elektrik-avto.ru
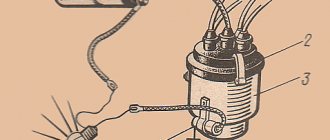
↑ Ignition distributor 0.3706
1 — ignition distributor roller; 2 — wire for supplying current to the ignition distributor; 3 — cover fastening latch; 4 — vacuum regulator housing; 5 - diaphragm; 6 — vacuum regulator cover; 7 — vacuum regulator rod; 8 — pipe for the vacuum hose from the carburetor; 9 — lubricating wick (filt) of the cam; 10 — support (driven) plate of the ignition timing regulator; 11 — ignition distributor rotor; 12 — side electrode with a terminal for the wire to the spark plug; 13 — ignition distributor cover; 14 — central terminal for the wire from the ignition coil; 15 — central carbon electrode with a spring; 16 — central contact of the rotor; 17 - resistor for suppressing radio interference; 18 — external contact of the rotor; 19 — driving plate of the centrifugal regulator; 20 — weight of the centrifugal ignition timing regulator; 21 — lever axis; 22 — breaker cam; 23 — breaker lever; 24 — stand with breaker contacts; 25 — breaker contacts; 26 — movable plate of the breaker; 27 - capacitor; 28 — ignition distributor housing; 29 — roller oil deflector clutch; 30 — bearing lock plate; 31 — bearing of the movable plate of the breaker; 32 — oiler body; 33 — screws for fastening the rack with breaker contacts; 34 — terminal clamp screw; a — groove for distinguishing ignition distributors 30.3706; b - groove for moving the stand with contacts Fig. 8–22. Ignition distributor 0.3706: 1 — ignition distributor shaft; 2 — wire for supplying current to the ignition distributor; 3 — cover fastening latch; 4 — vacuum regulator housing; 5 - diaphragm; 6 — vacuum regulator cover; 7 — vacuum regulator rod; 8 — pipe for the vacuum hose from the carburetor; 9 — lubricating wick (filt) of the cam; 10 — support (driven) plate of the ignition timing regulator; 11 — ignition distributor rotor; 12 — side electrode with a terminal for the wire to the spark plug; 13 — ignition distributor cover; 14 — central terminal for the wire from the ignition coil; 15 — central carbon electrode with a spring; 16 — central contact of the rotor; 17 - resistor for suppressing radio interference; 18 — external contact of the rotor; 19 — driving plate of the centrifugal regulator; 20 — weight of the centrifugal ignition timing regulator; 21 — lever axis; 22 — breaker cam; 23 — breaker lever; 24 — stand with breaker contacts; 25 — breaker contacts; 26 — movable plate of the breaker; 27 - capacitor; 28 — ignition distributor housing; 29 — roller oil deflector clutch; 30 — bearing lock plate; 31 — bearing of the movable plate of the breaker; 32 — oiler body; 33 — screws for fastening the rack with breaker contacts; 34 — terminal clamp screw; a — groove for distinguishing ignition distributors 30.3706; b - groove for moving the stand with contacts
Adjustment how to set
It is recommended to use a special tool - a strobe light - to adjust contactless ignition. But if it is not there, you can use the following method.
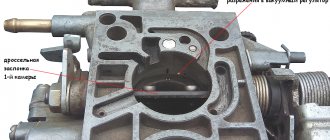
- We set the distributor slider: unscrew the first spark plug, plug the hole with a finger and turn the crankshaft pulley. If air begins to press on your finger, it means you are on the compression stroke. At this moment, position the distributor so that the slider faces the first cylinder.
- Seize the moment of ignition. To do this, connect the central wire from the coil to the spark plug and short it to ground. Turn the distributor against the movement of the slider until the spark jumps from the spark plug. This point should be in the area where the slider interacts with the first cylinder.
- Set the ignition timing completely: with a warm car in second gear, give the gas sharply to the floor. When detonation is heard, set it later, if not, then set it earlier.
Setup video
Contactless ignition uses two important devices - a switch and a Hall sensor. The distributor and sensor must be compatible with each other. The new ignition coil must be an oil-filled type. It is better to take the wires for connecting the system from Niva.
In my free time, I read a lot, play airsoft (a team military sports game) and amateur radio communications. Lots of professional connections. My strengths: communication skills, endurance, responsibility.
↑ Procedure for checking the gap
The gap between the contacts of the breaker must be inspected in the following order.
- Place the gear shift lever in neutral and apply the parking brake.
- Remove the cover from the ignition distributor and, by rotating the crankshaft, set the breaker cam to a position in which the breaker contacts are very open.
- Check the gap size with a feeler gauge; if it goes beyond the boundaries of 0.35–0.45 mm, then loosen screws 33, insert the blade of a screwdriver into groove “b” and turn the breaker stand to a suitable amount.
- After adjustment, tighten screws 33 until they stop.
Source: ovaze.ru