Tool:
- Medium Phillips screwdriver
- Medium flat screwdriver
- Driver for socket attachment
- Extension for socket bits
- Knob attachment 10 mm
1. We disconnect the engine control system wiring harness block from the mass air flow sensor and, loosening the clamp with a Phillips screwdriver, remove the air supply hose to the throttle assembly from the sensor branch pipe.
2. After unscrewing the screws securing the cover, remove the cover with the replaceable element, as described here.
3. We remove the solenoid valve for purge the adsorber by sliding it up the bracket on the air filter housing.
4. Using a screwdriver, squeeze the petals of the steam exhaust hose holder and disconnect it from the air filter housing bracket.
5. Using a 10mm socket with an extension, unscrew the nut securing the air intake to the radiator bracket.
6. Using a wrench or a 10mm socket, unscrew the bolts securing the two brackets for the rubber supports of the air filter housing to the upper cross member of the radiator frame.
7. We remove the third rubber support of the filter housing from the bracket slot on the battery platform.
8. Remove the air filter housing.
9. Install the air filter in reverse order.
The article is missing:
- Photo of the instrument
- High-quality photos of repairs
Hello everyone, today we’ll talk about how to remove the air filter along with the housing and, if necessary, replace it, Lada Kalina car.
So, first, let's figure it out, why does it need to be removed? After all, it would seem that you don’t need to do this to replace the air filter. My answer is that in most cases, when repairing a car under the hood, you will have to remove the air filter, and you will learn how to do this below. To work, we only need a Phillips screwdriver to loosen the clamps.
So, let's start first of all, you need to open the hood, after which in the engine compartment we find a black filter housing, it is located near the battery, or slightly to the left of the expansion tank.
Removing the air filter with the body of Lada Kalina
Hello everyone, today we’ll talk about how to remove the air filter along with the housing and, if necessary, replace it, Lada Kalina car.
So, first, let's figure it out, why does it need to be removed? After all, it would seem that you don’t need to do this to replace the air filter. My answer is that in most cases, when repairing a car under the hood, you will have to remove the air filter, and you will learn how to do this below. To work, we only need a Phillips screwdriver to loosen the clamps.
So, let's start first of all, you need to open the hood, after which in the engine compartment we find a black filter housing, it is located near the battery, or slightly to the left of the expansion tank.
First of all, we need to disconnect the mass air flow sensor.
Now unscrew the clamp screw that secures the pipe fitting to the body.
Next, we remove the adsorber from the body; to do this, pull it up and remove it from its seat; there are no other fasteners there.
We unscrew the nut that secures the air intake, it is located at the top near the radiator. Next, carefully remove them from the cushions and disconnect the expansion tank hose from below; I think it won’t cause any problems. Well, that seems to be all, put it back together in reverse order, don’t forget to connect the mass air flow sensor.
How to change the cabin filter on a Grant
Praise to AvtoVAZ - changing the interior is relatively easy and the same on Grant and Kalina. Changes from the street in the engine compartment
– dismantling of complex elements is not required.
Required
for all work:
- Torx key T-20;
- Crosshead screwdriver;
- New filter.
All you need for the job: a star wrench, a Phillips screwdriver and a replacement filter.
Step-by-step filter replacement
To work, you will have to remove part of the decorative apron at the base of the windshield. To do this, raise the wipers to a vertical position.
To raise the wipers, turn on the ignition and start the wipers. As soon as they reach a vertical position, turn off the ignition. Now access to the apron is free.
Step 1: Raise the windshield wiper to a vertical position. Step 2: remove the plastic trim from the right wiper.
We gained access to the filter casing - use a Phillips screwdriver to unscrew the 2 screws securing the cover
. Let's take it off.
Remember the order in which you removed the cover. It is inconvenient to place it - it is better to know exactly which edge to place first.
Step 3: Remove the filter housing. We get access to the element itself.
Last thing
– bending the fastening latches, remove the filter
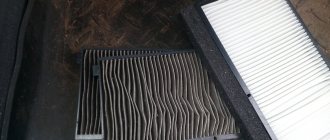
. If there are leaves and debris underneath, you can vacuum or blow out the seat.
You can buy a new filter without a mounting frame. In this case, remove the old filter from its frame and use it to install the new one.
Step 4: replace the old part with a new one. If the new filter is in the frame, just put it in place. Otherwise, we use the frame from the old element.
Reassemble in reverse order
- 2 fastening latches;
- 2 self-tapping screws in the casing;
- 5 screws in a plastic cover.
Features of replacement for Grant standard, 8 valves without air conditioning
On a number of Grants, the standard configuration does not have a filter from the factory.
. Regardless of body type: sedan or liftback. What to do with such cars?
Just install the filter according to our instructions. There is simply no filter in the car - there is a place for it and access to it is the same.
In relation to the cabin, the air conditioner affects only one way: after a long period of use, the air conditioner will begin to blow poorly.
Replacing the air filter housing on Kalina
Welcome! Despite the fact that the car can drive without an air filter, it is one of the important engine systems. In its absence, all the debris and dust from the environment will fall into the engine and spoil it. The filter performs the function of air purification, extending the service life of the engine. Removing the housing with the filter will increase the car's power by about 3-5%, but this is practically not noticeable and is not worth it.
Note! To replace the air filter housing, you will need the following tools: screwdriver, wrench, pliers (a knife or thin flat-head screwdriver will do instead).
Location of the building
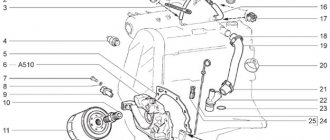
We open the hood, look for the engine, and a long hose comes from it, thanks to which the engine receives air. Let's look at this process in more detail.
Air enters the engine from the environment; it is necessary for the combustion of gasoline, and therefore for the operation of the car as a whole. The air enters the air intake located at the very bottom of the air filter (indicated in red). When driving through deep puddles, you need to be careful: water entering the filter pipe leads to water hammer - when it hits the hot engine cylinders, it cools the engine sharply, leading to cracks and damage to parts. Large amounts of water cause deformation of the pistons. The consequence of water hammer, as a rule, is a major engine repair (a very expensive service, so be careful when driving and take care of your car).
Why and when to change the air filter
To form a fuel mixture with the correct composition, clean air will flow into the combustion chamber. The operating conditions of modern cars are far from ideal. There is a lot of dust in the air, there are combustion products, midges, pieces of leaves, and other debris. It gets inside the chamber, clogs the fuel system, and negatively affects the engine. For this reason, timely and adequate cleaning is important. The filtration element is responsible for it.
In Kalina, removing the air filter housing is simple and quick; there are no problems with doing the work yourself - many drivers do it themselves. At a service station, the cost of the procedure starts from 1000 rubles, so there will be adequate savings.
The driver should know the symptoms of a blockage. In this case, he will be able to quickly take action. The following symptoms indicate a poor condition of the node:
- Fuel consumption has increased - a dirty filter does not allow air to pass through well, so the car begins to consume more fuel to perform standard operations. If the blockage is severe, about 3 liters per 100 km are added.
- The thrust disappeared and detonation increased - also a characteristic sign of a clogged filter.
- There were problems starting the engine, it starts, but not the first time, it just changed its behavior. Engine power usually drops.
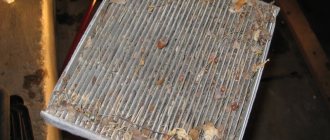
If you do nothing, difficulties will arise with the electronics, spark plugs, and the “Check Engine” error will appear. The only way to ensure the necessary conditions for durability and adequate operation of the element is to replace it in a timely manner. Cleaning and blowing are pointless because they do not solve the problem. The filtration element has the form of a plastic housing, inside of which a filtration unit is placed. A paper insert with large pores is needed to purify the air. Dirt gets clogged into the pores, preventing normal air exchange.
Blowdowns are used only as an improvised way to restore the performance of a part. In the long term they are useless, moreover, cleaning can disrupt the pore structure, and the element will perform even worse than before.
Replacement for VAZ 1117-1119
Note! This procedure will require interaction with electronics, we recommend that you remove the negative terminal from the battery! (For more details, see the article: “Replacing the battery in a car”, point 1)
Removal
- First, disconnect the Mass Air Flow Sensor (indicated by the blue arrow) from the housing (indicated by the red arrow) by pressing the mounting latch from below and pulling it out.
- Using a screwdriver, slightly loosen the fastening screw of the air supply pipe on the filter housing, then disconnect the pipe and move it aside so that it does not interfere with removal.
- Carefully inspect the new filter, is there a mass air flow sensor housing on it? If not, then use a wrench to unscrew the two mounting bolts (photo 1), remove it and the gasket behind it from the filter housing (photo 2).
- Then look under the TV - the front of the car, where the headlights, radiator grille, etc. are located. Find the nut that secures the filter housing to the radiator frame and unscrew it completely with a wrench (photo 1). Now remove the two top housing bolts (Photo 2). Find the bracket on the battery holding bar; it includes a rubber filter support (photo 3, red arrow), and remove it. The case no longer holds anything - remove it (photo 4).
Installation
Proceed in the reverse order of removal. Important point! Most cases are sold empty in auto stores, which means you need to remove all the parts from the old one and replace them with the new one:
- pull the pipe against the force of the clamps;
- disconnect it from the body as shown in the first picture;
- Using pliers, remove the rubber supports along with the brackets (photo 2): grab the ends, pull them out and install them on the new body.
Note! Lubricating the rubber bearings with engine oil will make the installation process easier!
When is it necessary to replace the Lada Kalina air filter?
The manufacturer's instructions for Kalina indicate that the filter we are interested in needs to be changed after the car has “run” 30 thousand kilometers. A driver who cares about the technical condition of his car pays little attention to this advice, preferring to change the filter much more often.
Experts recommend performing this procedure every time the oil is changed or the vehicle undergoes a technical inspection.
According to reviews from Kalina owners, the installation of a new air filter is required for their “iron horse” after 13–15 kilometers. However, if you drive your car exclusively on well-maintained city roads, the replacement can be carried out exactly within the time frame (30 thousand kilometers) set by AvtoVAZ. In other cases, the new element should be installed much earlier.
Considering that the operation of dismantling the old filter and installing a new one is easily carried out in a private garage, I think it is better to take care of your car and your safety while driving by replacing the failed element as necessary. The vehicle will respond to such care to the driver with long-term and trouble-free operation.
In what cases is replacement necessary?
For a car, especially with an injector, it is very important what condition the air filter is in. For high-quality operation of an internal combustion engine, a large volume of air is required, much larger than fuel, which is taken from the environment. The purpose of the filter element is to clean this air from these contaminants, because the quality of the air-fuel mixture depends on its purity.
The filter is a filter paper folded into an accordion to increase the filtering surface. During operation, the pores of the filter become clogged, which reduces its throughput and deteriorates the quality of the air that comes from the environment. The air filter also acts as a device that reduces noise during air intake, as well as a thermostat. This is especially true in winter; the incoming air, passing through the filter element, heats up, so the temperature difference will not be so noticeable.
The following factors influence the frequency of replacement:
- quality of road surface;
- quality of the filter element;
- terms of Use.
According to manufacturers' recommendations, the filter material should be changed at least after 30 thousand kilometers or after a visual inspection if it is heavily contaminated.
If the car is operated on unpaved roads or in a metropolis with polluted air, the air filter must be changed after 15 thousand kilometers.
Some advice from professionals
The following symptoms indicate that your car's air filter is dirty and requires immediate replacement:
- reduction of vehicle dynamics;
- difficult starting;
- a noticeable increase in fuel consumption.
If you begin to notice these phenomena, check the filter and change it. All the described symptoms will disappear without a trace. And further. When you install the new filter, very carefully insert the rubber seal, which is located on the housing itself. Then tighten the bolts and enjoy the high-quality operation of the car’s engine over the next 10–12 thousand kilometers.
Do regular maintenance - help the engine!
Of course, this applies primarily to stable oil changes after a certain period of time and replacement of all kinds of filters according to the mileage of the car. And today we will talk about such a device, without which the work of the entire engine would be difficult. Of course, we will talk about the air filter.
What is an air filter for?
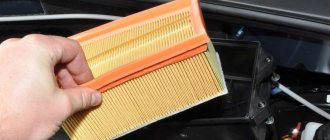
This filter is no longer helpful to you.
The engine air filter serves for timely air purification, as well as the formation of a fuel mixture in the engine. According to statistics, for every 100 kilometers driven, a car is capable of consuming from 11 to 16 cubic meters of atmospheric air, which undoubtedly contains particles of dust and dirt. And if there was no air filter in the car, then premature repair of the engine would be guaranteed.
Video of replacing the air filter on Lada Kalina
Replacing the air filter yourself
The entire operation of replacing the air filter on a Lada Kalina is not complicated; even the most unprepared car enthusiast can perform it.
Tool for the job
- Crosshead screwdriver.
- Vacuum cleaner or rag.
- New air filter.
Where is the air filter located?
The air filter is located inside the housing, which is marked with an arrow.
The air filter on Lada Kalina cars is located under the hood on the right side in a special housing, which usually indicates the filter element code 1118-1109010 , as well as a periodic replacement interval of 30,000 kilometers.
Replacing the air filter Lada Kalina
In the engine life support system, the air filter plays an important role in air purification. Air participates in the formation of the fuel mixture. The Lada Kalina air filter must be replaced in a timely manner.
Air filter for LADA KALINA and Lada Priora.
If you want to save money and replace it with a Lada Kalina (VAZ 1118) yourself, you should use the instructions. Any non-professional person can carry out a number of replacement actions without a service station.
Replacement instructions
- Disconnect the mass air flow sensor: remove the terminals from it. In Kalina it is located under the hood. Take the wires to the side and secure.
- Unscrew the 4 filter housing screws.
- Open the lid with force.
- Remove the worn filter element, first remembering the position of the arrow on it. The direction of the filter bellows must coincide with the direction of the arrow.
- Use a vacuum cleaner to move around the area where the filter is installed and wipe off the dust.
- Insert a new filter, aligning the marked arrow with the direction of incoming air - with the ribs towards the nose.
- Adjust the rubber seal in the filter element housing.
- Close the air filter and tighten the 4 cover screws without moving them.
- Return the terminals to their place.
Removing and replacing the Lada Kalina air filter.
The role of the filter in a car
The Lada Kalina engine requires about 12-14 cubic meters of air for every 100 km of travel. In the intake manifold, it is mixed with fuel sprayed by the injector nozzles. The mixture then enters the cylinder chambers, where it is burned. The optimal proportion of air to fuel ensures that the engine achieves the characteristics declared by the manufacturer. It is no secret that a large volume of dust, suspended dirt and other compounds enters the intake receiver along with the air. The role of the filter is to ensure high-quality cleaning of the intake air, because it is a kind of barrier in the path of these negative particles.
If there was no air filter, then all the suspended dirt would inevitably fall inside the engine cylinders, gradually settling on its walls and accumulating in the oil system. This would lead to scoring on the walls of the liners and liners, which would require a major overhaul.
Gradual clogging of the filter element leads to a deterioration in its throughput and, as a consequence, to air starvation of the LADA Kalina engine. This is fraught with the formation of carbon deposits on the parts of the valve assembly and elements of the cylinder-piston group, because such combustion will be characterized by the presence of a fuel-enriched mixture above the permissible limit. This inevitably leads to increased fuel consumption and a decrease in the power level of the unit. Also, exhaust gases are endowed with increased toxicity.
Adjusting the headlights of Lada Granta
In order not to contribute to the development of these factors, timely replacement of the air filter is imperative. ) recommends leaning towards such a procedure every 30 thousand km of the distance traveled, when the car is expected to be used primarily in urban conditions. If LADA Kalina spends most of its mileage in dusty conditions on country roads, then this interval should be reduced to 15 thousand km. These limits may change slightly, because the owner also needs to pay attention to the specifics of using his “horse”. To do this, you need to look into the air filter housing more often and change this element if there are signs of clogging.
Some owners resort to a rational solution - replacing the filter component along with changing the engine oil. Depending on the individual situation, this “trick” does not have to be done with every oil change; it can be done every other time.
How often to change the filter
Kalina's official instructions provide for the following standards for operating the air filter:
- for urban areas - once every 30,000 kilometers;
- for regular suburban and rural trips - once every 15,000 kilometers.
This is the best option for servicing the first and second Kalina, allowing the car to operate properly for longer. The less debris and dust gets into the mixture formation system, the more stable the engine will operate.
The process of removing and replacing the viburnum air filter takes no more than 15 minutes. As a result of such basic manipulations, the engine will work much more clearly and efficiently.
FakeHeader
Comments 27
I took the MAF and went shopping - in the end I didn’t buy it, because the MAF dangles like a glass in a bucket - the Kalinovsky filter has a diameter approximately one centimeter larger - tell me, what did you use to seal it with?
Didn't seal it with anything. Everything came to a standstill. The only thing I did was fastening brackets. You can see it in the photo.
maybe this is due to the fact that I have Bosch electronics...
So everything is Bosch for me too.
Interesting solution. Wouldn’t it be easier to weld a bracket with fastening to the standard barrel bracket, thereby removing the collective farm?
This option has the right to life, but for operating the car in the city, at the same time, a regular air blower is much better adapted to difficult operating conditions, including heavy dust (there is a built-in cyclone), the possibility of separating liquid entering the air supply system and, accordingly, an increased service interval replacements. But everyone decides for himself whether someone agrees to change the air vents every month as in the proposed option, and for others, reliability and an increased service interval as in the standard option are more important. Z.Y. I know one character, who instead of an air filter uses three layers of oiled nylon stockings and claims that this is the best solution for the engine, does not take up space at all, and to hell with the fact that he overhauls the engine every year))).