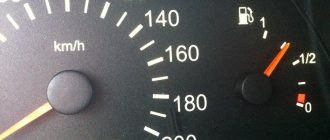
Probably every owner of a domestic car has encountered a situation where the information on the dashboard about the fuel level in the tank did not correspond to reality. This is a fairly common and unpleasant phenomenon, characteristic mainly of older machines.
The VAZ-2114 fuel level sensor with an injector performs one simple but extremely useful task - it informs the driver about the remaining fuel in the gas tank. During the operation of the car, the contacts of the mechanism oxidize, and the sensor itself begins to function incorrectly.
On what principle does the device work and how to replace it if necessary?
Causes of problems
The functioning of the device is disrupted for the following reasons:
- There is no normal contact in any part of the circuit (wires have broken off, areas where connectors are connected are oxidized, solder joints are cracked).
- The indicator on the instrument panel is faulty.
- The float has become detached from the sliding contact.
- The fuse has blown.
- There is no contact between the resistive track and the sliding contact. This happens if oxides appear on the sensor, the contact pressure on the resistive layer weakens, and the tracks wear out.
Dismantling and assembling FLS in VAZ Kalina
Replacing the fuel sensor on Kalina is done in the following order:
- the tips of the fuel pipes are removed and secured with spring clips;
- using a bit and a hammer, unscrew the pressure ring, moving it in the direction opposite to the clockwise rotation;
- pry it off with a screwdriver and remove it from the hatch;
- is taken out carefully, tilting the structure slightly so as not to damage the sensor lever. Near the pump, the guide clamps are retracted and the module cover is moved to the side;
Defective fuel level sensor
The removed device is inspected and, if necessary, repaired and adjusted. If restoration cannot be achieved, the FLS is replaced with a new one. Assembly is done in reverse order. A carefully assembled block is inserted into the gas tank so as not to bend the lever with the float part. It is installed in such a way that the arrow shown on the cover is directed in the opposite direction of the vehicle’s movement, and the fixing part fits into a special groove on the opening of the fuel tank. The pressure ring is installed, having previously been treated with petrol-resistant sealant, then scrolled clockwise. When the module is securely fastened, the pipelines and connector with electrical wiring are connected. To check the tightness of the system, start the car and perform a visual inspection. If there are no leaks, and the correct readings of the presence of gasoline in the tank are recorded on the instrument panel, it means that the replacement of the fuel level sensor was carried out successfully. We screw the hatch cover and install the seat in its regular place. Despite the simplicity of the procedure for disassembling and installing a device for measuring the amount of gasoline in a gas tank, this work requires care and adherence to basic safety rules. Careless, careless handling of them can lead to a fire, since gasoline ignites quickly.
In appearance, the VAZ family cars to some extent correspond to European automotive trends. But domestic cars have many technical shortcomings that do not allow them to compete with global brands.
An example is the performance of the fuel level sensor. Many car owners have had to deal with a situation where the device showed unreliable data. Sometimes the needle points to zero, although there is still a lot of gasoline in the tank. In some cases, the opposite situation is observed. This usually applies to older cars, but there are exceptions. Such signs indicate that the device is failing and needs to be replaced. The work can be done with your own hands, without the involvement of specialists.
Why does the sensor give incorrect readings?
The fuel level sensor of a VAZ 2114 car may not work correctly, giving false readings, for the following reasons:
- There is additional resistance in the circuit - the connectors have oxidized, deposits have appeared on the resistive layer and the sliding contact.
- The float casting was deformed, causing the float to fill with fuel. This cause of malfunction occurs infrequently.
- A coating has formed on the guide, making it difficult to move the float.
The fuel gauge indicator always shows that the tank is completely full if the float has come off the sliding contact. In addition, such a malfunction may be due to the fact that the wire that goes to the instrument panel has a short, causing the resistance in the circuit to decrease.
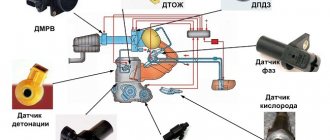
How does the device work?
To understand the problem yourself, you need to understand how the fuel level is measured and information is transmitted to the device indicator. The circuit implemented in most vehicles includes the following main elements:
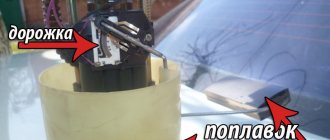
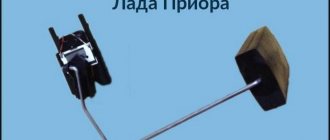
- a float made of lightweight polymer is immersed in the gas tank and is often combined with the pump block;
- gasoline sensor – lever-type potentiometer (otherwise known as rheostat);
- pointer arrow with scale;
- connecting wires.
In many modern cars, an electronic control unit is connected to the system.
The classic rheostat is an open coil of high resistance wire. A lever equipped with a contact and attached to the float rises or falls with the level of fuel in the tank, and the contact moves along the turns of the winding. The classic scheme works simply:
- The rheostat and the pointer device are connected in series in the circuit, both are powered from the vehicle's on-board network.
- When moving the float with the lever, the resistance of the potentiometer changes.
- A change in resistance causes an increase or decrease in the current in the circuit, to which the indicator arrow reacts. The scale is graduated according to the resistance values corresponding to the filling of the gas tank.
The updated version of the system works with the participation of a controller. The fuel level arrow receives a processed digital signal from the electronic unit that supplies power to the potentiometer. The principle of operation does not change, but the circuit allows you to obtain more accurate readings.
Self-replacement
To replace the fuel level sensor you will need:
- new device;
- resistance meter;
- screwdrivers;
- open-end spanners.
Remember that the fuel level sensor on the VAZ 2114 is located near the fuel, which means you need to follow safety precautions. First turn off the battery. It is not necessary to completely dismantle it; you just need to disconnect the negative wire. Make sure the tank is no more than 45 percent full. This will greatly simplify the replacement procedure.
Procedure
The broken device is located directly in the fuel tank. Follow this algorithm:
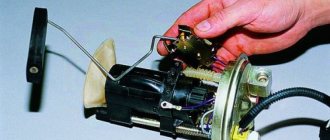
- The device is located in the module together with the fuel pump. Therefore, it is impossible to pull out the sensor alone without hitting the module.
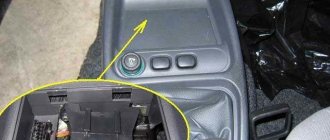
- To access the module, remove the lower cushion on the rear seats and move the trunk lining.
- Using a seven key, unscrew the fasteners that hold the fuel tank cap.
- You will see 8 screws pressing the edges of the cork. Unscrew them.
- Slightly move the tank cap to the front.
- Disconnect the electrical connectors from the pump using a size 17 wrench. Unscrew the nut of the fuel supply hose from the fitting.
- Take your time, be careful. Make 1 preliminary revolution. This will make it possible to reduce the pressure accumulated under the lid.
- According to the diameter of the plug you will find 8 nuts. Unscrew them.
- When dismantling the pump, lift it, turn it clockwise and tilt it. This minimizes the chance of damage to the measuring float.
- Using a flathead screwdriver, move the ring stopper on the module.
- Remove the module cover.
- Remove the end of the connected wire from the terminal of the device responsible for regulating the pressure.
- Release the clamps of the meter and slide it along the holes in the housing.
- Remove the sensor.
Now you only need to replace the removed meter with a new one and repeat all the above procedures in reverse order.
Replacement allowance
If you notice that the regulator no longer works, you will need to replace it. This procedure can be done at home.
Tools and materials
Before you begin the process, prepare:
- new regulator;
- Screwdriver Set;
- a set of keys.
Stages
So, the replacement procedure is performed as follows:
- Since the controller is part of the fuel pump structure, it will not be possible to dismantle it without touching the module as a whole. To gain access to this structure, it is necessary to dismantle the lower part of the rear seat, and then remove the luggage compartment upholstery.
- Using a 7mm wrench, you need to unscrew the screws on the right and left sides, in particular, we are talking about the gas tank cap latches. These screws also secure the upholstery to the sides.
- Having done this, you will see 8 more screws that secure the edge of the cover; they also need to be unscrewed.
- The next step is to remove the entire fuel tank cap, this can be done by moving it forward a little.
- After these steps, you will see the upper part of the pump; you need to dismantle the wire block that is connected to the device; for this you may need a 17-mm wrench. You will also need to unscrew the nut of the fuel supply line from the fitting. In this case, there is no need to rush, it is better to wait a little, but do everything carefully and correctly. Before completely unscrewing the cap, make one small turn - this will allow you to get rid of the pressure that has built up in the system.
- Next, along the diameter of the cover you can see 8 more small nuts, you need to unscrew them, for this you use a wrench, but it will be more convenient to do this with a ratchet.
- When dismantling the fuel pump, it should be lifted up, then turned slightly clockwise, and then tilted. Such actions will prevent damage to the device's float.
- After dismantling the module, we begin to disassemble it. Using a slotted screwdriver, you need to move the locking ring located directly on the module. After this, you can remove the cover itself from the structure. You need to remove the wire from the pressure sensor terminal, after which the fasteners are pressed directly from the cover and the blocks with wiring from the fuel pump are disconnected.
- The controller latches are detached, after which the device itself slides along the grooves of the case. The regulator is dismantled and replaced with a new one.
Checking the device with an ohmmeter
It is not always necessary to immediately replace the sensor with a new one. It happens that the problem lies in a completely different component of the car, for example, an injector. Also, if the meter is faulty, it may be possible to repair it.
Before replacing, check the sensor:
- To test the device, connect a resistance meter to its terminals. This indicator must be measured when the lever and float are in extreme positions or in the middle.
- In the lower position, meaning zero fuel level, the resistance should be 285–385 Ohms.
- In the central position, which means the tank is half full, the ohmmeter should show 100-135 ohms.
- The highest position is a 100 percent filled tank. The ohmmeter should read 7–25 ohms.
If in at least one position the readings obtained diverge from normal, repair or replace the sensor. After installing the new meter, make sure that the installation arrow on the module cover is directed towards the trunk. Otherwise, you will need to dismantle the system again and repeat the replacement.
Communities › VAZ: Repair and Modification › Blog › The instrument panel does not show the fuel level, 2114
Here's what I found: The indicator needle does not deviate from the beginning of the scale, regardless of the amount of gasoline in the fuel tank.
Fold down the rear seat and remove the indicator sensor hatch cover. Disconnect the pink wire from the pointer sensor and connect it to ground. Turn on the ignition:
– the pointer arrow has deviated – the sensor is faulty (replace);
– the pointer arrow does not deviate – continue troubleshooting.
Remove the instrument cluster from the panel without disconnecting the pads from it. Turn on the ignition. Connect the wire to the right pin 4 of the fuel level indicator (which is connected to pin 10 of the red block):
– the pointer arrow has deviated – there is a break in the wire connecting the pointer and the sensor;
– the pointer arrow does not deviate – replace the pointer.
The indicator needle is on the scale regardless of the amount of gasoline in the fuel tank.
Disconnect the red block with wires from block 3 of the instrument cluster. Turn on the ignition:
– the pointer arrow has deviated to the beginning of the scale – the pointer is working;
– the pointer arrow does not deviate – the pointer is faulty (replace).
Thank you, I’ll go and try to do these operations) But the phrase “Disconnect the pink wire from the indicator” is not clear, is it like removing the entire chip from the fuel pump and connecting the ground wire to the pink wire?)
The light comes on from the arrow, as far as I understand
I'm looking for a diagram right now. in general, as far as I remember, there are 3 wires from the fuel pump, minus, plus and signal to the level
Well, initially it comes out as 4, and they are converted to 3 later))
Most likely the contacts are on the float! try to put the working one on, if the arrow is working, it means it’s true, if not, then check the harness, it goes through the entire cabin. the mass has nothing to do with it: the fuel pump wouldn’t work at all, I had this happen for 2 days, I lost it until I thought of the mass and found it))))
Well, yesterday I installed a different sensor that worked, also zero effect