I found a topic on the forum on how to remove a ball joint without a puller, read it and forgot. The other day I had to remove the lever and decided to try it. But there was no hole, I remembered the theory but not verbatim, and the result was this. First, I describe the method posted on the forum. ——————————————————————————- You need a pit, not a lift (relevant for DIYers). 1. Remove the cotter pin nut. 2. Pour wd40 onto the nut. 3. Loosen the nut, but not completely, that is, so that it is screwed in at least 3 turns of thread. 4. Pour wd40 under the nut onto the finger. 5. Take a flat chisel, or any piece of metal 15mm thick. 6. We insert it between the lever and the steering knuckle so that it comes into contact with the ball joint boot. 7. Jack up the car. When jacking up the car, we see that the chisel begins to be tightly pinched between the fist and the lever. 8. When the wheel leaves the ground, we hear a strong click; this is the finger coming out of the fist. 9. If the wheel leaves the ground and the finger does not come out, use a small hammer to lightly hit the fist through a drift. All. forums.drom.ru/toyota-vitz-yaris … 66203.html
And how did I do without without a hole
It is possible without a hole and with the wheel removed, as long as you have a hydraulic jack or any other. You need to jack up the lever itself in the ball area, then insert the same chisel between the ball and lever and lower the jack. The ball flies out for the sweet soul. If you don't have a hydraulic jack, you can probably use any other one. Since the ball flies out under the action of the shock absorber strut spring.
Quite often, car enthusiasts are interested in how to remove a ball joint without a puller. This need may arise for various reasons. Most often, the existing puller does not fit the given car model. Although the principle of mounting the support is the same, the overall design of the suspension may be different. Therefore, it turns out that the existing puller simply cannot get to the part. Also, many novice drivers do not have some equipment available. You should not go to a service station due to the lack of a puller; again, you can do without it. In addition, there should not be any negative aspects.
Replacing a ball joint on a Renault Logan.
Owners of this brand of car are recommended to replace not only the ball joint, but also the lower suspension arm at the same time (here, I wrote on this topic). This procedure is performed as a result of wear or damage to the unit. To carry out the operation you need:
- Hammer.
- Flathead screwdriver.
- Socket wrench - size 30.
- Dimension key 13.
- Open-end wrenches for 16 and 18.
- Two pipes of different diameters.
- Bar.
Basic steps of the process.
- The car is hung up, or its front part is raised using a jack, and the car is placed on supports.
- The wheel is removed.
- The nuts of the upper and lower bolts, as well as the connecting rod, are removed.
- The nut at the stabilizer bar link is unscrewed, then the bolt is pulled out.
- The ball bolt is removed.
- The finger is pulled out from the rotating mechanism housing.
- The bolts of the silent blocks, both front and rear, are removed.
- The lower suspension arm is removed.
- The old ball joint is removed. To do this, remove the rubber cover and the metal fixing ring from the assembly. At the end, the support is knocked out with a hammer (more details in the video).
- The new ball is installed so that its teeth fit into the grooves of the spline.
Reassemble the mechanism in reverse order.
Video instruction.
How to remove a ball joint with your own hands without a puller?
If you have a normal tool, free time and a desire to tinker with the car, then what is the point of going to a service station? The money you have to leave there can be spent on more enjoyable activities. Moreover, you can work if the ball joint has been giving signals for a long time that it is time to send it to rest - it is knocking in the pits. Very soon it will become difficult to turn the steering wheel, and then it will get worse; tires with uneven wear will have to be replaced.
How to remove a ball if there is no puller
There is no need to look for an overpass, inspection hole, or lift. It is enough to settle down on a small asphalt area. Prepare the tool:
- a couple of jacks;
- a pair of wheel chocks;
- a set of spanners and open-end wrenches;
- crowbar;
- hammer.
Sequencing
- place the car on the platform;
- there should be stops under the rear wheels to prevent the car from rolling;
- Place even wooden blocks or bricks under the jack;
- loosen the nuts on the wheels;
- lift the body until the wheels slightly lift off the asphalt;
- completely unscrew the wheel nuts. Be careful, because the car is now standing only on relatively unstable jacks and may fall if too much force is used;
- remove the wheel and place it under the beam for complete safety;
- open your toolbox, take a suitable key and remove the caliper, to which the protective casing can be screwed with a small bolt;
- if replacing the pads is not planned, then move the caliper on the hose to the side and tie it to the frame;
- unscrew the tie rod mounting nut 3 turns;
- insert a crowbar so that one end of the lever rests on any metal part, and the lever itself is on the tip rod. With one hand, press the lever to press out the tie rod cone, and with the other hand, tap the knuckle in the hub with a hammer to release the tie rod;
- unscrew the fastening nut and move the rod to the side;
- unscrew the stabilizer link;
- Use a crowbar or jack to release the tension between the stabilizer and the strut and remove the ball strut;
- remove the shock absorber by unscrewing the upper nuts and the bolt at the bottom;
- loosen the upper support nut;
- insert the crowbar in the same way as when removing the steering rod, but very carefully so that the chassis boots are not damaged;
- tap the hub with a hammer at the point where the hinge is attached to the turning shoe;
- completely unscrew the ball joint nut;
- Unscrew all the upper arm mounting bolts;
- remove the ball joint and begin dismantling the lower one;
- loosen the fastening nut;
- remove the protective cover from the hub;
- remove the locking ring and the adjusting washer;
- Place a jack under the lower arm and lift it until it stops with the upper arm. At the same time, slightly turn the hub towards the bumper;
- continue to lift the hub, straining its connection with the ball;
- tapping on the hub, squeeze out the ball joint, unscrewing the nut completely;
- remove the ball and try not to lose the washer that was between the bearing and the grenade. Cover the hole with a clean rag;
- After unscrewing the mounting bolts, remove the ball from the lower arm.
As you can see, there is no problem with how to remove a ball joint without a puller. I would have free time and a great desire. Assembly is carried out in reverse order. You can always buy new spare parts in our online store!
How to replace a Lada Priora?
In this case, the role of a puller can be performed by a hammer and a reinforcement rod. To remove a worn or broken ball joint, you will need:
- The car is raised using a jack.
- The front wheel is removed.
- The two ball mounting bolts are unscrewed and the fastening nut is unscrewed (wrench 17 and 19).
- The reinforcing rod is inserted between the lever and the support body, and then pulled down.
- The pin must be hit from bottom to top in different directions so that the cone of the ball pin pops out of the lever.
- Once the cone is out, the support turns away from the steering knuckle.
- To prevent the ball from being pressed against the fist by means of a lever, the hub is supported, or the wheel is placed and the jack is lowered.
- Next, the ball joint, which is attached to the lever and knuckle, is replaced.
Video instruction.
Purpose of a ball joint on a car
The front wheels of front-wheel drive cars Lanos, Sens and Chance are not only driven, but also have the ability to vertically change the angle. In simple terms, the front wheels turn right and left, which is necessary to select a trajectory.
Changing the position of the wheels relative to the road occurs in compliance with the following requirements:
- level position of the wheels;
- the car must move (forward or backward);
- easy steering control.
All these conditions are achieved through the car’s suspension, and an element such as a ball joint is one of the main devices of this part. It is designed to connect the suspension arms to the steering wheel hub. The supports replaced pivot mechanisms, which had many disadvantages.
The ball joint on Lanos is designed to transmit a control signal from the steering mechanism to the wheel. Their use facilitates the possibility of free angular movements of mating angles. Simply put, the hinge support ensures that when the wheel moves vertically, its fixed position in the horizontal plane.
Is it possible to restore the support?
This element has 2 types of faults. Most often you may encounter the depletion of lubricant in the housing. With this development of events, restoring the ball joint to working condition is easy. Using a special syringe, the amount of lubricant in the housing is updated. Experienced craftsmen prefer graphite lubricant, but you can use another type of it, preferably with similar values. I advise you to read the article - how to lubricate a ball lubricant.
If the performance of the ball was restored using the above method, it is worth considering that it will not be possible to extend it for a long time. In cases where there is a high degree of wear, adding lubricant will not change the situation. A replacement part will be required.
The condition of most domestic roads means that car suspensions cannot last for a long time, as a result of which regular and frequent replacement of its elements is required. As for the ball joint, removing it without a puller is not a big problem. This process requires a minimal set of auxiliary tools. At the same time, the absence of a professional tool will not have a negative impact on the parts of the mechanism.
Faulty ball joints are one of the most common chassis failures that motorists encounter. A characteristic knock in the front part, which is difficult to confuse with another knock, indicates the need to replace the ball joint. In earlier articles I talked about how to replace ball joints on a VAZ 2107, this time you will learn how to replace a ball joint on a Lada Priora with your own hands.
To work you will need:
- Jack, pry bar, hammer;
- Spanners for: “17” and “19”;
- TORX E12 socket head;
- Ratchet or crank;
- Special puller for removing ball joints;
- New ball joint for Lada Priora.
How to remove a ball joint without a puller? When it's not at hand
Quite often, car enthusiasts are interested in how to remove a ball joint without a puller. This need may arise for various reasons. Most often, the existing puller does not fit the given car model. Although the principle of mounting the support is the same, the overall design of the suspension may be different. Therefore, it turns out that the existing puller simply cannot get to the part. Also, many novice drivers do not have some equipment available. You should not go to a service station due to the lack of a puller; again, you can do without it. In addition, there should not be any negative aspects.
Content
- Diagnostics
- Removing the ball joint. What is the danger of malfunctioning ball joints?
Diagnostics
How to remove a ball joint without a puller?
This question is asked by people who are faced with replacing a ball joint. Especially in cases of unexpected breakdown. To prevent this from becoming an unpleasant surprise for you, you need to know how to correctly diagnose a breakdown. The first sign of a malfunction is a knocking sound in the suspension when driving over uneven roads. But here you need to take into account that in extreme cold the lubricant can freeze. In this case, knocking noises may be observed when starting to move. Don't panic, this is completely normal. Also, with severe wear, the car may wander along the road, and increased tire wear is observed.
Do not forget that it is not only ball joints that can knock in the suspension. Therefore, be sure to carefully inspect the suspension. The easiest way to diagnose is to check the play. To do this, you need to jack up the car. After that, they try to shake the wheel; if there is play, the ball must be replaced. At the same time, we determine which support has failed. This is true for machines with two supports on each side. In some models, it is possible to measure the level of wear of the hinge through a hole in the lower part of the support.
Removing the ball
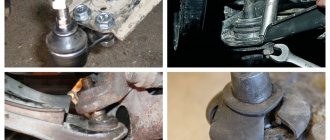
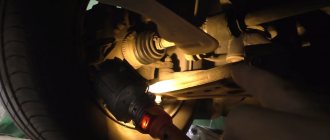
So, you are convinced that the support has come to an end, and now you should change it. By the way, this is done not only in the event of a malfunction of this structural element. When repairing the hub, you will also have to remove the ball joint, otherwise it will not be possible to dismantle the steering knuckle. Before starting work, you need to treat the nut with penetrating lubricant. This will make disassembly much easier. We prepare the car. They put it on the handbrake and install wheel chocks. The car is jacked up and measures are taken to prevent it from falling. Remove the wheel.
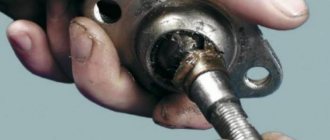
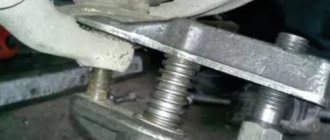
To remove the ball without a puller, you will need a wrench, a pry bar and a hammer. This work is done in the following order:
- Loosen the nut securing the support pin. It should be unscrewed to the top edge of the finger. Some models have additional screws that secure the ball joint housing. If there are any, then you need to unscrew them;
- Having thus prepared the support, we proceed to remove it. To do this, we slip a pry bar under the lever and begin to push it slightly (up or down, depending on the location of the support). At the same time, we apply strong blows to the finger. That's what the nut was left for. Usually a few hits are enough.
You can use this method without fear for the remaining elements of the suspension. Even if vibrations occur, they are damped by silent blocks. This method is completely universal; it can be used on all car models with ball joints.
What is the danger of malfunctioning ball joints?
Restoration of support
There are 2 malfunctions of this design element. Most often, the lubricant present in the housing is used up. In this case, you can easily restore the functionality of the ball joint. For this, a special syringe is used, with its help a new portion of lubricant is added to the body.
Graphite lubricant is best suited for this, but you can use another one with similar performance. But, do not forget that the service life of the restored part is somewhat shorter. If there is a lot of wear, then this method will not help. The part will have to be replaced.
Conclusion
. Domestic roads are not conducive to long suspension life. Therefore, the chassis has to be repaired quite often. Because of this, the question often arises of how to remove a ball joint without a puller. It's actually quite simple. This doesn't require a lot of effort. The tools used are a pry bar and a hammer. Removing the ball without a special tool does not negatively affect the suspension.
Replacing ball joints Lada Priora - step-by-step instructions
1. First of all, tighten the handbrake, put wheel chocks under the wheels, jack up the car and remove the wheel. I think everything is clear here, no need to describe it!?
2. Use a key set to “19” to tighten the ball pin nut.
3. Using a ball puller , press the support out of the lever.
4. When the finger comes out of the seat, unscrew the two mounting bolts, which are indicated by a yellow pointer.
Use a pry bar to remove the ball joint.
The support is now released and can be removed.
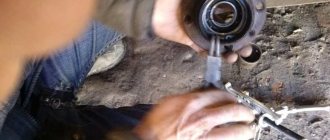
Take a new Priora ball joint, remove the boot from it, then fill it with lubricant, for example Litol.
Removing the ball
So, you are convinced that the support has come to an end, and now you should change it. By the way, this is done not only in the event of a malfunction of this structural element. When repairing the hub, you will also have to remove the ball joint, otherwise it will not be possible to dismantle the steering knuckle. Before starting work, you need to treat the nut with penetrating lubricant. This will make disassembly much easier. We prepare the car. They put it on the handbrake and install wheel chocks. The car is jacked up and measures are taken to prevent it from falling. Remove the wheel.
Main manufacturers
To make a quality purchase, it is better to purchase from the most rated manufacturers.
These include:
- "Belmag". The “Favorit” series is specially manufactured for the VAZ 2110.
- "Cedar". The body is solid forged. The rod is rolled with diamond rollers, which ensures high manufacturing precision. After this, a zinc coating is applied to the surface. The boot is made of rubber with high elastic characteristics.
- "Track". Often used in vases. The support is capable of traveling up to 60 thousand km.
Tools for work.
To replace the ball, you will need to prepare. To do this you need:
- Keys and gates.
- Liquid WD-40.
- Litol or ShRB lubricant.
- Puller.
- Hammer and crowbar.
Ball location
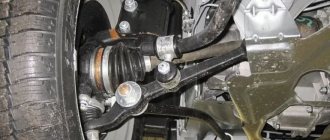
The ball joint connects the lever and the steering knuckle.
They are located on both sides of the car on the bottom of the lever.
It is used to attach the lever to the hub.
Replacement time
When driving a car on a bad road, you will need to change the ball joints often.
- Initially, when it fails, a knock will be heard.
- Then the car will begin to pull to the side even when driving on a good road.
- Then the tires will begin to wear unevenly.
- When turning the steering wheel, squeaks may appear.
- It will become more difficult to turn the wheels.
If the finger moves freely with little hand force, the ball joint requires replacement.
Replacement
The whole process is carried out in the following stages:
- Removal . Hang the wheel, unscrew the nut on the pin, then knock the rod out of the socket.
Unscrew the 2 bolts securing the ball to the knuckle.
If there is no puller, insert the assembly and knock out the lever with a hammer.
When the bolts are tight to unscrew, you can use WD-40.
Installation
Installation is carried out in reverse order. There is no need for a puller here.
Before installation, fill the case with lubricant.
You just need to insert your finger into the socket and tighten the nut on it. You should definitely lubricate the ball inside under the boot.
Article number and cost of analogues of original ball joints
The lack of stable quality of original ball joints forces car owners to search for good analogues from third-party manufacturers. At the moment, the market is filled with a lot of alternative spare parts options. The price for non-original supports is comparable to the original. The best brands of balls are presented in the table below.
Table - Recommended alternatives to ball joint 11180-2904192-00.
| Manufacturer | vendor code | Approximate cost, ruble |
| BelMag | BM.0033 | 370-400 |
| Hofer | HF815503 | 300-350 |
| Pilenga | TS-P 3142 | 380-420 |
| Stellox | 52-00840A-SX | 400-430 |
Options
As you can see, the quality and durability of a ball joint for any car is built on these important details. And for the VAZ-2110, the support should have the following parameters, if you can check them:
- finger angle - minimum 50°>;
- finger swing moment - 0.4-0.8 kGs/m >;
- moment of finger scrolling - 0.4-0.8 kGs/m >;
- the force of destruction of the top cover (pulling out a finger) is 2900 kgf .
Where is the part installed on Lanos, Sense and Chance
To help drivers understand how dangerous it is to drive a car with a faulty ball joint, below are a few photos. Such consequences are associated precisely with the failure of the hinge.
If one part fails on Lanos, then it is not at all necessary to replace them in pairs. Before resorting to replacement, you need to find out where the hinge is located on the car. To find out the location of the ball joints on a Lanos, you need to look at the wheel from the inside in the CV joint area. It is under it that the lower ball joint is located. Some car models use not only lower, but also upper SHOs.
The photo above shows the location of ball joints on Chevrolet, Daewoo and ZAZ Lanos.
For what reasons does a ball joint fail?
Depending on the manufacturing quality of the part, its service life can vary from 20 to 150 thousand kilometers. The reasons for the failure of the SHO are the following factors:
- Natural wear and tear. The average service life of an original spare part is about 100,000 km. The reduction in service life is affected by temperature changes, driving patterns, as well as abrasive substances that fall on the surface of the rubber boot.
- Loads during movement. Frequent maneuvers and driving on uneven roads with numerous potholes also negatively affect the service life of the hinge.
- Depletion of lubricant - the longer the part has served, the higher the likelihood of a reduced amount of lubricant. To avoid the need to change it in the near future, it is recommended to regularly service it by adding lubricant.
Part failure accelerates with frequent exposure to temperature changes. In the cold, rubber hardens, and as the temperature increases, it becomes soft. Regular changes contribute to the formation of microcracks in the rubber boot, which cause moisture and contaminants to penetrate inside.
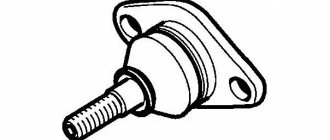
What does the part consist of and how is it constructed?
By design, the support is a separate unit consisting of two main parts. One part is called a rod or pin, which has a spherical boss on one end and also threads on the other side. The threaded part connects the part to the lever of the rotating mechanism.
The second part of the assembly is called the body. Its design has a spherical recess for mating with the rod. To connect the wheel hub with the suspension arms, special holes are provided in the housing design.
All component parts of the assembly are made of steel. The design of the ball joint is shown in the photo below.
Reducing the friction of the spherical part of the finger with the metal body is achieved through the use of a polymer or plastic liner.
This is interesting!
On outdated models of domestic cars, ball joints were used that did not have liners.
The units had a collapsible design, so if backlashes occurred, they were eliminated by tightening the cover. Ball joints are characterized by a long service life, which depends on the quality of the part, as well as the absence of mechanical impact. The main component of the hinge is the boot, violation of the integrity of which leads to immediate failure of the entire assembly. Only with proper care can a long service life be ensured. To do this, lubricants are added to the working part of the unit and the anthers are replaced.
Article number and price for the original ball joint
The original ball joint for the Lada Granta has article number 11180-2904192-00. Its cost is about 500 rubles.
Ball joint diagram
The service life of the original product varies widely, since the quality of ball joints varies from batch to batch. Therefore, buying a branded product, according to reviews from car owners, is a kind of lottery.