Cars of the Lada Vesta and Lada XRAY family are equipped with turn signal indicators. The first model has pre-installed LEDs, the second has standard incandescent lamps.
According to the manufacturer, the turn signal repeaters are disposable; if the diode burns out, the unit must be replaced as a whole (assembled). However, craftsmen have found other ways to replace diodes at minimal cost.
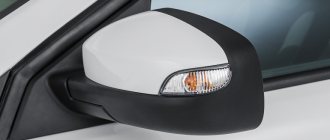
How to remove and disassemble the rear view mirror on Lada Vesta and XRAY
Side mirrors of Lada Vesta and XRAY cars are removed for replacement, repair or modifications. The process is not complicated, but it has certain features that it is better to know about in advance so as not to break anything. Before starting work, do not forget to disconnect the negative terminal of the battery.
Dismantling process
You can limit yourself to a minimum set of tools; the main rule of work is caution and precision in the application of effort. Excessive load should be avoided, as it can aggravate the problem and cause new damage and deformation.
Excessive load should be avoided, as it can aggravate the problem and cause new damage and deformation.
To begin with, you need to disconnect the mirror directly (the procedure is not necessary), for which you remove the lock located on the pillar on the interior side. First, the upper fastener is loosened, and then the two lower ones.
After this, the screws holding the mirror are unscrewed and the wires that provide electrical control of the mirror are disconnected.
For heated mirrors, the wires responsible for supplying electricity to the heating device are also removed. They must first be disconnected from the heating coil. For subsequent connections, soldering is used.
The next set of actions looks like this:
The mirror element is retracted to its extreme position, which creates a small gap.
A flat-head screwdriver is inserted into the gap, and with light force the fixing parts are moved to the side.
- The latches are located around the entire perimeter, which needs to be taken into account.
- The mirror element is removed and replaced with a new, undamaged analogue.
After the new mirror sheet is installed, assembly is carried out in the reverse order.
When assembling the case, you need to take into account not only the location of the clamps, but also focus on 4 guide elements, which must coincide with the corresponding holes.
Installation is not particularly difficult; the main point is also to control the force, not to put too much pressure on the structure, eliminating deformations and cracks.
If the mirror has a mechanical drive, then when dismantling and installing it is necessary to work carefully with all mechanisms. The electric drive is supplied with power through wires located in a special block.
When dismantling, the block is carefully pulled out, and when reassembled, it is installed in its original place without much effort. On average, such work takes about half an hour if we are talking about the simplest modification of the mirror.
The presence of additional elements, heating and electric drive, slightly increases this time.
Lada Vesta
Procedure for removing the exterior mirror:
- Remove the trim from the door pillar in the passenger compartment (snap off the upper clamp No. 1 and disengage the two lower ones No. 2).
- We disconnect the blocks with wires by pressing the latches.
- Remove the three mirror mounting screws (10mm wrench or TorxT20).
How to disassemble a mirror:
- rotate the mirror element to its maximum lateral position.
- Carefully unclip the mirror element through the resulting gap and remove it from the housing (using a flat-head screwdriver).
- The plastic cover is held in place by clips and can be removed without removing the mirror element (pry it off with a screwdriver).
The process of disassembling the mirror can be studied in more detail using the instructions “Repairing the gear motor for adjusting the position of the mirror element on an assembled car.” The archive is available to site users:
_x000D_ To download files you need to log in to the site
The process is also shown in the video:
Replacement
As practice shows, if there are lamps, then there is no need to expect any difficulties. But with LEDs everything is not so simple. If such a turn signal burns out, it must either be replaced as an assembly or repaired. It is the second option that needs to be considered in more detail.
It is worth noting that the design of the mirrors of Vesta, Kalina, Priora and Granta is the same, and therefore independent replacement of LEDs in the turn signal of the mirror of Lada Vesta and other listed models is carried out according to the same scheme.
Materials
For work carried out following the example of one of the Drive participants, known there under the nickname Rusl01 with his “Lada Vesta I'm ROBOT”, the following materials will be needed:
- Hot melt adhesive;
- Orange nail polish;
- LED strip in silicone shell.
Lada XRAY
Removing mirrors . The side mirror trim is combined with the door trim, so we remove it first. Then we disconnect the block with wires (No. 1) and unscrew the screws securing the mirror No. 2 (a “10” wrench or TorxT20).
To disassemble the outside mirror :
- remove the mirror element (catch onto the edge of the mirror and unclip the latches), the heating wires do not need to be disconnected, but simply leave the mirror hanging on them;
- remove the mirror cover (press the clips inside the housing and move the cover to the side).
This process was discussed in detail when replacing turn signal lamps.
Let us recall that earlier we looked at the features of Vesta’s mirrors, as well as ways to combat the whistling of mirrors.
Categories of products that may be of interest to you based on the article “How to remove and disassemble the rear view mirror on Lada Vesta and XRAY”:
Disadvantages of exterior mirrors
- Lack of electric folding mechanism . A clear drawback that cannot be compensated for, even for an additional fee.
- Rattling and shaking . Some owners of Vesta cars report that while driving they hear a rattling sound from the mirrors, and the mirror itself becomes uninformative as it shakes violently. Perhaps these are isolated assembly problems, but the problem is not widespread.
- Turn signal fogging . Many Vestas have a problem with fogging of the turn signals built into the side mirrors. The manufacturer recognizes the problem and therefore replaces the entire mirror assembly under warranty without any problems. From the first visit to the dealer to replacing the mirror, it usually takes 3-5 days.
- Difficulty replacing the LED . The turn signal operates using an LED, so it cannot be replaced quickly. You can replace the LED lamp assembly, but the dealer will not be able to do this now, since the manufacturer officially recommends that if the light element fails, you replace the entire mirror.
It is important to note that component manufacturers are already offering to buy an assembled repeater, which can be installed to replace a burnt-out one, without replacing the entire mirror. Of course, this option is cheaper, but you can save even more if you replace the LED yourself. You will find out how to do this below.
Other (accessories) Lada Vesta
Products from the Dustershop77 range on the topic of the article:
| Name | Manufacturer | Price | Availability | Add to cart |
| DC495 | Discount card (Dusterclubs.ru, Dustershop77.ru) | 700 / 500 rub. Discount: 500 rub. | >10 | |
| DC1024-V117 | Windshield and roof edge seal | Duster-Guard | 700 / 500 rub. Discount: 300 rub. | >10 |
| DC959 | Seal under the hood of Duster / Terrano / Kaptur / Arcana, etc. | 800 / 500 rub. Discount: 400 rub. | >10 | |
| DC511-94520 | Cloth with adhesion activator 3M 94520 | Original | 400 / 200 rub. Discount: 150 rub. | >10 |
| DC020 | Set of door, hood and trunk seals | 6500 / 4500 rub. Discount: 3900 rub. | >10 | |
| DC694 | Keyhole plug (lock cylinder) | Original | 500 / 450 rub. Discount: 400 rub. | 4 |
| DC534-263216 | Teroson adhesive-sealant for installing glass, spoilers and other body kit (cylinder) | Original | 1500 / 1000 rub. Discount: 900 rub. | 6 |
| DC152 | 3M adhesive tape for installing plastic parts 6mm x 5m | Original | 500 / 400 rub. Discount: 300 rub. | >10 |
| DC1768 | Keyhole plug (lock cylinder) analog A2107660056 color black | Analogue | 200 / 100 rub. Discount: 50 rub. | >10 |
| DC1556 | Door seal instead of the standard one (price for 1 doorway) front=rear, left=right | 1500 / 1000 rub. Discount: 800 rub. | >10 | |
| DC155 | Wide 3M tape 12mm x 5m | Comfort | 1000 / 700 rub. Discount: 500 rub. | >10 |
| DC877 | Keychain Renault (rhombus) original | Original | 700 / 400 rub. Discount: 300 rub. | 5 |
| DC1727 | Door seal RKI-19 (2 pcs.) | 1200 / 900 rub. Discount: 800 rub. | >10 | |
| DC1769 | Keyhole plug (lock cylinder) analogue A2107660056 white | Analogue | 200 / 100 rub. Discount: 50 rub. | >10 |
| DC099 | Frames for numbers are anti-vandal (chrome color) | 2000 / 1400 rub. Discount: 1000 rub. | 7 | |
| DC1004 | Door edge protection (rubber) 7.5m | China | 2500 / 2300 rub. Discount: 1800 rub. | 4 |
| DC1732-106233 | Seat belt extension extension Renault Duster, etc. (Autostandart) | 1000 / 600 rub. Discount: 400 rub. | >10 | |
| DC2086 | Sealing gasket for license plate (self-adhesive 2 pcs.) | Original | 400 / 300 rub. Discount: 250 rub. | >10 |
| V090 | Trim filter mesh LADA Vesta | ArmAuto | 1000 / 450 rub. Discount: 400 rub. | 5 |
| DC163-02 | Engine compartment insulation - car blanket 140x90cm | 2500 / 2000 rub. Discount: 1700 rub. | 5 | |
| DC980-749329187R | Ring for securing cargo in the trunk original 749329187R | Original | 700 / 600 rub. Discount: 500 rub. | 5 |
| DC1726 | Door seal instead of the standard one (price for 1 doorway) front=rear, left=right (Lada, Renault) | 1200 / 900 rub. Discount: 700 rub. | 6 | |
| DC2110 | Rubber seal on the frill along the windshield Duster 2021- | 1100 / 600 rub. Discount: 300 rub. | 9 | |
| DC100 | Frames for numbers are anti-vandal (black) | 2000 / 1500 rub. Discount: 1000 rub. | 3 | |
| DC1626 | Silicone frame for numbers (black) (1 piece) | 900 / 600 rub. Discount: 450 rub. | 9 | |
| DC509-PU8590 | Adhesive-Sealant Teroson PU 8590 kit for installing glass, spoilers and other body kits | Original | 2500 / 1900 rub. Discount: 1600 rub. | 4 |
| DC1357 | ABRO MASTERS silicone gasket sealant (up to +260°C) (85g) transparent | Original | 300 / 200 rub. Discount: 150 rub. | >10 |
| DC1130 | Scale model Renault Duster 1/43 | Original | 1900 / 1300 rub. Discount: 1000 rub. | 2 |
| DC1744-8201531497 | Original ring for securing cargo in the trunk with bolt 8201531497 (set of 2 pieces) | Original | 1000 / 900 rub. Discount: 700 rub. | 3 |
| DC1866-CR2032 | CR2032 battery for Duster, Logan, Largus, Terrano, Vesta, X-Ray, Captur, Arcana, etc. key (interchangeable with CR2016, CR2018, CR2025) | Analogue | 100 / 70 rub. Discount: 50 rub. | 1 |
| DC2097 | Seat belt extension extension Renault Duster, etc. | 800 / 500 rub. Discount: 300 rub. | 6 | |
| DC098 | Frames for numbers are anti-vandal (white) | 2000 / 1400 rub. Discount: 1000 rub. | 5 | |
| DC1266-8200257684 | Duster 10 - wing turn signal (L=R) original 8200257684 | Original | 800 / 600 rub. Discount: 500 rub. | 4 |
| V132 | Wheel hub caps for LADA Vesta (4 pcs) | 800 / 600 rub. Discount: 300 rub. | >10 | |
| DC2018-7701423330 | Mastic sealant for door cards original 7701423330 | Original | 1200 / 800 rub. Discount: 700 rub. | 4 |
| DC2111 | Universal rubber seal on the edge of the frill | 200 / 150 rub. Discount: 90 rub. | >10 | |
| V131-ULAVES011 | Pneumatic hood stop Lada Vesta 2015-2017 (Auto-stop) | Analogue | 2900 / 2700 rub. Discount: 2500 rub. | 1 |
| DC925-80486 | Metal car hanger | 1500 / 1200 rub. Discount: 900 rub. | 2 | |
| V115-1430501-LVE112801 | Radiator grille LADA Vesta (Classic, Comfort) | Pt GROUP | 12000 / 10300 rub. Discount: 6600 rub. | 1 |
| DC1141 | Caulking gun | 350 / 250 rub. Discount: 200 rub. | 3 | |
| DC1140 | Masking tape 50mm x 50m | 500 / 300 rub. Discount: 250 rub. | 6 | |
| DC2162 | Car soundproofing kit (for 2 doors) | 2000 / 1600 rub. Discount: 1400 rub. | 3 | |
| V116-1500505 | Radiator grille LADA Xray | Pt GROUP | 7500 / 7000 rub. Discount: 4900 rub. | 1 |
| DC177-8200733848-BLACK | Internal handle left original 8200733848 black | Original | 1200 / 800 rub. Discount: 700 rub. | 2 |
| DC1502 | Handle (Renault logo) original | Original | 700 / 600 rub. Discount: 500 rub. | 2 |
| DC1990-7711821301 | Original Renault phone holder with glass mount magnetic 7711821301 | Original | 2100 / 1500 rub. Discount: 1100 rub. | 2 |
| DC1715-489702120R | Steering column adjustment knob Renault Duster, Logan, Sandero, Lada Vesta, X-Ray original 489702120R | Original | 1500 / 1300 rub. Discount: 1000 rub. | 1 |
| DC1196 | Rubber (tire) ink aerosol 520 ml | 500 / 400 rub. Discount: 300 rub. | 1 | |
| DC1503 | Black mug 330 ml, soft touch coating Renault original | Original | 1500 / 1300 rub. Discount: 1200 rub. | 1 |
| DC1620 | Arcana pillow original | Original | 2200 / 1700 rub. Discount: 1500 rub. | 1 |
| DC1932-8450007707 | Driver's door handle mat Vesta 8450007707 original | Original | 120 / 80 rub. Discount: 60 rub. | 2 |
| DC1992-7711821302 | Original Renault phone holder with glass mount, sliding 7711821302 | Original | 2100 / 1700 rub. Discount: 1400 rub. | 3 |
| DC2380-7711821369 | Reno red mug 360ml. original 7711821369 | Original | 1500 / 1300 rub. Discount: 1100 rub. | 1 |
| DC1618 | Red mug 360 ml, original soft touch coating Arcana | Original | 1500 / 1300 rub. Discount: 1200 rub. | 1 |
| DC1724 | Thread locker IMG red | Original | 800 / 400 rub. Discount: 300 rub. | 2 |
| DC1619 | Black mug 360 ml, original soft touch coating Arcana | Original | 1500 / 1300 rub. Discount: 1200 rub. | 1 |
| DC1961-8450007268 | Mat for the central niche of the Vesta tunnel 8450007268 original | Original | 250 / 150 rub. Discount: 100 rub. | 1 |
| DC1989-7711821299 | Holder for tablet Duster, Terrano, Kaptur, Arcana, etc. 7711821299 original | Original | 2200 / 1800 rub. Discount: 1500 rub. | 2 |
| DC2165-8200194580 | Duster 2011 - wing turn signal (L=R) original 8200194580 | Original | 550 / 400 rub. Discount: 300 rub. | 1 |
| DC1926-8450039478 | Plug for rear left outer door handle Vesta 8450039478 original | Original | 100 / 70 rub. Discount: 50 rub. | 2 |
| DC1401 | Clock for car interior (black type2) | Analogue | 1000 / 700 rub. Discount: 600 rub. | 0 |
| V089 | LADA Vesta windshield drain | ArmAuto | 700 / 550 rub. Discount: 550 rub. | 0 |
| V114-1420501 / LVE112802 | Radiator grill LADA Vesta (Luxe, Exclusive) | Pt GROUP | 9900 / 8600 rub. Discount: 5100 rub. | 0 |
| DC1376 | Car interior clock (black type1) | Analogue | 800 / 600 rub. Discount: 500 rub. | 0 |
| DC1402 | Car interior clock (white) | Analogue | 800 / 600 rub. Discount: 500 rub. | 0 |
| DC2578 | Set of Z-shaped automotive seals (2 pieces, 1.5 m each) | 500 / 250 rub. Discount: 200 rub. | 0 | |
| DC1991-7711821300 | Original Renault phone holder with magnetic deflector mount 7711821300 | Original | 1500 / 1000 rub. Discount: 800 rub. | 0 |
| DC540 | Deflector for the air duct in the cabin from Renault Captur, suitable for Duster, Logan, Sandero, Largus (chrome) | Original | 1200 / 900 rub. Discount: 700 rub. | 0 |
| DC101 | Sealant for installing spoilers and other body kits | 1500 Discount: 1500 rub. | 0 | |
| DC539 | Deflector for the air duct in the cabin from Renault Captur, suitable for Duster, Logan, Sandero, Largus (orange) | Original | 1000 / 800 rub. Discount: 600 rub. | 0 |
| DC189 | Renault badge | Original | 100 Discount: 100 rub. | 0 |
Mirror in analysis
I took apart the old mirror “to the bones”. It became clear how everything works there and where is the source of the glass rattling at high speeds (“the vacuum zone on the back of the case slams”). In short, the situation is this. The assembly from the body to the mirror sheet is assembled sequentially, and the plastic plate itself with glued glass is snapped into place at the very end.
At the same time, apparently, snapping it back in its entirety is very problematic! You have to press the spacers out of the grooves, but they are under glass! If it breaks, there is no problem, with a decent amount of force it will pop out, but to take it apart without damaging it and then snap it back... hardly.
And the reason for the slacking is simple. There, the plate with the mirror is attached to a movable slide, which on one side is fixed to the side of the ring with a spherical base and is held by a small pin inserted into a hole in this side, and on the other - to gear brackets, which, when the axis rotates, pushes out 2 parallel motors with gears the drawstring is pulled outward or, conversely, pulled inward.
The slide and the support ring are rigidly connected, and the ring, following the slide, moves freely back and forth, turning the mirror. And all this is pushed apart (and in theory should prevent vibration) by a hollow rubber ring (pictured on the left):
But it has thin walls and is very soft. I think when the air blows at speed, its elasticity becomes insufficient. The solution seems simple - increase the elasticity of the rubber ring (for example, by inserting a strip of foam rubber inside it).
But, I repeat, it is unlikely that you will be able to get there and unfasten the mirror from the stops without damaging the glass! So IMHO it’s easier not to take risks and try to disassemble the mirror, but, as Vid suggests, to adjust the position and support the edge of the glass with an elastic band inserted into the shelf between the glass and the body.
The door does not open from the inside - what to do?
If everything opens normally from the outside, but it cannot be opened from the inside, then check the position of the “child lock” lever. This mechanism is designed to prevent children sitting in the rear seats from opening the door. Moreover, this does not depend on whether the car is moving or not. The door opens from the outside without any problems.
To disable the child lock, you need to find its lever, located next to the main locking mechanism. To unlock it, it must be moved to another position. Each door handle has its own lock; to fully unlock it, you need to disable the mechanism on each specific door. It cannot be disabled if the lock is enabled and the battery is discharged or disconnected.
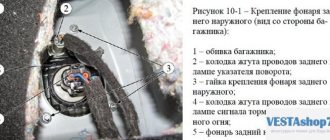
Fuse
The very first step in diagnosing this problem is to check the fuses. The block is located on the left side of the instrument panel, under the plastic shield. You need to find three protective elements in it:
- F9(3A) – responsible for the turn signal in the left mirror;
- F18(3A) – for the right repeater;
- F12(15A) – BCM controller (body control module), responsible for the rest.
Each of them should be removed and checked for integrity. If a blown fuse is detected, it is replaced with a similar one. But it must be remembered that the protective elements do not simply burn out; there may have been a network overload or short circuit. If the situation repeats, contact the service center.
Installing a buzzer
If it is not possible to flash the instrument panel, or the instrument cluster is not included in the list from the document, it is possible to install the buzzer yourself (buy).
- We connect the white wire of the buzzer to pin 49A of the turn signal relay.
- black wire - to ground.
- secure the buzzer with tape inside the panel.
The buzzer can also be connected to the hazard warning button block (photo author):
Source
Interior dimensions of the domestic model
Thanks to the impressive size of the body, the Lada Vesta managed to acquire a fairly spacious interior. Here, on both seating rows, five people of average build can sit with sufficient comfort. Trips over long distances with such a large number will proceed with comfort and in an unnoticed time.
The developers paid great attention to such an important dimensional parameter as the height inside the LADA Vesta cabin. Thanks to this, Vesta has increased the amount of space between the seat cushions and the roof lining. Tall passengers will feel quite comfortable after boarding
Also, now there is no risk of catching your head on the edge of the doorway while “immersing” in the cabin
Tall passengers will feel quite comfortable after boarding. There is also now no risk of catching your head on the edge of the doorway while “immersing” in the cabin.
The length and width of the Russian model had a beneficial effect on the amount of space available for placing the legs of the rear riders. The distance from the back of the front seats to the passenger’s knees in the rear seat row is an enviable 200 mm. Even people 2 m tall will not be able to rest against the front backrests.
Turn signals don't turn on well
Do you notice a strong click when you turn off the right turn or a slow activation of the 3-blink mode with the turn signal in one direction? The cause of this problem is poor-quality casting of parts. Ilya Shabanov shared instructions for repairing the steering column switch in this situation.
Required
: remove the left steering column switch, prepare a file or sandpaper p1200.
Procedure for disassembling the steering column switch
:
- If necessary, remove the seal by heating it with a hairdryer.
- Remove the cover, remove the two screws and release the two latches.
Repairing the steering column switch
:
- We find a white part of poor cast.
- Remove the part by prying it off with a screwdriver.
- We level the walls of this part with a file or sandpaper.
- After finishing the part, we install it in place and lubricate it.