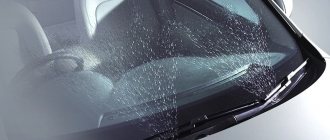
Side mirrors improve rearview visibility, but unfortunately, side mirrors often break or come off. Driving with a broken side mirror can be very unsafe, especially in heavy traffic conditions. Replacing side mirrors at service stations can often cost a lot of money. But this is a very simple procedure that every car owner can do with just a few special tools. Below in the article we have described a detailed action plan for removing and disassembling the side mirrors.
- Keep the car in park position. Turn off the ignition. Lower the glass all the way down on the side you want to change the glass on.
- Disconnect the negative battery terminal. This will help prevent electric shock when working with electrical components in the mirror power harness.
- Disconnect the negative battery terminal. This will help prevent electric shock when working with electrical components in the mirror power harness.
- Remove the interior door trim panel using the removal tool and remove the trim pieces. Look for any hidden screws in the mounting cover around the door panel. Remove all screws using a screwdriver. Place all screws and trim pieces in a safe place to avoid losing them.
- Remove the panel from the door. You need to be careful when removing the panel. There is wiring connected to the door panel. When removing the panel, make sure that all wiring is disconnected. Pay attention to how all the wires are connected so that you can connect them when reassembling.
- Locate the wiring harness and slowly disconnect it from the clamp. You may need a screwdriver to help press the lock. Do not attempt to unlock it without the proper tool. If you have manual windows, skip this step.
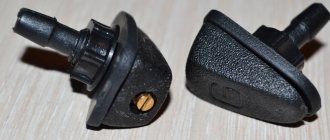
- Loosen the mirror mounting nuts using a hex wrench or screwdriver. Carefully remove the nuts and keep them aside. Gently pull out the mirror.
Mirror for Toyota Corolla: rear view and side
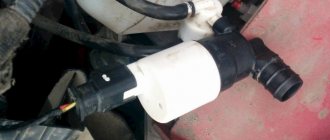
The process of operating a car involves the occurrence of various types of malfunctions, ranging from engine breakdowns to scratches on the hood of the vehicle. One of the most commonly at risk parts is the rear view mirrors located on the sides of the car. They “suffer” in dense traffic or over time they become cloudy and lose their information content (the same applies to the interior reflective element). Toyota Corolla is equipped with fairly informative mirror elements, but to increase the reflection area, many drivers equip their vehicle with larger “reflectors”.
Position and adjustment
5 accurate rear view cameras for a car from AliExpress
Before you begin dismantling the mirror, you need to understand the method of attaching it. Some cars have mirrors mounted on the fenders, but this is extremely rare these days. Fastening is realized using special studs through the car body.
But most often mirrors are placed on the pillars of the front driver and passenger doors. They are secured with several studs through a nut. If a car is equipped with a function such as electrical adjustment, then microcircuits are located in the case; they often break down, which necessitates repair work.
How to install and secure heated side mirrors
To assemble and connect the side mirrors yourself, you will need minimal electrical knowledge and dexterity. You must act in the following sequence:
- A set of mirrors equipped with an internal heating system is purchased.
Heated mirrors for Lada Granta - The standard side mirrors are removed from the car in the manner described above.
- After installation, the top cover on the side mirror housing opens. This gives access to the wiring socket (it is supplied with the mirrors). The side mirror housing is opened and the electrical wiring is connected.
- The wires are connected to the socket and inserted into the door through the mirror housing.
- Use a Phillips screwdriver to remove the plastic trim from the door.
Plastic trim removed from car door - The wiring runs through the door and dashboard to the fuse box, next to which there is a relay with a plug for turning on the heated mirrors. Mirror wiring is connected to the heating relay
- The wiring plug is connected to the socket shown in the photo, after which the car door trim is reassembled.
Removing the mirror device from the car
How to disassemble a side mirror? First you need to remove the mirror from the car, and only then start disassembling it. If the device is equipped with a mechanical drive, then at the initial stage it is necessary to remove the bracket that acts as a stopper. It is located on the adjusting mechanism.
Then we unscrew several screws that secure it to the car body, and then remove it. If it is a power mirror, you will first need to remove the terminals from the battery. After this, we disconnect the contacts going to the device drive, and also unscrew a couple of screws and remove the mirror from the body.
How to remove a rear view mirror
Mirrors of this type are designed to study the situation on the road behind the car. They can be divided into two categories:
- salon - installed inside the car;
- side - located on both sides on the front door pillars.
The interior mirror is located inside the car
side mirrors are located on both sides of the car
It seems that it could be easier than dismantling the mirror? In fact, this is not so easy to do, and the principle of dismantling can vary significantly between different brands and models. We will tell you about the most universal methods of removing, disassembling and installing internal and external ones. However, if any of the methods described here do not work for you, check your machine's owner's manual. Today, many automobile companies make all such processes much easier: perhaps, instead of unscrewing bolts and bending terminals, you only need to press a small button or pedal.
Required Tools
In order to remove the mirror, you do not need any specific or hard-to-reach tools. As a rule, everything you need can be found in any motorist’s garage.
- a set of screwdrivers (most likely, only figured and flat ones will be useful);
- wrench depending on the size of the bolts;
- household hair dryer for removing the mirror element.
Add to this set skillful hands and the desire to do everything efficiently, and you can get down to business.
Salon
Interior mirrors can be installed in a variety of ways depending on the make, model, and year of your vehicle. There are two methods that are used most often.
- Installation into the car ceiling using bolts or self-tapping screws.
- On the windshield using glue or suction cups.
Thus, on many domestic cars the assistant device is installed using ordinary bolts, which greatly simplifies the dismantling process. To do this, you just need to unscrew the bolts after removing the plug.
in order to remove such a mirror, you just need to unscrew the bolts
The situation can become more complicated if the mirror is mounted on a bracket glued to the glass. First of all, check whether it is possible to separate the bracket itself and the platform glued to the glass. On most cars, they are separated by moving the clamps or turning in a certain direction.
if the mirror is glued to the glass, you need to try to separate the bracket from the holder platform
If this is not possible, you will have to resort to a radical method and remove the bracket along with the windshield. The fact is that the glue holds the elements very firmly, so when you try to separate the mirror, you may accidentally damage the glass.
You most likely will not be able to separate the bracket platform from the mirror on your own, so it is better not to risk it and contact a special salon. Especially if you are dismantling it for future tinting. However, if you decide to do it yourself, be prepared that a trace of glue will remain on the glass.
https://youtube.com/watch?v=XvTNVkHw8Do
Side left and right
Side mirrors are divided into two categories:
- with mechanical drive;
- with electric drive.
On almost all cars, you will need to remove the door trim to get to the mounting screws. You can find out how to do this on your model in the instruction manual.
This is what a car door looks like with the trim removed
Next, to remove a mechanically driven part, you need to follow a certain procedure.
- Remove the regulator locking bracket.
- Unscrew the fastening screws on the inside of the door.
- Remove the mirror.
Video: dismantling the side mirror
If the mirrors are electric, the procedure will be slightly different.
- Disconnect the negative terminal from the battery.
- Disconnect the block from the wires.
- Unscrew the fastening screws on the inside of the door
- Dismantle.
How to change the side glass yourself
To successfully replace your side glass without the help of a specialist, first make sure you have not only the new part, but also the following items:
- different screwdrivers, preferably a set, with the obligatory presence of a Phillips and a flat blade (“spatula”);
- new clasp clips;
- a broom or brush to sweep away debris and debris.
You should also think about how to replace the broken side glass without getting hurt by pieces of it while working. Even if it is Stalinite, it is better to wear durable rubber gloves, or rubberized fabric gloves of sufficient density so that your fingers are definitely safe.
1st step: remove the door trim
You need to unpin the following parts one by one:
- Armrest. It is usually held in place by three screws hidden by plugs. To remove the latter, just pry off their edges with a thin screwdriver. The Phillips will help you unscrew the screws themselves.
- Handle for driving the lifting mechanism. It is located on a splined shaft, from which it is easy to remove. Before this, you only need to remove the small plastic retainer in the same way as you removed the plugs in the previous paragraph, that is, using a thin screwdriver.
- Door handle. Remove the special trim, which not only serves a decorative function, but also serves as a fastener.
Now all the obstacles to removing the casing are behind you. All that remains is to remove its latches using a flat-head screwdriver, after which you can remove it from the door frame.
If your car has side airbags, the necessary steps will be to disconnect the electrical wiring and remove the airbag sensor. If you have electric windows, they will also have to be temporarily removed.
2nd step: remove the decorative trim at the top of the door
Here the already familiar process is repeated with latches that are convenient to pry off with a “spatula”. Then the plastic cap screwed into the door lock is removed.
The trim can also be pryed off with a screwdriver (from the outside), slightly lifted above the hooks on which it sits, and carefully separated from the door, being careful not to damage the upholstery.
Step 3: Remove shards from broken glass
Return the window drive handle to its place and lower the glass (its remains) as much as possible. If you took off your gloves, be sure to put them back on. Pull out large pieces and fragments first. Small ones can be removed with a vacuum cleaner. It happens that some particularly tiny particles of glass get stuck in hard-to-reach areas of the seat. The following life hack will help in this situation: wrap the shaft of a thin screwdriver with electrical tape, but only so that the sticky side is on the outside. This way you can remove any remaining glass chips.
Try to collect the fragments as much as possible. When some of them remain, there may be a specific unpleasant sound when using the door and a risk of injury for passengers in the driver’s car.
4th step: change glass
It is advisable that you find an assistant at this stage. When you directly install the part into the door frame, it is better not to hold it alone. Without some skill, this is risky.
Let's tell you more about how to change the side glass yourself. First you need to lift the window regulator so that you can see all the screws that hold the cable pressure plate. It is recommended to unscrew one of them completely and loosen the others, after which you can move the cable to the side.
Then you need to slightly tilt the new part inward and slowly place its lower edge into the pressure plate
This is the most crucial moment, act carefully and focused. The help of a second person is needed to ensure that the glass does not break or slip out of your hands.
Now secure the part by tightening the clamping screws.
It is very easy to check whether you succeeded in changing the side glass correctly. Use the lifting mechanism to lower and raise it several times. This should be done smoothly and effortlessly.
Assemble the car door, proceeding exactly in the reverse order (use our instructions as a cheat sheet if you don’t remember the order of all your actions).
That's all, the procedure doesn't look that complicated. But before you take it on, evaluate your capabilities sensibly, because not every car enthusiast will be able to competently and safely change the side glass themselves. Sometimes turning to professionals is the right step.
How to change the rear side window on a classic video:
Third way
Press on the top edge of the mirror without much effort. Place a screwdriver on the raised edge and pry out the hooks. The mirror element must be removed.
Hit the massive part of the car mirror against a hard surface, but not too hard. With sufficient force, the internal grooves open and the mirror flies out. But here you need to be very careful so as not to accidentally break it.
Removing the fastening to the body is carried out as follows: remove the spring and unscrew the adjustment rod from the fastening side. All assembly work on the mirrors, if everything went without damage, is carried out in the reverse order.
Remove the rubberized pads. Unscrew several screws that regulate the position of the mirror. Before further disassembly, we sketch (remember) the position and colors of the cables, since each of them works in a certain direction and performs its own function.
How to glue a car mirror to the windshield
First we need to decide on the glue that we are going to use.
What glue should I use?
The main rule: the glue holding the interior mirror to the windshield must be two-component. Yes, there are many varieties of all-purpose glue. But in this case, universal glue will not work. The fact is that two-component glue perfectly withstands sudden temperature changes, high humidity, and most importantly, vibration. Conclusion: the mirror element should not be glued with universal glue.
There is a second option: use light-curing glue. This is a substance that quickly “sets” when exposed to sunlight. This glue can be purchased at specialized auto stores. But it has a serious drawback: to work with it, a powerful ultraviolet lamp is required, without which reliable bonding cannot be achieved. Some car enthusiasts claim that you can do without it, just sticking the mirror on a sunny summer day is enough. But such gluing cannot be called reliable.
The conclusion is simple: the best and least troublesome option for gluing a mirror is two-component glue. For example, Loctite 37438, which has become incredibly popular recently. By the way, it is sometimes used to glue DVRs that have a loose fastening device.
How to attach a mirror element
To keep the mirror securely on the windshield, you must follow the following algorithm:
- Select the location for installing the mirror. It should be glued in the center of the glass, at the same distance from both the passenger and the driver.
- The windshield is cleaned of dirt. First, this is done with a rag, then the surface of the glass is wiped with alcohol.
- The mirror is disassembled as indicated above (after all, in fact, only the bracket on which the mirror will be installed needs to be glued to the glass).
- A thin layer of glue is applied to the bracket and to the windshield. After this, you must wait at least 15 seconds. Glue is applied to the interior mirror bracket
- Then the bracket is installed on the windshield and lightly pressed down manually (and if you decide to install the mirror entirely, without disassembling, then after installation it must be additionally secured with tape, which will support the mirror until the glue sets). The interior mirror is glued to the windshield
- The glue must dry properly, so you cannot drive the car for 24 hours.
Mounting the Device on a Bolt-On Bracket
Not all modern cars have interior mirrors glued to the windshield. In some cases, the mirror bracket is attached the old fashioned way: with bolts to the ceiling. In this case, you need to act like this:
- The mirror together with the mounting bracket is installed in the ceiling niche and held by hand. The interior mirror is installed in a niche and held by hand
- Self-tapping screws are inserted into the holes and tightened using a Phillips screwdriver.
- Sockets with installed self-tapping screws are closed with plastic plugs (provided that such are provided in the design of the bracket).
Common device problems
Let's look at a few troubles that every car enthusiast may encounter.
Peeling off the mirror surface
Sometimes this kind of trouble happens even on new cars. The reasons can be very different.
- the manufacturer decided to save money and used a low-quality adhesive;
- during the work, the master did not allow the glue to set properly;
- the mirror came unstuck due to too sudden temperature changes (and this is the most common reason, especially in frosty winter).
In all these cases, the car owner will have to use two-component glue, as shown above.
Glass replacement procedure
The mirror element of both the exterior and interior mirrors may be damaged. Below is the sequence for replacing it:
- The glass is removed from the mirror body.
- The new mirror element has several plastic hooks (in our example there are 4).
These hooks are inserted into the mounting holes in the mirror body, after which you need to press very carefully on the mirror element. The new mirror element is installed into the mirror housing manually - A characteristic click will be heard, indicating that the plastic hooks have engaged and the glass has “settled” into place.
The procedure for replacing mirror elements in interior mirrors is similar to that given above (the only difference is that there are usually 2 plastic latches in the interior mirror, not 4).
How to secure and how to glue a new one
If you have successfully dismantled the mirror yourself, then returning it back will not be difficult. As a rule, all actions are performed in reverse order.
But you should pay special attention to the selection of glue, since not everyone is suitable for this process
it is necessary to choose the right adhesive for attaching the mirror to the windshield
Glue selection
There are three types of compositions for gluing mirrors:
- chemically cured;
- light-curing;
- compositions based on epoxy resin.
A composition with resins will work well only if it is allowed to dry properly. This usually takes from 10 hours to a day. In this case, the part must be pressed tightly at all times. This approach is not very convenient, so such products are not used in everyday life.
Light-curing mixtures operate when exposed to special ultraviolet lamps. This is one of the most common methods in production. However, if you are not the happy owner of a lamp, you should not purchase such a composition. Sunlight, especially diffused light, is not able to have a sufficient effect.
For these reasons, chemically cured compounds are the most popular. A special hardener starts the polymerization process. As a rule, they consist of the glue itself and an aerosol activator, although one-component compositions are also found.
Please note that some materials cannot be used to glue the mirror
- household superglue;
- double-sided adhesive tape.
The adhesive component of both materials has such a composition that when used on glass or metal, it will not be able to harden completely. High air temperature inside the cabin or heating of the glass from sunlight will soften it and the mirror will fall off. You can use household adhesives only if the mirror fell completely unexpectedly, and now you need to urgently get to a car service center.
How to stick to windshield
Having selected the appropriate glue, you can begin returning the rear view mirror to its rightful place. Choose a warm day for this or install a heater in the garage: the air temperature should be between 20 and 25 ° C.
process of applying glue to the holder platform
- Clean the holder platform of any old adhesive residue.
- Lightly sand the surface of the holder to improve the adhesion effect.
- In the same way, sand the area of the windshield where it is glued.
- Degrease the holder and glass area.
- Apply a thin layer of glue to the holder.
- Spray a special activator onto the place where the part is attached.
- Place the adhesive side of the part onto the glass. Try to follow the trail left from the previous time.
- Press the mirror firmly against the glass and hold for the time indicated on the package.
- After making sure that the part is firmly in place, clean the mirror from any remaining activator and glue around the holder.
- Reinstall the windshield (if you removed it) according to the owner's manual.
Ready! If you followed all the instructions carefully, the mirror looks like it was installed at the factory or at least in a car repair shop.
How to install on bracket
If during dismantling you did not separate the bracket platform from the glass, it will be even easier to assemble it. To do this, find a fixing element: it may be a screw or a latch. After this, connect the bracket leg to the platform.
There are also special brackets that are not glued to the glass, but are installed on the ceiling or other elements of the car, for example, on sun visors.
Replacing the mirror element.
Replacing mirror elements may be required for the following reasons:
1. The mirror element cracked due to impact or temperature changes
2. Replacing a regular mirror element with a heated mirror element
3. Mirror elements from the car were stolen.
The question arises: How to replace the mirror element? What is the technology and how to remove the mirror element yourself, without being a car service specialist. With little skills this is not difficult.
It should be remembered that when dismantling and installing the mirror element, care must be taken not to allow large loads on the mirror sheet, since it is not rubber and will burst after a critical load threshold. That is, patience and tenderness. Of course, if the mirror element has already burst or cracked, then you can safely pull it out of the mirror housing, the main thing is not to break off the side mirror of the car itself and not to turn the car over
So, let's begin
Of course, if the mirror element has already burst or cracked, then you can safely pull it out of the mirror housing, the main thing is not to break off the side mirror of the car itself and not to turn the car over. So, let's begin.
1. When removing the mirror element, it is necessary to turn it out as much as possible so that a gap is formed at the top between the element and the mirror body
Be careful when using electrical adjustment to avoid damaging the mirror motors.
2. The mirror element is usually attached in the center to a round seat with latches that disengage with the seat when dismantled
3. It is necessary to apply force to the mirror element from within the mirror itself, distributing this force as much as possible over the area of the mirror element to avoid distortion. This is achieved in several ways:
• Those whose fingers are not very spread out with their rings can insert them into the gap formed between the mirror body and the mirror element and press from the inside onto the backing of the element until it falls out of the body; with the other hand, of course, you need to catch it.
• Take 2 screwdrivers and hold them in your hand in the form of an inverted V; the ends of the screwdrivers press the element from inside the mirror and dismantle it.
• A rope or twine, folded in half, is inserted into the gap between the element and the mirror, distributed in the center of the mirror, the ends of the twine are clamped in the left hand, the right hand holds the mirror body so as not to damage it. By smoothly pulling the twine, the mirror element is removed from the mounts and falls out. In this case, the right hand holds the mirror body, so you need to find a third hand somewhere that will catch the falling mirror element.
4. The installation of mirror elements is carried out, as they say, in the reverse order - the latches are inserted into the mounting grooves on the mirror itself and the element is fixed by pressing evenly with the entire palm. It is not recommended to hammer the element with a hammer, press on the edge, or rest with your feet.
If the mirror element is heated, then it is necessary to provide for the presence of wiring for it in advance.
And this is a separate replacement for the glass of the mirror element:
Disassembling the mirror
Disassembly example
There are several ways to disassemble a car mirror.
First way
Using a curved object or a screwdriver, unclip the mirror by gently pressing it from the inside. Trying to pry the mirror off from the edge may damage it. Some car enthusiasts use a wide variety of objects to remove the mirror element. It could even be all kinds of kitchen spatulas. Some wrap the edge of the spatula with electrical tape so as not to damage, or rather, scratch the mirror surface. Others use one hard spatula to fix the gap, and a second softer one to thread it into the resulting gap.
Replacing a rear view mirror: how to remove and disassemble
Hi all! I think there are many different reasons why a driver might need to replace their rear view mirror. For some, the glass cracked; for others, the case itself broke. Or the car owner simply wanted to install a more modern design or tint the glass. Or maybe the light bulbs in your mirror have burned out, and therefore you will have to first disassemble everything and reassemble it again.
Now there are many options for new glasses that replace the standard mirror. The same function of a rear view camera, heating or monitor may not be superfluous in a car.
You get the point. We need to remove, disassemble and reinstall the mirror. Which one exactly? Logical question. The procedures may concern both the exterior mirror and what is inside the cabin. Accordingly, we will talk separately about the left and right side mirrors, as well as the interior cabin mirror.
You have decided to carry out dismantling work with your own hands and then reinstall it. The only question now is how to remove and disassemble the element, so that later everything can be returned to its place without any risks. In the meantime, glass replacement or another procedure will be carried out, depending on the specific situation.
To carry out dismantling work, you need to take:
- curved screwdriver;
- flat screwdriver;
- wrench to match the size of the fasteners;
- hair dryer;
- degreaser;
- rags;
- high-quality glue;
- some free time;
- clean garage;
- good mood.
Add to this set of tools a couple of skillful hands, and everything will go great.
As you understand, rear and interior mirrors are removed differently.
Work in the salon
Let's start with the interior design. A lot depends on what kind of car you are working with.
Automakers use different mounting systems. Therefore, start from the specific situation. So, for example, different fasteners are used on cars such as:
- Deo Lanos;
- VAZ 2110;
- Niva Chevrolet;
- Ford Focus;
- Renault Logan;
- Chevrolet Cruze;
- Lada Priora;
- Lada Kalina;
- Hyundai Solaris, etc.
Still, owners of inexpensive cars mostly do this work on their own.
And here you may encounter glue and suction cups, or bolts and screws. These are the most common installation methods.
Domestic cars mostly come with bolts. Therefore, it will be easy to remove the structure. The plug is removed, the key is taken and the fasteners are unscrewed.
But there are also brackets glued to the glass. Here you will first have to figure out whether it is actually possible to separate the fastening element from the glass. Most often, designers use clamps or rotating mechanisms. If this is not possible, you will have to remove not only the bracket, but also the windshield itself. The glue holds the element very tightly, and therefore it will not be difficult to damage the front cover.
Please refer to the instruction manual. There you will probably find a hint on what exactly to do in this situation. Sometimes it’s better to visit a car service center, where specialists will do everything carefully and clearly.
Side dismantling
Everything is clear in the cabin. Now you need to dismantle the exterior mirror structure. Left or right, it doesn’t matter much here. What is more important is what type of design is used. The side mirrors are power driven. And it can be mechanical and electrical.
Almost any car is structurally designed to allow access to fasteners through the doors. You just need to remove the casing. Again, look in the manual for your car, since there are no universal instructions on this matter.
If you have a mechanical drive, then:
- The locking bracket of the existing regulator is removed;
- The fastening screws are tightened on the inside of the door;
- The mirror itself is removed.
In the case of an electric drive, everything is somewhat different. You need:
- raise the hood;
- find battery;
- remove the negative terminal from the battery;
- disconnect the block with wires;
- remove the door trim;
- unscrew the mirror fasteners;
- remove element;
- rejoice at the result.
The last point is especially important. Know how to be enough for yourself even for small achievements.
Installation of mirrors with additional functions
Modern devices not only reflect, but also have a number of additional functions. You can equip them with heating, or even install a camera with a monitor.
Heated
The heating function is very convenient for external side mirrors, since thanks to it they will not fog up in high humidity and will not become covered with a crust of ice in frosty weather.
The heating element in the mirrors will help prevent fogging and icing
The heating device consists of the following parts:
- a heating element;
- wiring for a 12V system;
There are both separate heaters and mirrors themselves with a built-in element on sale. Both are quite easy to install. To do this, you must perform the following steps.
- Remove the door trim.
- Remove the side mirrors according to the instructions.
- Thread the wires through the side of the door and out to the outside mirrors.
- Remove the reflective element after preheating the junction with the body.
- Remove the screw and remove the frame (if equipped).
- Pull the wires through the frame body, strip the ends and install the connectors.
- Put the frame back in place and route the wires through it.
- Connect the wires to the contacts of the heating element and install it.
- Put the mirror back in place and put the entire structure back together.
- Connect the part of the wire that is located inside the passenger compartment to the heated rear window relay.
- Check the functionality of the mechanism.
Now, in bad weather, you don’t have to get out of the car and clean the mirror yourself. This is a very convenient feature, especially considering the low price of the equipment.
Video: installation process of a mirror with a heater
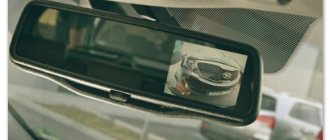
With monitor
Monitors are a common feature in modern high-end cars. As a rule, they are installed on the control panel and display information about the car, an image from a DVR or camera.
Article on the topic: VAZ 2110 fuel filter - change it on time to avoid trouble
a rear view mirror equipped with a monitor will show the entire space behind the car
If you cannot afford a car with such equipment, but you like the idea of a monitor in the cabin, pay attention to special rear-view mirrors with a monitor.
The most difficult thing in installing the structure is correctly laying the wiring and connecting the power. As a rule, wires are attached to the mirror: negative black (-12V), positive red (+12V), blue for connecting the signal source, as well as RCA connectors, which in everyday life are called tulips.
The mirror is equipped with a set of necessary wires
As a rule, monitors have three connectors, one of which is responsible for power, and the other two for receiving signals. In this case, you can connect both the front and rear cameras. By default, video from the front camera will be displayed on the screen. But when receiving a signal from the rear, the monitor will automatically switch.
The colors of wires and plugs may vary depending on the mirror model.
Route the wires along the floor or ceiling. Choose the best option taking into account the characteristics of your car model.
The mirror itself, as a rule, has special mounts that allow it to be installed directly on top of the factory one. If desired, the monitor function can be turned off, and then you will be left with a regular mirror, but, unfortunately, with a slightly worse reflectivity.
Video: DIY monitor and rear view camera installation
With a camera
Installing a monitor usually makes sense when you plan to display camera images on it. Conventional mirrors have blind spots, so the camera allows you to significantly expand your view of the area behind the car. In addition, using such equipment is very convenient when parking.
The rear view camera films the situation behind the car and sends a signal to the monitor
It is best to purchase a camera and a mirror with a monitor as a set: this will simplify your task when connecting.
According to the mounting method, all cameras can be divided into several types:
- mounted;
- built-in;
- on the bracket.
Mounted cameras are the most popular because they are smaller in size and do not require serious manipulations with the body or other elements of the car. They are usually installed above the number plate. There it is quite invisible, so you don’t have to worry about it being stolen.
All cameras have special parking lines that are displayed on the monitor. Using them you can calculate the angle, estimate the parameters of the machine and understand the distance to the displayed object. At first it may seem unusual, but with experience you will acquire all the necessary skills.
Front and rear cameras have different optical systems and are therefore not interchangeable.
The camera comes with all the necessary wiring to connect to the monitor. These include the excitation wire, which activates the operation of the monitors with a current with a positive charge, as well as the power wire.
The principle of the signal is as follows: when you switch to reverse gear, current is supplied to the camera, which, in turn, sends a signal to turn on the screen in the mirror. As soon as reversing is stopped, the image automatically disappears.
In order for the camera to work, stretch the wires from the back to the front of the car and connect them according to the instructions. If you purchased a monitor and camera as a set, this will not be particularly difficult: just connect the necessary plugs and wires according to their charge (plus to plus, and minus to minus).
Reasons for removing film
Peeling off the tint film is a very labor-intensive process that needs to be approached no less seriously than gluing it. So the removal methods will largely depend on the reason why you need to remove the old tint. Because a relatively freshly applied film is much easier to remove than an old one. And so let’s get acquainted with the most common reasons for its removal.
Reasons for removing the film:
- If you notice that the film has begun to fade, peel off, or some defects have formed, for example, air bubbles, or it has simply changed its color, then it is clear that there is no point in leaving it on the glass, because it has already lost its functions anyway and the appearance too. Basically, a change in color can occur when using non-metallic dyes in tinting, and the appearance of bubbles, in turn, is due to poor adhesion of the tinting to the window or poor-quality glue.
Side glass removal process
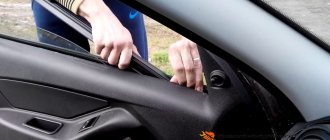
Step 1: remove the door trim
To do this, we sequentially dismantle:
- Armrest. It is usually secured to the door with three screws hidden under the plugs. Using a thin screwdriver, pry up the plug - it should come off easily. Now use a Phillips screwdriver to remove the screws.
- Window lifter drive handle. It is held in place by a small plastic element, which can be easily removed by prying it with a thin screwdriver. Next, it remains to remove the drive handle from the splined shaft.
- The handle that opens the door. To remove it, you need to remove the decorative trim.
The casing can now be removed. To do this, you need to press the latches with a flat-head screwdriver and pull the door trim out of the metal frame.
If your vehicle is equipped with side airbags, you will need to disconnect the wiring and remove the airbag sensor. If you have power windows, this will also require additional steps when replacing the glass.
Step 2: remove the decorative trim at the top of the door
To remove the decorative trim, you need to pry the latches with a flat screwdriver. Next, unscrew the plastic cap on the door lock. Now nothing holds the trim on the door; it can be removed
You must act carefully so as not to damage the upholstery. Pry the cover with a screwdriver (from the outside) and slightly lift it off the hooks
Step 3: Remove glass shards
To remove the side glass or remove its remains, you will need to put the window handle back on. The glass (or what is left of it) must be lowered to its lowest position. Be sure to wear gloves to avoid cutting yourself. Now carefully remove the fragments from the seat.
It is better to collect small fragments with a vacuum cleaner. You can pull out fragments from the most inaccessible places using one trick. Take a thin screwdriver and wrap the tape around it with the sticky side facing out. This device will help collect fragments from hard-to-reach places.
If you leave the fragments in the car, then an unpleasant sound will probably appear when opening and closing the door. In addition, the driver and passengers risk injury. Therefore, after you have removed the side rear or front glass, you need to collect the fragments as carefully as possible.