In the suspension, the stabilizer struts of the Priora car act as an “adapter” in the chassis of the car. The stabilizer is responsible for the lateral stability of the car on the road. Every pothole, turn, braking, and sharp acceleration “shakes” it. The stabilizer bushings of the Priora car are the conductor between the stabilizer and the car body. It is the racks that bear the brunt of the impact from potholes and uneven surfaces. Everything in the struts suffers: the rubber bands wear out, it happens that these “eggs,” as car enthusiasts call them, break, which is a sad end to their work. Replacement is a labor-intensive task if you have never done it, the price of the parts themselves is not more than 300-500 rubles. But bushings and stabilizer struts can cause you to suffer - read the article to the end so as not to suffer and not be nervous!
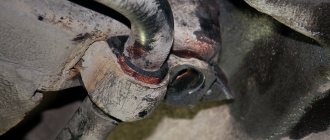
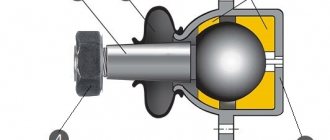
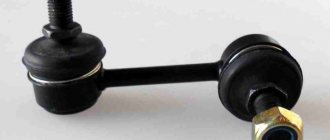
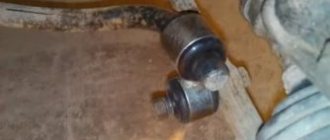
The rear stabilizer bushing looks like this
The original chassis components in the Priora work well, reducing the impact force from artificial and natural bumps. But not everyone is happy with them: those drivers who like to take turns at speed prefer to upgrade their Priora by installing SS20 front struts, which are often installed in sports cars. They increase the vehicle's stability when cornering and on a straight road.
But it’s not just the desire to drive that makes Prior owners exchange the “eggs” for sports ones - the original ones, of course, are made to last, but the mounting brackets are flimsy; during operation, not everyone remembers that the stabilizer along with all the fastenings (including - the bracket is invisible at first glance!) needs to be checked. This is very noticeable on the stabilizer of the rear beam - it loosens faster - the bushings first of all make alarming creaking sounds, warning about replacing the stabilizer struts (bushings).
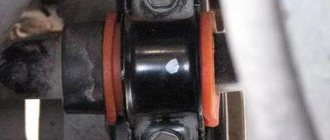
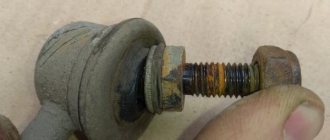
The stabilizer strut (eggs) when installed on a Priora look like this
Analogs
Not only sports stubs can be installed as a replacement for the original racks. There are good analogues for the price of VAZ racks:
- VIS;
- BRT;
- Trialli;
- CC20.
They all have about the same price - about 200-300 rubles. And SS20 struts can cost 3-4 times more, because they change the driver’s perception of his car - the car becomes more maneuverable, holds the road better, making it more difficult to resist the temptation not to press the gas pedal to the floor.
But it’s too early to dream about racing until one good measure is taken to prevent chassis failure in the Priora. In addition to the “eggs,” the bushings suffer, crack, and wear out. They make it so that during maneuvers the stabilizer twists in different directions, and when they wear out, play is formed in the stabilizer bar. This can be felt because the car wobbles more during acceleration and braking on turns.
Buying and replacing stabilizer bushings for a Priora is not such a big investment, but by making it in advance - during the replacement of the same struts - the problem with the suspension in the future will be solved, its service life will increase. Remember that the quality of roads leaves much to be desired, so suspension elements are a real consumable item for the domestic car enthusiast.
How to disassemble an existing structure
- At this stage, you will need pre-prepared spring ties. They need to be installed on the second coil of the spring. The second tie is installed in exactly the same way, only on the other side.
- Reduce the spring by twisting the coupling bolts of the first tie. This must be done until the moment when the second tie begins to move freely on the coils. Repeat all these steps on the second screed.
Why do racks fail?
On the Priora, the struts really fail quickly, you may not notice it, but hear it. Experienced mechanics say that there are three main reasons for this - poor build quality, carelessness of the owner and extreme driving. The fact is that when turning, the stabilizer tilts towards the angle of rotation, which is why the strut closest to it is compressed, and the farthest one is decompressed.
Constant cornering, drifting, and driving over artificial bumps at high speed cause the stabilizer struts to continuously compress and unclench. What happens to the springs during such experiments? Sooner or later they will become deformed. And with the racks, everything is a little more complicated, because they do not deform - they break immediately.
There are very few high-quality spare parts on the market; most components are supplied from China. Spare parts are no exception to the rule; they are also low quality - flimsy. The “cherry on the cake” from Chinese manufacturers is the replacement of good lubricant with ordinary technical petroleum jelly. Vaseline does not promote stable rotation of the joint, and the stabilizer does not perform its main function.
Lada Priora asks that its owner check the suspension more often for serviceability! Undoubtedly, you can replace the stabilizer bar, but this will not solve the problem if you install loose bushings and struts on it. If you change something in the suspension, then change it radically - so that the next knock in the suspension will not be heard very soon.
How to disassemble an existing structure
- At this stage, you will need pre-prepared spring ties. They need to be installed on the second coil of the spring. The second tie is installed in exactly the same way, only on the other side.
- Reduce the spring by twisting the coupling bolts of the first tie. This must be done until the moment when the second tie begins to move freely on the coils. Repeat all these steps on the second screed.
How to change stabilizer struts and bushings on a Priora
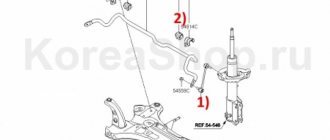
To replace these parts you will need WD-40, a 14 key and a 17 key. Removing the stabilizer on the Priora is not required. But you can remove the wheels (although this is not an easy task, getting to the parts to be replaced will be much easier). First you need to unscrew the four bushing nuts, then the two strut nuts. Before doing this, it is better to “water” everything generously with WD-40 lubricant - this will make it easier to remove the nuts and parts.
During the process, the thought may creep in that you can change the “egg” and the bushing on one side, and on the other hand, not touch anything. Don’t even think about it: not only will there be an imbalance in the operation of the stabilizer, but also, the new parts will “grow old” much faster than expected, then you will definitely have to change two sets at once.
After unscrewing the nuts, you can begin to dismantle the old bushing and strut. Lubrication can alleviate the situation, but it will not provide simple, easy removal of the strut and bushing in the most advanced cases. After removal, you can clean the stabilizer tips to ensure good adhesion of the new parts.
Before installing new suspension components, it is recommended to coat the ends with liquid soap to facilitate installation. The front stabilizer struts in the Priora are larger than on the “tenth family”. Do not skimp on this spare part: the difference in the sizes of small parts, which seems insignificant, while driving will affect the agility and stability of the car.
What you need for this: tools, components
Replacing the front struts on a Lada Priora is possible with special equipment. If the appropriate equipment is not available, you should contact a service station. You will need the following tools: spring ties and a puller for steering tips. Some of the more accessible ones will be useful:
- Socket and socket wrenches.
- Six inch hexagons.
- Pliers.
- Hammer.
- A lift or trolley jack to raise the car.
Usually, replacement components are purchased for a car; sometimes they can be found in one set or purchased separately, saving money. The set includes:
- the racks themselves;
- set of bolts;
- support bearing;
- a pair of steering tips, as well as a pair of bump stops and boots.
Before starting disassembly, it is recommended to spray WD-40 on the joints of the parts and leave to “soak” for up to 10 minutes. This will allow you to easily remove old components and other elements.
Advantages of SS20 stabilizer struts
No matter how much you would like to save on sudden suspension repairs, it is worth considering the option of purchasing stabilizer struts, which will give the car improved performance and last longer with a calm driving style. SS20 stabilizer struts for Priora are usually installed on sports versions. They are not chosen in vain - with them, the stabilization and maneuverability of the car increase so much that they change the Priora beyond recognition. Simply put, they give the driver great driving emotions.
Replacing “eggs” often ends with the installation of an original part or an analogue. But ordinary repairs can be turned into small tuning. This will undoubtedly have its advantages: for example, due to the high quality of the part, it wears out more slowly and will last longer than usual.
There is nothing special about installing them: everything is as simple as with factory parts. There are a lot of elements in the Priora that can be replaced - someone starts with upgrading the interior, and this is not entirely correct. The first thing you can and should feel about a car is its ability to bring positive impressions from every trip. Of course, if you treat her well and monitor her condition.
The rear stabilizer on a Priora receives more load during acceleration than the front one. It basically takes less damage from any driving style and is replaced much less frequently. The procedure for replacing bushings and rear stabilizer struts on a Priora is no different from the process described.
Tips for newbies on replacement
- Before you begin replacing a part, be sure to check that all components are present.
- Follow the step-by-step instructions, remember which parts were removed from where, and in what order.
- When tightening the bolts and fastening the parts, there should be no differences from the original: no gaps, tight and even.
- It is better to replace the old ones with hydraulic structures; they can be disassembled, it is easier to replace some parts than to dismantle the entire structure later.
- Don't neglect to use WD-40 before starting work. This will preserve the thread and save effort.
- If you have doubts about whether it will work, it is better to ask an experienced car mechanic to observe and be present.
Sources
- https://gil-service.ru/dvigatel/zamena-perednih-stoek-priora.html
- https://koreec73.ru/uhod-i-remont/zamena-perednih-amortizatorov-priora-2.html
- https://k-SportRacing.ru/neispravnosti-i-remont/zamena-perednih-amortizatorov-priora-2.html
- https://ilifia-club.ru/tehobsluzhivanie/sborka-stojki-priora.html
- https://vaz-remont.ru/zamena-perednix-stoek-lada-priora-svoimi-rukami/
- https://priora-remont.ru/zamena-perednix-stoek/
- https://www.autoposobie.ru/zamena-perednih-stoek-lada-priora-svoimi-rukami/
- https://vaz.today/zamena-perednih-stoek-lada-priora
Standard bushings and struts
Everywhere you can hear the words that the standard stabilizer struts on the Priora are almost instantly replaced. But are they as bad as they actually say? The suspension of cars of the Prior family was modified after the “tenth” family - its service life has increased, and it allows it to go through bumps and holes more smoothly. The survivability of the suspension is reflected in the reviews of the owners - the Priora is more praised because it performs well in rural areas with original spare parts.
The stabilizer in the Priora is very different in size from the same part in the “tens”. But you won’t even be able to damage your car unintentionally. They may not be distinguishable visually, but the article number for the stabilizer link for the Priora 2170 contains the numbers 1118 or 0118, so it will not be easy to confuse them. The set for the “tenth” family is cheaper, but “the miser pays twice”!
The new generation, Priora, is a collection of the best tested developments of AvtoVAZ. Of course, compared to the SS20, the standard bushings and struts for the Priora have a shorter service life, but they cost “like originals.” They are stiffer than SS20, but over a period of multiple strut and bushing replacements, they will cost less to replace than SS20. Original parts are suitable for Priora. With their purchase, there will be no fear that instead of good lubrication of the joint there will be technical Vaseline.
Repair of the Priora suspension should always be carried out on time so as not to aggravate the condition of the car. Remember that stabilizer bushings are just a consumable item that can be replaced, but a total repair of the car’s chassis is already a big expense and a larger amount of work. Don't be lazy and take care of your Priora, check the suspension on time!
Now let's start disassembling the existing structure
1. This is where you will need the previously prepared spring ties. Install them on the second coil (top and bottom) of the spring, as indicated in the picture. We install the second screed in the same way, only on the other side.
2. Now start bringing the spring together; to do this (if anyone doesn’t understand) you need to twist the tie bolts of the first tie. This is done until the second tie begins to move freely on the turns; repeat all of the above in relation to the second tie.
3. Using a “22” socket and a hexagon, unscrew the nut securing the strut rod to the support.
4. Next, remove the bump stop (limiter), as well as the support bearing, compression limiter and support.
5. We replace the old rebound limiter washers with new ones that came with the struts, be careful, they are different - the top one is slightly larger than the bottom one.
6. Remove the spring cup along with the rubber damper, as well as the spring, compression buffer and boot.
Now let's carefully examine the rack.
The cause of the malfunction was discovered almost immediately, after checking the play, I raised the rod to the top point, then simply released it, after which the piston sharply went down without the slightest resistance and “slammed” into the upper part of the cylinder. Here, as they say, no comments... Now it’s clear where the dull knocks were coming from.
Before replacing the front drain, it must be bled.