You may know that many cars contain stabilizer bars (beams) in their design - either on the front axle or on both.
On Vesta, stabilizers (beams) of lateral stability are installed by the factory only at the front.
The stabilizer is designed to combat lateral rolls (for example, during a turn), preventing a possible rollover. With such a beam, the car has greater stability on the road, and you are less likely to lose reliable grip on the road. The stabilizer kit includes the following elements:
- Barbell
- Mounting bracket (clamp)
- Bushing (cushion)
- Rack
- Mounting bolt
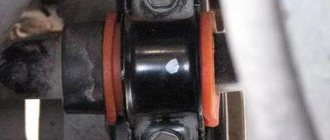
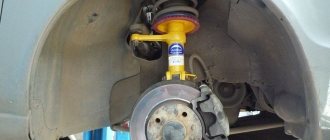
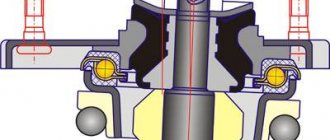
The stabilizer bar for Vesta is made of spring steel, which is installed on the subframe using brackets and bushings. The rod is also attached to the front suspension shock absorbers with appropriate struts. During the lateral tilt of the machine, the stabilizer links move (one moves up, the other moves down), resulting in an even distribution of the load between the chassis parts.
In this case, the stabilizer bushings play a very important role - they allow the bar to twist around its axis during load, ensuring stabilization of the car’s position on the road.
The bushings are replaced if they are worn out. The results of wear can be:
- Extraneous sounds from the front suspension.
- Creaking occurs when driving on uneven roads or after driving through puddles.
- Reduced controllability in the speed range from 60 to 90 km/h.
The causes of wear are the aggressive action of the environment (road dirt, reagents) or poor manufacturing quality of the bushings.
Why do stabilizer bushings creak?
One of the unpleasant features of the front suspension, elements of which were borrowed from Renault, was the creaking of the anti-roll bar bushings. It occurs for several reasons:
- Poor quality material used to make parts.
- Dirt caught on rubber elements.
- Poor tightening of bushings.
- Damage to the stabilizer itself.
The result is damage to important suspension components. The Lada Vesta stabilizer bushings have to be changed.
Let's sum it up
We made sure that replacing bushings with your own hands is not considered a complex job. If the entire list of manipulations is performed correctly, then the products are guaranteed to withstand the declared service life or even exceed its value if driven carefully.
When operating the Lada Vesta, it is important to periodically inspect the products and clean them of any dirt that has fallen on the rubber surface. Rubber and polyurethane bushings tend to be particularly sensitive to the effects of engine oil or transmission lubricant.
If there is a leakage factor in the units, then its elimination is guaranteed to protect the bushings from premature wear and destruction
It is also important to pay attention to the creaking
Why should it be replaced?
The reasons for the need for such a replacement are obvious:
- A poorly secured knot does not perform its function. The car's lateral roll when turning increases and it becomes poorly controlled. It is unsafe to drive such a vehicle.
- The resulting noise creates severe discomfort. A nasty squeak is heard despite the good sound insulation of the cabin. It becomes especially noticeable at low speeds when overcoming obstacles such as small holes and speed bumps.
Installation
In general, the algorithm for replacing standard stabilizer bushings with an analogue one is simple and, by and large, the same for components from the Chevrolet Niva and for parts from KIA. The only difference is that, in the case of parts from KIA, you will have to install the purchased bracket.
As for the Chevy Niva, the bushings from it will need to be modified - it is necessary to make a slot on the side, and then grind the sides down to the same size as on Vesta.
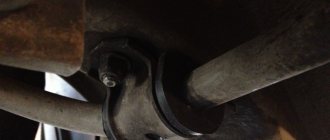
The replacement process itself begins with installing the Lada Vesta on the overpass, after which you need to thoroughly clean the bolts that secure the stabilizer bar from dirt. Next, you need to arm yourself with a wrench and a Torx T40 bit, with which one bolt from the bracket is completely unscrewed (located further from the steering rack). The second bolt is also unscrewed, but not completely, but enough so that the mounting bracket can be moved to the side.
When the bolts are unscrewed, all that remains is to move the bracket and remove the bushing itself. A pre-prepared bushing is placed in its place, and the bolts are tightened. The second element changes similarly.
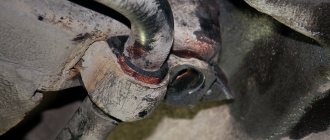
This method works provided that components from ChevyNiva are used. If you decide to install bushings from KIA, you will have to completely remove the brackets. In this case, simply unscrewing the bolts will not work, since the screw, which is located closer to the steering rack, rests on the clamp that secures the rack boot.
It can be seen that it will not be possible to unscrew both bolts
In this situation there are 4 options:
- Turn the clamp itself;
- Rotate the boot (together with the clamp, of course);
- Remove the rack protection, then loosen its fastening bolts and slightly lift the rack up;
- Remove the rail completely.
This will allow you to replace the bracket along with the bushing.
And also the bracket from it
As you can see, there are several options for getting rid of creaking Lada Vesta bushings, which differ strikingly in both the effort involved and the financial and time costs.
This form provides general recommendations for eliminating squeaks.
There is a problem on the Lada Vesta car: the stabilizer bushings (struts) make a squeaking noise. Needless to say, on modern cars, besides the Lada Vesta, even on expensive ones, the problem of rubber bands is noticeable. The Lada Vesta stabilizer bushings begin to creak well and the struts quickly make themselves known. Creaking, knocking, non-functioning stabilizer bars appear so often on the Lada Vesta car - that AvtoVAZ even answered the question: why Vesta creaks so early. The price for such stabilizer struts and bushings is not high, but the sensations are not pleasant. By the way, the dealer changes the bushings under warranty. What to replace with: as an analogue, stabilizer bars from Kia Rio and Avensis are suitable for Lada Vesta - but this is after warranty. Polyurethane stabilizer bushings have proven themselves better - you can install them. Replacing components with your own hands takes 14 steps, more on them later in the article. The maximum weight of the Lada Vesta is 1670 kg. The Vesta is equipped with MacPherson strut suspension, a suspension that has been tested over years of operation on different types of vehicles. There is an opinion that the car is simply too heavy; for such stabilizers, they should be more powerful. On the Lada Vesta suspension, the stabilizer bushings are simply not slightly modified to accommodate the weight of the car. To understand the problem, let’s understand the principle of operation of the stabilization system of modern cars. There is nothing complicated about this. Everything works on the principle of a lever, which was invented by Archimedes at the beginning of the last millennium, read the article and find out about it
DIY replacement
Replacing the front stabilizer bushings of a Lada Vesta with your own hands is not a very difficult task. A person even without special skills can cope with it. For this he will need:
- Lift or inspection hole. You can't get by with a jack here. Unobstructed access to all parts of the structure should be ensured.
- A driver and a set of socket heads, among which there must be a 16mm head.
- Sets of open-end and spanner wrenches.
- TORX bits.
- Lubricant that does not destroy rubber and plastic.
It makes no sense to indicate the exact sizes of the keys, since the manufacturer reserves the right to make changes to the design. You'll have to find your way around. You can assess the complexity of the upcoming task by watching videos posted online.
Independent work
In this case, there are several ways:
- Bushing lubrication;
- Replacement with analogues.
Bushing lubrication
If you choose this option, everything is done exactly the same as when contacting a dealership. However, car owners choose the lubricant themselves. Some people buy regular mastic, others use foreign lubricants, for example, Japanese ones.
Owners buy different lubricants
Be that as it may, these are only temporary measures, since mastic and other lubricants are still quickly washed out. It may last a little longer, but that doesn't solve the problem.
Replacement with analogues
According to reviews from owners, most often either bushings from Chevrolet Niva or components from KIA are used.
Bushings from Chevrolet Niva
Elements from this model are suitable for Lada Vesta, which can be bought at almost any car store. In addition, they can be ordered online using the following article numbers:
— 2123-2906046;
— 2123-2906040.
Stabilizer bushings from Chevrolet Niva
The second type of product has larger dimensions, so it is used more often. The price of bushings from Chevrolet Niva is about 150 rubles per pair. However, there are also polyurethane products on sale, which are often painted in bright colors (yellow, red, etc.). The price of polyurethane products reaches 250 rubles per piece.
- https://www.autopiter.ru/goods/21232906046/rossiya/id51385878
- https://niva-lada4x4.ru/product_info.php?products_id=4152
- https://tankomobile.ru/polyurethan-chevy-niva.html
- https://www.nivashop.ru/catalog.html?idc=420&stype=4
However, Vest owners note that elements from the ChevyNiva also often creak, and it doesn’t make much difference what material they are made of - rubber or polyurethane.
Bushings from KIA
These are more expensive components, which can be purchased under article number KSBSOULF or 54813-2K100. The price for such products is significantly higher than for similar ones from ChevyNiva. Usually the cost varies between 400-650 rubles, but the price can reach 850 rubles per piece. Therefore, it is recommended to monitor offers from various suppliers before purchasing. In this case, you need to buy only original products. Purchasing a non-original one is fraught with the same creaking noise, which is extremely unpleasant, because bushings from a Korean manufacturer are not cheap.
Products from Kia
- https://koreanaparts.ru/product/548132K100/730
- https://www.autodoc.ru/part/hyundai-kia—647/548132k100/
- https://www.autopiter.ru/goods/548132k100/hyundai-kia/id11105217
- https://plentycar.ru/autopart/1981834
In addition, it is worth taking into account the configuration of parts from HYUNDAI-KIA, which differs significantly from that of the Lada Vesta. For this reason, along with the bushings, you need to buy brackets for them, which are sold under article number 54814-1G000. The price tag for them ranges from 300 to 500 rubles per piece.
Comparison of Russian and Korean elements
You can order brackets online at the following addresses:
- https://koreanaparts.ru/product/548141G000/730
- https://nomer52.ru/kronshtejn-vtulki-stabilizatora_hyundai_elantra-hd_548141g000_mobis_i126/
- https://www.autodoc.ru/part/hyundai-kia—647/548141g000/
- https://www.autopiter.ru/goods/548141g000/hyundai-kia/id11105233
Bracket for bushings from Kia
Which stabilizer bushings are suitable?
As already noted, the original parts are not of high quality. A worthy replacement should be found for them. There are several options to solve the problem:
- Some enterprises are already producing polyurethane bushings for the Lada Vesta stabilizer. This material has better mechanical and chemical resistance than rubber.
- Install stabilizer bushings from KIA on Vesta. These parts fit true to size and are of satisfactory quality. Whether these are original Kia components or analogues does not matter.
Bushings for Kia and Lada Vesta
Both options give good results. Which one to prefer, you will have to decide for yourself. Buying the necessary components is not a problem. But it is not recommended to mount stabilizer bushings from Niva to Vesta. Like original parts, they may be of poor quality.
When purchasing parts from KIA for Vesta, you should make sure that their external and internal dimensions match! Otherwise they may not fit.
Let's sum up the results
As a result, we received a new solution from AvtoVAZ related to the rigid fixation of the stabilizer bushings on the bar. Now, having installed such a new rod, we lose the opportunity to experiment with bushings.
Stabilizer bushing after 15 thousand mileage
If earlier replacing bushings cost a penny and for this you did not need to disassemble half of the front end, now to replace bushings you need to change them together with the bar ($50) and, most likely, with the stabilizer struts, which is another $50. Therefore, before replacing the barbell with a new model, it is worth considering whether there is another use for this hundred dollars.
Let's sort it out
Dismantling operations should be performed in the following order:
- Place the car level on the inspection hole or lift it on a lift so that both front wheels are hanging. This is necessary in order to eliminate the occurrence of stress on the torsion bar. Only after this can you proceed to the next operations.
- Remove the protective cover of the steering mechanism, having previously unscrewed the bolts securing it. After this, access to the mounting points will be greatly simplified.
- Unscrew the lower bolts securing the stabilizer struts and release the struts from their mounting points. You can find videos and instructions where it is recommended to replace old parts with new ones by making a cross-section on them. In this case, the strength of the elements will decrease and they will not be able to perform their functions as expected. In order for the front stabilizer bushings of the Lada Vesta to serve for a long time, you will have to completely disassemble the unit.
- Unscrew the bolts securing the fixing brackets.
- Remove the stabilizer.
Order of Operations
Important! You can begin repairs if the stabilizer bar is not tense. To do this, the front wheels need to be suspended or the weight of the car is evenly distributed - on a viewing hole or overpass. The place where the work will be performed must be washed
The place where the work will be performed must be washed.
So, the car is lifted with two jacks or driven into a pit, now you can start working:
- Clean the stabilizer bar fasteners from dirt.
- Completely unscrew the stabilizer link fixing nut and move it to the side. The same procedure must be performed on the other side of the machine.
- There is a cover on the steering system casing that protects it from contamination. It needs to be removed. To do this, five bolts are removed.
- Now you can unscrew the two bolts securing the brackets.
- The bracket or clamp is removed from its place.
- Now you can remove the bushing.
- The rod must be thoroughly wiped, and particles from the old bushing must be removed, especially at the fastening points. The operation is repeated for the second element.
- The rod needs to be rubbed with lubricant so that the new parts can easily fit on it and move easily.
- A new element is installed on the rack.
- The bushing moves along the rod to the installation site.
- On site, you need to accurately align the bushing along the axis of rotation and fit.
- The same procedure will be repeated with the second bushing.
- Next you need to do the assembly. It is performed in reverse order.
On a note! The manufacturer recommends carrying out routine maintenance every 25-30 thousand kilometers, but Russian climatic and road conditions make significant adjustments to the condition of car parts. Practice shows that bushings are changed much more often. If there is only a suspicion, you need to inspect the part. If defects are found, replace them immediately, since the car’s handling and road safety depend on it.
We collect
After lubricating the surface of the stabilizer with soap or lubricant, the bushings are installed. They should fit tightly, without play. After making sure that everything is in order, we assemble the unit in the reverse order:
- We install the stabilizer in place.
- We install the brackets securing the bushings. We tighten the bolts securing them.
- We fix the ends of the struts to the stabilizer. We tighten them.
- Only after this do we tighten the bracket bolts with a force of 1.8–2.4 kgf. m. Do not overdo it, otherwise you will break the threads in the mounting holes!
- We install the protective cover of the steering mechanism.
Replacing the Lada Vesta stabilizer bushings is a simple job. If it is done correctly, the service life of the stabilizer bushings will increase several times. You can extend the life of important parts by carefully monitoring their cleanliness and promptly removing contamination. Both rubber and polyurethane elements are especially sensitive to the ingress of engine or transmission oil. This is another reason to immediately eliminate the leak that has arisen. Well, decide for yourself which is better – rubber or polyurethane, and don’t forget to leave your feedback on whether the recommendations helped you!
According to the results of a survey among Lada Vesta car owners, about 60% of those who encountered the characteristic problem of the stabilizer cushion creaking. A strong, persistent grinding noise in the area of the front suspension of the car can simply infuriate you. What is this connected with?
Loose wheel bolts
The situation when the fastening bolts of one or several wheels have become loose is typical not only for Lada Vesta, but occurs frequently. There can be many reasons - from inattention during tire fitting to an unsuccessful attempt to steal a wheel.
If a knocking sound occurs while driving, the first thing you need to do is stop the car and check the tightness of the wheel bolts, since a tire that falls off while turning can cause the car to roll over with unpredictable consequences. In this case, diagnostics is inseparable from troubleshooting.
After tightening the bolts or making sure that the reason for the knocking is not their tightening, you can continue driving. If the problem is not solved, you should not put off diagnosis for a long time. In order not to aggravate the situation when one malfunction causes another, it is strongly recommended to contact an authorized dealer as soon as possible for qualified diagnosis and elimination of the causes of knocking or other abnormal suspension noises performed on a car raised by a lift.
Independent repair of a car before the expiration of the warranty period may be classified by the dealer as a violation of contractual obligations by the consumer and become grounds for premature termination of warranty service.
Creaks of the stabilizer bushing on Lada Vesta
As it turned out, the device's bushings, or rather the material from which they are made, are to blame. AvtoVAZ is aware of this problem, and there is hope that sooner or later everything will be resolved for the better.
While this time has not yet come, there are three solutions left:
- Lubricate the original, installed rubber bands;
- Replace with new ones, exactly the same (catalog number 8450006748) ;
- Exchange for similar ones from other models or brands of cars.
Rubber bands from KIA and Vesta brands.
The disadvantage of the first option is that the procedure will have to be carried out regularly as soon as an unpleasant sound appears from under the hood. This is guaranteed, since it is the material of the product that causes discomfort. An extraneous sound appears even on new cars after the first thousand kilometers . Buying another pair of substandard products is not a particularly encouraging prospect. Even dealerships offer to use analogues that are suitable in terms of characteristics for replacement.
What are the alternatives to standard bushings?
Practice shows that car enthusiasts have already coped with the task, having tried some options. According to them, analogues from :
- Chevrolet Niva, made of polyurethane (items 2123-2906046, 17012680) ;
Stabilizer bushings for VAZ-2123.
Hyundai-KIA stabilizer bushings.
In practice, there is no clear opinion regarding the first replacement. Some argue that the attempt counts. Others are sure that nothing has changed. There is even a special point of view, they say, it is polyurethane that causes grinding, contributing to additional wear of structural elements . There have never been any complaints about the Kia Rio.
Korean-made bushings definitely do not creak and are by far the best replacement, as it turns out, the only possible one.
True, it will not do without the additional headache of finding clamps for attaching to the body (article 54814-1G000) . There are no problems with them, you just need to order and wait a little for delivery. If our new imported parts are already in place, we can begin disassembling and installing new components.
Radiators (cooling, heating, air conditioning systems): Valeo brand, made in Russia
All three Vesta radiators from the French brand Valeo (a well-known component manufacturer) are distinguished by good workmanship, in no way inferior to their world analogues. During dismantling, it was difficult to suspect that the radiators were assembled in Tolyatti at Valeo’s own production site.
By the way, the competence of the employees of the hotline of the Russian representative office of Valeo (where we were transferred to answer questions) was called into question. They couldn’t say exactly what was being assembled at the Valeo site in Nizhny Novgorod, and when asked about production in Togliatti, we were told that there was no confidence that it was working at all, although the press service of AvtoVAZ firmly confirmed the opposite.
Replacing stabilizer bushings on Lada Vesta
When removing elements, it is extremely important to do this when the load on the stabilizer is completely removed . This can be achieved using a lift, which will relieve the load on both front wheels. The second option is to jack up one wheel, install a reliable stop, and move on to the next one. Or use two jacks. The wheels are raised, let's start replacing. It will be the same for any of the selected options.
Required Tools
- open-end wrench 10×12;
- ratchet bit or L-shaped Torx T40 (star-shaped with six rays);
- socket wrench 13;
- knife to cut new pillows.
Dismantling sequence
We carefully clean the bottom of the car from dirt, paying special attention to the stabilizer bars and mounting bolts so that all the debris does not fall on your head. We take a key with a T40 bit and completely unscrew only one bolt securing the rod of the first bracket . We turn the second one out almost to the end so that you can release the bracket and turn it 180 0, using the remaining fasteners to fix it. We remove the creaking pillow, and do the same with the second bushing.
Unscrew the bolts securing the bracket rod.
In fact, it would not be possible to unscrew the bolts that are located on the steering wheel side, since the clamps will not allow this to be done. The fact that we have weakened it by at least 2/3 is quite enough. Provided that you want to change new bolts, the operation will be a little costly in time and effort . Dismantling the protection alone is not enough. You will need to slightly unscrew the bolts on the steering rack, lift it up, and remove the stabilizer pad brackets to the end. In some cases you have to completely remove the rail.
You can try one more method, but very carefully, so as not to violate the main principle of medicine - “do no harm.” With a little effort, move the anthers a little , as they are, together with the clamps. Our simple method of turning the staple together with the rubber band should work exactly.
Installation and assembly of unit bushings
Half the battle is done. We take new elements and use a knife to cut each one according to the marks made on the pillows . The material is very hard and will require some effort. Then everything is simple, we install the spare parts in place of the unsuitable ones, reassembling them in the reverse order. We tighten all the bolts tightly, and there is no need for additional lubrication.
We make a cut in the bottom of the new pillows and put them on the bar.
All is ready. Our Lada Vesta doesn’t care about potholes, speed bumps or other obstacles. Now there will be no more creaking or nervous tapping. The trip will bring you joy and a sense of inner peace.
AvtoVAZ official opinion
To answer thousands of questions from car owners about stabilization problems, AvtoVAZ has the following opinion; These are design features of the model caused by the long working strokes of the struts when driving on uneven roads.
- bushing lubrication;
- installation of rubber-metal hinges, .
Point one is reminiscent of servicing the Volga GAZ-21. It recommended lubricating ten lubrication points under the car body, after rain and once a week. True, no one suggested doing interesting things like lubrication of bushings. The most unclear thing is how to smear them. Whether it is worth disassembling the stabilization unit or not is still unknown. Although old cars can still be found on the roads and nothing creaks or breaks for years.
Regarding the short operation of the stabilizer struts: They promise to bring them to normal condition. Now the problem is caused by the liner, which creates play inside the ball joint. Replacement of stabilization struts can be done free of charge at the dealer, it does not cause problems, they know about the problem with the stabilization unit and are ready to make repairs. But in this case, it’s much more profitable to learn how to change yourself. The reason for this is quite obvious. Replacing standard spare parts at a dealer does not imply the installation of spare parts or consumables from other brands of cars.
How to change the stabilizer struts yourself in 5 simple steps Replacing the stabilization struts on a Lada Vesta car comes down to a simple algorithm, but there is also preparatory work: It is necessary to hang the front wheels of the car. Firstly, this is required by safety measures. Secondly, it’s much more convenient to work this way. Let's get started:
- The stabilizer link pin nuts are cleaned;
- The nut is turned out from the top of the part, keeping the ball joint pin from turning;
- The nut is turned out from the bottom using a similar tool;
- The anti-roll bar is removed, the ball joint pin is removed from the front suspension strut and from the anti-roll bar;
- To check the anti-roll bar link, you need to pull out the top pin of the ball joint, grab it firmly with your hand and swing it up and down. The presence of a knock indicates a faulty part. Installation of the node rack is performed in the reverse order. When starting a repair, you can watch the entire process in the video.
Something happened that many car enthusiasts in our country were waiting for - AvtoVAZ created a high-quality Lada Vesta car. To expect that he will be devoid of shortcomings is, if not stupid, then naive. But I wanted them to be insignificant and not disturb too often.
It’s been 3 years since the serial production of the car and it’s safe to say that the domestic auto industry has made a big step forward. The car turned out to be not only beautiful, comfortable and affordable, but also reliable.
Among the few shortcomings of the car are poor-quality stabilizer struts, which are not able to withstand the high load of driving on damaged roads. As a rule, this part fails first.
As AvtoVAZ representatives assured, the car’s suspension is reliable and can easily withstand the load of bad roads. But this turned out to be untrue, since many owners complain about the appearance of minor noise when driving on rough roads after 5-10 thousand kilometers.
In most cases, noises and knocks are associated with a malfunction of the stabilizer struts. If you contact an official dealership and have a warranty, the problem will be resolved quickly. But, as practice shows, many experienced car enthusiasts prefer to repair the suspension themselves.
Reviews
| № | Positive |
| 1. | Vasily , 34 years old (drive2.ru) Sverdlovsk: for the first time the seals creaked at 20,000 km, I went to the service station under warranty, the guys lubricated it with a metal-rubber aerosol. A year has passed - silence. |
| 2. | Petrovich , 44 years old (prom.ua), Krasnodar: the car is in its third year, no complaints, the suspension is working as normal. I've heard drivers complain about the crunching noise, but I didn't have that problem. |
| 3. | Alexander , 35 years old (autotoday.com), Omsk: I’m happy with the purchase of the Lada Vesta, I regularly visit the service station, I drive carefully, the speed limit is medium. |
| 4. | Ivanovich , 45 years old (rozetka.ua), Rostov-on-Don: my positive review of the Lada Vesta car in general. Good build quality, relatively cheap spare parts, developed network of car services. |
| 5. | Vyacheslavovich , 43 years old, Kursk (avtoflit.com): my first car was a Lada Priora, after which I bought a Vesta. The difference is noticeable in quality, assembly, and service life. Undoubtedly Lada Vesta is better. |
| 6. | Valery , 33 years old, Voronezh (autotoday.com): in three years of using the car, I visited a service station once to replace stabilizer bushings, not counting scheduled technical inspections. |
| 7. | Vasilievich , 46 years old, Ufa (drive2.ru): I take care of the equipment, periodically go to the inspection pit, check the fastenings and components. Over the course of three years, I lubricated the stabilizer bushings several times. I didn't do any more work on the suspension. |
| 8. | Semenych , 38 years old, Bashkortostan (drive2.ru): The Lada Vesta is well assembled, I’m pleased with the quality. I fix minor damage myself. Even when operating on rough terrain, the suspension absorbs bumps perfectly. |
| Negative | |
| 9. | Dmitrievich , 49 years old (prom.ua), Saratov: Vesta disappointed me, after 30,000 km the stabilizer seals creaked. I visited a service station, the guys lubricated it with an aerosol, and after 5000 km the situation with the “sound” repeated itself again. |
| 10. | Alexey , 46 years old, Moscow (avtoflit.com): in two years of using the car, I went to the workshop three times for suspension maintenance. Constant squeaks and crunches. The quality is raw, the machine has shortcomings that the manufacturer must eliminate. |
| 11. | Filippovich , 39 years old, Voronezh (drive2.ru): my opinion is that the Lada Priora was made with better quality than the Vesta. I bought it a year ago and now I regret it. There are a lot of shortcomings, defects, and expensive spare parts. |
| 12. | Valentin , 37 years old, Pskov (autotoday.com): if you are choosing a car between Lada Vesta and Renault Logan, then consider buying a French brand. |