To complete the work, you will need an inspection ditch or overpass.
Removal
1. We prepare the car for work.
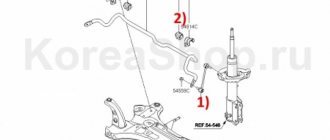
2. Using two 17 mm wrenches, unscrew the nut of the bolt securing the stabilizer link to the transverse arm.
3. Using a bit of suitable diameter, we knock the bolt out of the rack and lever.
4. Lubricate the end of the stabilizer rod with soapy water.
5. We insert the barbs into the hole in the lower silent block and, using it as a lever, rotate the stand from side to side, gradually moving it towards the edge of the rod.-
6. Remove the stand from the barbell.
Similarly, remove the strut from the other end of the stabilizer bar.
Installation
We install the racks in the reverse order, having previously lubricated the ends of the stabilizer rod with soapy water.
Hi all! Recently there was a knocking sound in the suspension on the left side. I made a mistake on the ball joint, went for diagnostics, the master said that the bushing had become unusable. Replacement will cost several hundred rubles, plus the purchase of the bushing itself. He also said that two bushings need to be replaced, saying that if you change one, the pin may break off, and then it will be much more difficult. In general, the question is: how is Kalina stabilizer bushings replaced? I want to do the work myself
The anti-roll bar is considered one of the most reliable and stable elements in a car's suspension. However, constant driving on uneven roads and vehicle wheels falling into potholes leave their mark on the resource of the unit. Repair work boils down to replacing stabilizer bushings, which sometimes cannot withstand critical loads from road potholes and imperfections.
Stabilizer struts for Lada Kalina
Anti-roll bars are part of the vehicle suspension structure, the functional purpose of which is to equalize dynamic loads on the body during maneuvering.
Structurally, the struts are located between the stabilizer and the wheel hub, as a result of which they experience serious loads during vehicle operation - failure of faulty parts can provoke loss of controllability and an accident on the road.
ManufacturerArticle Structural arrangementClass of componentsApproximate cost, rub.
| AvtoVAZ | 1118-2906050 | Front axle | Budget | 450 |
| AvtoVAZ | 2190-2906050 | Front axle | Budget | 510 |
| AvtoVAZ | SS40111 | Front axle | Premium | 770 |
| AvtoVAZ | 2108-2906345 | Rear axle | Budget | 460 |
| AvtoVAZ | 1118-2906050 | Rear axle | Budget | 525 |
| SS20 | SS40134 | Rear axle | Premium | 750 |
Note! When selecting components for the Lada Kalina, it is necessary to check the part numbers with the VIN number of the car - otherwise there is a possibility of purchasing incompatible spare parts that differ in form factor and size from the stock version.
How to identify faulty racks: diagnostics at home with a guarantee of accuracy
The critical level of wear of the anti-roll bar struts on the Lada Kalina can be diagnosed by taking a closer look at the behavior of the vehicle - it is advisable to replace components in the following cases:
- When overcoming obstacles on the road, shocks are felt or extraneous sounds are heard in the suspension area;
- When moving in a straight line at low speed, the car spontaneously changes its trajectory;
- The car sways when reaching maximum speed or as a result of emergency braking;
- During maneuvering or when entering a turn, a strong body roll is observed;
- You feel a strong vibration load in the steering wheel or have difficulties in driving the car.
If several factors are similar, an urgent diagnostic inspection of the vehicle's chassis and suspension system is required. The best option would be to contact a certified service station, but you can detect the presence of worn-out struts at home - all you need is:
- Turn the steering wheel to the side all the way in any direction and, holding the disc, try to turn the wheel to the side - if you feel play, you need to disassemble the wheel liner and inspect the struts; you may have to change the struts soon;
- Next, we inspect the stabilizer bushings for mechanical deformation or leaks of technical fluid - detection of defects indicates depressurization of the structural unit, which will lead to moisture and small abrasive particles getting inside and grinding down the hinges in the future;
- Then we drive the car into the inspection hole and ask a partner to help - when periodically pressing on the car’s suspension under the fender liner, you need to place your palm on the outside of the strut - the feeling of play indicates the deterioration of the strut hinges and the formation of free space in the area of the wheel hub.
Note! The best option is to carry out a full diagnostic of the chassis every 15,000 km, which will prevent the possibility of accidental breakdown and promptly replace worn out parts.
Remember, if problems with the struts are identified, the parts must be replaced with new ones as soon as possible, otherwise the operation of the vehicle is not safe. Neglecting maintenance only makes the situation worse and increases the cost of future repairs.
Replacing stabilizer struts on a Lada Kalina with your own hands: detailed instructions for beginners
Dismantling and installing racks on Kalina occurs according to an intuitive scenario, however, if the vehicle maintenance instructions are not followed, inexperienced mechanics may experience some difficulties. The entire front of maintenance work can be easily performed with one pair of hands and will require no more than 40 minutes for each stand. Also, to replace components you will need a lift or a good jack, a set of wrenches or sockets, a hammer, Torx sockets and WD-40 fluid. To install new racks on Kalina you need:
- First, drive the car onto a level area with a solid foundation and place wheel chocks under the second axle of the car. Next, we stick the gearbox selector into the position of any gear and set the handbrake. If you have access to a lift, it will be safest to use it to service the chassis - since during repairs it is possible to pull out the jack from under the car;
Note! When preparing the car for replacing the struts, it is necessary to turn on the parking brake. When lifting the vehicle body, the suspension relaxes, as a result of which the struts lose dynamic tension, which lengthens the spring and interferes with comfortable dismantling. The clamped handbrake allows you to secure the suspension in a static position.
- Next, we release the fixing bolts and dismantle the wheel, after which we proceed to remove the brake mechanism. To make repairs faster, you can unscrew only the upper fastening, and simply release the lower one, which will allow you to turn the mechanism to the side without completely removing the structure;
- Then we clean the strut and bushings from dirt and treat them with WD-40, after which we leave the fixation points to remove any traces of corrosion. It is important not to try to dismantle the oxidized nuts, as this can lead to thread breakage - to remove a rack with a broken thread on the mount, you will have to disassemble the entire chassis of the car, which will significantly increase the repair time;
- After the parts are loosened, unscrew the fasteners and pull out the stand. Next, we clean the seats around the entire perimeter of the structure from dirt, and if desired, treat them with an anti-corrosion compound. It is also recommended to replace the bushings and sealing elements before installing a new rack;
- We install a new rack and assemble all the elements of the car according to these instructions in the reverse order. To increase the service life of components, it is recommended to lubricate all fixing fasteners with any technical composition before installation - this will prevent premature corrosion and reduce the rate of play formation between the connecting elements;
- A similar procedure is carried out with the remaining parts of the suspension. It is important to replace the anti-roll bar struts in pairs, that is, along the perimeter of the suspension axle - otherwise the service life of the new part is reduced and the controllability of the vehicle as a whole is deteriorated.
Replacing struts on a Lada Kalina will not cause difficulties even if you do the repair yourself, which will allow you to save a lot on car maintenance - the average price of this procedure at a service station is approximately $15-25, which is the cost of a full set of “Standard” class struts.
Source: https://zapchasti.expert/podveska/stojki-stabilizatora/stojki-lada-kalina.html
Signs that it’s time to change the struts
There are characteristic signs indicating wear on the shock absorbers.
- Extraneous sound when moving over an obstacle. When the car goes through a pothole, the pillar knocks and a dull thud is heard.
- Wheel loosening on uneven surfaces. The car holds the road worse, the tire bounces on potholes. Additionally, the process may be accompanied by a specific, intermittent whistle when turning.
- Leaking shock absorber seals. Drips of working fluid may appear on the racks. This causes airing of the damper and provokes a critical decrease in its efficiency.
- The need for scheduled replacement of components. Each manufacturer indicates the service life of shock absorbers.
- Loss of control stability. The car begins to float along the road, and the process is accompanied by a rhythmic tossing.
Front pads for Kalina: do-it-yourself replacement
The front brake pads are the most actively used in the vehicle braking system and are subject to accelerated wear. At the same time, Lada Kalina was no exception. It's all about the distribution of braking forces and the transfer of the weight of the car itself when braking to the front axle.
Simply put, the car brakes to a greater extent with the front wheels, while the rear brakes are activated only during active or emergency braking. Also, front pads that are used more often become hotter. Accordingly, this also affects their service life.
As a result, the front brake pads wear out faster than the rear brake pads. Of course, you need to monitor their condition, and also change the Kalina front pads if the slightest signs of wear below the permissible norm appear. Next, we will look at how to replace the pads on Kalina with your own hands, as well as what you need to consider when choosing brake pads for Kalina.
Checking the brake pads
So, Kalina has disc brakes on the front. So, to quickly assess the condition of the pads, you need to pay attention to a number of characteristic signs that indicate wear. First of all, the driver may notice the appearance of extraneous noise (usually a whistle, creaking or metallic grinding sound when braking).
Signs that it’s time to change the struts
There are characteristic signs indicating wear on the shock absorbers.
- Extraneous sound when moving over an obstacle. When the car goes through a pothole, the pillar knocks and a dull thud is heard.
- Wheel loosening on uneven surfaces. The car holds the road worse, the tire bounces on potholes. Additionally, the process may be accompanied by a specific, intermittent whistle when turning.
- Leaking shock absorber seals. Drips of working fluid may appear on the racks. This causes airing of the damper and provokes a critical decrease in its efficiency.
- The need for scheduled replacement of components. Each manufacturer indicates the service life of shock absorbers.
- Loss of control stability. The car begins to float along the road, and the process is accompanied by a rhythmic tossing.
Replacing silent blocks of the front suspension of Lada Kalina: video, photo
You can recognize problems in the front suspension system, and more specifically the silent blocks on the Lada Kalina, by the characteristic sounds it makes while driving. Thus, driving on an uneven road may be accompanied by various cracks, squeaks and other unpleasant noises. This situation not only causes great discomfort, but can also cause a more serious malfunction or cause an accident.
In the video, replacing the front arm silent block on a VAZ car:
Replacing silent blocks on Kalina
Front suspension silent block close up
The silent blocks on the Lada Kalina car are located exactly the same as in the VAZs of previous years. These elements are located generally on or adjacent to the wishbone . You will have to change them either on the entire element at once, or by selecting the most damaged ones. Of course, if there is damage on one of them, the wishbone with rubber (stock – approx.) stabilizers must be removed and replaced with polyurethane analogues.
Removing the wishbone
- In order to begin work on replacing old silent blocks with new ones, you need to place the car on a viewing hole, a lift, or jack it up.
- Next, you need to remove the wheel and spray all the connections on the wishbone with WD-40.
- After the lubricant has penetrated into all hard-to-reach places, we begin to unscrew the bolts.
- First of all, we begin to dismantle the ball joint bolt, but before that we remove the cotter pin from the bolt.
- Then unscrew the bolt securing the longitudinal tension joint (where the “daisies” are attached - approx.
) and remove it from the seat.A generously lubricated bolt is a guarantee of success.
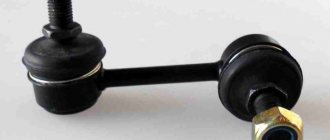
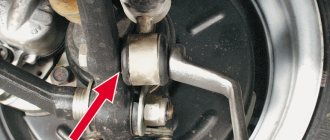
- The next in order will be the bolt and nut that secure the stabilizer link.
When dismantling this unit, there should be no problems. - And the final stage is the wishbone bracket.
When the bolt and nut are removed, you can remove the lever. For the best impact on the bolt, you can use a wrench extension.
How to change silent blocks
On Lada Kalina, replacing the rear pillar silent block is quite simple. Here you will need a special puller. Standard large yews will also work. The next steps look something like this.
- Remove the shock absorber itself from the car.
- Clean the part from dirt and bitumen stains.
- There is no need to spare the old silent block - the insert is knocked out with a spacer using a sledgehammer or hammer. The main thing is not to damage the seat.
- Next, the mounting sleeve is cleaned and lubricated. Consistent ointments are used here in small quantities, the goal is to ensure ease of installation.
- Then the bushing and rubber insert are installed in the yew so that they are on the same axis.
- The collar is clamped and the insert slides into place.
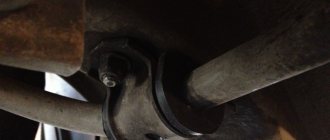
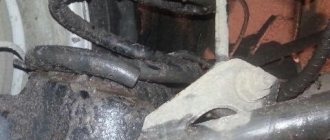
Replacing the anti-roll bar on a LADA
The suspension parts of the LADA “Kalina” wear out when driving on uneven roads and require periodic replacement. The Kalina anti-roll bar is a strong and durable part that requires replacement only as a result of an accident. The repair of this unit consists of replacing the bushings, the rubber of which does not withstand long-term use on our roads.
What is anti-roll bar LADA “Kalina”
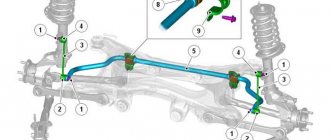
The suspension of the LADA Kalina, like any modern car, includes an anti-roll bar. This is a rod with a round cross-section. The part, made of high-strength spring steel, is attached to the body with clamps at two points through rubber bushings.
Taking into account the location of components and assemblies located in the lower part of the car, the stabilizer has a complex shape, vaguely reminiscent of a U-shaped one. The ends of the stabilizer are connected by wheel suspension arms to redistribute the load between them.
When a lateral body roll occurs, one end of the stabilizer goes down, the other goes up, and the middle part twists, providing resistance. The more the Kalina rolls, the stronger the counteraction of the stabilizer,
The Kalina transverse stabilizer does not interfere with vertical and horizontal vibrations of the body while driving. Its task is to reduce roll when turning and improve wheel adhesion to the road surface.
Signs of malfunction of the anti-roll bar LADA “Kalina”
Malfunctions of the suspension stabilizer appear when cornering and driving over uneven roads. The cause of the malfunction is broken bushings or poor tightening of the nuts of the clamps holding the stabilizer bar. This manifests itself as follows:
- there is a knocking noise under the hood when driving through potholes and potholes;
- the car begins to “go to the side” when driving in a straight line and you have to constantly adjust its trajectory (this is especially noticeable at speed);
- the car sways and rolls heavily when turning or braking;
- Excessive roll appears during maneuvering.
You can independently check the bushings and stabilizer mounts as follows:
- turn the wheels to the side until they stop, freeing up space in the wheel well;
- grab the Kalina stabilizer with your hand and pull strongly in different directions;
- If there is the slightest play, the stabilizer bushings must be replaced.
A more detailed analysis of the condition can be made by driving the car onto a pit or lift. This way you can determine exactly where the knocking is coming from and which part needs to be replaced.
What is needed to replace the Kalina stabilizer
To replace the anti-roll bar you will need:
- standard set of socket wrenches (socket wrenches can be used);
- WD-40 liquid;
- jack;
- special device (extension);
- hammer;
- stabilizer bushings “Kalina”;
- stabilizer's pole;
- stabilizer bar.
To access the mounts of the struts and stabilizer, you must place the car on a viewing hole or a lift.
How to replace the Kalina stabilizer
To replace the bushings and stabilizer on a car, you need to perform the following steps:
- install the car on a lift or inspection hole (in the latter case, you need to place wheel chocks under the wheels);
- treat threaded connections with WD-40;
- unscrew the left and right nuts securing the stabilizer struts;
- unscrew the nuts holding the left and right stabilizer mounting clamps;
- dismantle the struts, bar and stabilizer brackets;
- Unscrew the nuts securing the stabilizer links to the arms;
- knock the stabilizer struts off the rod using a polymer or wooden hammer;
- inspect the stabilizer pads (bushings) and, if necessary, replace them with new ones;
- inspect the condition of the stabilizer bar;
- if the ends of the rod are in different planes or it has other signs of deformation, a new rod should be used;
- inspect the condition of the stabilizer struts and their bushings;
- replace worn bushings and deformed struts with new ones;
- lubricate the threaded connections with graphite lubricant;
- install the bar and stabilizer pads on the car;
- tighten the nuts of the stabilizer mounting clamps;
Tip: when using split pads, the nuts must be tightened until the gap in them is eliminated. To do this, first tighten the front, then the rear fastening nut.
- tighten the nuts holding the Kalina stabilizer struts;
- if the replacement work was carried out on a lift, it is necessary to lower the car to load the wheels;
- make a final tightening of the threaded connections of the clamps and stabilizer struts (4.5-5.3 kgf and 1.3-1.6 kgf, respectively).
Replacement
Tool:
- jack;
- wheel wrench;
- open-end wrench 19;
- open-end wrench 17;
- socket wrench 13;
- pliers;
- ring wrench 22 and open-end wrench 9;
- special puller for tie rod ends;
- 2 special spring ties.
Execution order
- We park the car on a level surface and put it in gear.
- We jack up its front part on the desired side and remove the wheel.
- Using pliers, unscrew the nut securing the steering tip to the strut and unscrew it with a 19 mm wrench.
- Using a tip remover, remove the tip pin from the shock absorber strut. As a last resort, the finger can be knocked out by prying it up with a small pry bar and carefully tapping it from below.
- Using a 19mm wrench, unscrew the 2 nuts securing the strut to the steering knuckle. If necessary, hold the bolt heads with a 17 wrench.
- Using a 13 mm socket wrench, unscrew the 3 nuts securing the support to the body.
- We remove the entire shock absorber.
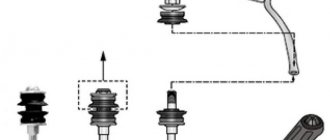
- We install two ties on the shock absorber spring and compress it until the upper part of the shock absorber is released.
- Using wrenches 22 and 9, unscrew the upper support nut on the upper side of the shock absorber.
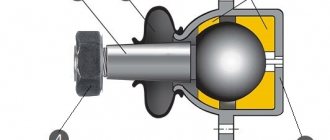
- We remove the support, disassemble it, and remove the worn support bearing.
- We install a new one in its place.
- We install the shock absorber in the reverse order.
Replacing the ignition module on a viburnum and checking it
Welcome! Ignition module - someone else calls it a coil, but this is the wrong name and it came from the people; in fact, inside this module there are two ignition coils, one of which goes to two cylinders and the other of which also goes to two cylinders.
Note! In order to change the ignition module in a car, you will need tools, namely you will need: A hex wrench with which you will unscrew the hex bolts that secure the module itself, in addition, be sure to stock up on a wrench with which you will blue the minus terminal from the battery batteries!
Summary:
Where is the ignition module located? On the eight-valve native engine of the Kalina car, it is located in the front part of the car between the engine and the TV (The TV is the very front part of the car that connects both side members together, it is made in the form of metal; headlights, front bumper, etc. are also put on it ., the wings no longer belong to it), for a more detailed location, see the photo located just below:
Note! If you own a 16 valve car, then in this case the module is located in a completely different place and you have four of them (above the spark plugs) and if you need to replace them, then follow the link to another article that is posted on our website and read it, it’s called: “Replacing Spark Plugs”!
When do you need to change the ignition module? As mentioned earlier, there are two coils inside it, one of the coils leads to the first and fourth cylinders, and the other to the third and second, thus if one of the coils fails, the engine will start to double (Many car enthusiasts ask the question after the word double, namely, they ask: “How is it, this doesn’t happen?”, in fact, you can simply hear these words rarely, many are accustomed to the word the engine is tripping and they don’t know how it doubles, in general, doubles means two cylinders are not working) , due to the fact that two cylinders have stopped working, you can immediately say that the car’s power will decrease by half, in connection with this, “Check engine” will light up on the instrument panel, which will tell you that something is wrong with the engine, and of course But there will be a problem with the idle speed, namely it will float, then the tachometer needle will go up, then it will fall down, etc.
How to replace the ignition module on a VAZ 1117-VAZ 1119?
Note! We want to tell you right away, remember once and for all, if you go to a car store to buy new spare parts, be sure to look at the markings on the old ones and according to it and buy new parts, for greater clarity, first find the module where it is installed in you (Where the module is installed in Kaliny was shown above in the photo), after finding it, look at the marking on the module body (indicated by a red arrow) and write it down on a piece of paper and give it to the seller in the store before purchasing the part, if you install any other module, then the same engine operation will not guaranteed since they are all different for VAZ cars!
Removal: 1) At the very beginning of the operation, disconnect the minus terminal from the battery terminal, this is done in order to protect yourself from the module, since it produces a very huge current (Around 25,000-35,000 volts) so you need to take all precautions (It produces this current, only if you start the car), and if you don’t already know how to remove the terminal, you can read the detailed instructions about this, and it’s called: “Replacing the battery on a VAZ”, read the first point in it.
2) Then, when everything is de-energized in the car due to the terminal you removed, disconnect the four ends of the high-voltage wires from the module terminals by hand and move them to the side so that they do not interfere.
Note! By the way, when you disconnect the high-voltage wires, then also disconnect the wiring block from the module; for clarity, in the photo above it is indicated by a red arrow, and it is very easy to disconnect, just press the latch that secures it and then you can disconnect the block!
3) And to complete the operation, pick up a hex key and unscrew the four bolts that secure the module to the bracket (the bracket is indicated by a red arrow), and when they are unscrewed, then remove the module and replace it with a new one.
Note! By the way, if you are changing the coolant on cars and you need to get to the drain plug of the cylinder block, then you will also need to remove this bracket, which is indicated by the red arrow in the photo above, so that it does not interfere, and to remove it you don’t need to unscrew all the bolts with a hex wrench which secure the module to the bracket, so in this case, unscrew all the bolts that secure the bracket itself and then remove it from the car with the module installed on it!
Installation: Installing a new module is done in the reverse order of removing it, but when installing you need to know one very important thing, namely, take a closer look at the module and look at the numbers against each pin (Pins are indicated by blue arrows) there should be numbers (Indicated by red arrows), so on the tips of the high-voltage wires there are these same numbers (see photo 2), your task is to connect all these things to each other so that everything corresponds to the numbers, that is, to the terminal with number 1, connect the tip of the high-voltage wire also with number 1, etc. d.