Print this article Font size 16
The anti-roll bar is an incredibly important element of the entire vehicle suspension. Due to these devices, car roll is minimized when cornering. As a result, the quality of handling improves and the car becomes more obedient.
Plus, these stabilizer links improve driving safety and also improve the performance of your suspension.
Today we will talk about how you can install a stabilizer on a VAZ 2114, borrowed from a newer model from AvtoVAZ - Priora.
Searched device
Replacement
If you decide to actually install units from Priora, you should take into account the fact that the thickness differs from the standard design by 4 millimeters. Original eggs for the fourteenth
Original eggs for the fourteenth
Plus, the sizes of the brackets used differ. Therefore, with such modifications, experts recommend simultaneously replacing the stabilizer struts themselves, brackets and cushions. In total, purchasing such a kit will cost you no more than 2.5 thousand rubles.
Devices from Priora
The work itself is carried out as follows.
- Raise the front of the body using a jack.
- Place bricks under the body, first turning on the handbrake and placing stops under the rear wheels.
- Remove the strut nuts from the left and right wheels.
- Now the bracket fixing nuts are removed from both sides.
- The entire kit should be dismantled together, assembled, after which the spare parts from the “fourteenth” are put somewhere aside.
- Next, you need to slightly modify the elements that you borrowed from Priora.
- Restyle the rod, since different sizes are provided in the engine compartment of the two models.
- If you don’t modify the stabilizer from Priora, they will rest against the tunnel of your VAZ 2114. And there are pipes for the exhaust system, and you shouldn’t forget about the gearshift lever linkage. If this point is not improved, the new stabilization racks will quickly fail.
- Compare two elements from two cars. The arched gadfly of the rod from the “donor” is corrected with a heavy hammer.
- You will need an extra pair of hands to put the modified part into place.
- The nuts for attaching the brackets should be tightened until the gap in the cushion cuts disappears.
- The brackets of the racks themselves are mounted in the same way. Full tightening should be performed with a force of 44-53 Nm in relation to the nut, and no more than 13-16 Nm in relation to the bracket.
Practice shows that “Prior” stabilization racks behave excellently when installed on a VAZ 2114. Here it is imperative to use only serviceable, new elements, and also follow the sequence of operations.
It is not difficult to do the work yourself, but it is necessary to clearly refine the elements and also use the appropriate fasteners. Otherwise, the task is not difficult, which is why many owners of the “fourteenth” model prefer to do it themselves.
Causes of failure
The desire to replace stabilizer links arises mainly due to the failure of the old ones. As practice shows, these elements, borrowed from Priora, work better than those native to the VAZ 2114.
Therefore, many specialists in the modification of domestic cars, as well as ordinary owners of the “fourteenth” model who have tried this method, agree on the correctness of replacing the original struts with “Prior” ones.
There can be many reasons why racks fail. The most common of them is the poor quality of the road surface on which we have to drive our cars.
The best way to determine a breakdown is to carry out diagnostics.
Troubleshooting
If the stabilizer bar on a car fails, you will hear a characteristic knock, and the car itself will begin to move to the side when moving in a straight line.
It is also worth paying attention to strong swaying when entering turns.
Many have now noticed that we voiced signs similar to bushing failure. Indeed, the symptoms are quite similar, so for your own confidence we recommend conducting a diagnosis.
Checking the condition
Checking the condition of the stabilizer struts is carried out in two ways.
- Professional. To do this, you will need a reliable service center that has the appropriate diagnostic equipment. The accuracy of identifying a breakdown is high, but the price of the service is not low.
- Independent. To do this you will need your own garage and a little time. Turn the wheel as far to the right and left as possible. If knocking or play occurs, the stabilizer struts should be replaced. There is a second method of checking - using an inspection hole. You should unscrew the bottom nut and release the strut. If the hinge moves freely, the stabilizer link must be replaced.
Such modernization of the front suspension often becomes the basis for tuning the VAZ 2114. This is one of those models from a domestic manufacturer that is perfectly suited for tuning. Moreover, both external and technical.
By installing Priora stabilizer struts, you can increase body rigidity and slightly raise the front end. The sensations on the road will be different; even an inexperienced driver will feel it. The bottom line is that the new elements improve maneuverability and safety.
How to identify a malfunction
Replacing the VAZ 2114 stabilizer struts will only be necessary if the driver clearly knows that his strut is completely worn out. There are several verification methods for this, among them are:
- focus on knocking;
- skidding on corners;
- unwinding of hinges;
- vibration when touched.
When a strut in a VAZ 2114 fails, you can always hear it, especially when turning. This is a peculiar knocking and rumble that is difficult to confuse with something. As a rule, the rack only makes a rattling noise when it is completely worn out. This noise can be heard in the front and rear of the car at the same time, since the car has two racks installed in opposite places and they wear out almost equally.
Important: Since the rack is easily subject to physical wear and tear, over time it begins to perform its functions much worse or does not perform them at all. This can be felt when turning, as the driver begins to feel the skidding more significantly. You have to hold on to the steering wheel more confidently to avoid getting into an accident.
You have to hold on to the steering wheel more confidently to avoid getting into an accident.
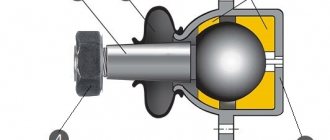
The VAZ 2114 car is equipped with articulated struts. This is a standard version of the part that is freely sold on the market. Its peculiarity lies in the fact that on both sides it is attached with rotating hinges, lubricated under the anthers. The driver can freely unscrew the strut, remove the hinge and open the boot. If all the lubricant under it has already been used up, it can be reapplied there, but if instead of lubricant a mixture of dirt and Vaseline is found, the rack will have to be changed.
The last effective method includes two stages. At the first, the VAZ 2114 needs to be placed over the pit, one person sharply turns the steering wheel to the side, the other holds the rack with his hand. If you feel vibration and grinding, the part must be replaced.
Machine controllability
Another symptom that indicates a malfunction of the stabilizer link is a significant deterioration in the controllability of the car. The movement is accompanied by “yaw”. Periodic drifts are possible. Steering becomes much more difficult even when driving in a straight line.
Due to a sharp deterioration in vehicle controllability, there is a high risk of getting into an emergency situation, for example, as a result of the vehicle deviating from the intended trajectory.
Vehicle deviation from the planned trajectory
Replacing stabilizer struts on a VAZ 2114
Experts recommend replacing suspension elements in pairs. It is highly undesirable to leave worn parts in their original places without attention, since repair work will soon be repeated.
- We install the car on the inspection hole, install the shoes to avoid any arbitrary rollback, squeeze the hand brake;
- Jack up the side, unscrew the bolts, remove the wheel;
- Using a “17” wrench, we unscrew the rack mount from under the hole, use a metal spacer to knock out the bolt, and knock down the rack;
- Lubricate the bolt with graphite grease, having previously cleaned it of rust and deposits;
- We carry out troubleshooting of adjacent mechanisms, parts, levers. If there is no damage, install a new rack, fix it with a bolt, and tighten the nut.
By analogy, we carry out work on the opposite side.
If defects are detected in the lateral stability link bushings, they must also be replaced. The process of installing new ones is not at all complicated; you can do it yourself.
- After removing the wheel, unscrew the stabilizer bar, suspension arm, and ball joint pin. On each side, the rod is fixed with a rubber bushing and a metal plate at the base. We unscrew the two bolts to “14”, replace the bushing, and assemble the structure.
- After the repair is completed, we visit a service station to restore the wheel alignment angle. The degree of tread wear, fuel consumption, and acceleration dynamics depend on the accuracy of the angle.
Often the cause of the knock is the ball joint. As the pin wears out, free play develops inside. Each time you enter a hole, there is an impact on the metal surfaces of the parts.
The defect is eliminated by replacing the ball joint assembly. To do this, jack up the side, unscrew the bolts, and remove the wheel. Using a “14” wrench, unscrew the fastening of the ball joint pin. We substitute a wooden spacer and knock the tip out of its seat. Unscrew the remaining two bolts securing the ball joint.
We troubleshoot the steering knuckle, clean the seat, and fix the ball joint. We assemble the remaining structural elements and check the functionality of the system.
Replacement
To replace or partially repair you have to go through a rather labor-intensive path.
You will need the following set of tools and materials:
- Screwdriver Set;
- Set of wrenches;
- Jack;
- Partner.
Decide in advance whether you are going to change the entire assembly, or whether you want to change only the damaged elements of the rear pillar. The volume of your purchases depends on this.
You can start working. Based on our instructions and the video lessons provided, you will be able to replace the rear struts yourself.
- Turn the gearbox into first gear mode.
- Raise the rear wheels using a jack.
- Install supports, strengthening the reliability of fixing your car in a given position.
- Remove the racks. To do this, first go to the trunk, remove the decorative rubber plug, which is located on top of the rack mount. It is better to remove all unnecessary things from the trunk.
- Take a 17-size spanner and a 6-size open-end wrench. With their help, you can unscrew the nut with a spanner, and the open-end wrench will be useful for holding the shock-absorbing strut rod.
Removal process
- That's it, this allows you to remove the mounting nut, support washer, spring washer and top pad without any problems.
- Now we go under the car to finish what we started.
- Take a 19 mm wrench and remove the shock absorber mounting bolt to the rear beam. Remove it.
- In some cases, problems may arise with dismantling this bolt, since it simply sticks. To do this, pre-treat the bolt with the almighty WD40 and give it time to react.
- If even this method did not help, then you will have to take the guide and simply knock out the fastening element.
- Next, remove our shock absorber along with the spring.
- Do not forget that during such manipulations most often the spring gasket remains on the body. It sticks to the metal. Many people forget to take it out, which causes difficulties during reinstallation. Don't make this mistake.
- Clean all the seats to make it more convenient for you and make it all look more aesthetically pleasing. Plus, neatness never hurts to extend the service life of new spare parts.
- To make it more convenient for you, wrap the gasket on the new spring with electrical tape, or secure it with thin wire. This will prevent it from slipping when you begin installation.
- When putting the assembly back together with the new rear strut, be sure to make sure that the raised portion of the spring cup faces the direction of the wheel.
- Secure the lower end of the rack with a nut and bolt, but there is no need to tighten the fasteners just yet.
- Using the lever of your jack, raise and lower the rear of the car. This is necessary in order to eventually insert the shock absorber rod into the hole in the body of your nine.
- With the spring in place, pull the shock absorber rod out to its full length.
- Insert the rod into the lower ear and secure with a bolt.
- Place a jack under the beam and begin manipulating the lifting mechanism.
- At the same time, the spring will begin to compress, and the rod will move towards the glass.
- You or your assistant must be alert in the car in order to have time to pry the rod with a screwdriver and ensure it is directed in the right direction.
- Once the rod is in place, the work can be considered almost complete.
- Fix the rod, not forgetting to insert the cushion, washer and engraver. All this is securely fixed.
- Now you can lower the car onto its own wheels and fully tighten the bolt of the lower shock absorber mounting.
Reassembly stage
Changing rear strut assemblies is easier and faster than dismantling, disassembling the old strut, looking for defects in it and replacing individual damaged components. But this requires less financial costs.
Changing racks is not that difficult, even if you have little experience in such matters. But if there are none, be sure to contact trusted car services. Do not risk your own car, otherwise subsequent repairs will be even more difficult and expensive.
Loading …
How to extend the life of racks
Often the driver wants to know how to extend the life of the struts on his VAZ 2114 car. Moreover, the desire arises when he is tired of constantly doing this. For some drivers, strut models fail after a while, while others can drive them freely for many years. In order for the purchased part to last longer on your favorite VAZ, you need to follow three simple instructions:
- improve driving style;
- choose good stands;
- repair racks.
The first thing you need to think about is your driving style. None of the other methods will work if the driver continues to adhere to an extreme driving style. It is recommended to slow down when turning, as well as during any irregularities. If no roll is created, the stabilizer will not react, and accordingly the struts will not wear out.
To drive a VAZ 2114, racks from any company are suitable. When purchasing a new car, the suspension is equipped with Russian factory struts, but the car enthusiast can freely choose struts of a different brand, too. The main rule is that the more expensive it is, the better the quality. It is recommended to avoid counterfeits, which are most often found among German products.
Most purchased racks can be repaired. It is recommended to repair the spare part immediately after purchase. Often, the manufacturer does not apply high-quality lubricant under the boot, but simple technical petroleum jelly. Just one syringe of good lubricant can increase the service life of the part. It is also recommended to periodically check the spare part, removing dirt under the boot and changing the lubricant each time.
Many still cannot finally decide for themselves what exactly they call a stance. Some are sure that the stabilizer link is a shock absorber, others claim that it is a shock absorber element.
But in reality, there is only one option and the correct one. The strut is the part of the shock absorber without support and spring.
Varieties
Elements with polyurethane bushings
Today, a total of three types of racks are available for the VAZ 2114 car.
| View | Characteristic |
| Oily | An ideal rack option for those who adhere to a careful driving style and expect maximum comfort from their car. Considering the condition of the vast majority of domestic roads, it is not surprising that all versions of the VAZ 2114 are equipped with just such racks from the factory. But it’s better not to drive at high speeds; |
| Gas-oil | They began to be installed on Kalina, Granta and other new models from AvtoVAZ. They provide an average level of comfort and a sporty ride. The golden mean between oil and gas struts. Unlike oil ones, when accelerating a car on gas-oil struts, it will not swing, since the body behaves more rigidly and more stable. |
| Gas | The choice of those who prefer full throttle and a sporty driving style. Literally every hole is felt when driving a car with such struts, but they are ideal for racing. They are not suitable for everyday use, since soon the car will literally begin to crumble from shaking and vibrations. |
It is important to note that the VAZ 2114 does not require the installation of identical struts on all four wheels. Therefore, there is room for experimentation and searching for the optimal combination of different types of racks.
- Telescopic stands are installed at the rear, the rod is mounted on a beam behind the bowl and has space for a spring.
- The front pillars are lower than the rear ones, but wider in diameter. They have steering knuckles, plus the attachment system to the bowl is different.
Replacing the anti-roll bar for a VAZ 2114
Replacing stabilizer struts for a VAZ 2114 - subtleties and features
The VAZ 2114 model is one of the most popular on the Russian automobile market. The machine has a relatively low cost, as well as optimal operational capabilities. It is thanks to the price-quality ratio that the car is in great demand among our car enthusiasts. Like any other car, the VAZ 2114 eventually needs to replace struts. If the driver is doing this for the first time, we will tell you what replacing stabilizer struts on a VAZ 2114 is and how to do it.
Why do you need to change
Important: before making a replacement, the driver must clearly understand why to change the struts, how this may affect the movement, so that in the future the car owner can identify the malfunction at the initial stage. Racks need to be changed for several reasons
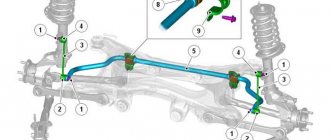
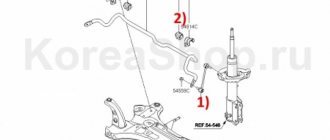
Since the anti-roll bar is one of the most important parts of the vehicle's suspension, it must be directly connected to it. Since the stabilizer and suspension are in parallel planes, a perpendicular part is needed that will allow them to interact with each other. This is exactly the part that the stabilizer strut acts as.
Racks need to be changed for several reasons. Since the anti-roll bar is one of the most important parts of the vehicle's suspension, it must be directly connected to it. Since the stabilizer and suspension are in parallel planes, a perpendicular part is needed that will allow them to interact with each other. The stabilizer strut is just such a part.
Car suspension
When driving a VAZ 2114, the car can skid when turning. At this moment, a roll is created and the anti-roll bar signals the suspension to overcome this roll by raising and lowering the car in the right places. The fact is that this process goes through the racks, which is why they wear out. In fact, this is quite convenient, since a separate part is subject to wear, and not the stabilizer, suspension and other participating elements, which suffer much less from roll.
Anti-roll bar
How to identify a malfunction
Replacing the VAZ 2114 stabilizer struts will only be necessary if the driver clearly knows that his strut is completely worn out. There are several verification methods for this, among them are:
- focus on knocking;
- skidding on corners;
- unwinding of hinges;
- vibration when touched.
When a strut in a VAZ 2114 fails, you can always hear it, especially when turning. This is a peculiar knocking and rumble that is difficult to confuse with something. As a rule, the rack only makes a rattling noise when it is completely worn out. This noise can be heard in the front and rear of the car at the same time, since the car has two racks installed in opposite places and they wear out almost equally.
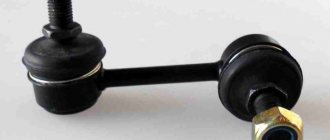
Stabilizer struts VAZ
Important: Since the rack is easily subject to physical wear and tear, over time it begins to perform its functions much worse or does not perform them at all. This can be felt when turning, as the driver begins to feel skidding more significantly.
You have to hold on to the steering wheel more confidently to avoid getting into an accident.
Removing the rack
The VAZ 2114 car is equipped with articulated struts. This is a standard version of the part that is freely sold on the market. Its peculiarity lies in the fact that on both sides it is attached with rotating hinges, lubricated under the anthers. The driver can freely unscrew the strut, remove the hinge and open the boot. If all the lubricant under it has already been used up, it can be reapplied there, but if instead of lubricant a mixture of dirt and Vaseline is found, the rack will have to be changed.
VAZ-2114 on the pit
The last effective method includes two stages. At the first, the VAZ 2114 needs to be placed over the pit, one person sharply turns the steering wheel to the side, the other holds the rack with his hand. If you feel vibration and grinding, the part must be replaced.
Purpose of the stabilizer and checking its condition
A structural element such as an anti-roll bar plays an extremely important role, especially when driving at high speed. It reduces the amount of vehicle roll when turning and, thus, helps maintain its position on the road.
This, in turn, increases controllability, makes the car more obedient and at the same time safer. But, due to the quality of the surface of most domestic roads leaving much to be desired, as well as as a result of frequent driving on primers, this part fails very quickly.
There are two solutions to this situation - install a new original stabilizer to replace the worn one, or install a stabilizer from Priora on a VAZ 2114.
The last option is the most optimal, because the Priorovsky stabilizer is superior to the stabilizer of the 14th model in terms of massiveness, reliability and service life. In addition, it gives the car a little more rigidity and allows you to feel the road confidently even at speeds over 100 km/h.
The stabilizer installed on the Priora (and, accordingly, which can also be installed on the 2114) comes in two types:
- symmetrical - it can be installed on any side of the suspension;
- asymmetrical - suitable only for one side of the suspension.
Stabilizers are produced by different companies, but their quality (as well as reliability) is approximately the same, and therefore you can purchase any of them as a replacement.
You can find out that the original factory stabilizers have worn out by a number of indirect signs, for example, knocking or extraneous noise in the suspension while driving, skidding when cornering and deterioration in the overall handling of the car on the road.
True, these same “symptoms” are also characteristic of a number of other suspension faults, for example, worn bushings. For this reason, before starting the replacement, you should resort to simple diagnostics, which will accurately show whether the stabilizer is working or whether it is time to change it.
To do this, turn the wheels as far as possible to the left, and then as far as possible to the right. If at the same time there is a strong knock or noticeable play, then the part has become unusable and it’s time to replace it.
Another method of checking can be carried out if there is an inspection hole. In this case, the lower mounting nuts of the struts should be unscrewed from the car installed on the pit. If their hinges move freely, then it’s time to replace them.
As already mentioned, the most optimal solution in this case would be to install stabilizers designed for Priora. But, due to their difference in size from the VAZ 2114 stabilizers, their struts will also need to be replaced. We will describe the procedure for performing this operation below.
Guide to self-replacement of front suspension struts on VAZ 2114 - 2115
The first step is to put the car on the handbrake, remove the front wheel bolts and jack up the car. Then finally remove the wheel and you can begin this repair of the chassis on the VAZ 2114-2115.
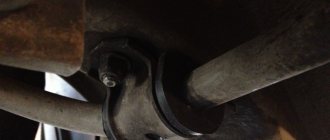
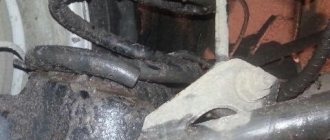
First, you need to release the rack from the mount with the steering tip. Read about this in more detail in the article on Replacing tie rod ends. After we have completed this task, unscrew the two nuts securing the strut to the lever from below, as is clearly shown in the photo below:
And we try to pull out the bolts from the back side with our hands. If this cannot be done due to rusted connections, then you can use a punch or a wooden block to knock out the bolts with a hammer:
When the bolts pop out, the stand can be moved to the side, thereby disconnecting it from the lever:
Now open the hood and unscrew the three nuts securing the front support to the body glass of the VAZ 2114-2115. This is clearly shown in the picture below:
When you unscrew the last nut, hold the stand from below so that it does not fall. Then you can remove it without any problems:
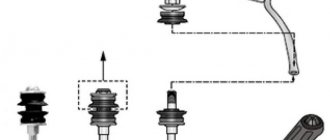
So the entire front suspension module has been removed. To disassemble it, we will need spring ties and a special wrench to unscrew the central nut on top of the support. The first step is to loosen the top nut, holding the rod from turning:
Never let go completely, otherwise you might get a spring on your forehead or something else. Tighten the springs using special tools and only then unscrew the nut completely and remove the upper support cup:
Then you can start removing the support itself:
And then the springs:
Now all that remains is to remove the rubber boot and compression buffers and you can begin replacing all the necessary parts of the front suspension: support bearings, supports, struts or springs. The entire assembly process is carried out in strictly reverse order and does not take much time. When installing the module on a car, it is possible that you will have to tinker a little so that the holes in the strut body itself and the lever line up at the bottom. But if you have a mount, you can do it yourself!
The prices of components are approximately the following (for example, I will name from the manufacturer SS20):
As for the remaining parts, such as compression buffers and anthers, in total you will spend about 1 thousand more rubles. Of course, the effect after installing a non-factory suspension is simply pleasing. In general, I’ll write about this in future articles.
- remont2114.club
- www.drive2.ru
- 24techno-guide.ru
- zarulemvaz.ru
Repairs on discontinued vehicles
First, let's look at how to replace the front struts of a VAZ 2109 according to detailed instructions. When carrying out this procedure we will need:
- special key for holding the rod;
- set of spanners;
- universal puller for pressing out fingers;
- special threaded ties for springs.
Also read about replacing rear springs and how to change brake pads. Well, let's get started.
- In the engine compartment, unscrew the nut for the upper fastening of the rod, holding the rod with a special wrench, and then unscrew the three support nuts. Then loosen the wheel mount.
- We jack up the side to be repaired and remove the wheel.
- Next, you need to turn to the steering rod: having pulled out the cotter pin, unscrew the nut securing the steering rod joint to the lever of our part. Using a universal puller, squeeze the finger out of the assembly lever.
- We release the brake hose from the mount so that it is not damaged during repairs. Then, having unscrewed the two bolts, we dismantle the brake caliper and move it to the side.
- After unscrewing the fastening of the ball joint, disconnect the ball joint.
- We unscrew the hub nut, now you can pull out the CV joint, and at the same time our defective part assembled with the steering knuckle will be released. If a complete replacement of each strut is required, you will have to unscrew the camber bolts from the steering knuckle eye to free the knuckle. But more often there is a need to update some elements.
Therefore, the assembly can simply be disassembled without removing the cam, in order to avoid installing wheel camber.
- To disassemble the unit and then change the elements, we install universal couplers on the spring, then compress the spring, after which we dismantle the support bearing and install a new one in its place.
- Next, remove the spring support and remove the spring without loosening the special ties.
- Now you can replace the shock absorber cartridge if the entire assembly is dismountable.
- Assembly is carried out in reverse order.
Next, we will consider a method that makes it easier to dismantle the strut, but without the fist, immediately replace it as an assembly, after which you will need to do a wheel alignment. To study this method, we will simply describe how the front struts of a VAZ 2110 are replaced, that is, of a similar design, in a different way. Although you will need the same tools, however, instead of a universal finger puller, if you don’t have one, you can use:
To change one of the front struts of the VAZ 2110 in a different way, we start from point 3 of the previous instructions.
- Having pulled out the cotter pin and unscrewed the nut, press out the pin as follows. Having inserted the end of the mounting blade between the steering rod and the lever of the defective part for expansion, we strike the end of the lever with a hammer.
- The bracket that secures our unit to the steering knuckle eye has an adjusting bolt, which is responsible for the wheel camber. There is an option to put a mark on the bolt in order to at least approximately maintain the camber, but this will not help much.
- We disconnect the brake hose from our defective assembly unit.
- Unscrew the adjusting bolt, as well as the lower bracket bolt. That's it, calmly remove the assembly to the light, after which it can be replaced as an assembly.
You can do the same on the Lada Samara. The fact is that the replacement of the front struts of the VAZ 2114 is carried out entirely according to the procedure already given, as they say, one to one, since the structure of the unit is identical to the “tenth”.
The process of replacing stabilizer struts on a VAZ 2110
The stabilizer struts on a domestically produced VAZ 2110 car are replaced as follows:
- Place the car on a viewing hole or raise it on a platform. The front part must be fixed to supports.
- To avoid putting yourself in danger, put the car on the handbrake.
- If you are in a pit, then place shoes under the wheels, even if the handbrake is on.
- On both sides, alternately unscrew the nuts that secure the body to the arms of the anti-roll bar struts.
- Remove the spring washers.
- Unscrew the bolts on both sides.
- Unscrew the two nuts that hold the stabilizer bars to the body.
- Remove the spring washers from the studs.
- Remove the stabilizer brackets and rods along with the struts.
- If you need to replace the strut or bushing, unscrew the nuts securing the strut and arm, then knock the former off the bar with a hammer. The hammer must be wooden or plastic. Under no circumstances should it be a metal instrument. You will damage the element with it.
- Visually inspect the condition of the struts and bushings. If deformation, tears, wear, deterioration of elasticity, cracks, or loose fit are detected, be sure to replace the failed elements with new, high-quality ones.
- To remove bad bushings, you will need a press. Because of this, it is easier to replace the struts at the same time as the bushings.
- Inspect the assembly rod. There should be no signs of deformation on it. Make sure the ends are in the same plane.
- If the geometry deformation on the stabilizer bar is minor, it can be corrected. Otherwise, the part is replaced with a new one.
- If the stabilizer pads are worn out, torn, have lost their original elasticity or do not fit well on the bar, they must be replaced. New cushions are mounted on the stabilizer bar 350 millimeters from its center. The cuts should be located towards the front of the car.
- The struts need to be lubricated with a soapy solution, which will make it easier to put them on the stabilizer bar.
- The bar is mounted in its rightful place, the nuts that hold the brackets from the pillows are tightened. They should be tightened until the play in the cushion cuts is eliminated.
- First you need to tighten it from the side of the cut, that is, the front nuts. Only then are the rear nuts tightened.
- The nuts holding the front struts are mounted in place until there is no gap between the struts and the arms.
- Weight the suspension to finally tighten the stabilizer nuts. Place the car on a hard surface. The tightening torque for the rack components should be in the range from 4.3 to 5.3 kgf-m, and for the brackets - from 1.3 to 1.6 kgf-m.
Article on the topic: The starter on the VAZ 2109 does not work, what should I do?
Visual inspection
A visual inspection of the stabilizer link can detect signs of malfunction of the stabilizer link. The key points to pay attention to when checking a domino are shown in the table below.
Table - Signs of malfunctioning knuckles that can be identified by visual inspection
| Fault criterion | Note |
| Mechanical damage to the rod | Most often there is a fracture at the weld joint of the strut. Deformations also occur, but they are much less common. |
| Rubber loses its original properties | As a result of natural aging and exposure to an aggressive external environment, rubber loses its elasticity and cracks and tears may appear on its surface. This phenomenon is typical for bushings and hinge boots. |
| Excessive wear | Most easily found on stabilizer links with bushings. The rubber wears away on one side, causing metal to come into contact with metal, which is the source of the characteristic knocking sound. |
Rubber cracked due to aging
Replacement
Before you get started, we recommend watching a video on how to make the replacement. This is a useful lesson that will provide the necessary knowledge and concepts about the location of certain components of the unit.
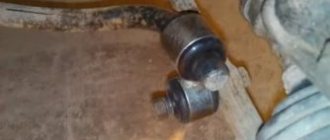
Removed suspension element
But let’s say right away that the lack of at least basic experience in car repair means that you should not start replenishing your own knowledge base with such a process as replacing these parts. It is better to entrust this issue to specialists.
If you decide to do everything yourself, then follow the specified algorithm. This will allow the replacement to be completed efficiently and without unnecessary manipulation.
- Place the car on a flat area, preferably with a hole. Loosen the bolts on the front wheels. Be sure to turn on the handbrake and secure the wheels with chocks. You need to think about safety first.
- Use a jack to lift the front of the car, then remove the wheel. Please note, when changing the front suspension elements, it is better to do this on two wheels at once, even if one of the struts is in satisfactory condition.
- Lift the hood and look for the bolts that secure the struts to the body. Look for them on the left and right, near the windshield.
- There is a plastic cap on the glass that needs to be removed. To do this, use a simple flathead screwdriver. The plastic element is pryed off and thus easily removed.
- Unscrew the mounting nuts holding the rack on top of the body.
- A brake hose with a bracket is attached to the rack. This element is also removable.
- Using a wire brush, be sure to clean all the fastening elements of the struts to the body and chassis of the car.
- Now take the pliers in your hands and use them to unscrew the nut. The one that holds the tie rod end joint to the A-pillar.
- A puller removes the hinge from the shock-absorbing strut arm. If this is your first time changing them and no one has removed them before, be sure to tighten the nut a few turns, which will protect the threads.
- Near the place where the fist is attached to the stand, there are nuts that should be removed. Just first mark where the adjusting bolts are located. This way you won’t have to go to a wheel alignment after replacing suspension elements.
- Using a hammer, knock out the bolts that hold the element and the fist. The nodes release, allowing you to pull your fist down and reach the worn post.
- Place the new part, then proceed to reassemble the unit in the reverse order. During the procedure, do not forget to check other components for defects, malfunctions, oil leaks, and so on.
When the procedure is completed, put on the wheels, but do not tighten the bolts tightly. By lowering the car from the jack, you can fully fix the bolts
This is an important rule that, unfortunately, many people forget.
Replacing the front struts is not the most difficult procedure, but it requires observance of a sequence of actions, accuracy and regularity.
Useful tips
Replacing struts is far from the most difficult procedure when repairing a car. However, it is important to take into account and observe certain nuances so that the quality of the work done is maximum.
Integrity check
Therefore, stick to a few tips.
- Before installing new parts, be sure to wash them using regular kerosene and the almighty product called WD40. The presence of oil in the latter will ensure better performance and mobility of parts.
- When purchasing racks and accessories for them, be sure to check their condition and quality directly on site. Do not throw away receipts in case you suddenly discover a defect or defect already at the beginning of car repair.
- After replacing the struts, tighten the fastening nuts, but do not tighten them. Only when the car is removed from the jack can they be tightened fully and firmly as permissible.
- Check the car periodically and do a wheel alignment. This is an effective method for extending the life of racks. Plus the car will move noticeably better.
- If possible, take the car to a car service center where there is a special stand. It allows you to obtain a diagram of the performance characteristics of the racks. Such a service costs little, and if you change the racks from specialists, they can even carry out diagnostics for free.