03/02/2022 1,543 Alarms
Author: Victor
According to the Tomahawk TZ 9020 instructions, the alarm feature is the engine relay blocking function - in the event of theft, the driver can remotely turn off the engine, which will prevent unauthorized access. Also, the advantages of the complex include feedback and auto-start, for the implementation of which a separate connector is provided in the design of the anti-theft system.
[Hide]
V. how to use the security system, Tomahawk tw-9020
Page 9
- Image
- Text
TOMAHAWK TW-9020
V. How to use the security system.
1. Arming.
To turn on the security mode, you must press the button once.
.
Lanterns
will flash once, one “CHIRP” of the siren will sound (if the siren is not disabled).
The system will close the central locking. The LED will blink evenly.
Display indication:
Attention!
If at the moment of turning on the security mode any trigger
is active (for example, a door is open), the system will give 4 siren signals and 4 flashes with side lights.
2.
Quiet arming
At night, you have the opportunity to turn on the security mode without
sound notification. In this case, the siren will be disabled. To use this function, press the button. ((|1 time. The system will close the central locking,
The LED will blink evenly and the lights will flash once.
Indication 1СО display:
Attention!
The siren sound notification is disabled, but all information
is displayed on the key fob display.
3. Disabling the shock sensor.
If you left someone inside a protected vehicle or vehicle
parked on the side of a busy roadway, it is possible to temporarily disable the impact sensor.
To turn off the shock sensor warning zone after turning it on
security mode press
2
times within 1 second. Subsequent
Pressing this button twice will turn off the main sensor zone. Repeat this
procedure to turn on the shock sensor.
ESOdisplay indication: ((<^ DH
4. Disabling the security mode.
To disable the security mode, press the button
. The doors will open.
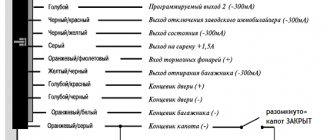
Specifications
Technical parameters of Tomahawk TZ-9020 equipment:
- voltage in power circuits - 12-15 V;
- current consumption - up to 16 mA;
- carrier frequency - 434 MHz;
- encoding type - frequency modulation;
- Remote control range is up to 1200 m.
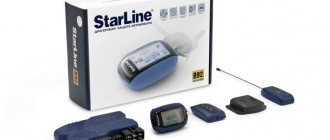
Equipment
The Tomahawk 9020 alarm kit includes the following components:
- head module;
- a set of remote controls (communicator and auxiliary);
- shock sensor;
- antenna unit;
- set of electrical wiring harnesses;
- limit switch;
- control LED (only for TW version);
- programming button;
- technical documentation.
Video
New cars > Car alarms >
Did you like the material? Share with your friends:
Have questions about car repairs? Ask them in the consultation section, to do this, click on the link below.
auto mechanic
The Tomahawk tz 9020 alarm system is equipped with a separate connector that allows you to connect with autostart. A similar connector is provided in all systems manufactured under the Tomahawk brand and belonging to the “90XX” family. The connector connection diagram depends on the model. Let's look at what this circuit looks like for one signaling device - tz 9020.
Equipment
Delivery kit for Tomahawk 9020 car alarm:
- Microprocessor module equipped with a relay unit. Supplied in a black plastic case.
- Basic communicator with display. Thanks to the presence of a monochrome screen, this device has a feedback function.
- Additional pager. It is equipped with a waterproof housing and is characterized by a single-channel operating mode.
- Touch sensitivity controller with two response thresholds - warning and alarm. Equipped with a cable and connector for connecting to the control unit.
- Transceiver with built-in antenna adapter.
- “Override” button for setting basic parameters and entering the service maintenance mode.
- Limit switch used for mounting on the hood or tailgate.
- Set of wires for connecting the system.
- Consumer Memo.
- Warranty card.
- Packing box.
- Technical manual in Russian, allowing you to install and configure alarms in garage conditions.
Since the Tomahawk 9020 does not include a siren and door triggers, these devices are purchased additionally.
System 9020 Contents
Various scheme options
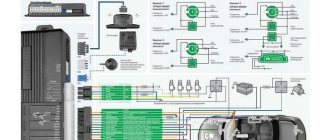
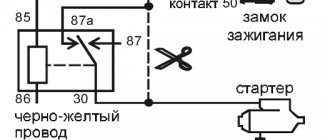
The power terminal block of the Tomahawk tz 9020 signaling contains 6 contacts. The basic diagram for these is shown below:
Auto start and power connector
The arrows here indicate T-shaped connections. According to the instructions, it is better to connect the “red” wire to the “30th” contact. The pre-flask shown in the diagram is then not installed.
The “blue” cord can be connected not to the “ACC” line, but to the lineman relay, which is what is usually done in practice. Your car alarm can also be configured additionally, and then the specified wire will emulate one of two lines: “IGN 1”, an additional starter line.
In any case, the “yellow” cord is connected to pin “15”. The “black and yellow” wires will go into the gap in the starter cable. The “thin” wire, moreover, is connected to the lock terminal. If the “black and yellow” cables are mixed up, it will be impossible to start the engine even with the key.
Let's say there are two starter lines in the standard wiring. The alarm is then connected like this:
Option with two starter lines
Some cars have a feature - current must be supplied to one of the two lines earlier than to the other. Then you need to “break” the second circuit, and connect to the first “T-shape”. The setting for the considered case is performed as follows: option “1” associated with autostart receives the value 4. If the lines are triggered simultaneously, use the value 3.
The Tomahawk car alarm of the model in question does not allow connection to locks that have two 30 terminals. Or rather, you can connect everything, but then you won’t be able to use autorun.
User manual
To control the TZ 9020 system, two types of key fobs are used:
- main five-button with display;
- auxiliary four-button.
If it is necessary to purchase new key fobs, the owner should remember the compatibility of the devices.
Remote controls for the following systems can be used for control:
- TZ-7010;
- TZ-9030;
- LR-1010;
- TW-7010;
- TW-9020/9030;
- H1 and H2.
When controlling the complex, three options for manipulating the buttons are used:
- normal pressing of one or two keys;
- double tap within one second;
- pressing and holding for two seconds until a sound signal sounds (on the main key fob) or the color of the control diode changes from red to green (on the additional one).
When you press the buttons, the built-in processor generates and encodes a command that is sent by the transmitter. Each subsequent code is different from the previous one, which makes it somewhat more difficult for code grabbers to intercept and decrypt commands. After execution, the head module of the system generates a response signal, which is received by the key fob with a two-way operating mode. The received information is processed and displayed on the display in the form of icons.
Purpose of key fob buttons
The purpose of the buttons is given in the summary table.
| Button | Executable function | Notes |
| A1 | Arming and closing locks | Ignition off |
| A1 | Closing the locks | When the ignition is running |
| A1 (double) | Deactivating the sensor | In security mode |
| A2 | Disabling security and unlocking locks | Ignition off |
| A2 | Unlocking the locks | When the ignition is running |
| A2 (for 2 sec.) and A2 | Remote engine start | – |
| A2 (for 2 sec.) and A1 | Automatic restart | – |
| A1 (for 2 sec.) and A2 | Remote Override Mode | Doesn't work with active security |
| A4 | Siren control | With the ignition off |
| A1 (double) | Security mode when the engine is running | – |
| A3 | System status poll | – |
| A3 (double) | Car search | – |
| A3 (for 2 sec) and A3 | Unlocking the additional lock (trunk) | – |
| A1 and A2 (for 2 sec.) | Panic | Ignition inactive |
| A1 and A2 (for 2 sec.) | Enabling anti-robbery (remote) | When the ignition is running |
| A2 | Disabling anti-robbery at a distance | – |
| A2 (for 2 sec.) and A3 | Immobilizer control | – |
| A2 (for 2 sec.) and A4 | Auto arming mode | – |
Keychains of the TZ 9020 complex
Designation of icons on the keychain
The screen contains icons that help the owner manage the alarm:
- 1 – security in normal mode, with siren signals (together with 3);
- 2 – quiet operating mode (together with 3);
- 3 – locked locks;
- 4 – open locks;
- 5 – indication of open door limit switches;
- 6 – display of the open limit switch of the hood lid;
- 7 – indication of an open trunk lid;
- 8 – activity of the transmitter installed in the key fob;
- 9 – testing the first sensor zone;
- 10 – signal from the main sensor zone (together with 9);
- 11 – disabling the first sensor zone (together with 9);
- 12 – complete disabling of the sensor (together with 10);
- 13 – anti-robbery;
- 14 – remote service mode;
- 15 – disabled parking brake lever;
- 16 – display of battery status;
- 17 – ignition circuit activity;
- 18 – engine started (together with 17);
- 19 – additional immobilizer is active;
- 20 – automatic arming;
- 21 – hourly warming up of the power unit;
- 22 – timer;
- 23 – alarm clock;
- 24 – field designed to display the clock and temperature (only 12-hour format is provided for time display).
Arrangement of icons on the screen
Key fob programming
The key fob with two-way communication has the ability to configure:
- hours;
- alarm clock;
- timer.
The setup is done as follows:
- Press A5 and hold until the hour field starts flashing.
- Set the value by pressing A3 or A4 (forward and backward, respectively).
- Press A5 again and set the minutes in the same way.
- Pressing A5 again will allow you to set the number of alarm hours. Changing the value is done using buttons A3 or A4.
- Pressing A5 will switch the alarm to minute setting mode.
- Additional impact on A5 switches the alarm clock into on or off mode (A3 – on, A4 – off).
- By analogy with an alarm clock, the timer time is programmed.
Recording a key fob in memory
The TZ 9020 head unit is equipped with a memory capable of storing codes for four control panels. During operation, situations may arise when the owner needs to rewrite old key fobs or program new ones.
Sequencing:
- With the ignition turned on, press the service button seven times in a row.
- After this, turn off the ignition and receive a notification in the form of seven short siren sounds, which confirms readiness for recording.
- Press and hold A1 and A2 on each key fob. The recording will be confirmed by beeps; the number corresponds to the remote control number in memory.
- After programming the last remote control code, pause for six seconds, the system will automatically exit the recording state.
The owner should take into account that when the Tomahawk TZ 9020 encoding starts, the memory is reset and all old key fobs become unusable without re-programming.
The owner can at any time find out the number of remote controls in the device’s memory:
- Turn on the ignition circuit.
- Press A3 of any key fob you are using.
- The status LED will start flashing. The number of flashes corresponds to the number of key fobs.
Controlling the system from the key fob
The main functions of the Tomahawk TZ 9020, which are controlled by signals from the key fob:
- Security is turned on using button A1. In this case, a single indication is given with a siren and lights. The locks are locked and the diode's flashing mode is activated. Icon 1 is active on the screen. For quiet switching on, use button A4. In this case, the siren does not emit a signal, and icon 2 is active on the screen.
- The system has a built-in two-stage sensor shutdown function. To do this, you need to first turn on the security, and then press A1 twice within one second. If you press again, the sensor will turn off completely. The screen displays icons 1 or 2, as well as 11 or 12. To turn on the sensor, double-click on A1, while indicators 11 or 12 are deactivated.
- The security is turned off by pressing A2, the locks are unlocked and a double indication is given with lights and a siren beep. Icon 4 remains active on the screen. If the complex emits a triple signal and the key fob buzzer sounds long, then it was triggered during the security cycle. Pressing the A2 button when an alarm is generated turns off the signaling, and the security mode is maintained.
- The complex allows you to guard a vehicle with a running engine. To do this, the owner needs to get out of the car and close all the limit switches responsible for protecting the perimeters of the doors and hoods. The key remains in the ignition. After this, you need to press A1, which will cause the lock to lock. Within three seconds, you must press A1 again, after which the car will give a single signal with lamps and a siren. Icons 1, 17 and 18 will turn on the screen. In this mode, the shock sensor does not turn on, which avoids false alarms caused by vehicle vibration when the engine is running. Disabling security is done by pressing A2; icons 4, 17 and 18 will remain on the screen.
- The owner can activate the automatic arming mode of the system. To do this, press and hold A2, and after the buzzer sounds, press A4. Icon 21 will appear on the display.
- To start or stop the additional immobilizer, use a long press on A2 and then on A4. After turning on the function, icon 20 is activated on the screen. In this mode, the engine starting circuits are automatically blocked 30 seconds after the voltage supply to the ignition circuit is stopped. To disable the immobilizer, use a short press on A2. If the remote control does not work, the immobilizer is turned off by pressing the service button once with the ignition off.
- The locks are controlled during movement by pressing A1 and A2 (locking and opening, respectively).
- Searching for a vehicle is performed by double pressing A3. The machine will respond in the form of a six-time light and sound alarm. At the same time, a radio signal will be sent, which will update information about the vehicle’s condition on the key fob display.
- Panic, which is used to attract the attention of others in the event of an attempted robbery or other illegal actions against the owner. Starting is done by pressing and holding A1 and A2. The activation of the mode is confirmed by three long beeps, a siren and a triple flash of flashlights. The locks will be locked and the vehicle security will be activated.
Another way to attract the attention of others is the anti-robbery mode. To do this, press the service button once while the engine is running (or press and hold A1 and A2). After opening and closing the door (simulating the car owner being ejected by an intruder), the function is launched. After 30 seconds the alarm sounds, and after another 30 seconds. the engine is blocked.
You can disable anti-robbery by pressing A2 or the settings button (hold for three seconds). Deactivation in this way is possible within the first 30 seconds. At later stages, shutdown is performed by pressing the service button for three seconds and then turning off the ignition. The anti-robbery mode switches to security mode. If a code request is enabled when programming the system, then anti-theft can only be deactivated by entering a secret password.
Additional functions
The owner can program several auxiliary services:
- Safe driving. This option means automatic locking of the locks after turning on the ignition. The parameter is programmed when setting up the alarm.
- Re-arming. The function automatically activates security if the complex is turned off, but the car door has not been opened for 30 seconds.
- A turbo timer that allows the engine to run for some time after the ignition is turned off. To operate the turbo timer on cars with a manual transmission, it is necessary to undergo a program neutral procedure.
Key lock
The Tomahawk TZ 9020 key fob is equipped with a button lock, which is activated by pressing A1 and A5 together; an icon with the text “key lock” lights up on the display. The block is removed by pressing A2 and A5 simultaneously. The button lock is used when carrying the remote control in your pocket and protects the system from transmitting accidental commands.
Emergency management
If the remote control is lost or damaged, the owner can turn the Tomahawk TZ 9020 alarm system on and off in a backup manner.
Step-by-step instructions for emergency arming:
- Open the car, get behind the wheel and turn on the ignition.
- Find the service button and click on it three times.
- Turn off the ignition, receive confirmation of readiness for arming - a single activation of the lights and siren.
- Close the doors from the outside. 20 seconds after the indication, the security system will be armed.
After turning on the security mode on the Tomahawk TZ 9020, a 20-second alarm delay is activated when any security zone is triggered. The delay allows the owner to deactivate the system without raising an alarm.
Emergency shutdown:
- Open the door, starting the alarm delay countdown.
- Turn on the ignition and press the service button three times.
- Turn off the ignition, the system will give a double light and sound indication and disable the security.
- Check the ability to start the power unit.
It is possible to disable security and anti-robbery using a code number consisting of two digits located in the interval 1-4. The factory password is 11.
The procedure for disarming and deactivating anti-robbery by entering a code:
- Unlock the door, then turn on the ignition with the key.
- Press the service button to enter the first number.
- Reconnect the ignition.
- Enter the second number.
- Turn off the ignition. If the code is correct, security or anti-robbery is turned off. If there is an input error, the procedure is repeated.
Changing the access code
The code number can only be changed if the ability to disable the system with a password is activated. This service is enabled when setting up the head unit.
Sequencing:
- After deactivating the ignition, press the service button four times.
- Turn on the ignition and wait for four beeps from the siren.
- After this, enter the mode of entering the first number into memory by pressing the setting key once.
- Enter the desired number using the buttons of the key fob registered in the memory. The entered value is confirmed by the corresponding number of siren beeps.
- Click on the service button and enter the second number in the same way.
- Pause for a few seconds, the setup mode is completed. The manufacturer recommends writing down the new code value.
Table of correspondence between buttons and code values.
| Button | Corresponding number |
| A1 | 1 |
| A2 | 2 |
| A3 | 3 |
| A4 | 4 |
Setting up autorun
To carry out a remote or automatic start, the following conditions must be met:
- turn off the ignition;
- ensure that all limit switches are closed;
- apply the parking brake;
- make sure the setup mode is inactive;
- install neutral on a car with a manual transmission;
- The automatic transmission selector must be in parking mode.
Remote start is carried out according to the following algorithm:
- Take the key fob in your hand, press and hold A2. The button is held until a signal is given or the diode changes color to green.
- Within three seconds, press A3 again (shortly).
- The doors will lock and the engine will start. The operating time is determined by a separate program.
- Forced early engine stop is performed according to a similar procedure.
To automatically start the motor with repetitions, you must:
- Press and hold until the A2 signal sounds, and then briefly A1. No more than three seconds should pass between button presses.
- After enabling the function, restarts will be performed at intervals of 1/2/4/24 hours (depending on the program).
In the video you can see a visualization of the autorun programming procedure provided by the author Evgeniy Vakshin.
Correction for cars with manual transmission
When using engine starting without placing the driver behind the wheel, it is necessary to exclude the possibility of starting movement. On cars with an automatic transmission, this condition is met by default - by setting the lever to the parking position. Otherwise, the owner will not be able to remove the key from the ignition switch. On vehicles with manual transmission, it is necessary to set the neutral programmatically before each starting procedure.
According to the instructions for use, the Tomahawk TZ 9020 alarm system allows two procedures for activating the neutral:
- safe;
- automatic.
Safe activation algorithm:
- With the engine running, you need to lift the brake lever until the limit switch is activated.
- Press and hold A2. The button is held until a signal is given on the main remote control or until the indicator color changes to green on the additional one. After this, the owner has three seconds to briefly press A2 again.
- Turn the key in the lock to the Off point, the engine should not stall.
- Take out the key, get out of the car, close the door behind you. After this, the engine should stop and the security system should automatically turn on. Closing windows is done by pressing A1 (subject to active service).
Automatic activation sequence:
- Raise the brake lever and the engine should be running.
- Turn off the ignition, the engine will continue to run.
- Open the door and leave the salon.
- After locking the door, press A1. The engine will stop, security will be turned on, and the locks and windows will close (if the window closer function is active).
Software system setup
The instructions for the Tomahawk model “9020” alarm contain two different tables. The first contains security functions. Now we are interested in another table (second). Its options can be accessed like this:
- Turn off the ignition;
- Press the Override service button 6 times;
- The ignition is turned on;
- After 6 beeps, press the service button to select the option number.
The desired value is set by pressing the key fob. The time period between steps should not exceed 7 seconds.
Autorun options table
So, the programming mode has been activated. Set up the functions in order:
Shown here is "Table 2" copied from the instructions. It contains options related to autorun.
Function 4 is a delay before starting the starter. Let us list the options provided for the first function. The choice depends on how the “blue” cord is connected:
- ACC line emulation (default);
- Duplicate wire "IGN 1" (but not "IGN 2");
- Duplicating the starter wire;
- The “blue” cord is the starter wire that engages first.
The car alarm should monitor whether the engine is running. The “gray-black” control cord coming out of the main terminal block is connected to a tachometer or to a pressure lamp. And “option 2” is then configured like this:
- Use the first option if connected to a lamp. The starter operating period will be 0.8 seconds.
- Same as option 1, but the period will be 1.2 seconds.
- Equivalent to option 1, but the period is increased to 2 seconds.
- Use “Option 4” if you use tachometer control.
Amendment for cars with manual transmission
Option 3, indicated in the third line, allows you to select the type of transmission: “automatic” or “mechanical”.
Having installed the alarm on a car with a manual transmission, the third option is assigned the value 2. Then they try the following:
- The handbrake is activated when the engine is started;
- Turn off the ignition with the key (the engine continues to run);
- All doors are closed;
- If you engage the security, the engine will stall.
The owner will perform all these actions during operation. The sequence is called "preparing to launch."
Let's say that in “step 2” the engine stops as soon as the ignition is turned off. Then you need to try this: when setting up, set the value to 3 or 4. And in the sequence indicated above, then another step will appear - before “step 2” you will need to press the “Disarm” button. Pressing is carried out in two stages: for a long time, that is, until a sound signal is heard, then briefly. The additional remote control does not produce any signals, but it changes the color of the LED.
Price
The cost of a complete alarm system varies in different cities of Russia. This is based on shipping costs and local economic conditions. As of today, the modification is out of production, which makes it difficult to establish actual price tags. Therefore, the table shows an indicative figure.
| Region | What is the price? |
| Rostov | 2500 |
| Moscow | 2600 |
| Chita | 1900 |
| Samara | 1790 |
| Murmansk | 2400 |
| Saint Petersburg | 2500 |
Functions
Functions implemented in the alarm:
- saving settings when power is turned off;
- automatic activation of security when the button is accidentally pressed;
- remote engine start;
- automatic start by time;
- turbo timer;
- built-in protection against false positives;
- parking search mode;
- the siren can be turned off by a signal from the remote control;
- ability to control the trunk lock.
Advantages and disadvantages
Signaling benefits:
- low cost;
- Remote engine start is supported;
- feedback is provided;
- large range of action.
Equipment disadvantages noted in reviews:
- the control signal is picked up by scanners;
- influence of interference on the transmitted signal;
- no start based on air temperature.
Problems and repairs
If you experience control problems when trying to use a car alarm, it is recommended to check the condition of the battery. A control indicator on the communicator turns on to help determine the battery charge.
Problems with signaling occur when the contacts are dirty or the buttons are damaged; to restore functionality, you will need to carry out repairs or purchase a new key fob.
Damage to the patch cables connecting the components of the complex leads to malfunctions. To detect the break point, you need to check the circuits with a test device. If the electronic components of an alarm system with auto start fail, you must contact a specialized service to identify the faulty unit and replace parts.
- Alarm Tomahawk X5 instructions
- Tomahawk keychain instructions
- How to install auto-warm on Tomahawk
- Tomahawk 9010 start by temperature how to set it up
About connecting the engine control wire
It was said above that the control “gray-black” cable is connected in one of two ways: to the oil pressure lamp, to the tachometer.
Main connector connection diagram
In the first case, everything is clear, although control using the indicator is not reliable. Using the output of the tachometer, you can get acceptable results, but you only need to connect to the high-voltage terminal. With this method of control, “training” is usually carried out to teach the system to recognize idle speed. But for Tomahawk signals, starting from the “9020” family, a similar procedure is not provided.
The instructions do not say that when connecting to the tachometer, it is better to install a capacitor (1 µF and 63 Volts) in the wire gap. Electrolytic capacitors are not suitable here. Happy installation.
Ignition switch contacts
In a simple version, the ignition switch contains three different contacts. They are designated as follows: “30”, “50”, “15”. At the 30th voltage comes from the battery, from the 15th the current goes to the ignition line, well, the 50th terminal is the starter contact. The list can be expanded further. At contact “15/2”, for example, there is no voltage when the starter is running, which distinguishes it from terminal “15”. Foreign cars also have an “ACC” line that supplies accessories.
4 lines switched by lock
To start the engine by autostart, the alarm must “emulate” the lines passing through the contacts of the lock. In many cars, however, it is possible not to connect the “ACC” line, as well as the “second” ignition line.
Some cars have two starter lines. The developers of your car alarm have provided this option. The “blue” cord coming out of the power connector is connected to the second line of the starter. But this connection method requires configuration. This will be discussed in more detail below.
why is it needed, how to enable or disable
Modern car security systems have a huge number of functions, and understanding them all is not very easy, especially for a novice driver. The main task of any security system is to protect the car from intruders, but in addition, the alarm key fob often allows you to remotely start or turn off the engine, warm up the interior and perform various other actions
Another important option in all modern security systems is the Valet mode, which is often called “service”. In this article we will look at why Valet mode is needed in an alarm system, how to enable and disable it if necessary
What is Valet mode in alarm systems?
Valet mode is a service mode in security systems of various levels. When the alarm switches to Valet mode, the main protective functions are disabled. The use of Valet mode is intended in situations, for example, when the car is in a service center and active security options may interfere with the work of car service specialists.
It is worth noting that in some older security systems, the Valet mode is used not only to remove security measures when leaving a car in a service center or other place without a key fob. Also, previously it was necessary to go into it to make alarm settings.
The Valet button is most often hidden in the cabin from prying eyes, since it can be used by attackers to deactivate the car's security system.
How to activate Valet mode
Valet mode can be activated on modern alarm systems through a push-button switch installed in the cabin, or using the alarm key fob. Let's consider both options.
Using a push button switch
- You need to get into the car and insert the key into the ignition, then turn the ignition on and off;
- Next, you will need to wait 10 seconds, then turn the Valet switch to “On” mode. If the cabin has a button to activate the Valet mode, and not a switch, it must be pressed for 2 seconds;
- In response to the driver’s actions, the security system will emit one beep and the control signal indicator will be activated, which informs that the security system has switched to Valet mode;
About installing alarms with auto start
Automatic starting of the car engine is a new option in modern anti-theft systems. Autostart Tomahawk 9020 is activated by pressing buttons on the remote control. This significantly increases the level of operating comfort of the car in the cold season or in the heat. To enter the autorun function programming mode, complete the following steps.
- Turn off the ignition.
- Press the “Override” service key six times.
- Activate the ignition. 6 siren signals will follow.
Download the official instructions for Tomahawk TW 9020.
In the autorun menu you can configure certain parameters:
- operating time of the car engine and its starter;
- IGN 3 output operation option – turns off when the starter is turned on, does not work when the starter is activated, turns on for the entire duration of the starter operation, is activated before the starter is turned on;
- gearbox type - automatic or manual transmission;
- engine type - gasoline or diesel;
- turbo timer mode;
- car engine warm-up time;
- periodic automatic engine start interval;
- arming during auto start;
- options for side lights;
- closing the doors after warming up.
Autostart functions are programmed using the “Override” key. Be sure to read the instructions before setting up.
How to set the warm-up time: every 1, 2, 4, 24 hours
The hourly start of the engine on an automatic transmission is activated in exactly the same way as on a manual transmission.
- At the same time, hold down the “Open lock/key” key until the key fob signal appears.
- Press the "Lock/zZ" button.
- The system LED will blink twice.
You can set the hourly start interval like this:
- Go to the programming settings (the procedure is described above).
- Press the Override key seven times.
- “Close the car / zZ” - 1 hour.
- “Open door/key” – 2 hours.
- “Trunk opening” - 4 hours.
- “Crossed out siren” – 24 hours.
The following combination of buttons will help you change the warm-up time:
- Enter the settings menu (the steps are described above).
- Press Override six times.
- Next, press “Closed car / zZ” - warm-up time is 5 minutes.
- "Open door/key" key - 10 min.
- "Trunk" - 15 minutes.
- “Crossed out speaker” – 20 min.
I. basic principles of installation, II. choosing the location of the main blocks
Page 29
- Image
- Text
Installation Guide.
I. Basic principles of installation.
The Tomahawk TW-9020 security system has a classic design
connections. First of all, before starting the installation, turn off the on-board
power supply to the vehicle (disconnect the battery terminal). To select installation locations
security system units, be guided by the following principles:
-Security of installation. -Absence of sources of body and moisture release near the blocks. -Provide for minimal influence on each other by staff
electronics and alarm units.
Attention!
The radiating antenna should be installed away from blocks
Alarm and vehicle control Try when installing
Minimize the length of wires.
II. Selecting the location of the main blocks
1. The electronic alarm control unit is installed inside the cabin
car Transceive-receive "RF" antenna of the system unit for receiving
maximum range, it is necessary to place it as high as possible, not to come into contact with metal objects or electrical wiring harnesses.
2. The siren is installed in the engine compartment, in an inaccessible place, if you
If you are using an autonomous siren, provide access to the service key hole. The siren should be installed with the steering wheel down, this will prevent moisture from falling out. It is better to plan the connections of the water lines inside the cabin for less oxidation.
3. All high current circuits (power supply, parking lights, central locking, etc.)
must be protected by fuses of the appropriate
denomination
4. The triggers of the trunk and trunk crash into places protected from moisture,
non-chairs and with the hood and trunk closed. Triggers need to be lubricated periodically to prevent seizing and corrosion.
5. The impact sensor is installed in the passenger compartment, the center of the car can be considered ideal,
It is attached to the metal of the body with self-tapping screws or glued.
6. Additional sensors are installed in areas where
best quality work.
7. Contacts in places where there are breaks in the ignition targets, starter, etc. recommended
lroll.
TOMAHAWK TW-9020
29
Autostart does not work on Tomahawk 9020 alarm system
If you have successfully programmed the autostart, but the engine does not start from the key fob, then check the following.
- The alarm does not detect the handbrake being applied. Information about its activation is displayed on the remote control when checking the alarm status.
- The security system does not detect engine operation. Find out how the system is connected. If the motor operation is monitored by voltage, then malfunctions will occur due to a faulty generator or poor connection of the power circuit. If control is carried out using a pressure lamp, then there will be practically no problems. If the alarm is connected to the tachometer, then train the security module to idle speed.
- Correct operation of the immobilizer crawler.
- The control unit is faulty.
- One of the fuses is not working.
Why is the keychain not registered?
When setting up the TW 90 10 remote control yourself, questions may arise. The key fob is not programmed and is not recognized by the alarm. This problem appears not only on domestically produced cars (Prior, Kalina), but also on foreign cars. The issue is not the make of the car, but a problem caused by the setup and use of the security system.
What to do in this case?
- Open the instructions for your car alarm. Find a detailed guide to programming remotes.
- If there is none, then try setting up the key fob using the methods discussed earlier.
- Did not help. Look for other reasons. Some mechanical damage is possible. Examine all components of the security system. Carefully inspect the contacts on the control and primo transmission connectors. Test the electrical circuits with a tester. If you find damaged wires, replace them. Clean oxidized contacts thoroughly.
- Remotes still not working? Carry out diagnostics on the control unit. Its reflashing is not excluded. This work can only be done by qualified electronics engineers.
- 1904 views
The feedback key fobs for the tomahawk 9010 TZ and 9010 TW are identical, the only difference is in the key fob body, the functions are one to one. Therefore, the recording of key fobs in the alarm memory is the same.
Instructions taken from the manufacturer's website
Turn on the ignition but do not start the engine
Press the “Override” button and operate for about 6 seconds; in other alarm systems it is called “Valet”. If you don’t know where it is, the length of the wire with the button is 0.5 meters from the unit, you need to look under the steering wheel or in the fuse box.
the siren will emit 4 chirps and “crack”
Release the Override button and you have a “window” of about 5 seconds for recording the first key fob. Press and hold buttons 1 and 2 on the top of the key fob until you hear the siren “crack” once. This means that you have registered 1 key fob.
To record a second or additional key fob, you again have a window of 5 seconds, press 2 buttons and the siren will grunt 2 times, confirming the recording of the second key fob.
You wait 5-10 seconds, the system itself exits the key fob “recording” programming mode.
What to do if the system emits 4 chirps, but the key fob is not registered
Sometimes the window for recording a key fob in a place of 5 seconds appears for only 0.5 seconds. In this case, after 4 chirps, you need not hesitate, but press 2 key fob buttons at once.
What to do if the system emits 5 chirps
Perhaps the installers screwed up and connected the alarm incorrectly and after pressing the Override button, the alarm system “does not see” the ignition key.
In this case, you need to place a jumper between the red and yellow wires ign 1
And then try to write according to the standard scheme
Several recording schemes when the key fob is drunk after 5 chirps
1 diagram
Turn on the ignition ACC, one turn back
Briefly press Override
Turn on the ignition (do not start the engine). Press the “Override” button and hold it for about 6 seconds, wait for 4 chirps and then continue according to the standard.
2 scheme
Turn on the ignition (do not start the engine) We press and hold 2 buttons on the key fob for recording, with the other hand we press the Override button and wait for 5 chirps. Release Override and the key fob buttons, then press the key fob buttons again. The turn signals should blink to confirm the entry of the key fob.
Linking a new key fob and flashing the old one
Programming problems and their solutions
Video “How to program a key fob?”
Comments and Reviews