An on-board computer is a device that can increasingly be found not only in foreign, but also in domestic cars. The Lada Granta in the “Norma” and “Lux” trim levels is no exception (owners of a car in the “Standard” trim level can buy it additionally, although the price is quite high). It gives the user many amenities that make driving and monitoring the car’s performance much more comfortable. Today we’ll talk about what the on-board computer is that comes with the Lada Granta, and we’ll look at the errors that the user may encounter.
Basic functions of the device
On-board vehicles for the Lada Granta have high information memory and a small monitor, except for the “State” model, which only has a digital display. This makes it easier for people with poor eyesight and those who are unfamiliar with the nuances of engine operation to monitor all the processes that accompany its stable operation. BC will help the car owner by pointing out the following parameters:
- total travel time;
- detailed fuel consumption at different speeds;
- average speed indicators and excessive fuel consumption;
- remaining fuel in the gas tank;
- speed of start of movement;
- engine temperature;
- malfunctions of components and mechanisms;
- temperature inside and outside the car;
- on-board network voltage;
- crankshaft rotation speed (engine speed).
The on-board computer has a volatile memory and the ability to control the anti-theft system - the Lada Granta immobilizer. The on-board vehicle has a built-in supervisor, a fault indicator, and a “afterburner” function - the ability to reset the memory after starting the engine.
The functionality of even the simplest on-board computer is much broader than the standard one installed on the Grant. The discrepancy between the readings of the factory and alternative devices can reach more than 30%.
Some on-board drivers can additionally control lighting, stove operation, clock, calendar and alarm clock, and automatic window closers. You can plan your trip route based on the BC readings. It also allows you to use various navigation installation options and can warn you about low fuel levels or exceeding the permissible speed limit.
Most devices allow you to independently diagnose the operation of different car systems. The device can read ECU error codes without using any equipment. The explanation is presented in the accompanying documentation for each device. Such functionality will allow you not only to save on a trip to a specialized center, but also to identify problems, preventing serious malfunctions from occurring.
Basic device errors
Setting up such an on-board computer is not something extremely difficult; detailed instructions are always attached to it. If some points are not clear to you, you can always find a video of this process. At the same time, the device can also upset you with an error, despite the fact that there is not always time to look for instructions. Here's an example of a few common device errors you may encounter along the way:
- P0030, 0031, 0032. Errors in the oxygen sensor before the heater. In this case, the on-board computer checks for an open circuit, as well as a possible short circuit to the ground or to the on-board network, respectively;
- P0036, 0037, 0038. In this case, you will be signaled by a sensor located behind the heater. The description of the errors is similar to the previous ones;
- P0112.0113. Intake air temperature sensor signal. In this case, we are talking about too low or high signal, respectively;
- P0116, 0117, 0118. Alert from the coolant temperature sensor. The code signals either that the signal is out of range, or that the readings are too low or too high;
- P0122, 0123. In this case, throttle valve sensor No. 1 signals you, notifying you that the signal level is too high or low.
Choosing an on-board computer for the Lada Granta
As an alternative to the weak standard BC, car enthusiasts install multifunctional on-board monitors that will show not only the engine temperature, but also many other parameters. Today, manufacturers can offer three main devices suitable for the VAZ 2190-91: “Multitronics”, “Orion”, “State”.
"Multitronics"
The device is a universal one, since the manufacturer does not produce them exclusively for Grants. Judging by the documentation and instructions included with the device, installation of Multitronics is quite possible on earlier VAZ cars: first-generation Kalina and Priora. Finding a place to install the device is the concern of the car owner.
"Orion"
The computer of this brand is also universal and is used not only for Grants. The installation site may have to be modified independently.
This company produces on-board computers exclusively for domestically produced cars. The devices are not created for universal use, but specifically for each car model.
"Stat" is based in Togliatti and tests all its developments on AvtoVAZ cars. Installed instead of a plug for additional buttons. This device is modest in size, but has additional useful functions:
- spark plug warm-up mode – relevant in winter;
- “Tropic” mode, which allows you to independently set the desired temperature for the engine cooling fan to operate;
- diagnostics of system errors.
The “State” X1 M is inexpensive, which makes it noticeably superior to its competitors. But if you need a full-fledged on-board computer with a display and an intuitive interface, you should take a closer look at universal devices.
Installing a BC can pay for itself after the first replacement of a sensor, because the car owner will be able to carry out diagnostics on his own.
General information and features
Remaining fuel in the tank Forecast of mileage on remaining fuel Fuel meter Travel time Travel time Average fuel consumption per trip Average speed per trip Diagnostic codes of the system Engine management Engine temperature On-board voltage Throttle position Digital tachometer Digital speedometer Plasmer Tropic Alarm Dangerous engine overheating Crash on-board network Exceeding the speed threshold Non-volatile memory
The BC is installed in a standard connector instead of a plug.
The X1-G state is connected to the standard diagnostic connector. No additional connection required.
The functions are distributed on both buttons, as in the photographs.
In diagnostic mode, if there is an error, its code is displayed on the display. A description of the error and possible malfunction can be found in the instructions for the bookmaker or download the program for the mobile application.
Options for installing BC in Lada Granta
Any of the existing onboard devices can be installed and connected independently, regardless of the modification of the car. The exception is computer models in the “Lux” configuration - they are initially installed at the factory with a multimedia system, navigator, and audio system. The “State” X1 M device can be added to the “Standard” and “Norma” configurations.
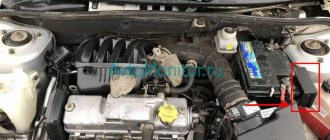
An important advantage of the “State” X1 M is its compact size. The device is installed instead of a button cover. The kit includes the device, wires and instructions. Installation will not cause much difficulty. You need to take out the plug, place the computer in it, connecting it to the connector. Then, in accordance with the pinout, connect the second end of the wiring with the block to the diagnostic connector located on the bottom left side of the panel. In addition to the State X1 M, Multitronics are often installed on Lada Granta. You can attach it wherever it is convenient for the driver - on the dashboard, on the rearview mirror. The main difficulty is connecting the wiring, since it needs to be hidden. If you install the device on a panel, you will first have to remove its front side and make a hole for the wires, for example, using a heated knife. Then the BC visor is glued to “liquid nails” type glue.
Operation and repair manual. Lada Granta 2190. Sedan.
Book: “Lada Granta 2190. Sedan with a 1.6 engine. Device, maintenance, diagnostics, operation manual and repair.” Series: “On my own.” Publisher: Behind the wheel" 2022 ISBN: 978-5-9906136-7-6 Binding: soft. Number of illustrations: 296 pages: color dimensions: 205×260 mm format: 84×108/16 (205×260 mm)
Abstract: “Operation and repair manual. Lada Granta 2190. Sedan.” This manual gives an idea of the structure of the Lada Granta car, its design of important systems, components and assemblies. The book describes in detail possible malfunctions, the reasons for their occurrence, as well as methods for diagnosing them and ways to eliminate them. Color illustrations are accompanied by comments that clearly explain each step. The book is aimed at car enthusiasts who want to independently maintain and repair their car, as well as for service station workers.
On-board computer firmware Grants
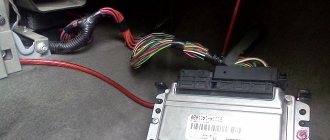
You can update the software yourself. To do this, you will need a USB-K-Line cable, the firmware itself, a diagram of the Lada Granta ECU, an installation program and a driver for connecting to the adapter.
BC connection diagram for firmware
Schema collection algorithm:
- Take 3 wires.
- Switch T1 is closed as required by the program.
- The computer serves as the power source; just connect to Molex. For the on-board device, you can use the terminal block from the cooler.
- Connect the adapter to the USB port and install the driver. Next, you need to remember the port number you are using.
The firmware process looks like this:
- The program starts and the firmware is selected.
- The desired port is selected.
- Click on the lightning icon, after the “Turn on power” message appears, you need to press any button and start the firmware protocol, this will take several minutes.
To download all the software necessary for flashing the firmware, just go to the official website of the manufacturer of the Lada Granta on-board computer. You can also find all the necessary drivers there.
Setting up and unlocking
You can unlock the onboard vehicle using the same firmware. Setting up the device is a simple task if you follow the instructions included with the device. You can also find out the answer to your question on the manufacturer’s official website or watch training videos.
Using the instructions, you can not only quickly set up the device, but also find out the codes of all possible errors. This will help to diagnose the malfunction in time and take measures to eliminate it.
In comparison with the standard BC on the Granta dashboard, any other on-board vehicle will be distinguished by its expanded functionality. You can do without them, but in this case, if you need to diagnose the car, you will have to contact a service center. By installing an on-board computer, the owner of the Grant can independently monitor all engine operation processes, diagnose malfunctions and activate some parameters.
Additionally, those owners of Lada cars who are not satisfied with the minimal information content of its built-in instrument panel do not miss the opportunity to buy a route on-board computer on the Grant. All the subtleties when purchasing lie in what kind of car router is needed, since the supply of models on the market is small. Nevertheless, they are enough for the right choice and independent installation of the on-board computer on the Grant.
DIY repairs
Everything is clear with the diagnosis. If you can detect a problem and determine its cause, then what about when it comes to repairing it yourself? This is where you will need the help of a book such as the Lada Granta Repair Guide. Here you can repair the engine, clutch, gearbox and much more. You can find step-by-step, detailed and extremely clear instructions that will help you solve problems of varying complexity. For example, the book describes in great detail both the replacement of various sensors and the replacement of the entire engine. In addition, there you will find step-by-step instructions for repairing the brake system, electrical equipment and many other systems. Another huge advantage is the clear, clear and colorful illustrations. All this will greatly simplify the process of repairing various systems in your car.
Such manuals can be found quite easily on the World Wide Web, where they are freely available for downloading. Also, do not forget about the service book, which is supplied by the manufacturer; there you can find a lot of useful information on repairing the Lada. Video tutorials are simply invaluable material because they give you the opportunity to see everything in action. This approach is the most effective for absolute beginners.
It is especially useful to watch such video manuals during or before carrying out rather complex work on replacing important spare parts. For example, replacing a steering rack is by no means the easiest thing, but a video report like this will be very useful. In the video you can watch how highly qualified service station workers replace the Lada Granta clutch. If you decide to install a new or replace the standard alarm system with auto start, then these detailed instructions will undoubtedly help you.
Functionality on board the vehicle
The manufactured models of onboard vehicles for the Lada Granta have a wide information memory and are equipped with a monitor. This significant advantage is beneficial even for drivers with poor vision and women who are not very confident in the functioning of the car. In this regard, the on-board computer can help the car owner. He points to:
- travel time;
- fuel consumption at different speeds and driving rates, up to a liter;
- average speed levels and gasoline costs per trip;
- residual quantity in the fuel tank;
- speed when starting the car;
- speed when driving until the engine is completely warmed up;
- engine heating level to avoid overheating;
- various problems with Lada mechanisms;
- timely heating and drying of candles;
- temperature in the cabin and outside.
In addition to these functions, the on-board computer on the Lada Granta has volatile memory, a malfunction indicator, a supervisor (warning about unplanned vehicle movement, unswitched headlights and direction indicators) and afterburner. The latter resets the memory when switching to the gas pedal when accelerating the Lada to its original settings when using gasoline no lower than 95.
The standard on-board computer of the Lada Grant, namely the State X1 M (Multi-Set) model, is considered the highest priority on-board computer for the Lada family. Compact dimensions allow it to be built into the instrument panel in the recess of the button cover. If a car owner wants to buy a State on-board computer, then, in addition to the device, the kit will include instructions and wiring.
The filling of the State X1 M model consists of a built-in trip computer, in which all the necessary information on the operation and diagnosis of Lada mechanisms will be processed.
A diagnostic tester can provide a lot of information about the car's condition.
The on-board computer diagnostic tester is equipped with a plasma, digital tachometer and speedometer. Using the tester, it is easy to clarify the position of the throttle valve and the state of the electrical network on board, which will help prevent possible damage and fire to the vehicle's electrical wiring.
How are the pedals located in a car with an automatic transmission?
The location of the pedals in a car with an automatic transmission
On a car with an automatic transmission (automatic) there is no clutch pedal; the brake and gas pedals are located in the same way as on a manual transmission, but for convenience the brake pedal is larger. The limit switch located on the brake pedal of an automatic transmission is somewhat more complicated - it serves not only to turn on the brake lights, information about the impact on the pedal is also transmitted to the engine ECU and ABS, as well as to various other active safety systems (for example ,ESP).
Engine starting is blocked if the brake pedal is not pressed on a car with an automatic transmission.
Engine starting is blocked if the brake pedal is not pressed on a car with an automatic transmission. Starting off, compared to the “mechanics”, is simplified - just move the selector to the “D” or “R” position (for reversing) and release the brake pedal. When starting uphill, you can simply press the gas a little harder. In any case, the car will not roll back, it will simply not move forward if the rolling resistance is slightly higher than a certain value. A comfortable seating position for the driver is also important – so that operating the pedals does not cause inconvenience. In addition, it is advisable to adjust the pedals so that they are at the same height. Don’t forget about safety - sometimes a mineral water bottle that rolled under the pedals caused an accident. Also, carefully choose interior mats - their pattern can “cling” to your shoes, which will irritate and distract attention. The same applies if chewing gum or grease gets on the surface of the pedals. As they say, “there are no trifles in technology.”
If you are the owner of a car with a manual transmission and you have no driving experience, then my recommendations are for you. Learning to operate a manual transmission is like learning to ride a bicycle. It may not work out at first, but if you are persistent and patient, you will be able to drive a car freely and easily in the near future.
The main thing is to learn the location of the pedals on the “mechanics”, and then everything will go like clockwork. Of course, if you put in the effort and study hard. Listen to my advice. I am sure that my experience will help you quickly master this science.
The first thing I did was choose the safest and most peaceful place for my studies. It is very advisable that there are no other cars near you, nearby. I hope you understand why such precautions are needed. The site should not have slopes. This will make it much easier to master manual transmission.
On-board unit installation
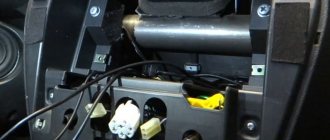
If you buy a State device for a Lada Granta after purchasing the car itself, you can install it yourself. At the same time, you do not need to worry about the supposed “failure” of the warranty of the purchased car, since the Lada panel has a corresponding connector for such an on-board device. When installing it, the panel will not be disturbed or damaged.
The on-board computer is installed by releasing the recess in the panel from under the button cover. The State on-board computer with the wiring already connected to it is inserted into the freed niche. The end of the wiring is brought out and connected to the diagnostic block below, near the passenger seat, where the passenger's foot is usually located.
Not too high a price, compactness, ease of use, ease of installation - these are significant factors for buying a State on-board computer for a Lada and making the operation of the car completely convenient and safe. A video on how to operate the on-board computer will help you get acquainted with the device in more detail.
However, the VAZ 2190 car can be equipped with other similar computer installations, for example, Multitronics routers. Their various modifications are considered universal, since they allow the driver to attach and install them in places where it is convenient for the car owner (on the windshield, inside, on the panel, etc.).
During installation, you will need to remove the dashboard to cut the appropriate hole.
Installing the Multitronics on-board computer on Granta in the Din-place (in the panel) will be complicated by the fact that here you will have to very carefully route the wiring to the diagnostic block. In this case, it will be necessary to remove the dashboard and make holes for the wires. In this case, it is convenient to use a heated knife to minimize the deformation of the panel. The wires must be secured in the panel itself to avoid the noise they make when the car is moving. It is better to secure the on-board computer to the panel with liquid nails.
After the on-board connector is connected to the diagnostic block, it is necessary for the computer to identify all on-board settings. If this does not happen within a certain time, it is necessary to change the computer firmware so that it supports the CAN protocol. Therefore, this will require reflashing the Multitronics, and this is already a significant disadvantage.
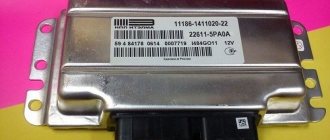
Engine control unit Lada Kalina
The capabilities of autodiagnostics depend on the type and brand of the ECU (electronic control unit, ECU). The type of ECU depends on the year of manufacture of the car and the engine (environmental friendliness and engine number).
On Kalina 1, 2 cars the following are most often installed:
- Engine 21116 - ECU M74
- Engine 21126 - ECU Bosch Me17.9.7 or M75 (with or without CAN bus).
- Engine 21127 - ECU M74 - 638 (analogue of M74 with a modified board).
- January and Itelma ECUs were installed on cars until 2008.
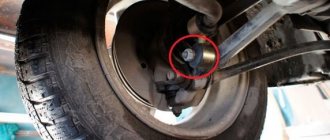
The ECU of the Lada Kalina is located under the central panel, and in order to view the number and type of the ECU, the ECU should be removed (lift the panel).
Engine control units, in turn, have a certain firmware, but for diagnostics via the OBD2 connector, only the presence of a CAN bus is affected. If you have CAN, you must select an appropriate diagnostic adapter that supports this protocol.
IMPORTANT: If ECUs without CAN bus support are installed, you must use the KKL VAG adapter
It is recommended to carry out ECU diagnostics once every 10,000 km, or every maintenance. The example shows a Bosch unit with firmware b173CR03 (serial firmware) without CAN.
Briefly about ECU firmware:
Flashing (reflashing) the Bosch Me17.9.7 control unit on VAZ cars is only possible using a K-Line adapter, which supports data transfer via the corresponding bus.
Source
Versatile alternative
Of course, thanks to their various mounting locations, Multitronics on-board routers can compete with the States. Powered by a 32-bit processor, multitronics are precise and fast in operation. If a car enthusiast has the opportunity to buy such an on-board computer, then the car will be under excellent control thanks to functions such as:
- a large number of diagnostic protocols, including extended ones;
- transfer and save all driving statistics to a personal computer;
- voice accompaniment;
- parking radars, etc.
All of the above functions of the State on-board vehicle have been added to the multitronics. In addition, the latter have easy setup for operation and a convenient user interface. But due to all this, the price will be much higher than that of a compact and more suitable State Grant.
Initially, it was possible to buy on-board computers for the Lada Granta only from the official one. Since sales of this car started at the end of 2011, for some time the unavailability of additional equipment for the Lada made it not very popular among car enthusiasts. However, it is now possible to buy on-board computers for Grants from official dealers and various suppliers of automotive products and equipment.
The dashboard is always the object of increased attention from the driver. In the process of starting the engine, when moving, stopping, the owner systematically pays attention to indicator readings, color signals, and speed meters. Fortunately, technology has stepped far forward and now electrical devices are used instead of mechanical ones, which significantly increases accuracy and service life, reduces cost, and simplifies repairs.
The concept of self-diagnosis mode. What are error codes and how to use them
We have already said earlier that the VAZ 2110 on-board computer greatly helps prevent problems that arise due to improper operation of the executive and control systems of your car when the “Check Engine” light comes on. All this is real, since the chip has an on-board self-diagnosis mode installed on the VAZ 2112 computer. The BC receives information from the ECU via the K-line and tells the motorist what’s wrong with his iron horse.
This is very important, since all engine systems on the VAZ-2110 injector type are controlled by the ECU and failures in its operation and the functioning of the main diagnostic systems can lead to failure of the entire vehicle, irrational fuel consumption and severe loss of internal combustion engine power. If you have a VAZ 2110 on-board computer, you just need to ask it what’s wrong with the car, and your “electronic” friend will immediately give out all the ins and outs. There is no need to call expensive specialists or spend a long time digging under the hood of the car - self-diagnostic systems can do it all for us
There is no need to call expensive specialists or spend a long time digging under the hood of the car - self-diagnostic systems can do all this for us.
Of course, the VAZ 2110 on-board computer tells us information about errors in encoded form. You won't see a text message telling you exactly what's wrong with your vehicle, just a digital fault code. The main reason for this approach is that the size of the on-board computer screen is very limited. But this is actually not a problem if you have a guide with decoding at hand (it can also be easily found on our website).
If your car is equipped with only a basic on-board computer VAZ-2110, located under the speedometer on the dashboard, then the self-diagnosis mode in it is started by simultaneously turning the ignition key and holding down the daily mileage reset button. Immediately after this, all the arrows on the dashboard should start “dancing” in front of you. By pressing the reset button twice, we switch from the firmware version, in fact, to error information
If your car is equipped with a luxury package, where the VAZ 2110 on-board computer is installed next to the SAUO unit (and AMK 211002), the self-diagnosis mode there is activated even easier by pressing the “clock” button in the time display mode. If an error message appears, you just need to connect the VAZ 2110 on-board computer to the diagnostic interface.
Setting up the AMK 211001 on-board computer
We set up the staff on-board computer on a VAZ 2110 using the example of a basic BC of a luxury configuration. Some useful tricks.
Undoubtedly, in order to fully cover all the capabilities of the on-board computer on the VAZ 2110, it is worth reading the operating instructions for it. We will consider only a short list of some useful functions that the standard on-board computer of the VAZ 2110 is capable of. For example, setting up a sensor responsible for the fuel level in the tank:
- 1. First of all, you need to completely empty the gasoline tank in your car. Next, you need to switch to the fuel selection mode by holding the first button from the top in the right row for several seconds. The on-board computer of the standard VAZ 2110 will display the number “0” on the display.
- 2. We switch to the testing mode by holding down the button with the image of the car for a second, about which the on-board computer on the VAZ 2112 will notify us with a short sound signal. The number “3” now lights up on the display.
- 3. Fill the gas tank with 3 liters. gasoline. After waiting for some time, press and hold the button with the image of the car again.
- 4. We continue to fill the tank with gasoline to its maximum capacity. The bookmaker will complete the thorification procedure itself and switch to standby mode.
- 5. It’s even easier to set up a BC for speeding alarms. To do this, you need to switch to the “medium speed” mode and again hold the upper right button for several seconds. The integer digital value is set using the “+” and “-” function keys on the instrument panel. We exit the speed setting mode in the same way as we entered it.
Symbols on the Lada Granta dashboard
Information panel Grants liftback in the “Standard” and “Norma” configurations:
- Tachometer needle: indicates the crankshaft speed in online mode. The green zone indicates the permissible speed, the red zone indicates exceeding the recommended range;
- engine breakdown: many are familiar with the “Check Engine” sign. The orange indicator goes out immediately after the engine starts, otherwise correct the problem. As soon as the indicator lights up while driving or does not go out after starting, immediately stop the power unit, carry out diagnostics, and repair the breakdown;
- left direction indicator (green color indicator);
- low engine oil level in the system (red): after starting the engine, the indicator should go out within the first five seconds;
- activation of the anti-lock braking system ABS: yellow indicator;
- immobilizer: yellow indicator color, displays the security mode of the equipment;
- critical temperature of the cooling system: red diode. When reaching 115 C, the indication is accompanied by a sound signal;
- emergency condition of the brake system: red indicator. The problem must be resolved quickly, as there is a high probability of the brake calipers blocking. Most often, the reason is insufficient brake fluid in the expansion tank of the master cylinder. It is installed in the engine compartment;
- right turn signal;
- battery status: red indicator. Common breakdowns: lack of charge, mechanical damage, impact;
- electronic speedometer needle;
- exchange rate stability system (ESC): when the engine starts, it operates in one of three modes: on, off, emergency;
- upshift: only with pre-installed automatic transmission;
- activation of high beam headlights;
- activation of PTF, running lights;
- low beam activation;
- cancellation of odometer readings: daily mileage;
- monochrome LCD display - on-board computer;
- car door open alarm;
- indicator of reserve fuel remaining in the fuel tank;
- low tire pressure indicator;
- electric power steering status indicator;
- airbag status indicator.
Where is which pedal in the car?
Currently, vehicles with manual transmissions dominate on domestic roads. This design requires the presence of a clutch pedal in the car, in addition to the two main ones - brake and gas. It’s worth taking a closer look at their functionality.
Clutch pedal
The leftmost lever controls the clutch. The location of the pedals on the mechanics in any car of any brand will be the same. During the start, the driver must depress the clutch in order to be able to change gears sequentially.
It is important to know that the smooth start on cars with manual transmission depends on the smooth release of the leftmost pedal and the parallel light pressing of the rightmost pedal, which is responsible for the gas.
In this position the following processes occur:
- when the left foot sinks the lever into the floor, then at the same time the clutch discs are disconnected, which entails the cessation of the power transmission of rotation from the engine to the wheels through the transmission;
- without raising his foot, the driver with his right hand on the “mechanics” moves the gear knob from the neutral position to the “first speed” position, which allows the gears on the shafts (driver and driven) to reconnect into the required pairs, providing the specified gear ratio;
- Now you can slowly release the clutch, moving your foot to the upper position, which will allow the discs to move closer to each other and finally return to the working closed position, ensuring the transmission of rotation from the motor.
On-board computer capabilities
The LCD display accumulates data from a number of programmed sensors. They send information online for decryption and subsequent output.
- daily mileage data;
- remaining fuel;
- current time;
- current transmission;
- temperature outside.
*configuration may vary depending on the technical characteristics and modification of the vehicle.
About energy consumption
The BC STATE model X1 G consumes 0.015 Amps when in standby mode. The rest of the time the current can reach 200 mA. In practice it is difficult to obtain a value exceeding 170-180 mA. For comparison:
- Good (expensive) signaling, standby mode - 10-15 mA;
- Conventional signaling with a key fob - 25 mA;
- Alarm in the “Disarmed” mode – 100-300 mA.
In general, our BC is quite “gluttonous”, but not as much as an alarm system.
2.5 6 votes
Article rating
Typical malfunctions of the Granta liftback dashboard
- mechanical damage, which contributed to the failure of the contact board and terminals;
- exceeding the permissible voltage in the network, short circuit;
- failure of one / several sensors, which resulted in the transmission of incorrect, incomplete information to the on-board computer;
- ingress of moisture or aggressive chemical liquid, which resulted in failure;
- manufacturing defects;
- violation of installation technology;
- purchase of non-original products.
Transmission malfunctions
| Code | Description of the error |
| P0717 | In this case, the BC reports incorrect operation of the turbine speed control device. |
| P0706, P0705 | The on-board computer reports the absence of a signal or several simultaneous signals coming from the automatic transmission selector. |
| P0720 | A failure of the output signal speed control device has been registered. |
| P0973, P0974 | BK detected an open circuit or short circuit in the wiring of the gearbox on/off solenoid. |
| P0962, P0963 | The motorist is notified of an open circuit or incorrect signal coming from the transmission pressure control solenoid. |
Sequence of actions when dismantling the dashboard
The reasons for disassembling and replacing the Grantback liftback dashboard are very varied: damage, installation of a new diode, etc.
- We unscrew the three mounting bolts around the perimeter. Carefully remove the assembled unit so as not to damage the contact boards, electrical wiring, and terminals;
- Remove the instrument panel mount for the Lada Granta liftback;
- To replace the tachometer/speedometer needles, you need to move the lever up a little and turn it counterclockwise.
After the final replacement and maintenance, we reassemble the structure. Self-repair of the front panel of the Grant liftback is completed.
Required spare parts
The maintenance regulations indicate which elements must be replaced during the next service.
Based on the technical regulations, the following mandatory parts and consumables are identified that must be replaced at certain intervals:
- The air filter is changed at 30, 60 and 90 thousand kilometers.
- The cabin filter needs to be changed every 15 thousand, that is, within the framework of TO1, TO2, etc.
- Engine oil, like the oil filter, is changed every maintenance, starting with the so-called zero. Although there are some nuances here. Not all versions of the Lada Granta must undergo zero maintenance.
- The brake fluid is changed for the first time after 45 thousand km, and then at 90 thousand kilometers.
- Spark plugs are changed after one maintenance, that is, at a mileage of 30, 60, 90 thousand km.
- According to the regulations, the timing belt will have to be changed for the first time at 75 thousand km.
- Drive belts must be replaced at 30, 60 and 90 thousand.
- The oil in a manual transmission lasts up to 90 thousand km.
- The fuel filter is changed in the same way as the drive belt and spark plugs.
- The lambda probe or oxygen sensor needs to be changed for the first time after a mileage of 75,000 km.
This is interesting: Where are the fuses of the Toyota Corolla 150: block diagram in the cabin
Refinement of the Granta liftback dashboard
The basic equipment of the dashboard of the Lada Grant “Norma”, “Standard” is quite simple and uninformative. The defect was promptly corrected by manufacturing a new panel sample. It is installed exclusively on the “Lux” modification. An alternative option outside the factory version is provided. In order to increase the information content, a new instrument layout and external design are used:
- the borders of the instruments are separated by a chrome insert;
- more space is allocated for a computer monitor;
- the owner can independently choose the color design of the backlight in order to reduce eye strain;
- basic (important) information is now displayed at the top of the display.
Information about the Lada Granta instrument panel software
- turn off the ignition;
- press and hold the mileage reset button in pause mode;
- activate the ignition;
- release the pressed button.
Information about the software version and hardware model will appear on the monitor. The data must be used when purchasing a new shield.
Error codes/test for instrument cluster (Kalina/Priora)
- The ignition is turned off. Battery included.
- Press the “Reset” control button and, holding it pressed, turn on the ignition. All positions of the familiar areas (segments) should light up on the LCD—LCD control.
- Press any of the control buttons. The LCD should display the program version (Ver 1.0).
- Press any of the control buttons. The following error codes (if any) should be displayed on the positions of the first and second lines of the LCD.
- Press the “Reset” control button and hold it for no more than 3 seconds. (maybe a typo, I need more than 3c). Error codes should clear to zero.
- Press any of the control buttons. All positions of the familiar areas (segments) should light up on the LCD—LCD control.
Error codes:
- 2-increased voltage of the on-board network;
- 3-fuel level sensor error (if a break in the sensor circuit is detected within 20s);
- 4-error of the coolant temperature sensor (if an open circuit of the sensor is detected within 20s);
- 5-outside temperature sensor error (if there are no sensor readings within 20s, indication on the LCD is “-C”);
- 6-engine overheating (the criterion for triggering the acoustic alarm has been met);
- 7-emergency oil pressure (the criterion for triggering the acoustic alarm is met);
- 8-defect of the brake system (the criterion for triggering the acoustic alarm is met);
- The 9-battery is discharged (the criterion for triggering the acoustic alarm is met);
- E-determination of an error in a data packet stored in EEPROM.
From yourself if you do not press any control buttons for about 15-30 seconds. the panel goes into working condition. “Reset” is the one that resets the daily mileage.
https://www.youtube.com/watch?v=ECQG0rilKNc
Let us remind you that you can read engine errors without the help of specialists; you just need to install an on-board computer.
Reviews from Lada Granta owners about the functionality of the dashboard
| № | Positive |
| 1. | Nikolay, 39 years old: in general, I am satisfied with the information content of the console, the display is bright. True, it shines a little in the sun, but this is not so significant. |
| 2. | Konstantin, 41 years old: I bought Grant a year ago in the “Lux” configuration with a new dashboard. I'm 100% satisfied. |
| 3. | Vitaly, 44 years old: I bought a Granta in 2013, the old instrument panel was good, but it was deformed after an accident, I replaced it with a new version from the “Lux” version. Identical in fastenings. |
| 4. | Dmitry, 37 years old: during a side collision with Renault, the dashboard and dashboard were damaged. I didn’t upgrade to a luxury one, I bought my original one. |
| 5. | Vladimir, 39 years old: he will buy Grant second-hand, he is happy with everything, the panel is good and informative. True, at night it is too bright, sometimes it strains the eyesight. |
| 6. | Kirill, 45 years old: I work as a taxi driver, I drive all the time, I’m happy with the panel, it’s informative. The on-board computer quickly displays all the necessary data. |
| 7. | Vladislav, 34 years old: after a major overhaul, friends recommended installing a new panel from the Luxury configuration, but he left the old one and is happy with everything. |
| Negative | |
| 1. | Vladlen, 44 years old: the old instrument panel is not very informative, often displays information and speedometer readings incorrectly. Installed from Lux configuration. Now there are no complaints. |
| 2. | Sergey, 33 years old: after the accident, I replaced the front console, including the panel, since the old version was unfinished and damp. |
| 3. | Vyacheslav, 39 years old: I drove the original device for a month and replaced it with a luxury version, it is much better and more informative. |
Owners' opinions on the functionality of the dashboard were divided, as expected. If we objectively compare the two panel models, then the winner is the “Lux” package. Regarding the duration of operation, efficiency of data output, and accuracy of readings, they are identical. The internal filling is the same, with the exception of the external design.