If the window regulator does not work, the malfunction can be caused by two reasons - problems in the electrical or mechanical parts. In some cases, the part can be repaired, but in others, all that remains is to remove the non-working window regulator and replace it with a new device. What are the features of electrical and mechanical malfunctions of Lada Priora windows? How to properly replace the mechanism? Let's look at these questions in more detail.
Mechanical problems
Failures in the mechanical part can be detected without ignition. Below are the main malfunctions of this type:
- Recession of the shield.
- Worn gear bearing.
- Worn teeth on the gear of the device.
- The window regulator is jammed due to oxidation of the moving elements.
- Damage to the cable mechanism. During operation, stretching or damage to integrity is possible, which in the future often leads to the cable slipping off the guide rollers.
Electrical faults
In a situation where the window regulator on a Lada Priora car does not work, the cause may be a malfunction in the electrical part, namely:
- Fuse F31 has blown. This is where you should start checking in the event of a mechanism failure. The fuse link is located in the power control mounting block. If an element burns out due to a short circuit, replace it. At the same time, make sure that the wiring is intact.
- Faulty motor brushes of the electric drive (they may stick or freeze). A similar problem is possible if the graphite brushes overheat. As a result, the plastic socket in which they are installed melts. The shields “stick” to the hole and stop moving.
- The voltage at the input to the electric motor has disappeared. If the window regulator does not work, one of the reasons is a break in the supply circuit. Look for such a breakdown of the Priora in the control unit or in the relay. It will be useful to clean the contact group.
Video: Repair of the front door window regulator on the Lada Priora
If the video does not show, refresh the page or style=”color:#CC3333″>click here
If the mechanism itself breaks down, it needs to be replaced.
Features of power windows on the Lada Priora
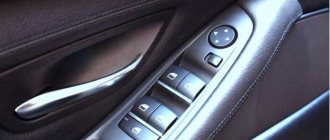
Like many other cars, the Lada Priora has sliding windows on the front and rear doors. They are moved up and down using power windows, which are controlled using a button on the door. The driver of the car controls the movement of all windows, and the passenger controls only his own.
There are two types of car window lifters - cable and rack and pinion. In Lada Priora cars, the design of the mechanism has much in common with devices on other models. The main difference is the absence of a power window unit. The functions of the device are taken over by the TsBKE - a built-in controller that controls the electrical package. It is located in close proximity to the ECU.
Power is supplied to the window lifting mechanism according to a slightly different principle. One wire performs several functions at once, thanks to the ability to change polarity, depending on the task at hand - controlling mirrors, central locking or power. That is why, if the window regulator does not work, it is not possible to immediately find the reason.
Video: Replacing a window regulator on a Lada Priora - highlights
If the video does not show, please refresh the page or » style=»color:#CC3333″>click here
How to remove a window regulator and install a new part
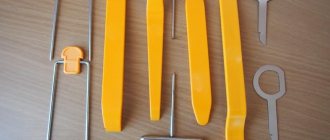
To remove the window regulator, prepare the necessary tools. To work, you will need wedges (made of wood or plastic), as well as a ten key. Please note that the removal and installation of mechanisms on all doors (rear and front) are identical.
To dismantle the window regulator on the Lada Priora, do the following:
- De-energize the vehicle's on-board network by removing the negative voltage from the battery.
- Remove the door trim.
- Raise and lower the window. This is required to gain access, through the top of the door, to the bolted connections holding the glass to the mechanism slider. Remove the bolts.
- Raise the glass manually to the top position as far as it will go and secure it using prepared wedges made of wood or plastic.
- Discard the block with wires from the mechanism that lifts the windows.
- Unscrew the nuts that hold the gear motor.
- Unscrew the nuts holding the mechanism guide.
Once all the fasteners are removed, remove the window regulator through the special hole. During the dismantling process, check the reliability of the glass fixation. At the end of the work, return all the parts to their place using the reverse algorithm. If you do everything according to the instructions, then removing the window regulator and then putting it back in place will not be a problem.
Video: Removing the window regulator on the Lada Priora
If the video does not show, please refresh the page or » style=»color:#CC3333″>click here
When purchasing a new window mechanism, be careful - study the markings and choose exactly the same window regulator. Check the installed device for quality of installation and make sure it is operational. Make sure that the glass closes tightly and that there are no gaps or distortion. If such defects are detected, loosen the screws that hold the glass frame to the slide. Finally, set the correct position through the oval holes in the slider.
If the window regulator on a Priora does not work, start by identifying the problem and then proceed to fix it. If the problem lies in the mechanism itself, or the breakdown cannot be repaired on site, then you will need to remove the window regulator for repair or replacement. At the same time, be careful and take into account the features of the mechanism in this car.
This is interesting: Which shock absorbers are better, gas or oil?
Installing a courtesy light for rear passengers
January 23, 2022 Lada.Online 25 273 1
Lada Granta, Lada Kalina and Lada Priora are budget cars, so they do not have all the comfort options. For example, in the interior of these models there is no second lamp for rear passengers. However, you can install the ceiling lamp for the rear row with your own hands. Let's talk about all the features of this modification.
Window lifters (or, to use a more familiar word, “window lifters”), as the name suggests, are designed to raise/lower windows.
The option under consideration refers to the electric window lifter
(although in a number of models only mechanical ones are provided for rear windows), i.e. manipulations with the side windows are carried out using electrical energy.
It is convenient and practical, creating additional comfort for the driver and passengers
It is pleasant to note that domestic manufacturers paid due attention to this indicator
Malfunctions requiring repair at a car service center
The cause of window lift failure can be not only mechanical, but also electronic faults. This includes a breakdown of the car’s central electronics unit. If it fails, independent repair of this unit is impossible. A complete diagnosis and troubleshooting is required in a specialized service center.
The thing is that the CBKE has a number of multifunctional wires, which at the same time are responsible for the functioning of the central locking, turn signals, electric heated windows and mirrors. Trying to eliminate the electronic cause of a broken window lift can only make the problem worse.
Electrical package control unit: vehicle electrical equipment is under control
March 8, 2018
In modern cars, all electrical equipment is combined into a single system called an electrical package. The control of the electrical package is entrusted to special electronic units - read all about these devices, their design and functionality, as well as the correct selection and replacement in the article.
What is an electrical package control unit?
Electrical package control unit (electrical package controller, comfort unit, central body electronics unit) - a component of the vehicle’s electrical system; an electronic device based on microprocessors/microcontrollers that acts as a central control unit for auxiliary systems and electronic components of the vehicle in order to increase its comfort and safety.
In modern cars and many trucks, various electrical equipment - power windows, external and internal lighting and light alarms, door locks, rear-view mirror drives and others - are assembled into a single system called an electrical package (EP). The functions of monitoring and control of the electric drive are assigned to the central control unit (controller). The use of an electrical package control unit allows you to implement various control schemes for automotive electrical equipment:
- Manual control via appropriate switches on the dashboard, doors, steering column switch, etc.;
- Remote control of electrical equipment using a car alarm or telematics system;
- Automatic control of certain elements in accordance with the state of the vehicle, engine controller and on-board computer;
- Automatic control of the main elements that ensure the safety of the car (central locking, windows, lights) when the status of the car alarm and/or immobilizer changes.
Thus, the electrical package control unit allows you to increase the comfort and safety of the car, as well as expand the functionality of its electrical system by using the advantages and capabilities of the CAN, LIN, K-Line and other data transmission protocols.
A malfunction of the electric drive controller can completely disrupt the functioning of the vehicle's electrical equipment, so this unit must be replaced as soon as possible. To make the right purchase of a new unit, you need to understand the existing types of these devices, their features and functionality.
Internal structure of the electrical package control unit
All modern electronic controllers are built on the basis of microprocessors or microcontrollers, which take on the functions of controlling electrical equipment circuits. The processors contain algorithms for controlling equipment in various situations - during manual control, in automatic mode, etc. Direct control of the equipment is carried out using small-sized electromagnetic relays or electronic switches based on powerful field-effect transistors.
Electronic components are located on a printed circuit board, which is installed in a plastic case; connection to electrical equipment is made using standard electrical connectors. One to three connectors can be installed on one block; often the power and control circuits are separated, and separate connectors are used to connect to them.
The electrical package control unit is located under the dashboard or under the center console; it is usually installed near the relay and fuse mounting block - this reduces the length of cables between these units. The unit is mounted with screws or using a metal bracket.
Types and functionality of electrical package control units
Electrical package control units used in various vehicles may differ in functionality and operating features, but in general they are responsible for controlling the following electrical equipment:
- Windows on all doors and window locking mechanism;
- Drive of external (side) rear-view mirrors;
- Heated exterior mirrors;
- Heated rear window;
- Heated front seats;
- Central locking;
- Locking mechanism and locks of the trunk and hood;
- Front and rear direction indicators;
- Interior lighting - lamp on the ceiling, lamps on the central pillars, lamps on the thresholds, luggage compartment lighting;
- Dashboard lighting;
- Exterior lighting devices - fog lights and rear fog lights, side lights, reversing lights.
Principle of operation
In the late 80s and early 90s, when most people were not so spoiled by the abundance of foreign cars, owning your own car with an automatic window opener was considered a luxury at that time. But, nevertheless, times have changed; now you will hardly be able to find a car that is equipped with a handle that you need to turn in order to inhale air. Electric power windows are now considered a standard feature of modern cars, just like mirrors and windshield wipers. Almost no one has seen this device, which is responsible for raising or lowering the windows.
The mechanism of this device is located between the base of the door and its casing, attached to the door thanks to screws and nuts.
The electric drive looks like in school physics lessons an electric motor for experiments, whose force influenced the gear-screw device. At its base lies an armature with a winding, in a cylinder-shaped housing, and a stator is located inside.
The rod located in the center is connected to a spiral, which resembles a meat grinder device. As soon as the rotor begins to rotate, the helical gear imparts force to the gear, which turns the handle. This process influences the lift mechanism, which raises and lowers the glass. However, it is worth saying that each car door has its own motor to lift the windows.
We recommend: How to properly replace a fog light on a car?
This is what the window lift motor looks like
Troubleshooting
Minor breakdowns include glass rattling, noise in the window lifter, free movement of glass under mechanical influence (for example, the glass does not rise or fall with the lifter, but the same can be done by hand). Their cause is skewed glass, failure of rollers or cables. If the glass is skewed, it must be adjusted. If the cable is broken, it must be replaced. If the cable comes off the rollers, you need to pull it back and adjust the car window regulator. The occurrence of noise is a sign that the mechanism is poorly lubricated. To eliminate the malfunction, you need to thoroughly lubricate all the power window mechanisms, as well as the glass guides. If the mechanism operates slowly, it should also be lubricated or replaced with a new one. Over time, the speed of lowering and raising the windows decreases due to wear and tear on the window lift motor.
Reasons for handle breakage
Often, replacing the power window handle will only temporarily fix the problem. Soon the new handle also fails. The reason is that the glass goes down and up too tightly, so you have to put excessive stress on the rather fragile plastic part. In this case, you must first eliminate the cause of the stuck glass or window regulator, and then change the handle.
It’s easy to check the operation of the mechanism - just raise and lower the window.
There are several reasons for the mechanism to jam:
- twisted drive cable;
- glass distortion;
- poor lubrication in the mechanism;
- freezing of ice (in winter).
If the window regulator works hard, you need to remove the door trim, find and eliminate the cause: change the lubricant, melt the ice or replace the faulty mechanism.
Another reason for handle breakage is worn-out window drive splines. In this case, it is necessary to replace the window lifter mechanism with a new one and only then change the handle.
Video “How to change a joint venture with an electric motor on Kalina”
Detailed instructions for completing this task are presented below (the author of the video is In Sandro’s garage).
The question of why the window regulator does not work is often asked by Lada Kalina owners on specialized forums and service stations. There are many reasons for this phenomenon, due to the low reliability of the design. In some cases, the part can be repaired, but in others, all that remains is to remove the non-working window regulator and replace it with a new device. What can cause the mechanism to fail? How to make a replacement? Let's look at these points in detail.
Causes of malfunction
The main reasons why the window regulator does not work on Lada Kalina cars include:
- Stuck electric motor brushes. Such a malfunction is possible in case of overheating of the brushes, which do not tolerate sudden temperature changes. As a result of such a negative impact, the plastic socket melts, as well as loss of brush mobility. At the first sign of a problem, knock on the plastic door trim. If you delay this, then you won’t be able to correct the situation with little effort—you’ll have to interfere with the design of the product.
- The reason that the window regulator does not work is often the lack of thought through the electrical circuit of the mechanism. The weak link in the chain is the contacts, which cannot withstand the currents passing through them. As a result, the power windows of the Lada Kalina fail due to the lack of a unloading relay. This means that if the mechanism breaks down, repairs to the power windows and control panel may be required.
Practice shows that in most cases, it is not possible to repair the unit, or considerable effort must be made to do so. That's why the best solution is to install new window regulators.
How to remove a window regulator and install a new part
Start work on dismantling the faulty mechanism from the front doors, but to remove the window regulator, free the door from the trim.
To complete the task, do the following:
- Raise the glass to the top point and secure it with tape. It does not matter which window lifter the work will be carried out on - the sequence of work will be the same on any front door.
- Take a ten-size wrench and unscrew the pair of bolts that hold the glass in place. Also unscrew the lock handle screw from the inside.
- Disconnect the electric motor and wiring from the electric motor supply circuit.
- Unscrew the eleven nuts on the mechanism, after which you can remove the window regulator.
Video: Replacing the electric window and motor on the Lada Kalina and Grant
If the video does not show, refresh the page or style=”color:#CC3333″>click here
When performing work on the rear doors, the procedure will be almost identical. Do the following:
- Raise the glass to the top position and secure it according to the principle discussed above.
- Using an eight-socket wrench, unscrew the three nuts that hold the assembly in place.
- Take a ten key, unscrew a couple of screws and three more nuts.
- Remove the assembly through the hole formed at the bottom of the door.
- Remove the rear door window regulator of the Lada Kalina and inspect it.
- If the problem can be corrected without replacement, have the device repaired. If the breakdown is fatal, for example, the window lift motor or gear is broken, then installation of a new mechanism is required.
If the window regulator does not work, start by determining the cause of the breakdown, and then decide on the urgency of repairing the mechanism. If the malfunction is serious, the only solution is to remove the Lada Kalina window regulator for restoration work or a complete replacement.
Types of compatible window regulators
One of the most common models on the aftermarket is the window regulator for the Priora Forward. This model of electric lift is made in a combined arrangement of the drive and the actual rack-and-pinion lifting mechanism, compactly combined with the glass guide. Lifts of this model are characterized by increased reliability and ease of installation on Priora.
Garnet is the second most popular system. Under this name there is not even a single model, but a whole family, each modification of which is intended for a specific car. The mechanism is also rack and pinion type and has earned many good reviews from car enthusiasts. This type of lifts is characterized by uninterrupted operation, fast speed of raising/lowering the glass, and low noise.
It has already been said above about glass closers. In the luxury package they are available on all doors, but their performance leaves much to be desired. It is necessary to resort to replacement with other similar devices. One of the available alternatives is the Master system. It allows you to automatically raise the windows when the anti-theft system is turned on, and even control them within half an hour from the moment the ignition is turned off. The device itself looks like an electronic board with connectors connected to the standard Priora wiring.
The master is not very expensive (from 700 rubles), and its installation does not affect the door trim in any way. The whole procedure consists of removing the rear door sill trims, bending the sound insulation and connecting the door closer to the connector.
For the front doors, the Master will by default raise and lower the windows without ignition, and for the rear doors you need to install a slightly different version, called Master Plus. There are no differences in installation, the main thing is not to forget to disconnect the negative battery before starting work. The wizard has many other useful functions, for example, it automatically turns off the radio when the car is armed.
Description of the electrical package control unit
The electrical package controller in Priora is a device used to control the functionality of the vehicle. This unit is responsible for the operation of turn signals, power windows, control panel lighting, dimensions, fog lights, interior lighting, and rear window heating system. This device also ensures the normal operation of the reversing lights. The fact that the car is equipped with this device makes it even more practical.
Priorovsky electrical package control controller
Location
The control device on the Priora is located above the electronic engine control unit, at the bottom of the center console, in the middle. In this case, the device is connected using two connectors - power and information. The power output is used to supply voltage to the control unit, and the information output is used to perform the functions of the device. It should also be noted that the control unit is protected from external influences of dirt and moisture.
In general, this device is a circuit installed in a plastic case. The board itself includes 15 chips, each of them performing certain functions. This is the entire electrical part of the car, including power windows, door open sensors and a control system for external electric mirrors (the author of the video is the CompsMaster channel).
terms of Use
In order for the node to operate normally, certain conditions must be met:
- the air temperature level in the car interior should be from -45 to +40 degrees;
- the air humidity level in the cabin should be no more than 90%;
- The voltage parameter for normal operation should vary around 9-15 volts;
- The atmospheric pressure level should be up to 800 mm Hg.
As practice shows, malfunctions in the operation of this device often appear as a result of its overheating or disconnection of wires or contacts inside the structure. If you are faced with the problem of a device failure, first of all you need to visually diagnose it. It is quite possible that the reason can be discovered only by looking at the device.
Self-repair of the Priora comfort unit, is this possible?
If you have never encountered soldering, diagnostics of printed circuit boards of varying complexity and configurations, or do not have the necessary diagnostic or soldering equipment, then it is better to address the repair question to qualified specialists. If you have the above skills and understand the causes of malfunctions, independent repairs are carried out quite often. This is due to the fact that various microcircuits or chips constantly fail. For example, having established that the reason for the turn signal failure is a failed control driver, it is always possible to purchase a new part and simply re-solder it to replace the faulty one.
Common faults
Malfunctions of the mechanism that raises the windows can be electrical or mechanical in nature. Regardless of the nature of the breakdown, you can do the repair yourself (video author: Xie Dan).
Mechanical failures can be detected without ignition.
The following are typical mechanical problems:
- wear of the teeth on the device gear;
- sunken shield;
- a defective cable mechanism can stretch or deteriorate, and later during operation it will come off the guide rollers;
- jamming of mechanisms due to oxidation of moving parts;
- gearbox bearing wear.
Mechanical defects of the device
Among the electrical reasons why the power window on a Priora does not work are the following:
- If all four power windows do not work, the first thing you should check is fuse number F31. It is located in the power management mounting block. If the element burns out as a result of a short circuit, it should be replaced. In this case, it is advisable to check all wiring.
- Sticking or sticking of the brushes of the electric drive motor. This happens due to overheating of the graphite brushes, which melts the plastic nest in which they are located. Thus, the brushes stick to their nest and lose mobility.
- No voltage at the motor terminals. The cause may be an open circuit. The fault must be looked for in the relay or control unit. In addition, the contacts should be cleaned.
Fuse block
If the mechanism itself that raises the windows is faulty, then it needs to be replaced.
How to check if the window lift motor is working
Kalina. There are cases when the owners of these cars are faced with the problem of non-working power windows. There are quite a few reasons for this defect: a fuse and relay could burn out, a wire could break, a failure in the device’s control unit, or mechanical failure in the mechanism itself.
VAZ 2110. After the necessary checks of the electrical circuit section, making sure that the VAZ 2110 mechanism has stopped working, then the problem may be in it.
It can be fixed as follows: remove the motor, pull out the rotor. Then you need to clean the carbon deposits using sandpaper.
The second problem can be caused by a mechanical effect, which occurs as follows: a buzzing sound after the window has been opened and it remains in place. This problem occurs due to gears. In this case, it needs to be changed, just select the same part.
If you start to close a window and it starts jumping or jerking, it could be warped or debris could get in there. In this case, the parts must be lubricated, and then the adjustable mechanism must be adjusted.
VAZ 2114. There are few reasons for the power window not working on the VAZ 2114:
- Contact connections have oxidized.
- One or more controls are broken.
- Power failure.
In most cases, parts can be repaired, but in extremely difficult situations, all that remains is to replace them with a new device.
Priora. If there is no voltage, then:
- This may be a breakdown of the power window control unit.
- The problem is in the connection of the wires.
- CBKE failure.
We recommend: How to replace the outer CV joint in a car?
If there is voltage, then look for the problem elsewhere. In most cases it is hidden in the following:
- The window motor is stuck or stuck.
- The lifting cable has expired and needs to be replaced.
- The glass was warped.
Renault Megane 2. In this brand of car, a malfunction of the power windows can be caused in two cases. The first is mechanical. In this case, the cable could break or stretch. The second one is electric. In this case, there are many more faults.
Replacing the window regulator and its motor
This article will consider this type of Priora repair, such as replacing the electric window mechanism assembled with the motor. Of course, if your electric motor has failed, then there is no need to change the entire mechanism. Regarding the motor, it will be shown below how to change it.
Necessary tool for replacing the window regulator on a Priora
- 10 mm head
- Extension
- Ratchet or crank
How to remove the front window lift mechanism assembly
The first step is to perform a procedure such as removing the front door trim. After this, unscrew the two bolts securing the glass to the bracket on the lift. The bolts will only be accessible when the glass is raised up. This is clearly shown in the photo below.
To prevent the glass from falling down during this repair, it is necessary to fix it by placing something between it and the inside of the door. Next, you can unscrew all the power window mounting nuts.
This mechanism is attached in several places:
- from above, in the place where the glass is fixed, and also a little higher in the very corner of the structure
- below also in the corner
- and closer to the center of the door where the motor is installed - there are three nuts
Then disconnect the plug with the power wires by simply pulling both ends to the sides with a little force.
Next, we lower the structure so that the motor appears in a special opening:
It is through this that the entire structure should be removed from the door, which will be clearly shown in the photo.
And we remove it completely out so that further manipulations can be carried out.
Replacing the window lift motor of Lada Priora
As mentioned above, the most common reason is the failure of the electric motor. And in this paragraph we will consider the procedure for replacing it. First, you need to turn the mechanism over so that the pins are facing us.
- Turn out all three studs
- Using a flat-head screwdriver, unscrew the screws securing the motor housing to the window regulator.
- We separate the two parts of the structure and install the new electric motor in place
Video review of replacing front electric windows on a Priora
This video is embedded from my YouTube channel.
I hope that the replacement process is shown in the most accessible and understandable way!
The price of the motor is from 600 rubles, but for the entire assembled mechanism you will have to pay at least 1000 rubles. The Priora has lifts from the VAZ 2110, so you shouldn’t look for “Prior” ones.
Window lifter.RF › Blog › Replacing the rear right electric window on a LADA Priora
Our buyer Ivan Igorevich Fokin from Moscow sent his next photo report on replacing the rear electric window on a LADA Priora car as part of his participation in our promotion.
In our Lada Priora the problem occurred again, only the window regulator on the rear right door broke. It was decided to order a window lifter, but not as an assembly, as last time, but separately the mechanism itself without a gearmotor.
Electric window lift for VAZ-2110 rear right without gearmotor.
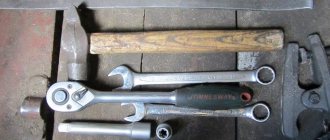
Tools: shaped screwdriver, star screwdriver, 10 socket, 22 socket, plastic tool, adhesive tape, electrical tape, scissors.
We unscrew the screws from the panels, only 3 pieces - red arrow.
Take a tool for plastic. We use it to pry the panels in the direction as indicated in the photo, and remove them to the side. Again, use this tool to remove the door panel, starting from the lower left corner, moving in a counterclockwise direction, and unfasten the panel clips. Having unfastened the panel with clips, lift it up, the panel is removed.
We remove all the insulation so that it does not interfere.
Unscrew the nuts - red arrow.
We lower the glass a little in order to remove the strip from the door body mounted on the bolts.
Raise the glass to its highest position and secure it with tape.
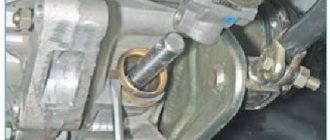
We remove the engine bolts and racks from their mounted places and pull out the old window regulator through the corner.
After we have pulled out the power window, unscrew the 4 screws and use a 22mm head to unscrew the bolt/nut with a rubber surface, removing the gear motor cover.
We “throw” the gear motor onto the new window lifter and tighten the bolt/nuts, after which we connect it to the chip and check its functionality. As a result, there are 4 screws left that are not used.
In the reverse order, we insert the window regulator and, first of all, install the engine on the bolts with the nuts. Perform subsequent manipulations strictly in reverse order.
Thank you, Ivan Igorevich, for another prepared photo report. We will transfer the promised prize to your mobile phone account.
Notes on implementation of schemes
Let us immediately note: if there are no window lifters, the second diagram will not contain parts K2/K3. Then you only need to cut one wire. Sometimes only the rear windows are missing. This means that relay K3 is excluded. And the diodes connected in parallel with the winding can be absolutely anything.
Now we list the requirements for an element called “relay”:
- Operation voltage – 12 Volts;
- Switching current – 10 A or higher;
- The current consumed by all relay windings should not exceed the value specified in the instructions for the signaling. Usually it is 200-300 mA.
It is the last requirement that is often violated.
In order for “scheme 2” to work, it is necessary not only to assemble it, but also to program the main unit: you need to enable the “2-step unlocking” option. And be that as it may, control impulses cannot be made too long. Use values of 0.7-1.1 seconds.
Power cables (cord X1-6) can only be connected using twists.
The cross-sectional area of the wire must be sufficient to withstand a current of “10 Amps” (this does not apply to signal circuits). A fuse protecting the power circuits must be installed. And of course, before installation, remove the negative terminal of the battery.
Applicability on cars
| Brand | Automobile model | Body type | Number of doors | Years of manufacture |
| VAZ | 2110 / LADA 110 | sedan | 4 | 1995 — 2014 |
| VAZ | 21108 / LADA Premier | sedan | 4 | 1999 — 2007 |
| VAZ | 2111 / LADA 111 | station wagon | 5 | 1998 — 2014 |
| VAZ | 2112 / LADA 112 | hatchback | 5 | 1999 — 2009 |
| VAZ | 2170 / LADA Priora | sedan | 4 | 2007 — 2015 |
| VAZ | 21708 / LADA Priora Premier | sedan | 4 | 2007 — 2015 |
| VAZ | 2171 / LADA Priora | station wagon | 5 | 2009 — 2015 |
| VAZ | 2172 / LADA Priora | hatchback | 5 | 2008 — 2015 |
Electric windows "GRANAT" are an original Russian development that has no analogues. It is simple, reliable, tested over the years on various car models. Window lifters "GRANAT" are deservedly popular among Russian motorists. An excellent choice both for tuning and as a replacement for faulty original electric windows. A special feature of the GRANAT window lifters is: - the operating principle in which the motor reducer, together with the glass frame, moves along a fixed guide (rail) of the window lifter using a toothed shaft; — are installed in place of the guide of the original window lifter and are attached to the standard holes, while drilling additional holes and modifying the doors is not required. To attach the window regulators to the door and the carriage to the glass frame, fasteners from the replacement window regulators are used.
Main advantages: - reliable original design, - absence of glass distortions, - absence of bending elements guarantees long-term uninterrupted operation, - window lifter is equipped with an imported gear motor, - noise level 40 - 50 dB (no louder than a running car engine), - electric window lifter during the established operating life does not require special maintenance.
Installation of rear windows on Lada Priora. Complete instructions
Car owners of the model of the same name would do well to know what it means to install rear windows on a Lada Priora
– more precisely, to have at least general information about the complex of works united by this concept. We will try to describe the process in detail, noting some related points that will undoubtedly bring practical benefits to domestic car enthusiasts. Installing rear windows on a Priora has a number of specific features. But first things first.
The concept of "power window"
Window lifting mechanisms (or, using the more familiar word “window lifters”), as the name suggests, are designed to raise/lower windows.
In the variant under consideration we mean an electric window lifter.
(although in a number of models only mechanical ones are provided for the rear windows), that is, manipulations with the side windows are carried out using electrical energy.
It is convenient and practical, creating additional comfort for the driver and passengers
It is pleasant to note that domestic manufacturers paid due attention to this indicator
Design features
The steps described below are focused on the removal/installation of electric lifts, which does not exclude the use of this text:
- manuals for mechanical joint ventures;
- The mechanism is placed inside the door (there are, however, modifications with special subframes, as well as mounts on the car body).
The window regulator consists of:
- about what includes a unit consisting of an electric motor, gear and worm gear;
- mechanical regulator for raising/lowering windows;
- control unit.
Raising or lowering the glass is done by pressing the corresponding key. Note that on the Lada Priora, three types of electric windows (hereinafter referred to as ESP) are used: rack and pinion, cable, and strip. Various configurations are used - this applies to both a specific design solution and electric motors.
The latter vary over a fairly wide range - a number of models use various imported electric motors. The noise depends on the quality of this part
, produced by the device, the speed of raising/lowering the glass, resistance to external influences.
Installation of rear ESP
The need to replace the ESP may arise for a number of reasons. The most common ones are:
- the corresponding fuse has blown;
- poor-quality connection of wires and, as a result, lack of contact;
- failure of the electric motor.
In any of the above cases, replacement (or repair) of the mechanism is necessary. Let’s make a reservation right away - for most amateurs, self-repair is a difficult task, so it will not be considered here. We will simply describe the process of removing the mechanism - accordingly, installation is carried out in the reverse order.
At the first stage
We get access to the ESP. To do this, you need to remove the decorative edge. The process is quite simple and does not require additional description. Let us remind you that the windows must be pre-fixed in the “closed” position.
Next stage:
unscrewing the mounting bolts. We use a 10mm socket. Then we turn out the elements with which the ESP is attached to the door. Here you will have to deal with three bolts (we use an “8” head). Armed again with a “10” socket, we unscrew the nuts securing the ESP guide.
This completes the dismantling. As already mentioned, installation is done in reverse order.
video: Installing a power window mechanism on the rear left door of a Priora Luxury.
As you can see, installing rear window regulators on a Priora is not difficult: you just need to unscrew the corresponding bolts. Please remember that this process requires care.
, proportionate application of force to avoid the danger of the heads falling off. As for the unit being replaced, specialists will have to deal with it.
Removal and installation instructions
To carry out the work, you will need a “10” key and plastic or wooden wedges. It is important to know how to remove the window regulator on the front doors; dismantling and installing the rear window regulators on the Priora is carried out in a similar way.
The procedure consists of the following steps:
- First of all, for safety reasons, it is necessary to de-energize the car by removing the negative terminal from the battery.
- Next, the door trim is removed.
- Then you need to raise or lower the glass so that there is access through the upper door opening to the bolts with which the glass frame is attached to the device slide. These bolts should be unscrewed.
- At the next stage, you should lift the glass up to the end with your hands and secure its position with the help of prepared wedges.
- Then you need to disconnect the block with the wiring harness from the window lifting mechanism.
- After this, the nuts are unscrewed, thanks to which the gearmotor is held in place.
- Then the fastening nuts of the device guide are unscrewed.
- When all the nuts are unscrewed, the window regulator is removed through the technological hole. When removing the glass lifting mechanism, you need to ensure that the glass is securely fixed.
- Installation of the device is carried out in the reverse order.
This is interesting: How to disassemble a bicycle fork with a shock absorber
When purchasing a new window lifter, you need to pay attention to its markings and select exactly the same one.
Replacing the Priora window lift motor
Hello everyone, dear subscribers and readers of the blog))) Just a couple of days ago, the driver's window lifter began to work poorly at times, I obviously already knew the reason, since about 2 weeks ago there was the same situation, and after disassembling the lifter I saw worn out brushes, then I just a little I stretched the springs and it worked again as before. Today I immediately went to a car and motorcycle store, bought brushes and when I arrived home I started doing repairs.
So, to begin with, I removed the trim, then unscrewed 6 nuts securing the window regulator and 2 bolts that secure the glass, with a couple of complicated movements and the window regulator was removed from the door))) After removal, I saw a not very pleasant picture
There was water in the motor, I don’t know how it got there, but that’s not good. Well, okay, I quickly disassembled the motor, removed the brushes and went home to solder new ones. But before this, it is necessary to fit new brushes, since they are longer. I took a metal file and carefully sawed it approximately in half; I will say in advance after soldering I adjusted the brushes using a round file.
In general, I soldered it, adjusted it to size and began to slowly put everything back together.
When assembling, I carefully coated everything with sealant, I hope it will help prevent water from entering. I assembled the motor and checked it before installation - everything works. I put the window regulator in place, adjusted the glass so that it wouldn’t warp when lifting, installed the trim, checked it again and, satisfied with the work, went to rest))))
The front ESP on the driver's side stopped working, at first I thought it was a button, but then I listened closely - the relay clicks, there are sounds, but it doesn't work. It was decided to disassemble. Step by step:
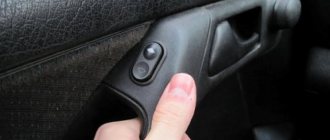
We unscrew the door closing pin, unscrew the self-tapping screw of the door opening handle:
Unscrew the 3 screws from the bottom of the upholstery.
We secure the glass with tape (I only had double tape)
Replacing the driver's door window lifter + door card noise
Replacing the driver's door window regulator is not a difficult task. The resource of the piece of iron is exhausted after 4-5 years of operation. I’ll note that about a month ago I took everything apart and patched up the structure—it was enough for exactly a month. Now it has been decided to replace it entirely with a new mechanism. Moreover, the price more than suited me. By today's price standards, and even more so in comparison with the same mechanisms for imported cars, the price of 455 rubles for a new factory window lifter trapezoid is very acceptable.
By the way, it comes complete with a motor. In this case, the price range is about 1000 rubles. Symptoms of failure are as follows:
First, compare the new part with the old one for possible differences. Although I checked it in the store using the catalog number.
Everything else is intuitive. We transfer the motor to a new part. A couple of deft movements and everything is cool. The only trouble that I definitely remember was the process of removing the trapezoid with the motor from the door itself. I had to tinker, to put it mildly, - it’s not so easy for him to get out of there. Well, if you have the scrupulousness of a macaque, everything will work out!
Next>>>> Along the way, it was decided to add some noise-absorbing materials to the already installed vibration noise. I wanted to take “Biplast Premium”, but it wasn’t available anywhere, so I took a slightly simpler material, just “Biplast” 10mm
Wash the door card (insider and offside), remove the top trim (attached with screws from the inside of the trim)
Source
"Kalina" and replacement of the window regulator
First you need to purchase a gearbox. Now they are sold in the same housing with the motor. Then the sheathing is done. Experts do not recommend performing this operation outdoors on a frosty day in winter, since the Kalina’s casing is secured to soft plastic pistons. If a fastener element falls off, you will have to glue it. Then you should unscrew the screws and other fasteners that hold the internal opening handle. The wiring harness and the speakers are disconnected.
The next step is to unscrew the glass itself, which is held in the guides. You need to unscrew the four bolts with a 10mm wrench. As a result, the glass will drop to the bottom. You should also remove the curtain that is attached to the bottom of the glass unit. The window regulator itself is secured with 4 nuts on the left and 4 on the right on the guides. The gear motor is also held in place by three nuts.
The block is dismantled through technological holes. This is a carriage and two guides. The gearbox control cable is passed through the latter. There are rings on the cable in two places, attached to the carriages.
The gearbox consists of two parts connected by studs. If the latter are unscrewed, the motor will fall apart into two parts. One contains a motor with a gear. The other part is a drum with special grooves.
After replacing the gearbox, you need to reassemble everything in the reverse order and you can enjoy the reanimated mechanism. The gear motor is inexpensive and replacing it is quite simple.
Before assembly, you must carefully inspect and lubricate the cable. If after this the driver's window lifter does not work on the Kalina car, then it is recommended to check the amplifier tube. In order for the glass to go down completely, the rubber bumpers are shortened.
https://youtube.com/watch?v=edJjxP16ERc
Why does the Priora window lifter not work?
Window lifter failure may occur due to a malfunction of the following systems:
The window lift motor has its own wear life; if it is exceeded, the mechanism fails, and the motor itself must be replaced.
If everything is fine with the motor, but the lifts still do not work, then the cause of the breakdown may be an electrical circuit or damaged wires.
“Priora” window lifter block
The car's safety unit contains a component responsible for the car's window regulators. If it fails, the mechanism stops functioning.
The Priora window control buttons can also cause a malfunction. This mainly occurs due to oxidation of the button contacts.
Situations also arise when the functioning of the Priora windows is quite unstable. For example, they can only work when the ignition is on, or they work partially. It may be that the front ones function normally, but the rear windows on the Priora do not work. Then, most likely, the problem lies in the car's electronics.
Glass closer Pandora DWM
Connection diagram for the passenger door button in series through a duplicate button on the driver's door. Contacts 1-6 and 7-3 are always normally closed. When you press the up button, contacts 1-6 open and 1-2 close (window rises). When you press the down button, contacts 7-3 open and 7-2 closes (window down). The 30th contact of a 5-pin relay, without supplying voltage to the winding contacts, is constantly shorted to contact 88, which gives us the necessary negative contact (works like a switch). If voltage is applied to the winding, then contact 30 is disconnected from contact 88 and connected to contact 87. Contact 86 of the winding is connected to ground.
Parallel connection - diagram
Wires from the main button next to the driver's ESP motor go directly to pin 88 of the relay and from pin 30 directly to the engine, and long wires from the backup button go to pin 85 of the relay winding, and the relay feeds a powerful plus to the passenger's ESP motor. A parallel connection for power buttons is preferable, since there is no need for a relay on the main (passenger) button, thereby eliminating unnecessary relay clicking when the main button on the passenger door is operating.
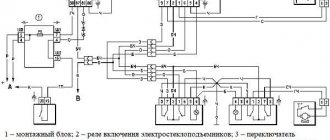
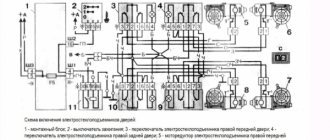
Window lifter diagram for VAZ-2115, VAZ-2115
Power windows for front doors for VAZ-2115, VAZ-2114 cars (usually power windows are installed only on front doors).
1 – mounting block; 2 – power window switch for the right front door; 3 – gear motor for the electric window of the right front door; 4 – motor reducer for the electric window lifter of the left front door; 5 – power window switch for the left front door; 6 – ignition switch; K5 – relay for turning on electric windows; A - to power supplies; B - to the external lighting switch.
ESP diagram VAZ 2110, 2111, 2112
- 1 – mounting block
- 2 – ignition switch
- 3 – right front door power window switch
- 4 – right rear door power window switch
- 5 – electric window motor reducer of the right front door
- 6 – electric window motor reducer of the right rear door
- 7 – electric window motor reducer of the left rear door
- 8 – electric window motor reducer of the left front door
- 9 – left rear door power window switch
- 10 – left front door power window switch
- 11 – relay for turning on electric windows
- A – to power supplies
- B – to the instrument lighting switch
- C – conventional numbering of plugs in power window blocks
The power window relay for this car is located in the mounting block. On the left under the panel in the fuse box on the additional connector.
Connecting power windows VAZ-2109
Owners of a VAZ 2109 car can replace power windows with electric windows. On 2109 cars, electric windows can be connected via standard wiring, which already has everything provided for connecting an ESP.
This circuit is used to connect ESP on more “rich” configurations of the nine and it is advisable to use it when connecting independently. Below are diagrams for connecting an ESP with fuse blocks of new and old models.
Wiring diagram for power windows on a VAZ 2109 with an old-style mounting block (17.3722):
- 1 - Mounting block
- 2 - Ignition relay
- 3 — Ignition switch
- 4 — Right door electric window motor
- 5 — Left door electric window motor
- 6 - Right door power window switch
- 7 - Left door power window switch
- K7 - Power window power relay
- A - To terminal “30” of the generator
- B - To the wiring harness block connected to the heater lever illumination display
- B - to the heater lever illumination display
- G - conventional numbering of plugs in the gear motor block