03/04/2022 19,717 VAZ 2114
Author: Ivan Baranov
The release bearing of the VAZ 2114 car is the most important clutch element, acting as a thrust mechanism that transmits the pressing force that comes from the clutch to the drive disc hub and the basket spider. Thanks to the release bearing, the disc disengages from the clutch with the basket, and it also ensures that the clutch is turned off and on. If problems arise with the clutch, then it is often necessary to replace the release bearing of the VAZ 2114. The article examines the main symptoms of its malfunctions and provides step-by-step instructions for replacement.
[Hide]
promzapchast › Blog › How to replace the release bearing of a VAZ 2114
The product in question is a clutch element and is located in the coupling.
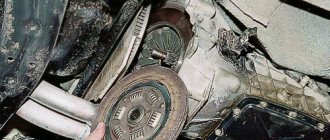
Replacing this bearing is a rather complicated process, since this requires first removing the gearbox. Some specialists change it without removing the box, but such a procedure has a high probability of poor-quality installation. And this is a direct path to an accident, since there is a high probability of clutch failure.
How to determine if a bearing is faulty
An external manifestation of the malfunction is the occurrence of extraneous noise and hum during clutch operation. If they occur, it is recommended to urgently perform a fairly simple diagnosis. This operation will reveal more specific signs of failure.
Bearing replacement is necessary in the following cases:
When you press the clutch pedal, you hear knocking, humming or noises. The appearance of these sounds is due to internal vibrations and rolls of rolling elements along the damaged track, resulting deformations of the coupling or separator; If the engaged clutch whistles, then the bearing urgently needs to be lubricated; The brake pedal is very stiff (optionally, it is impossible to change the speed). Probable causes: the bearing ear is broken, or the coupling has crumbled. Some novice drivers may mistakenly take noises that occur in the cold season when the car is not warmed up as a sign of a malfunction. Their reason lies in different temperature expansion of the bearing and coupling parts.
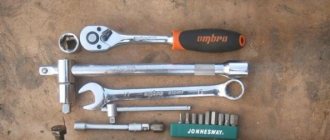
To work, you will need to stock up on supports and a pair of jacks, a set of spanners with a ratchet, a bayonet screwdriver, a pry bar and a container for used oil.
It is recommended to carry out work on a lift, overpass or inspection pit. It is necessary to resolve the issue with additional lighting. And, it is highly advisable to work together. Especially when dismantling and installing a gearbox.
The machine is fixed in place to prevent its unauthorized movement during operation. Then the gearbox is removed. You can read how this work is performed in another article.
After this, you should definitely evaluate the condition of the clutch basket, discs and internal surfaces of the gearbox housing. Remove used oil and dirt, check the integrity of the release bearing ear.
The next step is to replace the coupling.
To dismantle a faulty release bearing (RU), you need to find the edge of the spring installed in the coupling, pry it off with a bayonet screwdriver and remove the failed VP. A special lubricant (CV joint) is applied to the bushing splines. Then, it is applied to the installed VP, and the surface of the mounting hole is lubricated. After this, the new bearing is put on the shaft and secured with a spring. After this, the clutch travel is checked (by moving the fork). After disassembling the element manually, make sure that proper ease of rotation is ensured and that there are no rolls. The bearing replacement job has been completed. We return the box to its original position (in the reverse order of dismantling).
What type of bearing to choose
When choosing a product, you must be guided by the following indicators: geometric dimensions, performance characteristics, cost.
Bearings for this purpose are produced by several manufacturers in Russia and abroad.
As a release bearing, ball bearings or radial roller bearings are used, having a wide inner race, made in a closed design, which are pressed into the overrunning clutch.
The standard configuration uses type 6-520806. According to the VAZ 2114 catalog, the products we are interested in are assigned the following numbers:
Assembled coupling, completely ready for installation – 2110-1601180; Release bearing – 2109-1601182. According to current regulations, VP is marked:
How to change the release bearing on a VAZ 2114 with your own hands
After removing the gearbox, it is important to inspect the discs, clutch basket, and also evaluate the condition of the gearbox housing from the inside. Remove dirt and excess used oil, make sure that the ear of the release bearing has not broken, then proceed to replacing the clutch. Below is a diagram of the clutch layout.
The principle of operation of the part is as follows: when you press the clutch pedal, the applied force is transmitted to the fork (4) through a cable (3), which moves the release lever along the guide sleeve of the input shaft (1), then the ball bearing housing transmits the force to the pressure plate (basket) (6), After this, the driven disk is disconnected, then the unit is disconnected from the engine to change speed.
- The guide sleeve, which is shown in the photo, fixes and guides the coupling during its operation. To dismantle the old part, find the edges of the clutch spring, lift them with a screwdriver, remove the clutch VP from the VAZ 2114, the replacement of which is required.
- Using CV joint grease, apply it to the bushing splines, and also lubricate the new bearing and seating surfaces.
- We put the new VP on the guide shaft, then fasten the part with a spring. Check the clutch travel by moving the fork. Unscrew the element with your hands and make sure that there are no rolls or problems with ease of rotation.
- At this point, the replacement of the VP clutch is completed; we install the gearbox in place in the reverse order.
Changing the release bearing on a VAZ 2114
The release bearing of the VAZ 2114 car is the most important clutch element, acting as a thrust mechanism that transmits the pressing force that comes from the clutch to the drive disc hub and the basket spider. Thanks to the release bearing, the disc disengages from the clutch with the basket, and it also ensures that the clutch is turned off and on. If problems arise with the clutch, then it is often necessary to replace the release bearing of the VAZ 2114. The article examines the main symptoms of its malfunctions and provides step-by-step instructions for replacement.
Choosing a clutch release bearing for a VAZ 2114
The squeezer design is a ball or roller radial bearing with a wide inner ring, closed type, which is pressed onto the overrunning clutch. There are two types of such products: hydraulic and mechanical, the difference between them lies only in the method of moving the VP (hydraulic or mechanical (cable with traction)).
The VAZ 2114 has a mechanical version installed without modifications. The following provides information and dimensions of the ball bearing 6-520806, which is the main component of the clutch release element.
Factory numbers (articles):
- Clutch release assembly - 2110-1601180;
- Pressure bearing - 2109-1601182.
Marking:
- according to GOST - 6-520806ES23;
- according to ISO – 520806K1Y.P6R21.31Q6/L20.
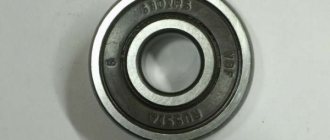
Release bearing size VAZ 2114 6-520806ES23
| Characteristic | Unit | Value according to GOST (TU) |
| Inner diameter | mm | 31 |
| Outside diameter | mm | 55 |
| Nominal height | mm | 19/13 |
| Inner ring flange diameter | mm | 39,8 |
| Radius of outer ring mounting chamfer | mm (min) | 0,5 |
| Inner ring mounting chamfer radius | mm (min) | 5,0 |
| Dynamic load capacity | kH | 11,2 |
| Static load capacity | kH | 7,4 |
| Nominal speed | rpm | 3200 |
| Radial clearance | mm | 0,012-0,029 |
| Steel type | – | SHH-15 |
| Hardness of steel and rollers | H.R.C. | 61-65 |
| Contact angle | hail | – |
| Torque | kN*M | – |
| Ring roughness | Ra | 0.32 |
| Number of balls | PC. | 12 |
| Ball diameter | mm | 6,35 |
| Weight | G. | 130 |
How much does a release bearing cost for a VAZ 2114?
The main advice when choosing spare parts for critical purposes is not to ask managers at retail outlets, “Which one is better to buy?” , because in the end sellers will impose on you those parts that are on sale, despite the quality and prices.
We recommend using a special table with a list of manufacturers, catalog numbers and prices for 2022. This will simplify replacement and reduce the time of purchase and selection of VP.
Which bearing to choose?
Currently, the automatic transmission is becoming increasingly popular, but there are still quite a lot of adherents of the manual transmission. The most important component of a manual transmission is the clutch release bearing. Thanks to technological progress, this part has undergone large estates. Instead of mechanical bearings that move the clutch discs due to a mechanical connection, hydraulic bearings have come. In these units, the function of the cable is performed by a hydraulic line; they have a more complex design, but at the same time they are highly reliable.
Thus, there are two types of release bearings on the automotive market:
- roller, using a rigid connection of its own rods;
- hydraulic, transmitting force thanks to hydraulics.
The photos show examples.
Release bearings for VAZ 2114
Price policy
When choosing replacement parts when repairing a clutch, including the release bearing on a VAZ 2114, you need to make sure of the quality of the product, find out its manufacturer, and familiarize yourself with the certificates confirming the quality. This is of great importance, since inexpensive parts break faster, which will require repeated repairs. Experienced drivers have long come to the conclusion that inexpensive analogues cannot withstand the loads provided for the VAZ 2114 car.
Thus, there is no need to skimp on components. When purchasing new products, you need to pay attention to both price and quality, which must be confirmed by certificates. Quality should come first, as reliable components will ensure safety on the road. The price difference is usually not so high as to risk your life. Below is a table of approximate prices for a release bearing.
Signs of a bad clutch
Clutch failure is not difficult to determine. There are proven signs that indicate that it’s time to go to a car service:
- Clutch slippage. Start the engine. Then smoothly shift into third or fourth gear and press the gas pedal. If the engine does not stall, then there is a problem with the clutch disc.
- You cannot shift into any gear. This indicates that the basket is not pressed sufficiently against the clutch disc.
- Specific smell of burnt rubber. This occurs due to slipping and excessive heating of the clutch disc.
- Vibrations when accelerating.
Although the manufacturer does not indicate the service life of the clutch, we noted that on average it lasts for 100 or 150 thousand kilometers. But you need to remember that these are average figures. For drivers with little experience, the clutch needs to be repaired somewhat more often.
Sometimes it is wiser to completely replace the clutch. In this case, although more investment will be required, the car will reward you with trouble-free operation. If you notice any malfunction, do not delay diagnostics. Most often, only minor repairs to the clutch are required: replacing the disc or simply making adjustments. Prolonging the problem can make the situation worse
We offer the best prices for clutch replacement in Yekaterinburg. We guarantee not only a professional approach, but also quality work.
Call numbers 5 or 6. We work seven days a week!
Our other works:
LAST NEWS
Telephone: tel. . . . . . . . . .(Horizontal) tel.5. . . . . . . . .(MTS) tel.6. . . . . . . . .(MTS)
OUR SERVICES
- Engine repair (ICE) Overhaul of ICE
- Chip tuning of a car engine
- Changing the engine oil
- Replacing antifreeze, replacing coolant
- Replacing crankshaft seals
- Replacing the timing chain
- Replacing the timing belt
- Replacing the cylinder head gasket
- Replacing the valve cover gasket
- Replacing the alternator belt
- Replacing the fuel filter
- Replacing the fuel pump (fuel pump)
- Replacing engine mounts
- Ultrasonic cleaning of injectors
- Camshaft replacement
- Replacing the crankshaft
- Replacing car struts
- Replacing brake fluid
- Clutch replacement and repair
- Replacing power steering fluid
- Replacing ignition coils
- Replacement, repair, or removal of the catalyst
CAN'T FIND A SERVICE?
PAYMENT METHODS
Signs of bearing failure
The release bearing comes into operation only when changing gears, the rest of the time it is at rest. Its malfunction makes it impossible to further move the car. Therefore, at the first sign of failure, the part should be replaced.
This part can deteriorate due to uneven loads on it: when the clutch is depressed, it moves back along with the driven disk. Therefore, manufacturers do not recommend holding the clutch pedal depressed when the gear is engaged, as this will increase wear and accelerate the failure of the part. The product is quite durable, reliable, and rarely fails; most often this happens on the cars of novice car enthusiasts.
Signs of a malfunction are the appearance of a knocking or crackling sound when the driver depresses the clutch pedal. This increases the free play of the pedal. The appearance of sound in the summer clearly indicates a breakdown; in winter it can be caused by a change in the size of the bearing cup when the air temperature drops.
Thanks to the large safety margin, even if a knock occurs, you can drive for a while to make sure that the part is faulty if the sound increases. Other signs are the appearance of a burning smell when the car slips, engine overheating, and increased fuel consumption.
Diagnostics of the clutch system on a VAZ 2114
All vehicle owners sooner or later face the need to change clutches. A worn-out system can cause failure of other components and parts and lead to more serious problems.
Operation of a worn clutch can lead to failure of other components and assemblies of the vehicle.
The need to replace the clutch is determined by a number of signs.
First of all, this is the appearance of strong noise when the clutch is disengaged due to wear of the release bearing. As a result, fuel consumption increases and engine power decreases.
In addition, slipping may occur - slipping of the disks relative to each other, ultimately leading to deformation and breakdown. A specific smell of friction linings burnt due to high temperature appears in the car interior.
Diagnosing such problems is quite simple. When slipping, for example, when you press the accelerator pedal, the revolutions increase, but the speed remains unchanged. In all these cases, replacement of either the entire system or one of its elements is required.
It is recommended to change the device every 80–90 thousand kilometers. However, this value may vary depending on the quality of the mechanism, vehicle operating conditions and driving style.
The main symptoms indicating the need for replacement:
- The clutch does not disengage completely. When changing gears, a characteristic crunching sound is heard.
- When the corresponding pedal is smoothly released, the car moves jerkily.
- When you depress the pedal, you feel a strong vibration from the engine.
You can check the wear of the discs, that is, measure their thickness, using a special tool - a gauge. This requires a lift or overpass.
Replacement process
It is more convenient to carry out work on replacing and repairing the clutch on an inspection pit, overpass or lift. The photo shows the clutch diagram:
Car clutch diagram
Tools
To complete the work you will need the following materials and tools:
- flat screwdriver;
- a set of keys;
- lubricant "Shrus-4".
Stages
Replacement consists of the following steps:
- First of all, you need to remove the gearbox.
- Next, the ends of the retainer are retracted from the place where the clutch associated with the bearing engages.
- Then the release bearing is removed from the guide sleeve along with the coupling.
- After squeezing out the four tabs associated with the spring holder, you should remove the holder itself.
- After complete release from the clamps, remove the release bearing from the clutch.
Release from the retainer
- Each removed part must be inspected. If damaged or faulty, parts must be replaced.
- Before installing a new bearing on a VAZ 2114, it must be checked. It is easy to determine serviceability: it should rotate freely without stopping, in addition, there should be no even slight play.
- If the check shows that the part is in good condition, it is installed on the coupling. When installing, pay attention that the protruding part of the inner ring must be directed towards the coupling. After checking that the installation is correct, you can clamp the part onto the coupling using a spring holder.
- Now you can mount the release bearing on the guide sleeve. To extend the life of the part, a preliminary procedure should be carried out: a thin layer of special lubricant must be applied to the surface of the guide bushing.
Car clutch repair - At the last stage, using a spring clamp, the coupling along with the bearing fixed in it is fixed.
- After the replacement is completed, the gearbox is put back in place.
Replacement does not present any difficulties, you just need to follow the correct disassembly and assembly process without violating the sequence. After carrying out the work, it is necessary to adjust the tension of the handbrake cable and check the functionality of the clutch drive.
Replacement
The procedure is not so simple, therefore, if you lack experience, it is not recommended to do it yourself. If you have enough skills and abilities, get to work.
- Disconnect the clamps and remove the release bearing along with the clutch.
- Remove the input shaft from the bearing.
- After fully releasing the clamps, remove the damaged bearing from the coupling.
- Install a new part, but first make sure of its quality. If the bearing moves freely, there is no need to worry, it works well.
- Lubricate the clutch and the release tool itself. This device loves high-quality lubrication. Then install it on a release sleeve that has been pre-treated with machine oil.
- Using special clamps, place the new element in its rightful place.
- The final stage will be reassembling and installing the gearbox in its original position.
The work can be considered completed. It is quite possible to do it yourself, but just do not forget about the accuracy and consistency of your actions.
A high-quality squeezer lasts a long time, so you won’t have to perform such operations regularly. Of course, provided that you have correctly replaced the old bearing and your clutch is functioning efficiently.
Replacing the release bearing of a VAZ 2114
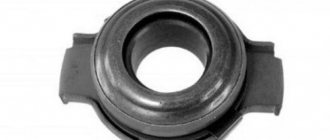
One of the important clutch elements of the VAZ 2114 car is the release bearing (VP). Located in the clutch, it participates in creating an axial impact on the pressure plate. The latter, in turn, breaks the connection between the basket and the flywheel. Only after this can you turn on the speed and start moving the car. During the latter, it is the pressure bearing that ensures silent and smooth gear shifting.
ABOUT THE DEVICE AND PRINCIPLE OF OPERATION
It is a regular roller bearing of a specific design.
In the clutch mechanism, it is destined to serve as a stop for transmitting the forces that will come from the pressed pedal. The bearing then transmits this movement to the pressure plate to break the connection between the basket and the flywheel. Without this, it is impossible to turn on the speed and start moving. Its structure can also be judged from the photograph.
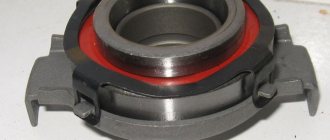
Release bearing disassembled
From the photo you can see that it consists of three main parts:
- Clip with guide bushing;
- Roller bearing;
- Fixing washer.
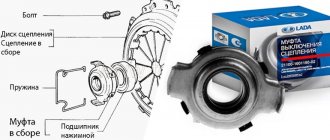
Release bearing device
Structurally, the VP is a ball or roller radial bearing, the inner ring of which is wide and closed, all parts are pressed into a clutch called an overrunning clutch.
Release bearing device
VPs can be of two types:
- Mechanical - the bearing is moved by a system of cables and rods;
- Hydraulic - the VP moves using a hydraulic drive.
Signs of a broken release bearing
The main way to diagnose a VP breakdown is to monitor the operation of the car:
- If, having pressed the clutch pedal, we hear extraneous noise (maybe a knock or a hum) - this means that the tracks and rolling elements of the VP have been destroyed, the separator or the entire coupling has been deformed;
- The clutch pedal is pressed very tightly - a sign of a broken ear VP;
- The speed does not change at all - this means complete destruction of the VP clutch;
- When squeezing the clutch, you can hear a whistle - this is a sign of insufficient lubrication in the VP or, if there is lubrication, of poor quality.
Advice! The noise of the VP may not always mean its breakdown. For example, if the air temperature is low enough and the car is not warmed up, then after squeezing the clutch of the VAZ 2114, the VP begins to make noise. The reason for this is the different rate of thermal expansion of the VP parts. After a short time of operation, the noise disappears.
Attention! Back in the 1990s, a popular method was to restore the performance of the VP by boiling it in machine oil. This somewhat extended the service life of the part. Now this method does not work, since the materials and the design of the VP itself have changed.
Signs of malfunction and diagnostics of the release bearing of the VAZ 2114 (how the bearing makes noise and hums)
Direct diagnosis consists of checking the functionality and presence of the following signs of failure.
Signs of a malfunction of the VAZ 2114 clutch release bearing, if detected, will require its replacement:
- When you press the clutch pedal, you hear a noise, hum or knocking (rolling, internal vibrations occur due to damage to the tracks with rolling elements, deformation of the cage or the clutch itself).
- A whistle when the clutch is engaged makes it clear that the quantity or quality of lubricant is not enough;
- The speed does not change or the pedal moves hard (occurs when the clutch has fallen apart, as well as if the ear of the release bearing is broken).
- Watch a video example of how the release bearing of a VAZ 2114 makes noise and hums, as well as how the check is carried out. You can also hear the noise of the bearing after disassembling the transmission after removing the VP.
Video: “How to check a release bearing”
Video: “How a faulty release bearing makes noise”
Attention:
In cold weather, a VAZ 2114 car that is not warmed up sometimes experiences noise from the release bearing. This is due to the fact that, unlike ball bearing rings, the coupling is made of a different steel, and also has low hardening, so the thermal expansion of the elements does not occur evenly.
How to choose a new release bearing
In the event that a breakdown of the VP is obvious, you must immediately buy a new one and replace it.
On the auto parts market there are release bearings of both domestic and foreign production, their cost ranges from 300 to 1600 rubles.
These are models from the following manufacturers:
The new VP must operate at least a million on-off cycles. The strength and quality of materials of most VPs correspond to this figure. But without following some recommendations, even the best VP will quickly fail.
There are five easy-to-follow recommendations in total:
- After replacing the VP, all bolted connections of the assembly parts must be coated with a sufficient layer of graphite lubricant;
- When installing it, the VP itself must be lubricated with the recommended lubricant in the required quantity;
- During operation, you need to ensure that water and dirt do not enter the transmission - if this happens, then breakdown is inevitable;
- Do not hold the clutch pedal down for a long time;
- Follow the order of pressing the pedal - fast pressing and slow release, without delays in the intervals between the extreme points.
Notes, recommendations and repair tips
- The average service life before product replacement is 800,000 off-on cycles.
- Recommendations for extending the life of the release bearing:
- Avoid holding the pedal for a long time;
- It is advisable to release the pedal slowly and press quickly, without stopping between extreme positions;
- Prevent moisture and dirt from entering the transmission;
- Carefully lubricate the part during the replacement process (see video below).
- After replacement, when performing reassembly, treat the threads of bolt connections with graphite lubricant.
- Purchase auto parts from previously verified retail outlets, check dealer documents and product quality certificates.
- The video shows an example of performing repairs without an inspection hole, as well as without removing the gearbox.
Save it for yourself, it will come in handy!
Replacing the release bearing
Replacing the VP in a VAZ 2114 is not particularly difficult, but will require quite a lot of time. The reason for this is the need to completely dismantle the gearbox. Although there is a way, it is shown in the video, of replacing the VP without this procedure, it is quite complicated and there is a high risk of incorrect replacement and concomitant breakdowns of the unit.
In any case, if a car enthusiast doubts his abilities, he should contact a car service center. There, the replacement of the VP will be carried out quickly and efficiently. The price of this service ranges from 3 to 5 thousand rubles.
If the owner of a VAZ 2114 has a little time and confidence in his abilities, then he can easily replace the VP himself. This will require a small set of tools and strict adherence to the disassembly-replacement-assembly algorithm of the gearbox and gearbox assembly.
- Car set of spanners (preferably with a ratcheting mechanism)
- Flat head screwdriver set
- Car mount
- plastic container for draining engine oil of sufficient volume
Replacing the VP in a VAZ 2114 consists of 27 stages:
- Place the car over the inspection hole, open the hood, turn on first gear and release the handbrake;
- Disconnect the air filter;
- Disconnect the terminals from the battery and remove it;
- Unscrew the upper fastener of the gearbox;
- Unscrew the starter mount and disconnect its terminals;
- Loosen the clutch cable by unscrewing the nut;
- Remove the front wheels;
- Remove the wheel bearings and drive axle shafts;
- Remove the anthers (they are often called mud flaps);
- Remove the protective cover from the engine crankcase;
- Unscrew the fastenings of the front suspension arm extension bracket;
- Unscrew the anti-roll bar bolt;
- Similarly - the bolts of the right and left ball joints;
- Remove both the lever and the extension completely;
- Carefully unscrew the plug and drain all the oil into a container prepared in advance;
- Completely dismantle the front drives of the right and left wheels;
- Remove the bolts securing the gearbox to the engine;
- Remove the bolts securing the starter from below;
- Disconnect and remove the rocker, gear shift rod and speed sensor;
- Unscrew the remaining fastenings of the gearbox and dismantle it;
- Visually inspect the gearbox from the inside, the condition of the basket, discs and the gearbox itself;
- Remove remaining oil and possible contamination;
- Using a suitable screwdriver, loosen the spring of the VP coupling and remove it;
- Lubricate the bushing splines with the recommended lubricant and apply it to the new VP;
- Place a new VP on the bushing and secure it with a spring;
- Check the smoothness of torsion of the VP (by hand);
- Assemble the Knot in the reverse order, starting from point No.20 to point No.1.
Advice! To lubricate the VP and bushing, you need to use a special high-plastic lubricant for constant velocity joints (CVH), for example it can be Litol-24 lubricant.
Replacing the release bearing on a VAZ 2101-VAZ 2107
Removal: 1) At the very beginning of the operation, you will have to remove the box from the car. (see details in the instructions: “Replacing the box on a VAZ”)
2) Now take a screwdriver in your hands and remove the springs securing the bearing to the fork.
3) Gradually pull along the shaft, in other words, pull the release lever towards you - it is removed from the shaft.
4) After removing the bearing, unclench the ends of the spring attached to the gear shift fork. After decompressing, simply remove this spring. If you find the bearing is in good condition, but the spring is not, replace the spring with a new one and continue to use your bearing. The spring is fine, but the bearing is not - take the spring and insert it into the new part.
Note! Please note that sometimes the bearing is still intact, but has already traveled quite a few kilometers, so you should not exclude the possibility of failure in the near future.
Installation
The new spare part is installed on the vehicle in the reverse order of removal.
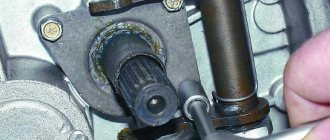
Note! Before installation, it is necessary to lubricate the splined part of the input shaft, indicated by the arrow, with the lubricant described in the set of necessary tools, because over time the lubrication of the shaft disappears, and malfunctions with the splined part may occur due to friction between non-lubricated parts.
Below is a link to a video with a visual demonstration of the replacement process:
How to replace the release bearing on a VAZ-2114
The release bearing is one of the main components of the clutch installed on the VAZ-2114. Without it, this node will not be able to function at all. Its main task is to transfer the pressure generated on the pedal to the drive disc and basket, due to which they open. When the pressure decreases, these parts are connected again. As practice shows, a car’s clutch quite often fails precisely because of the failure of the release bearing. How it is replaced directly on a VAZ-2114 is described in this article.
Examination
To make sure that the clutch really needs to be replaced with a clutch releaser on a VAZ 2114, it is first recommended to check it thoroughly for malfunctions. This will allow you to determine whether this device is really the cause of the problem.
The bearing allows the disc to disengage from the basket, plus it additionally ensures that the clutch is engaged and disengaged.
There are two types of squeezers:
- Roller . They work on the basis of a rigid bunch of rods.
- Hydraulic. The hydraulic system ensures power transmission.
Even an inexperienced car owner can detect a faulty release bearing. The failure of this element manifests itself as follows:
- When moving, extraneous sounds and noises arise;
- Gear shifting is difficult;
- When overtaking, the clutch may completely disappear;
- Slippage occurs during acceleration, etc.
If the squeezer turns out to be truly faulty, it is the responsibility of every car owner to replace it immediately. This can be done with the help of service station technicians, or with your own hands.
Specifics
The release bearing is activated exclusively at those moments when the driver changes gears. At other times it remains unloaded.
A breakdown of the element in question in a VAZ, or even just significant wear, is the cause of failure of the entire clutch. Thus, it is not advisable to postpone the repair of the unit - the key part should be changed at the first opportunity.
The service life of the release bearing is exhausted relatively quickly, not so much because of the load as such, but because of its unevenness. That is why the manufacturer of the VAZ-2110 advises not to hold the clutch pedal in the lower position when the gear is engaged unless absolutely necessary.
Typically, premature bearing failure is a typical failure that occurs most often in cars driven by new drivers. With proper use of the unit, the part will serve for many years.
Symptoms of a problem
If the release bearing wears out, then when you press the clutch you hear a rather loud knock, and sometimes even a crunching sound. At the same time, the free play length of the pedal drive increases noticeably.
However, noises are not always a sign of bearing failure. For example, in winter, a similar symptom occurs due to the compression of its rims under the influence of frost. In the summer, crunching and creaking are clearly interpreted as a symptom indicating wear of the element. If you detect alarming noises, there is no need to rush into repairs - you still have about two weeks left.
You cannot postpone replacement if, in addition to crunching:
- there is a smell of burnt metal;
- the engine begins to overheat;
- fuel is consumed faster than usual;
- The car, accelerating, begins to slip.
Finding and eliminating defects during clutch repairs
If such defects are observed, then you need to contact the service to carry out diagnostics to identify the following malfunctions:
- lack of free play - adjustment is in progress;
- wear and oiling of friction linings - complete replacement of the clutch;
- critical reduction in spring forces - a new basket is installed;
- cylinder compensation hole is dirty - flushing, installation of new cylinders;
- destruction of bearings - new elements are installed and the operation of the box is adjusted.
If a disc distortion with the threat of partial or total destruction is detected, then another unit is installed and the units are debugged. Very often you have to replace the clutch cylinder.
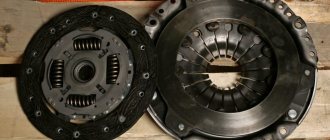
It is possible to replace the entire clutch kit, which includes the following components:
- basket;
- disk;
- release bearing.
Our experts recommend installing the rear oil seal of the engine crankshaft at the same time as installing the new system. The entire process of replacing a clutch in Krasnoyarsk does not take very much time.
Symptoms of malfunction
There are several main defects that indicate the need to contact Service Motors:
- slippage – lack of disk clamping, which causes slipping during the torque process;
- driving – complete relaxation of the disk by the basket is not ensured, preventing gear shifting;
- breakdown of the release bearing - characterized by a high noise level and the ability to switch.
Removing the gearbox
In order to get to the release bearing, you first need to remove the gearbox. For this:
- disconnect the battery and remove it from the engine compartment;
- drain the oil from the box (the plug is on the bottom - do not forget to substitute a container);
- remove the starter;
- unscrew the cable from the clutch;
- disconnect the terminal from the speed sensor;
- first remove the bolt holding the ignition bracket to the gearbox, and then the rest in any order;
- disconnect the shift lever from the gearbox;
- remove the wheel drives;
- remove the fasteners connecting the gearbox to the engine;
- remove the crankcase casing;
- hang the power plant (for example, on a board);
- unscrew the nuts of the left and rear engine mount (remove the latter completely);
- slide the gearbox along the guides.
Bearing replacement
After removing the gearbox, be sure to check the condition of:
- disks;
- basket;
- inner part of the gearbox housing.
Wipe all elements with a rag, removing oil and dirt.
Now you should examine the release bearing itself. To remove it, locate the end of the retaining spring that fits into the coupling. Use a flat-head screwdriver to pry it up and pull the element out. If a part shows signs of wear, it is replaced with a new one.
Before installing the working bearing, it must be checked for free rotation and absence of play.
- degrease the bushing, fill its splines with lubricant;
- CV joint-4 is also applied to the inner and outer rims of the bearing;
- put the part on the shaft (the top side will be where the central ring protrudes - it is directed towards the coupling) and fix it with a spring;
- make sure the entire assembly is working properly.
Once the bearing replacement is complete, the gearbox must be reinstalled. This is done in the reverse order to what was described above.
Finally, you should check how the clutch works. Just drive the car, changing gears.
Video - Replacing the clutch release bearing VAZ 2109
Operating procedure
1. Drive the car into the pit, put on the handbrake and install the wheel chocks. Then remove the terminals from the battery and put it away so that it does not interfere with the work. Also, disconnect the wire connecting to the clutch housing ground.
2. Unscrew all the bolts that secure the engine protection. Disconnect the protection. This way you will create unobstructed access from below to all nodes.
3. Unscrew the gearbox drive rod (link). To do this, use a 13mm wrench to unscrew the clamp bolt and move it to the side. Then disconnect the drive from the transmission.
4. Disconnect the sensor that turns on the reverse lights and disconnect the clutch cable.
5. Loosen the hub nuts and lift the front wheels. Remove the wheels and unscrew the hub nuts completely. After this, unscrew the ball joints and turn the hubs out so that it becomes possible to dismantle the CV joints. Remove the clamps and boots of the internal grenades and remove them from the gearbox.
Attention! Before removing the CV joints, be sure to drain the oil from the gearbox!
6. Leave some kind of support under the engine so that it does not fall over after removing the box. After this, unscrew all the bolts that secure the gearbox to the engine and unscrew the gearbox mounting bracket. It is recommended that only two people perform this work, since the gearbox is quite heavy. Pull the box out of the engine with extreme caution: the input shaft should not touch the petals.
7. Pull out the ends of the spring clip using a screwdriver and pull out the clutch.
8. Move the petals back and remove the old release bearing.
9. Install the new release bearing in reverse order. To do this, it is installed on the coupling in such a way that the protruding component is directed towards the coupling.
10. Fix the new part using the clutch holder and lubricate the entire shaft with engine oil.
After replacing the bearing, install the gearbox in the reverse order, insert the CV joint into place, secure the ball joints and tighten the hub nut. After this, install the wheels, tighten the wheel bolts and lower the car. After this, tighten them and the hub nuts. Don't forget to pour the oil back into the gearbox; it is best to replace it with new one.
This completes the process of replacing the release bearing. Good luck on the roads!