Howl and hum from the transmission on Lada Niva: we figure out what the problem is and how to fix it
The domestic small-class SUV Lada Niva, or Lada 4×4, or simply VAZ-2121 has been produced by the Tolyatti automobile plant for more than four decades. The model is in high demand not only among Russian car enthusiasts, but also among drivers in many other countries. The increased interest in the car is due to its uniqueness: an all-metal body instead of a classic frame structure, all-wheel drive with a center differential. Previously, few cars could boast of such a design, and those that were produced with such a transmission scheme were, as a rule, much heavier, larger and several times more expensive.
Throughout its history, the model was equipped with a manual transmission. Initially it was a manual transmission-4, since 1995 the SUV engine has been combined with a five-speed gearbox
labeled VAZ-21214, which is actually a manual transmission unit-21213 adapted for 1.7 and 1.8 liter injection engines. In 2013, the mechanics underwent major changes and received a new name 21214M
. However, along with the appearance of the new gearbox, constant conversations arose among car owners about where the howling and hum from the transmission on the Lada Niva comes from. Let's look into this issue further.
Transfer case noise
Post by Kolebon » Feb 22, 2012, 10:15 pm
Post by Vovchik » February 22, 2012, 11:05 pm
Post by tatarin545 » Feb 22, 2012, 11:11 pm
He disappeared somewhere
Tatar is not a nationality, Tatar is a profession.
I am slowly looking for an engine block or the 2130 engine itself. 42-tooth RK gear, inexpensive! Niva Fora for experiments, can be written off!
Post by Kolebon » Feb 22, 2012, 11:41 pm
Post by tatarin545 » Feb 22, 2012, 11:54 pm
Tatar is not a nationality, Tatar is a profession.
I am slowly looking for an engine block or the 2130 engine itself. 42-tooth RK gear, inexpensive! Niva Fora for experiments, can be written off!
Post by Kolebon » Feb 22, 2012, 11:58 pm
Post by tatarin545 » Feb 23, 2012, 00:12
Tatar is not a nationality, Tatar is a profession.
I am slowly looking for an engine block or the 2130 engine itself. 42-tooth RK gear, inexpensive! Niva Fora for experiments, can be written off!
Post by Kolebon » 23 Feb 2012, 00:14
Post by YVAN » Sep 15, 2013, 12:23 pm
Post by rendevor » Sep 15, 2013, 1:59 pm
Post by Alexey 30 » Oct 10, 2013, 10:09 am
Post by Anton » Oct 10, 2013, 11:09
Turn off the center differential lock (small lever away from you).
Posted by marselle » Oct 30, 2013 3:38 pm
Posted by marselle » Nov 13, 2013, 11:00 pm
Post by ivm53 » April 25, 2015, 4:08 pm
Post by Allbatross88 » 12 Aug 2015, 15:00
Post by Captain » 12 Aug 2015, 15:33
The howl of the transfer case
The howl of the transfer case
Post by Leon71 » 07 May 2014, 22:31
Re: Transfer case howl
Post by Sash » 07 May 2014, 23:15
Re: Transfer case howl
Post by DimZar » 08 May 2014, 05:35
Re: Transfer case howl
Post by Sash » 08 May 2014, 07:01
Re: Transfer case howl
Post by Sash » 08 May 2014, 12:29
Re: Transfer case howl
Post by DimZar » 08 May 2014, 20:18
Re: Transfer case howl
Post by Leon71 » June 14, 2014, 10:59 pm
Re: Transfer case howl
Post by Sash » 15 Jun 2014, 08:36
Re: Transfer case howl
Post by DimZar » June 15, 2014, 11:51 am
Re: Transfer case howl
Post by Leon71 » June 17, 2014, 10:52 pm
Re: Transfer case howl
Post by Slava N » June 18, 2014, 10:49 am
Re: Transfer case howl
Post by Leon71 » June 18, 2014, 10:45 pm
Re: Transfer case howl
Post by Leon71 » Aug 17, 2014, 8:25 pm
Tips for owners
To make driving your car comfortable, read some important points:
- The usual, standard arrangement of the front and rear handles is forward and backward, respectively. Movement in this mode can and should be carried out in areas characterized by even and smooth surfaces.
- Locking the differential by switching the front handle to the rear position is best on roads characterized by increased slipperiness. This measure will give Niva stability. It is worth understanding that after overcoming the problem area, the handle will need to be returned to its original position.
- As noted earlier, downshift should be activated before a potential obstacle, but not while the car is already stuck.
- It is worth understanding that activating the lock when the vehicle is stationary is sometimes impossible, even if the clutch is depressed. This may be caused by the clutch teeth hitting the gear teeth. In this case, you can try to activate the lock by starting to drive slowly and make a slight turn. If problems arise with disabling the lock, it is recommended to perform the same procedure with the clutch depressed and the steering wheel slightly rocked.
Also interesting: Tuning a Niva 4x4 with your own hands: updating the interior of the Lada VAZ-2121
How to use a distributor in the field
The transfer case on a Chevy Niva in its normal operating position is a differential lock, the first center lever must be unlocked and is in the extreme forward position, the overdrive is in the extreme rear position.
What kind of drive does the Niva have? The transmission distributes all-wheel drive to all four wheels in all Niva models.
How to turn on all-wheel drive in a field
In the normal operating position, the transfer case controls are removed from you; in this position, all-wheel drive operates. The front handle is away from you, the back handle is opposite to you. Forward locking is low-high.
You need to engage a low gear while the car is stationary, because if you move you can break teeth or screw something up, you shouldn’t do this. When overcoming difficult sections, you need to depress the clutch and turn the gearshift lever downwards. The Niva gearbox lever works smoothly. The Niva gearbox itself should not make noise. Everything should turn on effortlessly, without jamming.
Checking the lock
You need to remove any of the wheels and engage the lock, engage the gear and move off. If the car does not move, the lock does not work. There may be breakdowns. The lock can be activated both while the vehicle is stationary and while moving. When stationary, it may or may not turn on, depending on how the teeth are positioned on the differential. They may be slightly misaligned. If it doesn’t turn on, you need to drive the car a couple of meters forward or backward.
We turn on a lower gear, start the car, put it in first and off we go. When we are driving, we release the gas pedal a little and pull the locking handle towards ourselves, the indicator light comes on. Under load, if you drive under tension, it will not turn off. With a slight over-throttle, the downshift is switched on and also quietly switched off.
When accelerating from a neutral position, do not engage a lower gear, because it will start to crunch until it stops completely. We stopped, lowered the car if necessary, and drove on. To turn on the increased when moving the handle down and all the way.
Do-it-yourself gear shift assembly adjustment
To correctly adjust the gear selection mechanism you will need a 13 key
Sequencing:
- We start the engine, engage 1st gear. As soon as the car starts to move, we stop and turn off the engine. In this case, we leave the first gearbox speed in the ON position. We put the car on the handbrake and anti-rollbacks.
- We loosen the coupling bolt of the clamp securing the connecting rod of the gearbox under the body. For ease of work, you can use a lift, overpass, pit or jacks.
- We move the plastic traction lock located in the passenger compartment all the way to the extreme left position.
- Then we fix the loosened bolt of the mounting clamp back.
You can also try one more method to eliminate rattling and play in the gearbox handle: using a “13” wrench, you need to tighten the lever fastening nut until the axial play is eliminated.
The lever nut must be tightened to a torque of 24.5 Nm (2.5 kgfm).
If, after the adjustment has been made, the same difficulties with gear shifting and vibration remain, this means that this unit is worn beyond the permissible norm and needs to be replaced.
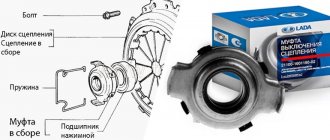
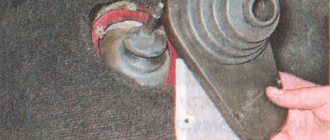
Repairing faults and adjusting the VAZ-2123 steering gear
Bleeding and adjusting the Chevrolet Niva clutch: step-by-step instructions
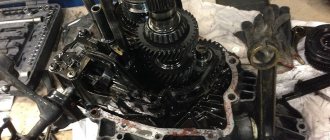
How to repair a Chevrolet Niva transfer case with your own hands: detailed disassembly instructions
Removing the Niva transfer case
To repair the transfer case on a VAZ 21213 (21214), the unit must first be removed. We carry out removal in the following order:
- in the cabin we dismantle the plastic lining of the gearbox and gearbox levers;
- unscrew the knobs of the transfer case shift levers, remove the casing under them;
- disconnect the speedometer cable, for RK 21214 you will need to additionally disconnect the speed sensor;
- we unscrew the bolts with nuts securing the elastic coupling of the front and rear propeller shafts; in order to remove the bolts, the cardan shafts must be turned - they are removed one at a time in one specific position of the shaft;
- We install a jack (or other support) under the transfer case and mark the places where the side supports of the RC were attached. This is done in order to minimize the alignment of the transfer case during installation;
- unscrew the 4 nuts securing the gearbox to the gearbox;
- unscrew the 4 fastenings of the RC supports to the car body;
- Now all that remains is to dismantle the transfer case.
Vibration
Vibration in the body is the main “disease” of the Niva; it often occurs due to improper alignment of the transfer case. Most often, vibration occurs on VAZ 21213/21214 cars, since the LCD is mounted only on two supports on the sides of the body; on the Chevrolet Niva, the transfer case is already installed on three supports. But before you start adjusting the position of the transfer case, you should check the condition of other parts of the chassis - vibration can also occur for other reasons:
- driveshafts are poorly secured;
- unbalanced wheels;
- there is play in the cardan crosspieces (vibration is especially affected by play in the rear driveshaft crosspieces);
- The vibration comes from the engine itself.
Vibration when starting off on a Niva can also occur for the following reasons:
- the mounting supports of the transfer case have become loose;
- The rubber on the RK supports themselves broke.
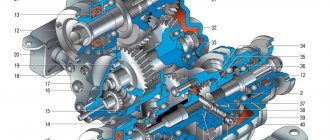
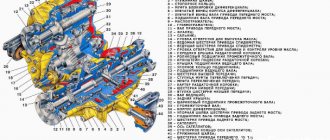
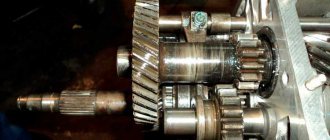
The device of the VAZ Niva transfer case
The transfer case is not present in all VAZ passenger cars, but only on cars with two drive axles. In the transmission, the transfer case (TC) is installed at the rear of the gearbox; a rear driveshaft is attached to its shank, which connects the transfer case to the rear axle. The front axle is also driven by the steering wheel; it is connected to the transfer case by a front driveshaft.
The reduction gear in the Republic of Kazakhstan is designed to obtain high torque, it is used to overcome difficult sections of the road, and helps to cope with off-road conditions. The VAZ Niva transfer case contains the following main parts:
- the body itself;
- front axle drive shaft;
The transfer case of the VAZ 2123 car has fundamentally the same device as unit 21213/21214, but in the Chevy Niva:
- another control mechanism (with one lever);
- an additional support was installed (on a simple Niva the RK is mounted on two supports, on a VAZ 2123 car - on three supports).
Methodology for determining the causes of vibration of the transfer case and body floor in the area of the front seats
First, note at what speed the transfer case vibration occurs, then begin to determine the causes of the vibration.
Test 1
Place the transfer case and gearbox levers in neutral and start the engine.
Set the engine speed equal to the vehicle speed at which the vibration occurred.
If vibration persists when the vehicle is stationary, you should check the fastening and condition of the engine mounts, as they are the cause of the vibration.
Test 2
If vibration is not detected during test No. 1, then set the transfer case levers to the neutral position, start the engine, engage direct gear in the gearbox and set the engine speed corresponding to the vehicle speed at which the transfer case vibration occurred.
If vibration is observed with a stationary car at this crankshaft rotation speed, then its cause is a malfunction of the intermediate driveshaft (imbalance, bending of the fastening bolts or elastic coupling flange, jamming in the universal joint).
Test 3
If no vibration is detected in tests 1 and 2, proceed to test 3.
Accelerate the vehicle to a speed where vibration occurs and place the transfer case and gearbox levers in neutral.
If the vibration persists, it is caused by a malfunction of the front or rear driveshafts, imbalance, jamming of the universal joints or imbalance of the center differential.
Before centering the transfer case, we check the condition of the power unit supports and the correct installation (the centering washers of the engine mounts must fit into the corresponding holes in the side brackets).
We install the transfer case on the car without fully tightening the nuts securing the brackets for its suspension.
By moving the transfer case in the longitudinal, transverse and vertical directions (tightening or loosening the nuts of its fastening), we achieve a minimum and uniform gap between the flanges of the intermediate shaft and the drive shaft of the transfer case (the flanges must be at the same level and parallel to each other).
We fill the gap between the body floor and the supports with adjusting shims and align the centering belts of the flanges, slightly moving the transfer case forward (by the amount of the gap between the flanges).
Finally tighten the nuts securing the transfer case supports.
When replacing a transfer case or changing a four-speed gearbox to a five-speed one and vice versa, as well as when the rear engine mount settles, causing vibration of the transfer case, it is necessary to select and install a new thickness of gaskets 3 (Fig. 1).
The device of the VAZ Niva transfer case
The transfer case is not present in all VAZ passenger cars, but only on cars with two drive axles. In the transmission, the transfer case (TC) is installed at the rear of the gearbox; a rear driveshaft is attached to its shank, which connects the transfer case to the rear axle. The front axle is also driven by the steering wheel; it is connected to the transfer case by a front driveshaft.
The reduction gear in the Republic of Kazakhstan is designed to obtain high torque, it is used to overcome difficult sections of the road, and helps to cope with off-road conditions. The VAZ Niva transfer case contains the following main parts:
- the body itself;
- front axle drive shaft;
- intermediate shaft;
- drive shaft;
- gears;
- bearings;
- differential housing;
- satellites;
- differential lock clutch;
- gear shift clutch;
- flanges (for connection to cardan shafts);
- oil seals;
- control levers.
Removing the howl and hum
We will assume that we have dealt with the vibration, but an equally significant problem remains - how to remove the howling of the transfer case on the Niva. Vibrations of the mechanism are not always the only reason for the appearance of extraneous irritating sounds. And the characteristic noise of the transfer case, alas, is one of the “trademark” shortcomings of one of the best domestic SUVs.
The first thing you should pay attention to is the levers. It is better to immediately replace them with silent ones - with anti-resonance bushings inside
They won’t eliminate all the noise, but they will definitely extinguish some of it.
Silent transfer case levers NIVA 2121 black Art. SV-21-18040401400.00-+ Buy
- The result will be even better if you install a small-module transfer case - with front and rear covers equipped with double-row bearings. In 2010, AVTOVAZ introduced new double-row bearings for output shafts in order to get rid of backlash and runout, as well as extend the life of the seals and, in general, increase the reliability of the mechanism. Here logic is man’s friend: less shaking and hesitation means higher service life and reliability.
Transfer case (2-row bearing) 21213 Art. 21213-1800020-0115000.00-+ Buy
We get rid of vibration and extraneous sounds of the Niva transfer case forever
The characteristic howl and hum of the transfer case on VAZ-21213 cars, alas, is familiar to many owners of such cars. Let’s figure out what is the reason for these problems, and most importantly, how to get rid of them without using “collective farm” methods, such as additional noise reduction.
Content
Understanding the terminology
Let's start by diving into the materiel. Transfer case (TC) is a separate unit of an all-wheel drive vehicle, which provides multi-mode power distribution from the engine to the front and rear axles.
Externally, this is a mechanism located under the bottom of the car, in the body of which a multiplier (divider) is placed in series to obtain an intermediate gear ratio in the transmission and a splitter of one power flow into two. It is with the help of this device and its controls (levers) that go into the vehicle interior that the LADA 4×4 driver selects the all-wheel drive operating mode.
The RK directly connects the front driveshaft and the intermediate shaft (shaft) with the vibration damper to the vehicle’s gearbox. As is probably already clear from the description, this element is connected to the rear axle of the car via a rear propeller shaft.
We study problems and repair methods.
Any car owner definitely doesn’t need to be told why howling and humming are bad. Vibration of the transfer case on a Niva at low speed is quite common. The driver, of course, gradually gets used to many extraneous sounds in the car, but the noise level is high enough to make it impossible to carry on a conversation with passengers while traveling. Due to excessive noise pollution, you will inevitably have to deal with the problem.
Vibration and how to deal with it.
The main reason for the occurrence of unnecessary sounds is multi-frequency vibrations of the components of the transmission. In general, the vibration of the transfer case on a Niva is one of the most common cornerstones that other car owners are forced to fight (or put up with) constantly.
- Check the cushions (supports) on which the power unit, gearbox and other parts are attached to the body, including the muffler. Any worn-out pad or rubber band can easily cause excessive shaking of the iron and accompanying rumble. It is better to replace worn silent blocks and pillows immediately.
- Be sure to pay attention to the intermediate shaft (inlet shaft). If you see signs of “fatigue” - change the elements that have become unusable, or the entire part!
Perhaps this is the most complete set of measures that experienced auto mechanics advise when the transfer case on a Niva hums and vibrates!
Removing the howl and hum
We will assume that we have dealt with the vibration, but an equally significant problem remains - how to remove the howling of the transfer case on the Niva. Vibrations of the mechanism are not always the only reason for the appearance of extraneous irritating sounds. And the characteristic noise of the transfer case, alas, is one of the “trademark” shortcomings of one of the best domestic SUVs.
- The first thing you should pay attention to is the levers. It is better to immediately replace them with silent ones - with anti-resonance bushings inside. They won’t eliminate all the noise, but they will definitely extinguish some of it.
Removing the possibility of oil leakage
In an effort to resolve the question of how to get rid of the howling of the transfer case, even before the 2010 update, the manufacturer began assembling this mechanism using silicone sealant instead of cardboard gaskets. And he introduced an improved crankcase ventilation system with an open breather, which was located under the hood. Again, the reliability of the vehicle when passing fords has increased slightly, and most importantly, the load on the seals has also decreased.
We mention them again to point out that the fewer vibrations and shocks, the longer it will not take to detect an oil leak on the transfer case housing due to deteriorated seals. Moreover, the flange in the RC covers can cause noise - during operation, the bearing seats are simply broken.
We hope that the steps listed above will become complete step-by-step instructions on how to eliminate transfer case noise on a Niva.
A universal remedy that will definitely eliminate the noise of the transfer case?
For people who do not want to spend a lot of time modifying the components of their SUV, there is a proven solution. A fairly reliable universal option for how to remove the howling of a transfer case on a Niva, one might say, know-how from the SV-PARTs company, is the installation of a steel four-satellite differential.
Practice shows that it eliminates up to 90% of noise. Perhaps, if you also follow the previous recommendations, then the total effort will be enough to find comfort and peace behind the wheel of your favorite car.
There is a difference? What transfer cases are on different modifications of the Niva?
One more point should be paid attention to: is there a difference for different modifications of the Niva car.
Niva (LADA 4×4).
The VAZ-21213 (Niva), and with it the VAZ-21214, LADA 4×4 URBAN and other small-scale vehicles assembled on their basis, are equipped with a single transfer case, only taking into account the updates and improvements introduced by the plant in 2009-2010.
Chevrolet Niva
Here you need to take into account that the transfer case of the VAZ-2123 car, which the Niva actually is, has exactly the same device as similar units on an ordinary VAZ SUV.
But the Chevrolet Niva, as you know, has a different control mechanism - it uses a single transfer case lever, not two. Gears are switched lengthwise, and the locking is switched across. At the same time, it was initially installed with a different clutch (Valeo) and small-module RK with single-row or double-row bearings. And the car left the factory with a transfer case control lever with a built-in damper, which removed excess noise in the range of 4-5 thousand revolutions of the power unit.
So, regarding the discussion on the topic “the causes of vibration and howling in the transfer case on a Chevrolet Niva and how to eliminate it?” The advice we gave above is quite appropriate.
SV-PARTS recommendations
We would like to point out that the assortment of the SV-PARTS online store has everything to solve issues with the transfer case, even complete units for Niva 4×4 (VAZ 2121) and Chevrolet Niva. We also recorded a short video to help car enthusiasts so that you don’t have to waste a lot of your time
Watch, comment and conquer new horizons off-road with us!
hum and howl when moving in tension | Topic author: Liane
Dear friends! My father bought a Chevrolet Niva in January 2022, before that he only drove right-handed cars. Before buying, we took it for a test drive, and there seemed to be no noise, but when we brought ours, until we arrived from the car dealership, we didn’t seem to notice such obvious noises, especially since we were driving no more than 40 km/h. Then, over time, we began to drive faster and noticed a howl and hum emanating from either the roofing felt box or the transfer case. We changed all the oils completely and everywhere, in general, everything that could be lubricated))! And it didn't help! The howling remained the same starting from 50 km/h and then increasing, and the most important thing is that the intensity of the sound increases when driving under tension, as soon as you increase the gas, everything goes away! Yes, and in the first 2 gears, the hum is present, but very weak. The car's mileage today is only 4 thousand/km.
Please tell me what this is and how to deal with it! Thank you in advance!
Sergey (Ragnar) Sergey, this is normal. As all the seals are replaced and the mechanisms are ground in, the noise will go away
Sergey (Ragnar) Thanks Sergey!
Andrey (Jasmeen) I had such a problem, at first it hummed slowly, then stronger and stronger, the hum came from the front axle gearbox, I changed the oil, it didn’t help, in the end it jammed, I had to change the gearbox, the hum disappeared!
Sergey (Ragnar) Andrey, I also had something buzzing in third.
I drove 24 thousand, but now it seems not.
Vasily (Marah) I had a hum starting from 60 km/h. They climbed a hundred and listened, they said that the handout was good. I spent a whole week thinking about what to do, replace it with a new one or remove it and give this one for repair. The car is new, produced in 2022. A friend works in a service center and advised me to change the oil in the transfer case to the Russian mineral w85-90, and add an anti-noise additive, like after 300 km all the noise will go away... I changed it, at the same time changed the axles, drove 300 km, nothing was missing, and now I’m driving like this then one day and suddenly it suddenly dawned on me that the hum was coming from the ROOF RACK)))) I removed the trunk and everything went away.
Alexey (Chalissa) guys, such a problem, I bought a Niva, it means there is a howling, and as the speed increases, the howling increases, as soon as I press the clutch the howling disappears, it comes from approximately under the gearbox lever, I looked around a bunch of frooms but found nothing, maybe you what do you suggest?
Dmitry (Sancho) Or maybe this is a feature of our Lada cars? It is very difficult to judge what your howl is. Moreover, the transfer case howls due to its design feature. Comparing the noise level with foreign cars is the same as driving comfort between an UAZ and a gelding. Ride other tires and compare the noises.
Igor (Annig) Alexey, what was not determined (otherwise it’s the same garbage)
Irinka (Artemios) Niva 2022 Mileage 30,000. Transmission filled with Liquid Moly - Everything is just super. Niva 2022 Mileage 8,000 Filled in trans. Liquid Moly. Vibration, noise and a terrible rumble began. 1 Changed the oil (drained CLEAN oil) in the gearbox and RC with Champion mineral water - NO changes. 2 I started changing the oil in the rear gearbox and drained the BLACK oil. Filled with clean and fresh oil. No changes. The vibration has increased! Guys, tell me what to do and what to do
Ivan (Vitthala) Hello guys, about the hum. I've already driven 270,000 on the shnivy, the hum has remained the same. What to do next?
Oleg (Sonoma) Sell and buy new
Marina (Landen) Steam locomotives hum; and the wind howls
Vasily (Marah) humming noise, from 10 km/h. replaced under warranty. humming and under tension and when you accelerate and go on gas at 4th 50 km/h and above. when releasing the gas there is no hum... like on a trolleybus in Soviet times.
Evgeny (Budd) Vasily, what was replaced under warranty? Gearbox, transfer case? I have the same trolleybus...
Vasily (Marah) The transfer case was replaced. The noise remained as it was. The howl of the Razdatka was added. So that…
Evgeny (Budd) I see, I’ll try to change the gearbox, but the diagnostics have no result at all. It only howls under load directly on the road..
Sergey (Ragnar) nothing will go anywhere) there will be a howl and it won’t go anywhere.!!!
Evgeny (Budd) Sergey, it howls and howls) it wouldn’t fall apart on the move) if I knew for sure where it was normal and where it was faulty... there are fields that howl! 10-15 percent)
Sergey (Ragnar) Evgeniy, when accelerating from 60 to 75, it starts whining and subsides, it’s like this in the transfer case almost from new, about 3000 km away, it started now at 52,000 it’s all the same.. I don’t worry about driving
Tags: How to determine whether a bridge or transfer case is humming in a field
Balancing cardans and transfer case on Chevrolet Niva (VAZ 2123)
1:502 I decided to share my thoughts on the fight against vibration and talk about how I finally defeated it.
Causes of vibration 1. Imbalance of cardans. The reason is still not the most common. An imbalance in a normal cardan appears only if it is bent or if it is repaired, or the crosspiece or flange is replaced. In addition, imbalance appears after, due to wear of the spline or crosspiece bearing, as well as wear of the transfer case or axle bearing, the cardan is displaced from the axis of rotation under which it was balanced. 2. Tight rotation of the crosspieces.
Usually drivers do not think about this, but in the case of tight rotation of the crosspiece, the force expended on this rotation is transmitted to the suspension elements of the units, and from them to the body. I won’t draw vectors, but the tighter the crosspiece, the more the transfer case deviates on its pads. And since with each revolution the crosspiece turns first in one direction, then in the other, then, accordingly, the vibration frequency is 2 times higher than the frequency of rotation of the cardan. A symptom of this particular problem is a hum, very similar to the hum of a bridge. For example, I thought that my REM would soon “bend.” 3. Large angles of crossing of the cardan flanges. The literature says: the drive must be “homokinetic”, which means that both flanges must be parallel to each other. In fact, this is ideal. In any case, deviations should be minimal. With proper alignment, the Niva turns out to be about 5-7 degrees (measured with a school protractor with a weight, so the accuracy is plus or minus a bast shoe). In this case, the angle of rotation of the cross should also not exceed 8 degrees (this is from memory, I could be wrong, correct me if I do). The kinematics of the Niva can be represented by the following diagram (as it turned out):
It can be seen that we do not have a single homokinetic driveshaft. The RPM is tilted forward approximately 6 degrees (angle E). REM back by about the same amount (angle F). Engine and gearbox back approximately 5 degrees (angle A). In this case, the remaining angles are within the tolerance only if the steering wheel is installed parallel to the bottom of the body. Look at the picture. The front cardan is almost coaxial with the RPM shank, and the angle D is less than the coveted 8 degrees. Of course, not everything is in order with the rear cardan, I did not measure angles B and C. But I can say for sure that their difference is equal to angle F. And it, as I already said, is about 6 degrees. Without thinking, I somehow tried to push the REM back even further. The vibration only intensified. Therefore, I concluded that the smaller F, the less vibration. As for the CV joint, it is important that the axis of the secondary shaft of the gearbox and the axis of the primary shaft pass strictly through its center. We achieve this by centering the transfer case. Conclusions 1. Cardan shafts must be balanced. 2. The crosspieces should rotate easily in their bearings, and the force should be the same. 3. The transfer case must be centered so that the axes of its secondary shafts are parallel to the bottom of the body and parallel to the longitudinal axis of the vehicle. In this case, it must be set so that the axis of the secondary shaft of the gearbox passes strictly through the center of the CV joint of the shaft. 4. There should be no loose crosspieces, splined joints and bearings of the secondary shafts of the RK. Practical recommendations (experience is the son of difficult mistakes) Selection of cardan shafts and shafts When you go to the store for cardan shafts, do not succumb to provocations. Cheaper is not always better. The signs of a proper wash are: - not painted, but blued metal; — presence of balancing drillings on the CV joint; Moreover, inside these drillings the metal is bare, not painted over or blued; — the presence of balancing washers on the bolts that secure the elastic coupling; — balancing washers and holes on the CV joint are located approximately on one side (as if they compensate each other); I don’t know why, but when dynamically balancing a normally balanced cardan it turns out this way; — The CV joint should turn tightly (not worn in), but evenly; - quality of rubber bands. Signs of a correct cardan are: - smooth and easy rotation of the crosspieces; if they are tight, then the transfer case will fall apart before they break in; — no play in the spline connection: hold it between your knees and try to rock it from side to side; It should move along the slots, but quite tightly; — presence of balancing plates; it is highly desirable that they be welded on different sides of the cardan; the plates are welded by spot welding, if usual - this is a leftist; — there must be a sticker with the manufacturer’s details.
Speaking of balancing. If there is no place in your region to balance the driveshaft, then there is no point in repairing it. Balancing is always disrupted! Bottom and resonance It is no secret that the body 21213 and 21214 are weaker. Often the vibration becomes unbearable precisely because the floor begins to resonate from the vibration of the cardans. Therefore, along with eliminating the causes of vibration, it would not hurt to get rid of resonance. There is another unpleasant thing about these cars: no matter how you center the transfer case, over time the alignment gets lost. This occurs due to the deformation of the floor in the area where it is attached. There are two options. The first radical one: install a subframe, ideally if the design is G8. The second is less expensive and barbaric: cut two plates from metal (about 3 mm) of such a size that they fit one end under the gearbox cross-member mount, and the other under the gearbox cushions. Naturally, drill holes in them for the standard gearbox and gearbox mounting bolts. By doing this, we make the floor in this area more rigid and shift the resonant frequency to a higher area. It helped me personally. Unfortunately, I didn’t take a photo of what it looks like, but you can see how it’s done in 2131. I saw someone like this from the factory. Bearings As I noted above, vibrations can also be caused by bearing play. The rear bearing of the RK, the one near the secondary shaft, is very weak on this topic. There is a bearing 305 (see documentation). This bearing has very stringent requirements for accuracy and metal hardness. I installed 126805 instead. This bearing was used in the Moskvich gearbox. Now the thing is quite scarce. Its advantage is that it is angular-resistant. The installation dimensions are the same as the 305th. My old bearing is in perfect condition, in any case, store-bought bearings are much worse. Nevertheless, the RK shank had already begun to dangle with it. One more note about RK. There are very thin gaskets, but the bearings (those with retaining rings) fit most tightly in the sockets when there are no gaskets at all. Therefore, it is better to remove the gaskets and use a sealant, then there will be one less source of noise. Alignment of the Republic of Kazakhstan On our forum this process was described many times in various ways, but in my opinion no one remembered what was described in the Kama Sutra. Only they managed to achieve satisfactory results. The essence of this method is to ensure minimal fracture of the shaft along the elastic coupling. So (with my additions): 1. Screw all the universal joints into place (this is necessary so that the transfer case supports are pressed to working condition). 2. Tighten the elastic coupling bolts until tight. Only in this case do its mounting planes become parallel. I'm convinced. True, if the bagel was made in the alley, then nothing will help you. Don't overdo it. Balance washers may be damaged. 3. Loosen the CV joint fastening to the drive shaft flange. Don't unscrew it at all. So let it hang out and that's okay. 4. Loosen the nuts securing the RK cushions. You can also loosen the nuts on the axles of these pillows. 5. By moving the transfer case forward - back, top - down, left - right, ensure that the TRANSFER SHAFT ARE STRICTLY PARALLEL TO THE FLOOR OF THE BODY AND THE LONGITUDINAL AXIS OF THE CAR, and the drive shaft flange is adjacent to the CV joint flange with a MINIMUM CLEARANCE and at the same time it DOES NOT FEEL THAT IT IS BENDING BLOW OUT FROM THE AXLE OF THE TRANSMISSION. That is, the CV joint should adhere to the flange freely, and they should not press on each other. It may turn out that you will need adjusting plates either for the gearbox yoke or for the CV cushions. 6. After that, tighten everything. 7. Check the result.
Common Lada 4×4 transmission problems
You can often hear from drivers that the car’s transmission is constantly humming and crunching. Many people have to sort out the gearbox after 20 thousand km, and then carry out minor repairs every 10 thousand km. High-quality foreign additives and oils do not radically change the situation. Howling and humming are a characteristic feature not only of the Lada Niva, but also of other AvtoVAZ vehicles, for example Lada Granta and Lada Kalina. AvtoVAZ is aware of this problem. Unpleasant sounds and crunches in the operation of the transmission are explained by poor modification of the teeth of the gears and the main pair. In 2014, the unit was seriously modified, but the problem was never completely eliminated.
Representatives of the plant comment on the fatal problems of the gearbox:
The factory has been fighting the rumble and howl of the transfer case virtually from the very moment the car appeared. In 1999, the Niva was equipped with an improved transfer case with fine-module gears. The level of external noise was indeed reduced, but the question of reliability and endurance of the modernized unit arose. Today, the Lada Niva 21214-M is equipped with a sealed transfer case with an updated ventilation system and an open breather located in the engine compartment. The design eliminates the possibility of excess pressure forming in the crankcase. Serious changes have also occurred with the cardan shafts: now they are on CV joints with boots. The plant's new balancing stands now make it possible to equip cardans with greater geometric accuracy.
Diagram and description of the design
The steering gearbox is a separate unit in the steering gear system, the main element of which is the worm shaft. It increases the force applied by the driver to the steered wheels when the steering wheel is rotated.
Typical diagram of a Niva Chevrolet steering gear:
https://www.youtube.com/watch?v=tPEPMc0J0ug
This part has the original serial number: 2123-3400010-20.
The mechanism is put on the market assembled with a bipod in a branded white and blue cardboard package with a quality certificate and an annual guarantee.
The Chevrolet Niva uses a mechanism in which a globoid-type worm (variable shaft diameter) is installed. This design ensures reliable vehicle control at any speed and on different road surfaces.
In the steering system gearbox, the worm shaft rests on 2 rolling bearings, the same number of bearings support the rotation of the bipod shaft. Ball bearings serve to reduce friction of the main parts, also making it easier to turn the steering wheel in different directions.
When the steering wheel rotates, torque is transmitted from the steering column shafts to a worm unit, which is engaged with a roller located on the bipod shaft.
Reference! The gear ratio is 16.4.
The bipod connects the steering linkage system through articulated pins. The transmission of movement from the middle rod to the right side rod occurs through a pendulum lever.
The worm steering mechanism used on off-road vehicles is quite shock-resistant. It easily absorbs all vibrations and irregularities from the road surface
Useful! The minor disadvantages of this mechanism include the complexity of manufacturing. Also, due to the large number of moving and rubbing elements, the worm gear must be tightened at certain intervals.
During vehicle operation, moving elements wear out in the worm gear over time and the technological gap increases. As a result, extraneous sounds appear. The first signs of an adjustment violation are a beating and a significant increase in the free play of the steering wheel, and the clarity of vehicle control is lost.
All this directly proportionally affects the safety of driving this car. If you do not adjust and tighten this play of the main pair in time, then due to the resulting runout, scuffs begin to form on the metal of the worm and bipod and the drive completely fails.
Important! Steering is one of the main vehicle systems responsible for safety. Therefore, operating a car with a faulty steering system is prohibited by the Road Traffic Rules.
Howling transfer case Niva Chevrolet
A whistle/howl has appeared a long time ago (since 2014), most likely in the transfer case of a Niva Chevrolet. It can be heard at the link (from the 1st minute): https://www.youtube.com/watch?v=lk75Yy2KXMk. The video is not mine, but, as you can hear and see, I’m not the only one with this problem. At 50-70 it howls when accelerating. When switching to neutral from 60 to 20, the howl gets louder and louder - from quiet to loud.
We hung it under all 4 wheels to detect such a howl in the pit - it was of no use, nothing howled, i.e. Only in a loaded state does a howl appear. When the transfer case is in neutral, when shifting gears, there is some slight “khhhhhhhhh” in the gearbox at first, but this seems to be normal, but maybe not.
We put the car back in the pit and removed the front driveshaft. I drove it without a cardan with a differential lock - the same howl. They didn’t remove the rear one (although it would have been necessary, but in order to remove it, you need to lower the transfer case), they thought that the problem was still in the transfer case.
Eliminate vibration with additional mountings
Installing the third support of the transfer case on VAZ 21213/21214 cars allows you to reduce the level of vibration of the transfer case; with this support it is easier to center the transfer case. You can buy the part at auto stores or make it yourself. The finished product comes with three long studs (for model 2121); to install the third support on this machine, you will need to unscrew the short studs from the transfer case housing and install new studs from the kit. We carry out repairs as follows:
- dismantle the front passenger seat in the cabin;
- remove the floor tunnel lining;
- in the cabin we move the carpet aside, covering the body amplifier (in front of the handbrake lever);
- remove the transfer case (alternatively, you can simply hang it up, but removing the third support makes it easier to install);
- We attach the bracket of the new support to the LCD housing;
- we install the transfer case in place, center it in the optimal position, and fasten the side supports;
- we combine the third support with the body, drill two holes in the bottom;
- Using washers, nuts, bolts and nuts (from the kit) we attach the support to the underbody.
Vibration is eliminated more effectively by installing a subframe under the transfer case. You can make such a device yourself or buy a finished product at a car store.
In order to install the subframe, the transfer case must be removed. It is more convenient to carry out such work in a pit; we carry out repairs as follows:
- leave the car in neutral gear;
- disconnect the propeller shaft from the transfer case, it is advisable to mark the driveshaft flange and the drive shaft so that during installation, align the driveshaft according to the marks - this way, the occurrence of unnecessary vibrations is eliminated;
- dismantle the muffler mounting bracket;
- remove the gearbox traverse;
- jack up the transfer case, remove the side fastenings of the transfer case;
- We treat the places where the subframe fits to the body with Movil;
- place the subframe on the gearbox studs;
- we mark the attachment points of the subframe on the side members, drill holes, attach bolts to the body;
- we tighten all fastenings, except for the transfer case supports themselves;
- we perform alignment of the steering wheel;
- Finally tighten the transfer case supports.
It should be noted that installing an additional support or subframe on the steering wheel does not always lead to the desired effect; in some cases, vibration only increases.
Lada 4×4 3D Adventure time ⌚ › Logbook › Installation of a vibration damper and the third support of the vehicle
After installing the transfer case supports of the new model, incomprehensible knocking noises appeared, which seemed to have gotten rid of, but they came out again.
I assumed that due to the “softer” supports, the transfer case sways more and this causes shocks in the transmission. This did not happen with the old supports. Reading the next entry in the BZ on the drive, I saw that a person had installed a subframe and was giving away for a nominal fee (500 rubles) a traverse with a vibration damper and a third support of the RK. I bought it for an experiment, although delivery cost the same 500 rubles. But in general, it is several times cheaper than buying the same spare parts new in a store. =)
The vibration damper was slightly bent, or rather its mounting. I straightened everything out, assembled it, and installed the traverse. There were no problems.
I also installed the third support. I had to tinker a little, of course. I didn’t remove the plastic cover of the tunnel, although I removed the driver’s seat for ease of work. I bent the casing up a little and installed the bolts, and to prevent them from turning, I made a fixing frame.
After installing the third support, I did not center the transfer case, I set it up quickly. The vibration that was previously at 1800 rpm has shifted to approximately 2200-2300 rpm. That's okay, we need to set the transfer case to normal.
Now the transfer case should no longer nod, but, nevertheless, the shocks when changing gears remain. And everything gives off somewhere in the area of the right foot, under the heel. I started to figure it out. It turned out that there was a large gap in the flange in the rear cover of the control valve. Those. If you move the cardan up and down with your hand, you hear a good knock. If this is the reason, then how is the knocking transmitted to the legs? I don't understand. There is some play in the flange of the front cover of the RC, but not much, there is no knocking. But at the same time, the cardan rotates relative to the axis at a large angle.
Did the transfer case “nod” more strongly on the softer cushion and the bearings were broken? Let me remind you that the cardans are CV joints and there seem to be no problems.
In any case, it will be necessary to change the bearings in the transfer case covers, or better yet, change the covers to new ones with double-row bearings. But there are no funds for this yet. In the garage there is a second transfer case, removed from the same car, which was very noisy. You can try to sort it out, replace the covers and bearings. I’ve never done this myself, but I think I can do anything.
I'm going like this for now. If you try to release the clutch more smoothly and choose the right moment, then there are no shocks.
I did not check the operation of the vibration damper. You need to center the transfer case, remove vibrations from it, and only then check the car on the track.
Source
Vibrations in the field, prologue
Introduction to history. In the team of people with whom I work, there are quite a lot of people with different characters, education and astrology)) What I mean is that “Virgo” is “VIRGO”. And either you understand this, or kill him right away. For example: when this person had problems with the gearbox and he decided to bring it “to mind” and go through it, he did it FIVE TIMES.
Sometimes during disassembly, changing one bearing that he didn’t like, for one reason known to him))) And this person suggested that I look for vibrations, because the box had been rebuilt 5 times, the transfer case 10, and even the “hammer and sickle” CV joint driveshafts were taken for additional balancing.
I won’t tell you what it looked like sometimes. But Gaidai could have made another one of his brilliant comedies. We didn’t get too clever, but simply used the experience of the farmers to confirm or refute this knowledge.
Transfer case centering
Correct installation of the transfer case can be done in several ways. Most often in auto repair shops, repairmen use this method:
- hang the car on a lift;
- loosen the transfer case;
- start the engine;
- engage the gear and accelerate the car according to the speedometer to the speed at which vibration occurs (often it occurs at speeds from 40 to 80 km/h);
- without using the brakes, reduce the engine speed, then turn off the ignition.
The transfer case itself is centered in place, all that remains is to tighten the fastenings of the supports.
You can also adjust the position of the RC using a wire; we do it this way:
- loosen all four fastenings of the transfer case supports;
- fasten one end of the wire to the rubber coupling of the propeller shaft;
- we attach another piece of wire to the CV joint, bring the other ends of the wire to each other;
- rotate the shaft; if the transfer case is not centered, the ends of the wire will diverge during rotation;
- the task comes down to installing the transfer case using the selection method so that the ends of the wire practically do not diverge from each other in any position when turning the shaft.
Niva transfer case repair
Below will be a list of faults characteristic of this unit and a list of their repair methods. This list is relevant only for the VAZ 2121 and LADA 4×4.
1. Vibration felt in the legs in the front seats. It is especially noticeable when starting to move or accelerating the car.
- the fastenings supporting the gearbox or transfer unit are loose or damaged. To fix this problem, you just need to tighten the fasteners.
- damage to the fastening support devices of the gearbox or transfer case. In this case, it is necessary to replace the faulty elements with new ones. Check the alignment of the drive shaft in accordance with the gear shift mechanism.
- deformation of the bolts supporting the elastic coupling has occurred. Eliminated by replacing the bolts or the entire intermediate shaft.
- the special fastenings supporting the elastic coupling have been weakened. Just pull them up.
Features of the Lada Niva transmission
Without exaggeration, we can say that all-wheel drive brought world fame to the domestic car, but at the same time it became a real headache for car owners. Drivers literally unanimously claim that the previous four-speed gearbox was an order of magnitude more reliable than the five-speed unit. Apparently, the mechanics took the predecessor as the basis for the new modification and added a fifth gear unit, which basically causes serious trouble for the owners. In most cases, the block does not last even 30,000 kilometers, requiring premature repairs. In modification 21214M this is much easier, but there are still cases when the fifth gear fails.
The gearbox and transfer case are two units connected to each other by a short intermediate shaft with a rubber vibration damper. Without this design, there would probably be much less vibration, but you just have to put up with the design features of the SUV's transmission. Another possible source of vibration is the rear driveshaft, which thus makes it known that an imbalance has occurred. But we note that on a fully functional car, vibrations are either not felt at all or are felt only slightly. If a problem appears, then it’s time to undergo diagnostics and find the cause of the malfunction.
Specifics. Flanges and helicopters.
Modified gearbox and transfer case flange. The results surprised even us, although it seems that nothing in this car should surprise us anymore. The photo shows the gearbox flange, also known as the transfer case flange. And it seems to be a rotating part with an even number of splines and an even number of holes. But you can’t “take” an AvtoTAZ so easily. This part has a landing diameter (along the splines) and a mating plane. We made a device from the transfer case output shaft. We very carefully centered them for axial runout, and clamping the flanges, as we do on transfer cases and gearboxes, began to check them for runout of the end plane. The results are depressing. 20% of products DO NOT have runout. There were flanges where the runout reached 0.5 mm. To avoid doubts about spare parts, we removed the flanges from the conveyor machines, the result was the same. On checkpoint “helicopters” the picture is exactly the same.
Who is to blame and what to do?
I think that the first question is rhetorical))) But let’s try to answer at least “why this is so.” I am a mechanical engineer by education and work, production technology is at an average level, so I turned to a military plant technologist for advice. How it should be: the workpiece is made with a press, rough processing is carried out with allowances, a thermal treatment is made, the part is processed completely according to the “main and landing” dimensions. How it was done: the last stage was removed. After heat treatment, the part warps and does not come out clean. Or it is placed on a cylindrical mandrel during finishing processing, which cannot be done. Since with this design, everything is centered on the splines.
The answer to the second question. We buy a box at the factory containing 100 “semi-finished” flanges wrapped in oil paper, drag them to the lathe, set up the “finishing fixture” and finish the entire batch.
What to do with excess noise on the VAZ-2121?
Cardan shafts on CV joints have further reduced the level of vibration and noise, but they have actually become maintenance-free. If a serious breakdown occurs, the complete unit will need to be replaced. It's easy to guess that this is not a cheap unit. Operating the car in difficult conditions only increases the likelihood of damage to the boot, and this is fraught with serious financial costs. So, we get that the noise of the transfer case is a design feature of the car, which you either have to put up with or look for ways to resist. One of the ways is to install a subframe or the same CV joints on previous modifications of the car. Sometimes car owners try to combat howling and humming in the cabin by improving sound insulation. But usually a new Shumka does not help and becomes only a waste of money.
You can modify the car as follows:
- installation of the RK subframe;
- silent RK handles;
- front axle gearbox release brackets;
- replacing the factory clutch with a unit from a Chevrolet Niva.
It is not at all necessary to do all this work on the car. It all depends on the owner’s requirements, assigned tasks and operating conditions. A subframe under the manual transmission and transfer case will reduce vibrations and extraneous sounds emitted by the units to a minimum. It is a natural way to protect the transfer case and increases the possibility of adjustment along the axes. Numerous tests have shown that this particular method of combating howling and humming is the most effective. Typically, the kit is made of structural steel, which allows you to accelerate the car without excessive noise up to 140 km/h, provided that you have the appropriate motor.
Complete sound insulation of the interior with high-quality sound-absorbing materials is advisable if at least one job from the presented list of ways to combat car noise has been previously completed. The operating comfort of the machine can be increased with the help of double-row imported bearings and seals pressed into the rear cover of the transfer case and the front axle disengagement clutch. Such a kit can not only eliminate hum, howl and vibration, but also prevent oil leaks on the transfer case flanges. In general, there are not so few real and effective ways to improve the comfort of an SUV.
What's the noise (noise in the transfer case, gearbox)?
Reg.: 02/16/2015 Messages: 2 From: Russia, Yaroslavl Age: 34 Car: VAZ 21214, 2004
Hello! I’ll write in this topic, Google directed me exactly here.
My gearbox began to howl loudly. Moreover, it howled a little before (probably, like everyone else, such a trolleybus rumble), no new sounds seemed to be added, but the old ones became many times louder, it hurts the ears in the cabin. The gearbox howls exactly, in 1st, 2nd, 3rd gears, and in 4th everything is quiet at any speed. There is no whine at all when pressing the clutch. In neutral, if you release the clutch, the sound also became a little louder (previously it was only noticeable if you listened) than before, but the annoying loud howl is in 2nd-3rd gears, under load or when braking the engine.
The oil in the gearbox is normal (although I immediately thought about it), after the whine appeared, they replaced it with a new one - nothing has changed.
I have read many messages with similar problems, but my case is different in that the loud howling appeared precisely after I replaced the clutch myself (by me)
Everything went, in principle, without complications, except that there was one nuance: when removing the CV joint, I unscrewed the nuts from the bolts securing the CV joint donut to the box, but forgot to remove the bolts themselves from the donut - due to inexperience, I thought that the CV joint would move back and the donut itself would come off the bolts — tugged the gearbox back and forth - it didn’t work, until I got the strength to return the gearbox to its place, it hung on the gearbox + lowering lever for half a minute, although I don’t think that this could ruin the gearbox. I replaced the washout and the rear gearbox support cushion, the rubber on the old one was cracked. That's all. The box seemed to fit back in without any problems, nothing was hammered in by force. I didn’t drop the gearbox, didn’t hit it :)) When you screwed the gearbox (together with the clutch housing) to the engine, the gearbox itself, I hope, did not need to be “centered” relative to the engine, it itself gets in the right place? :) What could be the reason for such an increase in howling? in the gearbox after removing/installing it? In the cabin, I re-checked the noise under the decorative panel several times, even added a layer of new noise - the howling does not become quieter, it seems to be spreading all over the bottom.
I don’t even know in which direction to dig, before replacing the clutch to the gearbox there were no complaints at all. Where could I screw up with the box?
I drove it again, I’ll add: in 5th gear the hum appears again, but a little different. On the 4th everything is quiet. Grinding, crackling, knocking - nothing can be heard, only an terribly loud, even hum of approximately the same pitch - it is much louder than the engine, heater, or heater fan. It’s as if it’s the same sound as before, only very amplified by some kind of “horn”
Replacing transfer case cushions Niva 21214
Good day, dear readers!
1)
I didn’t tighten it and wait for the RC to fall off, the studs were bald, I had to make 2 nuts everywhere. I already did this at the checkpoint, I liked it.
Having previously disassembled the interior and removed the seats, we cut off the studs and drill holes:
One hole, which is closer to the engine, goes directly under the seat mount, cut a thread there and screw in a stud from the bottom, choose the thickness of the studs yourself. I installed the studs M8
Access to the second hole is absolutely free from the interior, so I installed an M10 bolt and secured it by welding. I anointed it with mastic on all sides:
2)
It came to the third support and pillows 21214. The studs for the third support were made in the same way as above, the support itself and pillows 21214 were installed without problems, fortunately the kit came with long studs.
I poured two tubes of additive into the RK:
Installed it all, centered it well together with the Niva master
And I thought I’d be happy to drive now, but not entirely.
—
The third support of the transfer case is not an unambiguous thing, and the levers have stopped chattering, but it does not eliminate vibrations as many expect. I wanted to get rid of minor vibrations in neutral in the region of 80-90, in the end I just increased their range, they became 60-90. Well, what I didn’t like most of all was a howl, when you drive for the third 20-30 km/h hour and press the gas pedal a little, everyone’s RK howls, this howl became even louder, it was very depressing.
However, if you don’t have an ear for music and the car is rarely used in the city, then the support will be very useful, the rk sits very stable, no vibrations under load. But for myself, I decided that I didn’t need it and decided to take it off.
Here I was even more surprised, I removed the support, and the handles still didn’t dangle as much as before. The merit of pillows 21214? Or was the RK simply better displayed? I don’t know what, but I solved my problem without a third support.
If you decide to install it, you need to make oval holes in the mount so that the RK can be positioned more accurately. And I would advise you to think again whether it is necessary. There are many reviews that on a regular Niva the transfer case dampens these vibrations with its vibrations; if you hold it, the vibrations will be felt by the driver and everyone in the cabin. Yes, and driving without it didn’t bother me much, but now with the 21214 pillows and more precise alignment it’s even better.
Now I’m ready to sell the third support, mileage 100 km, but only KMV or pick-up. Details in PM.
Handout pillows.
In this new detail, we are completely on the side of the AvtoTAZ designers. A detail that can truly be called tuning. There is a lot of “rubber meat” and the design already works completely differently. We recommend replacing the old-style transfer case cushions with new-style ones as soon as possible. On many sites dedicated to the Niva, these pillows are advertised as spare parts for the Niva-Urban, and they ask for a lot of money. Meanwhile, this part is simply installed on the M-ki. Catalog number 21214-1801012-02.
An example from history. The reliability of Mercedes suspensions has already gone down in history and legend. We are not talking about modern multi-links, which have 20 parts, we are talking about cars produced in the 90s. The secret is simple, almost all silent blocks and pillows were the size of a fist, which is why they cost 300-500 thousand.
P.S. I somehow hit the building with a view of the parking lot where my cube is located, and I see a German brother-in-law settled down next to me :)
How to choose a new backstage?
What kind of rocker should I put on a Niva Chevrolet? This question came to the mind of every Niva car owner who had to deal with a malfunction of this element. In fact, there is nothing difficult in choosing a component.
In practice, many car owners of the above car models install mechanisms from classic Fiat cars on their vehicles. According to reviews on the Internet, these devices are completely suitable for installation in a Chevrolet Niva. However, there is also a negative side. In practice, Niva cars equipped with a mechanism from Fiat cars require more careful adjustment of the element. In addition, despite Italian quality, these components of the transmission system are more susceptible to wear and tear.