Good day to all! In this article we will tell you how to replace the Lada Granta fuel filter . This procedure is very simple, so you can do it yourself without trips to a car service center. In addition, by doing the work yourself, you can save additional money, which can be directed in another direction. When do you need to change the fuel filter on a Lada Granta and how often should you do it?
Maintenance regulations require replacing the VAZ Granta fuel filter every 30,000 km. However, it is better to reduce this figure if the car uses low quality fuel. Or the main signs of a clogged fuel filter began to appear, which will be discussed below.
Signs of a clogged fuel filter in Lada Granta
If the fuel filter is clogged, the first thing you will notice is a floating idle speed. The engine will not run smoothly, but intermittently due to lack of fuel. Secondly, starting the engine will be difficult. Most often, you will need to press the gas pedal additionally when starting the engine. Thirdly, you will feel a loss of power. The car will respond more slowly to pressing the gas pedal.
These are the main signs, when they appear, you should first change the fuel filter. So, from words to action.
Which fuel filter should I choose to replace on a Lada Granta?
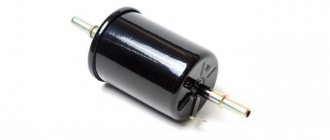
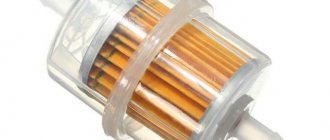
A fuel filter with a fitting (clip) is installed on a Lada Granta car. The fuel filter does not have a thread, i.e. secured using quick-release fasteners. The appearance of the filter is shown in the photo below:
Original filter number:
21230-1117010-82
Using this number you can easily find a list of analogues if you do not want to overpay for the original.
Gasoline filters for coarse and fine cleaning: replacement and repair
Manufacturers of gasoline filters establish replacement regulations that must be followed. The filters retain their efficiency in cleaning diesel fuel for 20–30 thousand kilometers. The regulated periods may vary under the influence of various factors - from the conditions in which the vehicle is operated, to the quality of the fuel used and driving style. You can judge the need to replace the filter device by symptoms indicating problems with the fuel system or engine.
Signs of TF malfunction
The car engine and fuel filters operate independently of each other, without affecting the operation of each until malfunctions occur. As gasoline filters operate, their internal cartridges become clogged with impurities retained from diesel fuel, which impairs their throughput and increases the resistance of the fuel line. Problems with the filters can be judged by the following signs:
- diesel fuel consumption increases sharply;
- at idle speed the engine begins to malfunction;
- starting the engine when cold is extremely difficult;
- an increase in the number of revolutions is accompanied by failures in engine operation;
- strange braking and jerking of the car while driving;
- loss of power and dynamics.
The gradual manifestation of the above-described problems in the operation of the machine may indicate a slow failure of gas filters. Despite the similarity of symptoms, other defects and breakdowns of the vehicle’s fuel system appear spontaneously and abruptly.
Failure of the filter leads to problems with the engine and fuel system of the car.
In addition to possible malfunctions in the operation of the car, it is also necessary to take into account its mileage. Manufacturers recommend servicing the fuel filter on Lada Granta cars in accordance with the following regulations:
- diagnostics and routine inspection of the element - every 5–8 thousand kilometers;
- Planned replacement of the part is every 25–35 thousand kilometers.
In practice, operating efficiency often decreases after 15–20 thousand kilometers, which is caused by difficult climatic conditions in the country, poor roads and low quality of sold fuel.
After the period specified by the manufacturer, you should not use the filter elements - even if the filter is working properly, it may unexpectedly fail, which will lead to damage to the fuel system and car engine.
TF replacement process
The process of replacing the Lada Granta filter element is not complicated and does not require a mandatory visit to a service station or service center. The whole procedure takes no more than 15 minutes and is divided into two main stages:
- Preparatory.
- Removing the old filter and installing a new one.
It is advisable to analyze both stages in detail to facilitate understanding of the replacement process.
Preparatory stage
The initial stage of changing the fuel filter is considered to be basic preparation, consisting of the following steps:
- purchasing a new part for Granta. The maximum price for a part is 300 rubles. It is advisable to purchase original filters using their catalog number 2190–1117010;
It is advisable to purchase original filters for the Lada Granta according to their catalog number
A screwdriver will be needed to loosen the latches that secure the fuel filter.
To facilitate the process of replacing the filter, it is advisable to jack up the car or drive it into an inspection hole.
Removal of the old filter and installation of a new one begins after completion of all preliminary preparatory work.
Replacing the filter element
The Lada Granta fuel filter is replaced as follows:
- The hood of the car opens and the battery is disconnected.
Before replacing the fuel filter, you must disconnect the car battery.
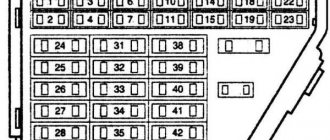
15 A fuse F21 is removed from the fuse box
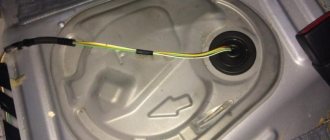
The fuel filter, located near the gas tank, is carefully disconnected from the line
The latches on which the filter is attached are bent with a screwdriver, after which the filter is carefully pulled out of the mounts
The new fuel filter is installed in the direction of fuel flow indicated on its body
After replacement, you need to check the correct operation of the new filter. If fuel leaks or other malfunctions occur, they are eliminated immediately.
Changing the fuel filter on the Grant, equipped with eight-valve power units, is carried out according to a similar scheme.
Video: installing a new filter for the Lada Granta fuel system
Filter element change frequency
According to the schedule established by the manufacturer, scheduled maintenance and replacement of the fuel filter on the Grant is performed every 25–30 thousand kilometers traveled. This regulation is very conditional and can change both up and down depending on the operating conditions of the vehicle.
Replacing the Lada Granta fuel filter - step-by-step instructions
The fuel filter on the Lada Grant is located next to the fuel tank at the rear of the car. Replacement work is best done in a pit or overpass.
1. Relieve the pressure in the system. There are two ways to go.
1.1 You can pull out the fuel pump fuse, which is located under the front console at the passenger's feet. Then start the car. After 1-2 minutes, the engine will stall because the fuel line will run out of fuel.
1.2. Or you can relieve pressure from the fuel rail by pressing on the valve with a sharp object.
2. Disconnect the fuel supply hoses from the filter. This is done very simply. Just press the lock and pull the hose to the side. Be prepared for the fact that gasoline will remain in the filter and it will inevitably spill. There is no need to be afraid of this, just be careful.
Why you shouldn't ignore replacement
The fuel filter will constantly become clogged. This means that its capacity is becoming less and less. This leads to a decrease in engine power and increased fuel consumption.
Many car owners get the situation to the point where the car simply stops starting. After all, gasoline cannot pass to the cylinders, as it is stuck in the filter.
Order of Operations
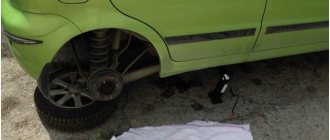
The fuel filter is located at the rear of the car, under the body. To replace, you will need to install the car on a viewing hole or jack it up.
- The gasoline in the fuel line is under pressure. Any work under operating atmospheres, including replacing the fuel filter, will be accompanied by fuel splashing. Before starting work, you need to reduce the pressure in the system. This can be done in 2 ways: raise the rear seat, disconnect the power, or remove the fuel pump fuse F21.
Part Description
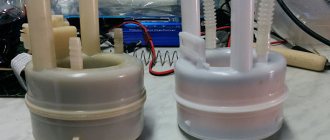
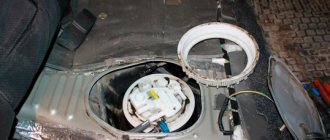
A fuel module is installed in the tank. Under the rear seat of the car you can find a hatch that will provide full access to it.
It is the fuel pump mesh that serves as the coarse filter. Its main task is to maintain stable operation of the element by cleaning the fuel from large particles of dust and dirt, sand and other foreign elements.
The fuel filters on the car are located on the right side of the gas tank, at the threshold level. To gain access to it, you will have to use a jack, a trestle, or an inspection hole. The first method is considered the most unsafe, especially when replacing the filter.
Let's summarize
Based on the above, it is clear that the work does not require qualifications or even serious skills in working with tools. Even a beginner can perform the operation. But, as you know, even the simplest works have their own nuances and tricks. For information on one of them when replacing a fuel filter, watch this video:
Old TF does not require special disposal conditions; it can be sent to a regular trash container.
In most cases, the warranty period of vehicle operation occurs without significant failures in the functioning of systems and components. Before the warranty period expires in the Lada Granta model, there is a need to change the fuel filter, which is shown in the photo. The reason for the need to replace this element is low-quality fuel. The fuel filter is used to prevent foreign impurities, various types of unwanted additives and other fuel contaminants from entering the power system.
The filter element protects the injection system and the cylinder-piston group in the engine. As dirt accumulates in the core of the Lada Grant, the throughput deteriorates until a critical moment occurs. Due to its design, the fuel filter cannot be restored and must be replaced with new elements. In this article we will tell you where it is and step by step how to change the filter.
Purpose and types of fuel filters
The Lada Granta car is based on the Lada Kalina. From its predecessor, it inherited a fuel supply system with two filters. Before entering the main fuel filter, gasoline passes through the fuel pump strainer. This two-stage cleaning scheme in fuel systems of injection engines is classic.
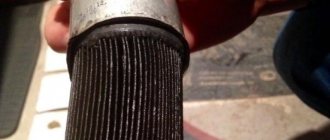
The fuel pump mesh acts as a coarse filter. It prevents large particles of dirt from entering the fuel supply system, which can completely or partially block the fuel line and affect the operation of the fuel pump.
The fuel pump mesh is a coarse filter
The mesh filters of the Lada Granta and Lada Kalina cars are completely identical. Externally, they can be identified by the oblique cut of the mesh. Despite the low cost (about 100 rubles), the mesh performs essential functions and prevents serious damage. Interruptions in the fuel supply due to a clogged mesh are the most harmless of the possible problems that low-quality fuel can create.
A distinctive feature of the Lada Granta mesh filter is its oblique cut
Fine dirt particles (less than 10 microns) do not cause much damage to injectors, pistons and cylinders. Larger particles are retained by a fine fuel filter.
Such filters first appeared on the VAZ 2110 with an injection engine and have remained virtually unchanged to this day. The only difference is that instead of fittings and tips with threaded connections, clamping clips are used. The Lada Granta is equipped with exactly these clips with smooth fittings with a diameter of 8 mm for fastenings with clamps. Threaded filters can also be used, but only after replacing the hose tips, which, in turn, does not make any sense.
The Lada Granta car is equipped with a fuel filter with smooth fittings with a diameter of 8 mm for fastenings with clamps
On sale there are fuel filters from various manufacturers costing from 150 to 500 rubles. The difference is significant. Is it worth overpaying?
Fuel filters have two main parameters - screening fineness and performance or throughput. An additional parameter that car owners sometimes pay attention to, but ignore Russian standards, is the surface area of the filter element.
According to experts from the magazine “Behind the Wheel,” there are no filters on the legal spare parts market that are unsuitable for use. All filters retain particles larger than 10 microns, while providing 2 liters of fuel per second. Therefore, there is no need to overpay.
On May 11, 2011, Vladimir Putin took part in testing the car in Tolyatti. The specially prepared car started only on the fifth attempt. Putin responded that he simply was not aware of the “electronic gas pedal” and called the Granta the future “people’s car.” He especially liked that two bags of potatoes could easily fit in the trunk.
The arguments in favor of expensive filters are as follows:
- higher degree of fuel purification. The screening fineness of a standard filter is 10 microns. However, you can find filters on the market that retain particles as small as 5 microns;
- large filter surface area. The larger the area, the more dirt will remain on the filter, and the longer it will last.
The practical value of these arguments is questionable. Is it worth catching particles that are too small if engine designers don't think it's necessary? Is it necessary to delay replacing the fuel filter when it can become completely clogged after just one unsuccessful refueling?
However, in cases where a high degree of purification or long mileage without replacing filters is not a whim, but a necessity, you should pay attention to the technical parameters of the filters, the values of which can be found in manufacturers’ catalogs.
Photo gallery: fuel filters for the Lada Granta from various manufacturers
Video: fuel filter device
How not to make a mistake with your choice?
Replacing a fuel filter is one thing, but first you need to choose the right element. It should be taken into account that different models require the use of filters that differ slightly in their design aspects. Before purchasing and installing a new element, you should carefully determine its applicability specifically to a specific car, including the LADA Granta. The packaging of the part contains information about the compatibility of the filter with the list of car modifications. If the Lada Granta is present in it, then we confidently buy it. When this fact is absent, it is not recommended to resort to unjustified risks, but to find and purchase a “native” filter, especially since its price is very low.
It would also be useful to purchase and replace a Lada Granta air filter in parallel with the fuel filter. This will ensure that a high-quality mixture is supplied to the engine.
The used LADA Granta filter element cannot be thrown away normally, but requires special disposal. Since during operation it has accumulated a significant amount of chemicals hazardous to health, it should be taken to a collection point for such products.
And so, you learned how to change, and actually where the filter is located in the car. Replacing the fuel filter is not difficult, and the car owner can do it himself.
Which filter to choose for Lada Granta
To conveniently search for spare parts, use the article number: LADA 2190-1117010.
Fuel filter parameters for Granta:
- length – 163 mm;
- hole diameter – 8 mm;
- case diameter – 55 mm;
- fastening – quick-release plastic clamps;
When the question arises about selecting consumables for a car, the car owner is most interested in the financial side of the issue and the quality of the fuel filter.
There are a lot of manufacturers and it’s quite easy to run into a bad filter, and at an inflated price. It's time to show good filter elements for the Lada Granta fuel system:
- Mahle – price 530 rubles;
- MANN – price 420 rubles;
- Filtron – price 280 rubles;
There is not much difference between them. The differences in cost can only be explained by how each of the presented analogue brands values itself. Each manufacturer is good in its own way, but the car owner will not notice the difference.
The most important requirement for any filter element is only one - that it is not a fake. The same company produces consumables for different engines, so you can read reviews not necessarily about Grant.
It is worth noting that the Lada Granta uses more than one filter element. The fuel pump is equipped with a fuel coarse filter.
This mesh is not a consumable material. If it is clogged, just wash it and put it back. The same is used in many modern Ladas, including Kalina and Vesta.
Replacing and removing the fuel pump for Lada Kalina filter, mesh, photo
KIA Shuma FreeLancer Logbook Fuel pump filter
The question of how to remove the fuel pump on Lada Kalina cars can often be found on the World Wide Web. But the thing is that the quality of our gasoline and the ability for stable operation of this part cannot “get along” in a peaceful environment. Therefore, the need for a complete replacement or repair of this device for owners of Lada Kalina occurs with enviable frequency.
In the video, replacing the fuel pump on a Lada Kalina:
Is it possible to replace the fuel pump yourself?
In this regard, a reasonable question arises: contact a specialized car service center or do everything yourself? Let's face it, no supernatural abilities are required for this! You just need to read our detailed instructions and damage to anything during operation will be kept to a minimum.
Replacing the fuel pump
To access the Lada Kalina fuel pump, you need to fold back the rear seat, remove the insulation (if any), and then begin dismantling the device.
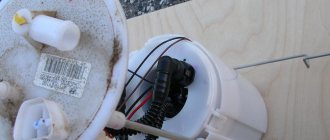
Step-by-step work order
Disconnect the negative terminal from the battery. We open access to the protective cover. Raise the rear vision airbag up. Then unscrew the four bolts from the black metal cover located under the rear seat. To avoid losing, we put the bolts in one place. When the bolts are unscrewed, remove the cover to the side. Under the decorative cover you can see the fuel pump and DUST! When the cover is removed, you will see a picture where the upper part of the fuel pump is visible, as well as the fittings that are connected to it. Now you can begin the dismantling itself, and first of all, disconnect the power wires. To do this, remove the plastic clamp on the block and pull it to the side. The next step is to disconnect the fittings; in order to remove them, you need to press on the metal clamp with one hand, and use the other hand to pull the fittings to the side using pliers
The block is marked with a red arrow, and the fittings with a green arrow. When dismantling the second tip, note that its retainer is made of green plastic, and in order for the fitting to leave the place of fixation, you need to press on it, and then pull the tip itself to the side with your other hand. Before you begin removing the fuel pump, you should thoroughly clean everything of dust and dirt to prevent any particles of debris from getting into the fuel.
When everything is clean, you can begin to dismantle the retaining ring that secures the fuel pump to the housing. To perform these manipulations, you can use a special puller, or using a flat screwdriver and a hammer, knock it counterclockwise from the mounting points. Use a hammer and screwdriver carefully so as not to damage the ring or fuel pump housing. Strikes should only be made on the ring. Then, when the ring clip has popped out of its seat, you can take it out. Now is the time to start removing the fuel pump itself; to do this, you need to grab it by the top part and pull it up. In this case, you should be extremely careful so as not to bend the structure. Please note that the fuel pump is equipped with a special float indicating the amount of fuel in the gas tank, and in order not to knock it down, the fuel pump should be removed so as not to touch the body of the fuel tank. Here is a photo example of when the fuel pump has been successfully dismantled. Successfully dismantled fuel pump. All installation work should be carried out in strict reverse order, similar to the removal procedure.
Replacing the fuel pump mesh
Fuel pump mesh close up
When the fuel pump is removed, you can inspect the filter mesh. This is the so-called coarse filter. To do this, you need to disassemble the fuel pump and replace the filter element.
On the left is the new one, on the right is the old fuel pump mesh.
All of the instructions described above are designed so that even the most unprepared car enthusiast can independently remove the fuel pump on his Lada Kalina; the most important thing is not to rush, do everything consistently and carefully!
Replacing the fuel pump mesh – Lada Kalina Blog
So, it all started with the fact that my Kalina began to have trouble starting.
Sometimes everything is fine, but several times a week, there are times when you have to drive the starter for 5 seconds, and there is no reaction from the engine . As a result, the car still starts the second time. Also, I noticed one more feature: sometimes when you press the pedal sharply, you feel a sharp dip, as if the car does not have enough fuel, and only then it starts to drive normally.
In general, the only thing that could be faulted was the fuel pump grid. And it was decided to replace it. To get to it, the first thing you need to do is remove the pump from the fuel tank. After this, you can begin the procedure with the mesh.
To directly get to the strainer itself, you need to remove the lower part of the fuel module. To do this, move the 3 side latches to the sides, which are visible in the photo below. 2 of them are marked with an arrow.
And at the same time we are trying to lift the pump itself up so that the lower part is separate. We also immediately disconnect the power plug from above by bending the latch to the side.
Also, we disengage the tube by prying it with a screwdriver:
Now the lower part can be released, and this can be clearly shown in the photo below.
Pay attention to the condition of the mesh. It is worth noting that she has had this condition for 5 years and 70,000 km.
The fuel pump screen can be removed quite simply; to do this, just pry it off with a flat-head screwdriver and remove it.
Be sure to wash the entire pump inside, or rather its body, as well as the pump itself at the place where the strainer is connected to it. To do this, it is best to use liquid to clean the carburetor and the car's power system.
After this, we take a new part and install it in the reverse order. But first you need to remove the rubber plug from the new mesh, which is shown by the arrow in the photo below.
Typical signs of filter contamination
- unstable operation of the power unit at idle;
- reduction in power, including without load;
- the engine “requires” a shift to lower gears before an ascent or hill;
- starting the engine is complicated, both “hot” and “cold”;
- Gases and exhaust periodically shoot out from the exhaust pipe, which indicates that the combustible mixture is unbalanced, depleted, or enriched.
- A burning smell can be heard near the car, which indicates incomplete combustion of the mixture inside the chamber and the formation of an excessive amount of soot.
Features of draining gasoline from the Lada Granta tank
The fact is that you won’t be able to drain the fuel using the “old-fashioned” method through the neck.
The reason for this is the low location of the fuel tank, as well as the specific design of the neck. The same applies to other modern VAZ models, as well as foreign cars produced since the 90s.
Method 1: Using the fuel line under the hood
In this situation, the simplest method is to use a fuel channel.
- To begin with, you will need to unscrew the nipple, which is located at the end of the injector ramp.
The nipple has been unscrewed, marked with an arrow
Put the hose on, the other end into the container
Factory fuel filter
You can also use the area after the fuel filter to drain. To do this, you need to dismantle the fuel filter from the injector side, and put a hose on its outlet, which is lowered into the drain container.
Method 2. Removing the gasoline pump
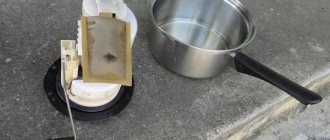
There is another option that may be easier for many people. We are talking about completely removing the gasoline pump. This is done by raising the rear row seat, after which you need to unscrew the pump mounts. Next, you get direct access to the fuel, so you can pump it out using the traditional method.
This is a fairly simple procedure that does not require prior preparation. In the case of the Lada Granta, the entire fuel module will have to be dismantled.
- To do this, the rear seat cushion is folded down.
- After which the parts of the mat, previously cut by the manufacturer, are raised. Under them you will find four screws that secure the cover. They will have to be unscrewed. A Phillips screwdriver is used for this purpose.
Removing the protective cover of the fuel pump
Removing the chip in the photo is indicated by an arrow
Carefully remove the hose with pliers
We use a hammer and a flat-head screwdriver
Carefully, without haste
Assembly is carried out in reverse order. If necessary, the sealing ring can be replaced with a new one, otherwise the smell of gasoline will be felt in the cabin. The arrow drawn on the fuel module cover should point to the rear of the car. Also follow the readings on the fitting arrows, which will tell you the direction of fuel movement.
Operating principle and specific purpose of the filter
Any car, regardless of its design, has a fuel filter. (pictured is a fuel filter on a VAZ-2115 )
Naturally, it differs in terms of fuel type and its supply to the car. But still, there is a filter. In the case of the Lada Granta car, this is a traditional filter element used everywhere in injection-type cars.
The main task of such a filter is to catch and sift out particles of dust, rust and other inclusions so that they do not penetrate into the fuel line. If such a filter did not exist, the motor would very quickly fail, since a lot of solid particles that could damage the cylinder walls would get into it.
The filtration system has an established principle of operation, which involves two degrees of purification. The first stage involves catching the largest contaminants, followed by the second stage of fine cleaning, which is usually called a fuel filter in the traditional sense of the word.
Fuel filter cross-section
Fuel filter from Granta in a section (removed from the car, not new)
But it must be located in front of the engine and after the fuel tank.
For Lada Granta, there is a restriction on the penetration of particles larger than 10 microns. If you do not adhere to this recommendation, the injector nozzles will clog very quickly, after which the engine will become unstable, and it will begin to move unevenly with breaks. And, in the most difficult cases, the working cylinders will be damaged.
Given the increased pressure in the fuel line, the filter must be made of metal or high-strength plastic.
Which fuel filter should I choose?
As you know, all variations of the Lada Grant are equipped with an engine with the same displacement of 1.6 liters. The differences are only in the power that this power unit can produce.
This injection engine, unlike its “carburetor counterparts,” requires a much greater degree of cleaning. So, many experts recommend not stopping at the basic recommendations for a purification degree of 10 microns, but turning to a more significant level of filtration that would guarantee the retention of solid particles with a size of 5 microns. The operating pressure, in the case of the Lada Granta, will vary between 3 and 5 bar.
Motorika fuel filter Old and new fuel filter Nevsky filter fuel filter
As for the manufacturer, here you need to focus on your own choice and preferences. However, many Grant Guides recommend taking a closer look at products from the MANN and WIX brands.
When to change the fuel filter?
And, of course, you need to say a few words about when exactly it is appropriate to replace the fuel filter.
On average, a fuel filter loses its characteristics closer to 25 thousand kilometers. But this applies to optimal conditions when the highest quality gasoline is used. In reality, the need for replacement may occur earlier.
Signs of a dirty fuel filter
To find out exactly when you need to replace the fuel filter on your Lada Granta, you need to monitor the main signs of its contamination.
- This usually concerns the engine starting, which will be uneven and delayed.
- Next comes insufficient traction.
- And, with sharp acceleration, the power unit can even stall.
- As for idling, if the filter is dirty, it will be uneven.
Of course, some of these “symptoms” are also typical for problems with the air filter or injectors. But, in any case, this is already a sign that it is necessary to begin a thorough check of the fuel filter, and, if necessary, replace it with a new one.
The cleanliness and timeliness of oxygen entering the fuel equipment is extremely important to ensure the performance of the vehicle and the power unit as a whole. The completeness of combustion of the fuel mixture determines throttle response, acceleration dynamics, and power indicators. Lack of air leads to depletion of the combustible mixture, engine detonation, and reduced power.
In order to maintain the functionality of the technical product, the manufacturer recommends replacing the fuel filter of the Lada Granta liftback every 30,000 km. mileage In this case, maintenance is carried out every 15,000 km. In practice, this interval is not maintained. Car enthusiasts who care about their vehicles update cleaning elements every 10,000 km.
Lada Granta fuel vapor recovery system:
1 - adsorber; 2 — fuel tank; 3 — bracket; 4 — steam pipe from the adsorber to the purge valve; 5 - steam line; 6 – pipeline hose from the purge valve to the throttle assembly; 7 — adsorber purge valve; 8 — throttle assembly; 9 — fuel vapor separator; 10 — valve gasket; 11 — gravity valve; 12 — hose for supplying fuel vapor to the separator; 13 — fuel tank filling pipe; 14 - steam line from the separator to the adsorber The fuel injection system and ignition system are controlled by an electronic engine control unit (ECU or controller), which continuously monitors, using appropriate sensors, the engine load, vehicle speed, the thermal state of the engine, and the optimal combustion process in the engine cylinders. A special feature of the injection system of the Lada Granta car is the synchronized operation of the injectors in accordance with the valve timing (the engine control unit receives information from the phase sensor). The ECU turns on the injectors sequentially, and not in pairs, as in asynchronous injection systems. Each injector will turn on after 720° rotation (2 turns) of the crankshaft. However, during start-up and dynamic engine operating modes, an asynchronous fuel supply method is used, without synchronization with the rotation of the crankshaft.
Filter replacement rules
Before you begin dismantling used parts, you should equalize the pressure in the system to atmospheric level. In good condition, it exceeds atmospheric standards. If you do not reduce the pressure, gasoline will definitely spill out.
To do this, you need to disconnect the plug under the seat or pull out the fuse that powers the fuel pump. After this, all that remains is to start the power unit and wait until the remaining gasoline is used up. There is another way. If the vehicle is not driven for more than three hours, the pressure will gradually release naturally when the ignition is turned off. Next, we should consider in more detail the methods of turning off the power to relieve pressure.
For the first method, you will need two screwdrivers, one with a flat end and one with a curved end. The algorithm of actions is as follows:
- remove the cover of the safety module (it is located on the left side next to the steering mechanism);
- remove fuse F21 (15A) through which power is supplied to the pump (it is in the middle part of the right edge).
This method is the easiest. But if the mesh in the gas tank also changes, then it is logical to assume that you can use another method. In the second case, the pump module block is usually removed, which means the power plug is removed from the block. To do this, you need to raise the rear sofa and remove the trim elements. After removing the protective cover, all that remains is to disconnect the block responsible for power supply.
After all these manipulations, you need to turn on the ignition and start the propulsion system. And when it runs out of the remaining gasoline, you should crank the crankshaft by turning on the starter several times. This completes the preparation.
Do-it-yourself Granta filter replacement
To change the element near the gas tank, you do not need any tools; you just need to prepare a suitable container to drain the remaining gasoline. The procedure is as follows.
- Disconnect the negative terminal of the battery.
- Locate the fuel filter under the bottom (located to the right of the fuel tank).
- Squeeze the fixing clamps and disconnect the fuel line pipes, collect the remaining gasoline in a previously prepared container.
- Release the filter from its retaining bracket.
- The new filter is installed in place of the old one in the same bracket.
Next, all that remains is to connect the fuel pipes and snap the tip clamps. After the completed operations, the power connector is connected or the fuse is inserted into place (depending on which method was chosen), the negative terminal of the battery is connected and the engine is started. At this time, you need to inspect the filter: there should be no fuel leaks. If they are not there, you have done the job.
Replacing the coarse strainer
You will need screwdrivers, a hammer and a suitable rod for knocking out. The process looks like this.
- Remove the rear sofa and remove the trim, then disconnect the cover of the fuel pump unit
- Press the latch and pull out the power plug.
- Tighten the clamps and disconnect the fuel pipes. If necessary, you can use screwdrivers if it is not possible to press the lock with your fingers.
- Using a screwdriver, move the fuel pump retaining ring counterclockwise. If difficulties arise, you can use a hammer and drift for these purposes.
- Remove the retaining ring and dismantle the fuel pump assembly.
- Drain the remaining gasoline and disconnect the drain pipe.
- After releasing the 4 latches, remove the intake chamber along with the cover.
- Pick up and remove the mesh, and then install a new mesh filtration element
Next, the fuel module is assembled in the reverse order of disassembly. After assembly, you need to start the engine, carefully inspect the cover and fuel line connectors for leaks. If they are absent, you can turn off the engine and close the fuel module with the lid. If after replacement the faults and engine malfunctions disappear, everything is in order.