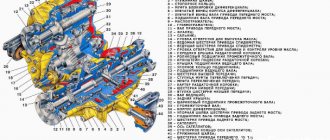
Niva Chevrolet transfer case design: 1 – driven gear; 2 – differential bearings; 3 – spring washer; 4 – retaining ring; 5 – differential lock clutch; 6 – gear ring of the differential housing; 7 – gear ring of the front axle drive shaft; 8 – front axle drive shaft bearing; 9 – oil deflector; 10 – dirt deflector; 11 – front axle drive shaft; 12 – flange; 13 – oil seal; 14 – oil drain plug; 15 – driven gear of the speedometer drive; 16 – speedometer drive drive gear; 17 – hole plug for filling and checking the oil level; 18 – front cover of the transfer case; 19 – roller bearing of the intermediate shaft; 20 – transfer case suspension bracket; 21 – drive shaft bearing cover; 22 – thrust ring of the bearing; 23 – drive shaft bearings; 24 – overdrive gear; 25 – gearshift clutch hub; 26 – gear shift clutch; 27 – transfer case housing; 28 – reduction gear; 29 – low gear bushing; 30 – drive shaft; 31 – back cover; 32 – ball bearing of the intermediate shaft; 33 – intermediate shaft; 34 – differential housing; 35 – thrust washer of the rear axle drive gear; 36 – rear axle drive shaft bearing; 37 – rear axle drive gear; 38 – satellite; 39 – satellite axis; 40 – retaining ring of the satellite axis; 41 – transfer case suspension axis; 42 – spring washer; 43 – front axle drive gear.
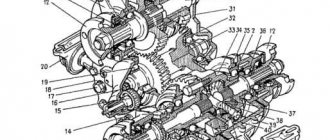
Niva Chevrolet transfer case drive:
1 – differential lock clutch fork; 2 – differential lock clutch; 3 – fork locking bolt; 4 – rod protective cover; 5 – lever spring; 6 – differential lock fork rod; 7 – front axle drive housing cover; 8 – lock washer; 9 – bushing of the lever axis; 10 – lever axis; 11 – differential lock lever; 12 – gear shift fork rod; 13 – control lever fork; 14 – control lever; 15 – differential lock lever rod; 16 – gear shift clutch; 17 – gear clutch fork; 18 – spacer sleeve; 19 – locking ball; 20 – retainer spring bushing; 21 – clamp spring; 22 – switch for the differential lock warning lamp; 23 – axis of the control lever fork; 24 – fork mounting bolt.
The Chevy Niva transfer case is designed to vary the torque in magnitude and distribute it between the front and rear drive axles. The car is equipped with a two-speed transfer case with a center differential lock. The transfer case is controlled (selecting a higher or lower gear, turning on/off the differential lock) with one lever through a mechanical lever drive.
https://www.youtube.com/watch?v=Vw3kZ3igAZ0
Changing the oil in Niva Chevrolet transfer case
According to the service book, the oil in the transfer case must be replaced every 45,000 km. To change or add oil to the transfer case, you will need a 12mm hexagon, a syringe for filling transmission units, and a container for used oil.
Unscrew the drain plug and drain the oil, then tighten the drain plug and turn out the filler
Using a syringe, fill in fresh oil to the level of the lower edge of the filler hole and tighten the filler plug. This completes the oil change in the Chevrolet Niva transfer case.
Device
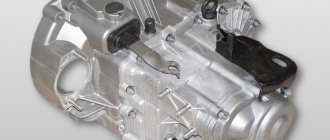
The VAZ 2123 transfer case is installed at the rear of the gearbox and is attached with brackets to the bottom of the car. It is driven by an intermediate shaft. Torque from the drive shaft to the drive axles is transmitted by cardans, which are screwed to the flanges of the transfer case drive shafts.
The transfer case body is made of aluminum alloy. In its upper part there is a hatch with a lid.
The transfer case consists of the following parts:
- RK Corps.
- Drive shaft.
- Control levers.
- Bearings.
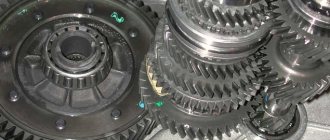
- Gears.
- Drive shafts (front and rear).
- Flanges.
- Differential mechanism housing.
- Axles.
- Satellites.
- Clutches for gear shifts and differential locks.
- Oil seals.
- Retaining and thrust rings.
- Housing covers.
- Breather.
The Chevy Niva transfer case has three speeds:
- The first one, with a gear ratio of 1.2.
- Neutral.
- Low (second), with a gear ratio of 2.135.
Neutral allows you to temporarily disengage the gearbox from the transmission. It is used when connecting a winch and other units to a vehicle.
The first speed is intended for on-road driving, and the second is for off-road use where high torque at low speed is required.
Important: there are no synchronizers in the transfer case. Therefore, it is necessary to switch the locking and speed of the RC only after stopping the machine. If you cannot switch the transfer case, you need to try turning the steering wheel or moving slowly. In this case, the gears will change their relative position, which will make it possible to switch the mode.
Replacing transfer case shaft seals for Niva Chevrolet
To install new shaft seals for the Chevy Niva, you will need a 24mm wrench, a 12mm hexagon, a syringe for filling transmission units, and a container for used oil.
Drain the oil from the transfer case and disconnect the corresponding driveshaft from the transfer case
Unscrew the self-locking flange nut, having previously locked the transfer case differential and engaged the gear
Remove the nut and washer and the flange from the shaft
Remove the oil seal using a screwdriver. Apply sealant to the seating surface of the seat in the crankcase under the oil seal, lubricate the working edge of the oil seal with oil and press the oil seal in with a suitable mandrel. Replacement of the Niva Chevrolet transfer case drive oil seal has been completed.
How the distribution box works
- This device is mounted on several brackets to the floor of the car body. The parts in the box consist of aluminum alloy, which are connected to each other by nuts and studs.
- The upper part of the crankcase is equipped with a special hatch, which is closed with a steel cover. There are cardboard gaskets in the space between the crankcase and the cover.
- All the shafts in it are sealed with cuffs, which are made of rubber-metal material. Rubber rings also seal the following elements: Differential lock, gear shift fork rod, speed sensor, and drive shaft
- The drive shaft is mounted on a pair of ball bearings, and outer rings are located in the crankcase and in the slots of the front cover.
Replacing the suspension cushions of the Niva Chevrolet transfer case
To replace the transfer case cushions on a Chevy Niva, you will need a key 13 and 17. Before starting work, install a support under the transfer case.
Unscrew the nuts securing the cross member of the transfer case rear support to the body
Unscrew the nut and remove the bolt
Remove the cross member (popularly called a helicopter) assembled with the support pad
To replace the cushion, unscrew the two nuts that secure it and, if necessary, also replace the rubber bushings of the cross member
To replace the transfer case side mounting cushion, unscrew the nut of the box mounting axis and the two nuts securing the cushion to the body
Remove the pillow. The second pillow is removed in the same way. Installation of Niva Chevrolet transfer case cushions is carried out in the reverse order of removal.
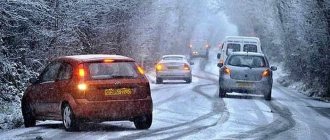
Vibration
Vibration in the body is the main “disease” of the Niva; it often occurs due to improper alignment of the transfer case. Most often, vibration occurs on VAZ 21213/21214 cars, since the transfer case is mounted only on two supports on the sides of the body; on the Chevrolet Niva, the transfer case is already installed on three supports.
- driveshafts are poorly secured;
- wheels are not balanced;
- there is play in the cardan crosspieces (vibration is especially affected by play in the rear driveshaft crosspieces);
- The vibration comes from the engine itself.
Also interesting: Niva Chevrolet transfer case: device, connection diagram and how to use?
Vibration when starting off on a Niva can also occur for the following reasons:
- the mounting supports of the transfer case have become loose;
- The rubber on the RK supports themselves broke.
Installing the third support of the transfer case on VAZ 21213/21214 vehicles allows you to reduce the level of vibration of the transfer case; with this support it is easier to center the transfer case. The part can be purchased at auto stores or made yourself. The finished product comes with three long studs (for model 2121); to install the third support on this machine, you will need to unscrew the short studs from the transfer case housing and install new studs from the kit. We carry out repairs as follows:
- dismantle the front passenger seat in the cabin;
- remove the floor tunnel lining;
- in the cabin we move aside the carpet covering the body amplifier (in front of the handbrake lever);
- remove the transfer case (alternatively, you can simply hang it up, but removing the third support makes it easier to install);
- We attach the bracket of the new support to the body of the RC;
- we install the transfer case in place, center it in the optimal position, and fasten the side supports;
- we combine the third support with the body, drill two holes in the bottom;
- Using washers, bolts and nuts (from the kit) we attach the support to the bottom of the body.
Vibration is eliminated more effectively by installing a subframe under the transfer case. You can also make such a device yourself or buy a finished product at a car store.
In order to install the subframe, the transfer case must be removed. It is more convenient to carry out such work in a pit; we carry out repairs as follows:
- leave the car in neutral gear;
- disconnect the propeller shaft from the transfer case, it is advisable to mark the driveshaft flange and the drive shaft so that during installation, align the driveshaft according to the marks - this way, the occurrence of unnecessary vibrations is eliminated;
- dismantle the muffler mounting bracket;
- remove the gearbox traverse;
- jack up the transfer case, remove the side fastenings of the transfer case;
- We treat the places where the subframe fits to the body with Movil;
- place the subframe on the gearbox studs;
- we mark the attachment points of the subframe on the side members, drill holes, attach bolts to the body;
- we tighten all fastenings, except for the transfer case supports themselves;
- we perform alignment of the steering wheel;
- Finally tighten the transfer case supports.
It should be noted that installing an additional support or subframe on the steering wheel does not always lead to the desired effect; in some cases, vibration only increases.
Read news about the new Niva
- The modernized Lada Niva Legend (4x4) 2021 was shown on the Internet
- Lada 4×4 Bronto - sales stopped, new details » Lada.Online - all the most interesting and useful about LADA cars
- Description of the instrument panel Lada 4×4 (VAZ 2121, 2131) » Lada.Online - all the most interesting and useful about LADA cars
- Chevrolet Niva gasoline consumption per 100 km
- Buy LADA (VAZ) 2131 (4×4) 2022 in Rostov-on-Don, low price for Lada 2131 (4×4) 2022 on the Avto.ru website
- Fuses Niva 21214 injector «
- The new large Lada 4×4 Niva “Bigster” 2021-2022 based on the Dacia Bigster was shown for the first time. The SUV has changed beyond recognition
- New Niva Chevrolet Lux 2022 - review of GLC equipment
Removal and installation of transfer case Niva Chevrolet
To remove the transfer case from a Chevy Niva you will need a key for 13 and 17, disconnect all driveshafts from the transfer case
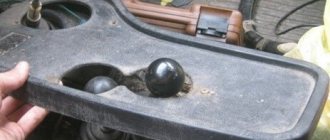
Inside the car, disconnect the transfer case lever cover from the floor tunnel casing and remove the cover together with the lever handle
Remove the rubber cover of the Niva Chevrolet drive shift lever
Unscrew the nuts securing the left side cushion of the box suspension to the body and loosen the nuts securing the remaining cushions
Disconnect the wires from the differential lock warning lamp switch
Place a support under the transfer case, unscrew the remaining nuts securing the cushions and remove the transfer case. Installing the transfer case on a Chevy Niva is performed in the reverse order of removal.
Instructions
1. Place the gearbox and transfer case in the neutral position, thereby ensuring free rotation of the intermediate shaft. 2. Unscrew the nuts securing the elastic supports of the transfer case on its axles (M10, wrench 17) and the bolt securing the elastic support of the box to its bracket (M10).
3. Unscrew and remove the catalyst thermal protection shield (if there is one) on Niva cars before 2008. Trim as shown in the photo.
4. Unscrew the transfer case supports from the body and remove them from the axles. 5. Unscrew the box support bracket from the body and remove it.
6. Unscrew the elastic support from the gearbox and remove it (later it will be used as a third support for the transfer case).
7. Unscrew the two nuts on the rear cover of the transfer case at the level of fastening the bracket of the third support and cut off the rib located between these nuts, ensuring a tight fit of the bracket to the cover.
On the fields, the year of manufacture is after 2008. Location of the catalyst (as in the photo)
8. Remove the catalyst clamp bracket and cut it off as shown in the photo.
9. Thus, a part of it remains at the place where the bracket is attached.
10. Attach the third support bracket to the transfer case with two nuts.
11. Attach the strips with elastic supports installed on them to the free studs in the body (do not pull the supports to the plates). Before installation, treat the bottom with mastic.
Types of reduction gears
As you know, the main purpose of the transmission is to transmit torque from the engine to the drive wheels. At the same time, the transmission not only transmits, but also converts torque. Most drivers know that a manual transmission has low and high gears. Conventionally, 1,2 and 3 can be considered reduced, 4 is considered to be direct transmission, while 5 and 6 are increased.
https://www.youtube.com/watch?v=https:accounts.google.comServiceLogin
Let us immediately note that in relation to SUVs, trucks and various types of equipment, such a conditional division is not enough. The fact is that the gearboxes on such cars have not only “low” and “high” gears, but also so-called downshifts. Next, we'll look at why downshifting is needed, what it is and how it works, and how to use downshifting.
Read in this article
So, let's look at the example of an SUV. In this case, a reduction gear can significantly increase the vehicle's cross-country ability. In simple words, the presence of a downshift allows such a car to drive where cars with a conventional gearbox are not able to overcome the obstacle and continue driving.
To make it clearer, you need to pay attention to the following. Typically, a power unit produces maximum power at a certain number of revolutions. Also, at certain speeds, different from the speed of maximum power, the maximum torque is achieved, which is transmitted through the transmission to the drive wheels.
So, usually gearboxes are designed so that the engine delivers maximum torque and power fairly evenly at different speeds. The first gear allows you to move away, and in this gear the “emphasis” is on maximum torque, while in the 5th gear the car can move at high speed at maximum power speed.
The result is that when you press the gas pedal, the car “buries” its wheels in snow or mud, slips and cannot continue moving. If you switch to second speed or higher, the engine will simply stall, since it does not have enough revolutions and power to overcome the difficult section.
It turns out that in a situation where you need high engine power (high speeds), but also need a smooth ride at low speeds and low wheel speeds, a conventional gearbox is powerless. It is with these features in mind that SUVs receive a transfer case with a low gear.
So, active low gear has a high gear ratio. This allows you to reduce the wheel speed and at the same time spin the engine to maximum power speed. As a result, the car is able to move at low speeds at maximum power speeds. This feature is indispensable on off-road terrain, when driving uphill, on steep descents, etc.
Worm, less often cylindrical and planetary gears are used as reduction gears. The worm gear is one of the gearing gears with intersecting shaft axes. Movement in them is carried out according to the principle of a screw pair. Its main properties are low noise level due to the characteristics of the gearing, relatively low efficiency, small dimensions and large gear ratio.
Compared to a helical gearbox, a worm gear provides better running smoothness. This type of transmission has a much greater potential for increasing torque and reducing rotation speed than gearboxes with other types of gears. Spur gears are used in mechanisms with parallel shafts. This type requires increased accuracy due to design features.
Gear drives are distinguished by their reliability and durability while maintaining the permissible load level; the disadvantages include the fact that at high rotation speeds such a mechanism has a high noise level and also cannot flexibly respond to changing loads. Planetary gears are also a type of gear.
They have gears with movable axles. Such gears are lightweight, easy to assemble, produce less noise compared to conventional gears, and also have the ability to obtain large gear ratios. Disadvantages include a large number of parts, increased requirements for installation and manufacturing accuracy.
https://www.youtube.com/watch?v=ytdeven-GB
It is necessary to stop the car, after which the main gearbox lever is moved to the neutral position, and the additional gearbox lever is moved to the “low gear” position. Then we depress the clutch. Not all transmissions have a separate transfer case. In this case, a regular gearbox has a special lever with which this gear is engaged.
Overcoming a deep puddle
How ESP Works in a CarOften, a dispute arises between motorists about how best to cross a ford with a transfer case. Some people prefer to “fly” into a puddle from acceleration, others prefer to downshift. If you get into a mud pit, there is a high risk of water hammer - water enters the cylinders through the filter, and the engine “chokes.”
To exclude this, many install a special snorkel. But you can do without it. A deep puddle should be overcome in second low gear. This is done so that in case of trouble (when the car starts to fail) you can switch to first gear in time and not stall. If you enter the water from acceleration (which is a better decision), remember that the wheels may get stuck in the middle of the journey. The engine power is not enough to turn the wheels - the car stalls, and the engine experiences a hydraulic shock.
Step-by-step instructions for removing the manual transmission and gearbox on a Niva Chevrolet
- And so, first of all, we disconnect the negative terminal from the battery.
- Next we will need to disassemble the center console. I will not explain in detail how this is done, if you cannot do this yourself, then it is better for you not to continue working, but to turn to specialized services.
- We remove it and bring it to this form:
- Unscrew the exhaust pipe from the manifold and disconnect the upper oxygen sensor.
- After we have done this, we lift the car on a lift to make it more convenient for us to work. If this is not possible, then you can work from the pit.
- Next, drain the transmission oil from the gearbox and transfer case, as well as from the rear and front gearboxes.
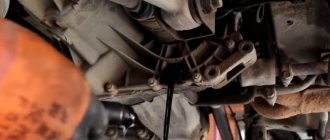
- Here we see our transfer case, it’s all covered in oil.
- Photo of the gearbox, also covered in oil.
- Next comes a very important point: the drain plugs are all magnetized and after we unscrew them, we carefully inspect them for the presence of foreign particles.
- In our case, there are metal particles on the transfer case plug and on the rear gearbox plug. This means that there is something that has fallen apart and we continue to disassemble the car.
- Next, you need to disassemble the following parts: rear cardan, front cardan, unscrew the rubber couplings on the intermediate cardan.
- Now we remove the sensors from the gearbox and transfer case.
- We disconnect the bracket going from the gearbox to the exhaust pipe and the upper front shield going above the exhaust pipe.
- We place the transmission jack under the transfer case and unscrew the supports on one side and the other.
- Unscrew this bolt on the engine mount.
- We lower the transfer case, and now we can easily remove the intermediate cardan.
- We disconnect two terminals from the transfer case. And we let her go calmly.
- Now we can remove the intermediate shaft from the transmission. Remove the sealing ring from it.
- Next, remove the clutch slave cylinder, starter and move it to the side.
- Now unscrew the two bolts from the side of the casing.
- Then there are two bolts on the left side, one is located behind the tab of the second on the right side.
- Next we need to unscrew the rear bracket holding the gearbox.
- Now lower the gearbox and remove it.
- It is recommended to immediately check the clutch disc together with the basket.
Common faults
Car owners most often note the following problems with the Republic of Kazakhstan:
- Difficulty shifting gears.
- Inability to engage differential lock.
- Increased vibration when starting or driving the car.
- Oil leak.
If any of these problems are identified, you must contact a service station or repair the transfer case yourself. In some cases, it is enough to adjust the steering wheel or treat the control drive joint with WD-40.
How to use?
By switching the operating modes of the transfer case, you can adjust the behavior of the car in accordance with road conditions.
Low gear is used in two cases:
- It is necessary to ensure low speed. For example, if you need to drive onto a curb or other obstacle, you can engage a lower gear so as not to burn the clutch.
- Need high torque. A lower gear is engaged before overcoming steep inclines.
The differential lock is activated when driving off-road, where there is a high risk of slipping.
At the same time, it must be turned on before entering a difficult area.
In general, you need to use the transfer case like this:
- Driving on the highway. The differential is unlocked, the first speed of the RK is turned on.
- Overcoming climbs and obstacles on hard surfaces. The differential is unlocked and the reduced speed is engaged.
- Overcoming difficult snowy areas, mud, slippery climbs. Locking and reduced speed enabled.