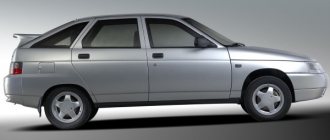
Checking and replacing the diode bridge of the VAZ 2110 generator with your own hands
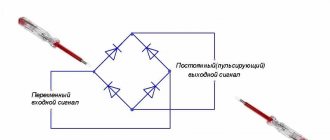
Once it starts working, the generator begins to produce direct current, but to operate all the devices in the car, as well as to charge the battery, an alternating current is needed (pulsating with a clearly defined frequency).
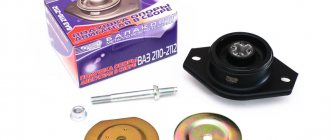
Diode bridge 2110-3701315 “StartVOLT” for VAZ 2110-2172 generators produced by KZATE
It is the conversion of current that the diode bridge of the VAZ 2110 generator, which is also called a rectifier, is engaged in. And although there are many design options, the cars are equipped with three-phase ones, the advantages of which are obvious:
- At the output they create the smallest ripple voltage;
- Three-phase rectifiers are suitable for bridge and half-bridge diodes;
- They make it possible to install an additional capacitor - a current filter.
Design
In the original (factory) configuration, the diode bridge of the generator on the VAZ 2110 is a monolithic structure. It is quite reliable, inexpensive, compact, and has, one might say, only one drawback: if one of the diodes burns out, its local replacement is impossible; you need to buy a new factory bridge and install it.
In the event that a check shows that the diode bridge is no longer functioning and needs to be replaced, it is quite possible to assemble it from various diodes. If the factory layout provides four or six diodes, then during self-assembly you can install an additional one.
Many car enthusiasts do this. In addition, as a rule, in the case of self-assembly, diodes are installed not in the factory layout, but a little stronger, so that they do not burn out so quickly.
But since it is impossible to qualitatively test such a rectifier, during “home assembly” you can damage the generator, after which it will be necessary to replace not just a cheap part, but the entire assembly.
We increase the voltage - all options for solving the problem
Voltage in the on-board network after modification
So, many motorists may decide that the way out of this situation is to install a high-power generator, but at the same time they will have to replace the battery with a more capacitive one. This is done in order not to “kill” the battery that is installed on the car, since a voltage overload will lead to the destruction of the internal cells. This option is not suitable because it is too expensive.
Causes of breakdowns
As numerous checks show, the main cause of breakdowns is factory. Here, first of all, you need to pay attention to the shell in which the diodes are located. If it is aluminum, it is better not to take such a unit. Much more reliable is steel.
In addition, if the seller does not provide a guarantee, you should be wary. According to reviews on the Internet, the most unreliable diode bridges are made in Belarus.
- Another reason is moisture ingress, which results in oxidation of the space between the diode itself and the housing;
- Contact of oil or other working fluids of the VAZ 2110 on the surface;
- If you reverse the polarity of the battery while lighting or charging, the diode bridge can easily “fly out”;
- You can also suspect that the VAZ 2110’s rectifier is failing if the battery stops charging.
What is offered by the car market
So, we have found out what is necessary for fog lights to work effectively.
It is from this position that we will consider the lighting devices offered on the market.
Today they can be roughly divided into:
- Built into the bumper;
- Mounted models.
Built-in PTF
The most optimal installation option is to use standard places in the front bumper.
There are several reasons for this:
- Proximity to the road surface, where the concentration of moisture in the fog is lower;
- Maximum fixation of the body, which reduces shaking and shaking during movement.
Such diodes in the VAZ 2110 headlights will not create the required luminous flux, because do not have a reflector
The main selection criterion is as follows:
- Identicality of the headlight housing to the standard location;
- The presence of an adjustment unit in the housing;
- Ease of maintenance (for example, when replacing a burnt out lamp).
Products like the one shown in the photo above will be useless as they only fit the standard size.
Mounted models
You should also avoid such models, since installing them yourself will require too much effort. But you still won’t be able to ensure their correct adjustment. And the price of such headlights is often too high. (See also the article VAZ 2111 wiring diagram: features.)
For such models it is necessary to order the production of headlight stickers
If the light does not produce a clear horizontal line, such a PTF will be useless
Examination
Using a multimeter it is very easy to check the serviceability. Need to:
- Place the positive probe of the multimeter at the positive diode bus;
- Do the same with the negative probe and the “-” diode output;
- This test, if the diode bridge is working properly, should give readings close to infinity. If this is not the case, there is a malfunction and needs replacement;
- Now we swap the probes (put plus to minus and vice versa);
- Let's look at the readings. If the unit is working properly, the readings should be several hundred ohms;
- To check the additional diode, perform the same steps as described above.
Does it make sense to put LEDs in lamps?
photo: vintagecarleds.com
LEDs, when properly placed and properly adjusted (in theory), can convert minimal power input into large amounts of light, which makes the technology attractive overall.
All things being equal, it appears that replacing energy-hungry discharge lamps with brighter, lower-power LEDs kills two birds with one stone. Plus, LED has an “instant on” effect and visual clarity of light (which in practice tires drivers on long trips more due to the sharp transition from bright light to dark than the soft gradient of conventional discharge lamps and even xenon), which forces experimenters put them on your cars. Also, and this is one of the main advantages, LEDs can give old cars a modern style.
Simply put, LED headlights are easy-to-install, easy-to-access “toys” with a flair of safety and technology that make cars look cooler.
Replacement
When dealing with any component related to electrical equipment, you need to start by de-energizing the VAZ 2110. So, we proceed according to the algorithm:
- Disconnecting the battery (remove the “-” terminal);
- Remove the pink wire that turns on the generator. To do this, you need to unscrew the nut from the positive bolt;
- Loosen the upper and lower nuts, and also unscrew the tension bolt, remove the belt;
- Turn the generator 90° and remove the lower mounting bolt;
- Clean all connections, as well as the rectifier housing itself;
- Clean the inside of the ring very thoroughly;
- Replace the generator diode bridge with a new one;
- Reassemble all parts;
- Check the functionality of the generator.
Source
Replacing the generator diode bridge on a VAZ 2110, VAZ 2111, VAZ 2112
Welcome! Diode bridge - it gives a charge and gives it an even charge (the generator gives a jumping charge, and this bridge straightens it) to the battery when the car starts and the generator starts working, which is why when the diode bridge fails, the battery is immediately discharged and upon arrival one day day in the car, the car cannot really start and you have to push it, or take it on a cable, one thing is good, when the diode bridge fails, the battery charge lamp on the instrument panel will immediately notify you about this, and if a person knows even a little about cars , then he will already understand what happened and in the near future he will drive the car to a service or to a garage and in the garage, checking the generator brushes, determine whether the diode bridge has become unusable or the brushes and, if necessary, replace the worn part with a new one.
Note! To replace the diode bridge with a new one, you will need to stock up on: All the keys that are present in your set and screwdrivers, but if you want to check the old diode bridge for functionality, then take a multi-meter (And we recommend that you check it)!
Summary:
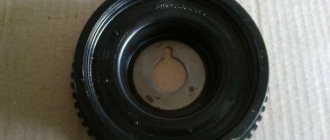
Where is the diode bridge located in the generator? Let's start with the fact that cars of the tenth family were equipped with different engines, different body kits (We are talking about the VAZ 2112 coupe) and, accordingly, such parts as a generator, depending on the engine, were also different, but in the injection system, with an 8-valve engine, one type of generators, with 16 valves, is completely different, carburetors also had their own generator, usually 55 amperes, because in carburetor cars there are many times less electronics and they only needed the generator that was installed on them, well, in this article we will only analyze one generator, marked 9402.3701 (It was used on fuel-injected 8-valve cars), the photo below shows just such a generator, it is very easy to disassemble, as you can see, the cover of such a generator is not secured with bolts but simply with latches (indicated by red arrows) By bending these latches, you can easily remove the cover and see behind it the diode bridge, which can be seen very clearly in the small photo.
Note! As for the generator marked 37.3701, which was used in carburetor eight and nine engines (later they began to install these engines on dozens, this generator migrated to them too, like the engine itself), it looks completely different and produces clearly less amperes (55 amperes, against 80 or some even go to 90, the latter, by the way, are absolutely identical in appearance to 80 amps and are even interchangeable, so if you are the owner of an 8-valve injection engine, you can install a generator with a little more amperes if 80 is not enough for you and the installation will be absolutely identical) but this is enough for the carburetor, the diode bridge in such generators is also not difficult to replace, you just need additional tools and more time, and also care is needed, because if the generator is not assembled correctly, then it can short-circuit and damage the wires that The batteries go and the battery itself will burn, so be extremely careful and attentive when assembling the generator in the car! (How to replace the diode bridge on a carburetor, read the article: “Repairing a generator on nines”)
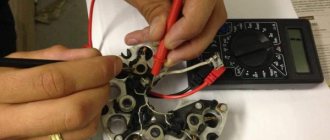
When do you need to change the diode bridge in the generator? 1. Only by checking it can you find out whether the diode bridge can be replaced or whether it will last a long time, it is checked only with the generator removed, so as soon as you remove the generator, remove the plastic cover from it and the bridge itself, so that it is convenient to work with it and hold it, after all the operations done, turn on the multi-meter as shown in the photo below (It needs to be turned on in ohmmeter mode) and connect to the diode bridge, namely to the common bus of auxiliary diodes (Number 1) a red probe, and the other, black , to the terminal of the diode (Number 2) that you want to check (You need to check all the diodes, so connect the black wire in order and just always remember, the diode should not pass current, if this suddenly happens, the multi-meter will immediately show infinity and this will indicate that the diode bridge is faulty and needs to be replaced).
Note! Let us explain to you what infinity is, it’s just that not everyone knows it, in general, infinity is indicated differently on different testers, for some it simply does not react (For example, it was 0, and it still stands after connecting the probes coming from the tester), while for others the tester shows 1 and stands firmly on this number (In this case, the readings should not move, that is, before connecting the tester showed 1 and after connecting also 1, this is infinity, but if it happened that it showed 0 and after connecting 1, this is already indicates that the diode being tested has resistance), but if there is suddenly resistance, then the tester will definitely have to show the result (see photo 2 above), if in your case this happened with all the diodes being tested, then your bridge is not subject to replace with a new one!
2. The second, final test, the black probe is connected to the plate of the generator rectifier block, inside which is the diode that you are going to check, and the other, red probe, is connected to the terminal of the diode itself, a working diode should not pass current and thus the tester will not should give a value of infinity, then swap both probes (see photo 2) and the tester will definitely have to give some value of several hundred, if everything turned out exactly the same for you, then the diode bridge is working and what else is the problem (B stator for example or in brushes).
How to replace the generator diode bridge on a VAZ 2110-VAZ 2112?
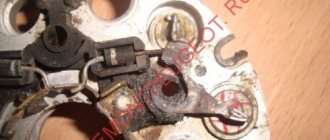
Removal: First, remove the generator from the car (For detailed instructions, read the article: “Replacing the generator on a VAZ”) and then snap off the latches on the sides that secure the cover to the generator (How to snap them off, read in the same article, just a little higher) and it remove, and as soon as it is removed and set aside, proceed to removal, first with a screwdriver or wrench (everyone has a different way of attaching the voltage regulator), unscrew either the screws or bolts securing the regulator (see photo 1) and pulling remove it, disconnecting the wire connector from the regulator (see photo 2), then using a spanner or socket, unscrew the three bolts (indicated by numbers 1 in photo 3) that secure the wires to the diode bridge and unscrew another bolt that secures it diode bridge (Indicated by number 2) and having removed the wires, throwing them aside, use a Phillips screwdriver to unscrew the screw that secures the capacitor (see photo 4) and remove the diode bridge and capacitor from the car generator.
Note! Screw all the bolts that you will unscrew strictly into their proper places, so remember them all or mark them with a marker, this is mandatory, because if you mix up and screw the bolt that goes without an insulating and thrust washer into the wrong place, the generator will simply short out to ground and work will not be!
Installation: Installation of the diode bridge is carried out in the reverse order of removal, the whole operation is carried out easily and quickly, the main thing is to assemble everything correctly, do not forget and be sure to read the video at the end.
Additional video clip: Be sure to watch the video located just below, it will warn you against incorrect installation of the diode bridge and short circuit; after installing the generator, if you do everything correctly, there will definitely not be any.
Note! If you want to see clearly how you can check the diode bridge for serviceability, then in this case, check out the video below:
Source
conclusions
Increasing the voltage of the VAZ-2114 generator with your own hands is real and quite simple. At the same time, the cost amounted to 500 rubles. It is worth noting separately that if you do not have the necessary skills or abilities to work with automotive electronics, then you should contact a car service center, where everything will be done quickly and efficiently, and of course, at the expense of the car enthusiast.
Greetings car enthusiasts. Today I’ll tell you how to increase the voltage on a car’s generator in a simple way, if for some reason it does not correspond to the norm of 14.4 volts.
So, to solve this problem, there is a very simple way to increase the voltage of the generator with a diode, which we will simply add to the main circuit of the generator.
2D219 diodes are suitable for this purpose; 2D 213 (diodes naturally have a letter index).
It is the letter index of the diode that will be responsible for the amount of the required voltage drop across this diode.
The diodes used must have a breakdown voltage of about 20 volts and a current of at least 5 amperes, the voltage drop across the diode should be in the range from 0.6 volts to 1.2 volts (here you need to look at how much you need to raise the voltage).
Probably for those who do not understand electricity, nothing is clear at all. I'll try to explain it more simply.
Let's assume that your generator produces 13.3 V - 13.5 V at partial load, and this is unacceptably low for recharging the battery and, in turn, the battery in the near future simply will not be able to provide the necessary energy to start the car.
But if you use a diode to increase the generator voltage by about 1 V-1.1 V, then everything will fall into place.
The voltage at the generator output will increase by reducing the voltage supplied to the power output of the voltage regulator, so the regulator does not seem to receive additional voltage in order to operate within the specified limits. The voltage is extinguished at the diode and thereby the regulator increases the excitation voltage (on the brushes), and the generator, in turn, produces a voltage higher by exactly the amount by which we extinguished the diode. Something like that.
How to replace the diode bridge of a VAZ-2110 generator with your own hands
Before you figure out how to replace the diode bridge of a VAZ-2110 generator, you need to find out its location, because not all motorists know about it.
It is also necessary to understand what kind of mechanism it is and what it is responsible for. So, let's start with the fact that the diode bridge gives a charge to the battery. When the car starts, this mechanism also starts working. Hence it is obvious that if it fails, then the battery is immediately discharged. As for the location, it is necessary to clarify that the VAZ-2110 with 8 valves and the VAZ-2110 with 16 valves have different engines. Thus, the location may also differ slightly. But usually it is located on the generator, or rather, on the back cover, in the shape of a horseshoe. It is not difficult to recognize it, but if you find it difficult, then look at the photo of this mechanism, which will help you quickly understand where it is located.
The functions of the generator diode bridge are as follows:
- Blocking current from entering the stator winding of the generator, that is, acting as a valve.
- Increasing the reliability of generator operation.
These are the main functions of this device, which are very important for proper driving. Now let's look at the main breakdowns that occur with a diode bridge, as well as a diagram for replacing such a device.
Tell me the brand of diodes in the generator
There is a problem: 1 diode in the generator rectifier has burned out (the one in the main circuit, that is, from the winding to the generator output, that is, circuit “30”). Replace the entire rectifier unit - but where can I find one? Replacing the entire generator is also a waste.
VAZ-21093 engineer GM Generator ISKRA AAK5102 14v 80A 11.201.440 Made in Slovenia
Theoretically, I’m ready not to even disassemble the rectifier unit itself, but to unsolder the contact from the burnt diode (it burned with a light, I saw a 3 cm flame myself) and install a new diode even outside the generator.
Questions: 1. Is it possible to “cheat” like this? 2. Which diode is suitable? (there are diodes in the form of a “tablet” about 5 mm high, no more than 10 mm in diameter, legs about 2 mm in diameter up and down along one axis) 3. Are there “related” problems? (eg cooling?)
Discussion closed by moderator
Re: Tell me the brand of diodes in the generator *Don’t worry! Buy a ready-made bridge!
He wrote “Iskra generator” *try to find a diode bridge for this generator
Thanks for the advice about KEMP, I’ll take a look today. I forgot to look on the way home.
Look for the bridge in KEMP *I saw some spare parts for Iskra generators there
I don’t know, but you can buy a bridge from our generator and break the diode - there are a lot of bridges on sale. External installation. so the diode needs a radiator.
Re: I don’t know, but it looks like it’s just the two of us left? ;-))
So the “regular” bridge is 55A, but mine is 80A.
Well, you can also add a radiator.
I really don’t want to bother with a new generator - first you’ll find nothing, then you’ll get away with the price.
Well, take it to 55A. If the machine does not have extra consumers for these 25A, then a regular one will do. 80A is the maximum current that the generator can produce, and it is not at all a fact that such a current will be required from it. I would try to simply attach the entire horseshoe from the 12th generator or look in Chip and Dip for a diode with the required polarity on the body (and current) for an M8 or M8 thread and screw it into a free hole in the body (a thick wire to it is needed from the winding output ) - such a current is no longer a trick. Like this: https://www.chip-dip.ru/shop/article.xtml? >
Well, you found a diode - “for all time” * I was glad