—Before reading the post and deciding to implement it, think about whether you need it. If there are problems described in the recording, contact those who have already installed the valves, ask whether they work or not.
—Due to the weak design and small engine volume, everyone who installed a General Motors valve 94580183 in a small circuit without a pressure reducing valve in a large circuit, monitor the oil level and jerking from the engine. — If oil burns, strong jerking and vibrations appear, remove the General Motors valve 94580183. Instead, it is better to choose the PSV-PCV valve 2674021314. Sankei KP125 or 2674032804 for eight-valve engines. — You can also choose the PSV valve yourself. The main criterion when choosing a valve is the volume and power of the engine on which it is installed, which should be no less, but preferably a little more.
Next, carry out the following work: - check the entire intake system for leaks. — crankcase ventilation large and small circuits, tubes pressed into the valve cover, oil dipstick seal, breather. — intake control hoses for leaks on engines with variable intake length. — update the ECU firmware to the latest factory firmware. — replace the vacuum booster valve with MW400017 MITSUBISHI, if you hear a rattling sound when you press the brake pedal, or you have no news and crap, they have it like that from the factory. - check the efficiency of the adsorber valve, before starting the engine, turn off its pipe to prevent it from working - check the timing marks - on cars with E-GAS, check the correct operation of the clutch sensor, it may not work and not give errors.
Some more advice, I will add to it: - never install filters or oil sumps in the low ventilation circuit if there is a PCV valve. Never. - make the small circuit line as short as possible, so that on the 16 valve the valve lies above the throttle, and on the 8 valve the valve is above the receiver fitting or valve cover. — if you operate the machine in areas with a cold climate, you can insulate the small circuit line with a valve. — in case of maintenance, do not blow with compressed air, do not shake the valve. Simply rinse with carb cleaner and dry.
Theory
— During engine operation, gases break through from the cylinder cavity above the piston into the crankcase.
These gases, called crankcase gases, consist of approximately equal parts of the combustible mixture and products of complete and partial combustion. As a result, crankcase gases contain fuel vapors, carbon oxides (including CO), sulfur, nitrogen, products of partial oxidation of fuel hydrocarbons, water vapor. Many of these components actively affect the oil, as a result of which it oxidizes, resinous and varnish-like substances, acids, salts of acids, etc. are formed in it. As a result, the oil loses its properties or, as they say, ages. Active acids, forming an emulsion with oil, enter the rubbing surfaces and cause corrosion. — In order to minimize the influence of crankcase gases and reduce the intensity of the oil aging process, it is necessary to remove them from the crankcase space. — The process of removing gases is called crankcase ventilation
, and the set of devices that ensure this process is called
a ventilation system
. — Ventilation also serves to maintain pressure close to atmospheric in the crankcase space. If the removal of gases is insufficient or absent altogether, the pressure in the crankcase increases sharply due to the constant influx of a new amount of gases. This can cause oil to be squeezed out of the crankshaft seals and other crankcase leaks. Intensive removal of crankcase gases leads to the suction of atmospheric air contaminated with dust and moisture into the crankcase. — Experience shows that oil stability is significantly improved if the crankcase space is purged with a small amount of fresh air. Therefore, there are two types of ventilation systems: exhaust, i.e. without purging the crankcase space with air, and supply and exhaust - with purging. The air entering the crankcase during supply and exhaust ventilation must be cleaned in a separate filter or in an air cleaner of the engine air supply system. — Crankcase gases can be released into the atmosphere or returned to the engine intake tract. Ventilation systems that remove crankcase gases into the atmosphere are called open. Systems with the removal of gases into the intake tract - closed ventilation systems.
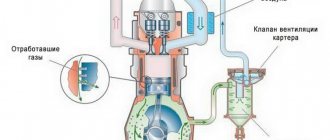
1 - Schemes of crankcase ventilation of engines: a) open; b) closed exhaust; c) closed supply and exhaust; d), e). e) - designs of automatic control valves of closed ventilation systems
— Until 1961, the entire automotive industry used an open system with an ejection operating principle in manufactured vehicles, in which an ejection tube running along the entire engine to the lower crankcase pan was used to remove gases from the crankcase. The diagram of the open ventilation system is shown in Fig. 1, a
.
When the car moved, a slight vacuum formed near the edge of tube 1
, which had a good effect on crankcase ventilation.
To prevent direct ejection of oil droplets with crankcase gases, the ejection tube is recessed into chamber 2
.
Air enters the crankcase through the oil filler neck, the cover 3
of which is equipped with a filter pad. The engines of Zaporozhets, Chaika, Ural-375, and MAZ cars have such a ventilation system. — A little later, the results of research conducted by GENERAL MOTORS proved that the main amount of harmful substances formed as a result of incomplete combustion of hydrocarbons is released into the atmosphere through the ejection tube of the ventilation system. As a result of this discovery, starting in 1961, all cars sold in the state of California (America) were required to be equipped with a closed exhaust system, and since 1962, this requirement began to apply throughout the United States.
- In Fig. 1, b
shows a diagram of a closed exhaust ventilation system.
Gases are sucked out here from under the valve mechanism cover through an ejection tube 2
, led into the inlet neck of the air cleaner.
Before the crankcase gases exit from under the valve mechanism cover, an oil deflector curtain 1
.
Mixing with the air flow, crankcase gases pass through the filter pack 3
of the air cleaner and are freed from oil droplets, condensed vapors and other impurities (engines MZMA-408, ZMZ-21 and up) If the air cleaner has a dry paper filter element, then the crankcase gases must be vented to intake tract to the area behind the air cleaner.
In this case, an independent filter element is installed in the path of crankcase gases. Due to the simplicity of their design, these systems are widely used, especially on foreign engines. - In Fig.
1, c shows a diagram of a closed supply and exhaust ventilation system, where crankcase gases are removed through
tube 3
into the throttle space of the intake
tract 4
.
Consequently, crankcase gases do not pass through the metering elements of the power supply system and do not pollute them, but they affect the operation of the carburetor 5
, reducing the vacuum in its channels.
To minimize the impact of such a ventilation system on mixture formation, it is equipped with a valve device 2
that regulates the intensity of crankcase gas removal.
At the outlet of gases from the crankcase space, an oil-collecting packing or oil deflector 1 is installed. Air for purging the crankcase space enters through the oil filler neck 6
, equipped with a filter element (ZIL-130 engine and a number of American engines).
The presence of a valve device complicates the ventilation system and increases the likelihood of system failure. — Valve designs used in ventilation systems made according to the diagram in Fig.
1, in , are shown in
Fig.
1, d, d, f .
— We will consider the operating principle of an automatic fluometer-type valve (floating valve (hereinafter referred to as “PCV valve”)) according to the diagram in Fig.
1, g .
The mushroom-shaped valve with through radial and axial holes in the non-working state is pressed by a spring to the extreme right position and with its heel closes the channel communicating with the crankcase space. When starting and idling the engine, when large vacuums arise in the intake pipe, the valve, overcoming the resistance of the spring, is sucked into the channel communicating with the intake pipe and closes it with its nose, and crankcase gases pass through calibrated holes in the valve itself. As the throttle valve opens, the vacuum in the intake manifold decreases, the valve is pressed away from the seat by a spring and is held in a certain middle position by the flow of gases. -There is also a so-called backfire mode, in which burning gases from the cylinder break into the intake manifold. In this case, the PCV valve is under the influence of pressure, not vacuum, and therefore closes completely, eliminating the possibility of igniting the fuel vapors in the crankcase. — The valve of the ZIL-130 engine ventilation system works similarly, the design of which is shown in Fig.
1, d .
In the non-working position, the automatic valve with its lower conical end closes the channel connecting to the crankcase space. When starting and idling, the valve is sucked up and its needle nose partially blocks the outlet hole in the valve body. At medium and full load modes, the valve lowers and is held approximately in the middle position by the flow. — In addition to floating automatic valves, ventilation systems use controlled diaphragm valves that change the flow area of the ventilation channel depending on the operating mode of the engine. — The design of the diaphragm valve is shown in Fig.
1, e .
(hereinafter referred to as “Reducing valve”) body 4
above
the membrane 1
is connected to the atmosphere through an opening, and the cavity under the membrane is connected to the inlet pipeline.
The diaphragm, loaded by a spring 2
, is connected by a rod to
a hollow spool 3
, which is located in a tube connected to the crankcase space. As the throttle valve closes, the vacuum in the intake manifold and in the lower valve cavity increases. The membrane bends down and the spool begins to close the hole in the tube, thereby reducing the intensity of gas suction from the crankcase space. Diaphragm valves are quite effective and are widely used in automobile engines of foreign and domestic manufacturers. Modern devices for crankcase ventilation of engines are an independent system that has a significant impact on the operation of other engine systems. Source: Raikov I.Ya., Rytvinsky G.N. Internal combustion engines, 1971: auto.today/bok/2211-venti…-kartera-dvigatelya1.html; avtoaziya.ru/avtotekhnolo…i-kartera-dvigatelya.html
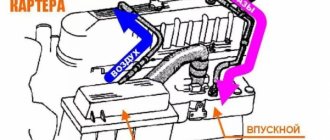
Disadvantage of the standard VAZ ventilation system
The system consists of two circuits that operate at different load modes and speeds:
- – The small ventilation circuit is connected to the valve cover and the intake manifold (behind the throttle body). This connection diagram provides intensive crankcase ventilation due to the vacuum that occurs in the intake manifold when the throttle is closed. To avoid an effect such as hyperventilation, the cross-section of the small circuit is limited by a jet in the cable throttle body with a diameter of 1.7 millimeters. This circuit operates in the region of 800-1500 rpm.
- – A large ventilation circuit is connected to the valve cover and the air pipe (in the pre-throttle space). This scheme provides intensive crankcase ventilation at high speeds. The cross section of the large contour is 16-18 millimeters
Let's consider an example when a car is going down a hill with the gear engaged. In this mode, the engine will operate at higher speeds with a reduced load. A high vacuum is created in the crankcase, and a large ventilation circuit is connected, in which there are no control valves. Since both circuits are connected to one volume of the oil trap, a strong vacuum in the crankcase will draw a fresh portion of air bypassing the throttle. The mass air flow sensor will show increased air flow, and the ECU will try to close the throttle. Having realized that this is not possible, it is already closed, the lean mixture will be corrected by increasing the fuel supply (fuel consumption will increase).
Operating principle of SVKG
Car engines have a ring gas exhaust system. The resulting gases as a result of the combustion of diesel fuel, gasoline or liquefied gas are not released into the environment, but are returned to the engine, where they are re-burned. The second end of the crankcase ventilation hose is attached to the intake manifold, with the help of which gases again enter the cylinder chamber for combustion. A significant part of the gases, when re-entered, ignite at the moment the fuel ignites, and the remaining ones are released into the atmosphere using the exhaust system. A small percentage of the gases are sent back into the cylinder chamber for re-combustion. This process is ongoing.
Stories from our readers
“Fucking basin. "
Hi all! My name is Mikhail, now I’ll tell you a story about how I managed to exchange my two-wheeler for a 2010 Camry. It all started with the fact that I began to be wildly irritated by the breakdowns of the two-wheeler, it seemed like nothing serious was broken, but damn it, there were so many little things that really started to irritate me. This is where the idea arose that it was time to change the car to a foreign car. The choice fell on the melting Camry of the tenth years.
Yes, I had matured morally, but financially I just couldn’t handle it. I’ll say right away that I am against loans and taking a car, especially not a new one, on credit is unreasonable. My salary is 24k a month, so collecting 600-700 thousand is almost impossible for me. I started looking for different ways to make money on the Internet. You can’t imagine how many scams there are, what I haven’t tried: sports betting, network marketing, and even the volcano casino, where I successfully lost about 10 thousand ((The only direction in which it seemed to me that I could make money was currency trading on the stock exchange, they call it Forex. But when I started delving into it, I realized that it was very difficult for me. I continued to dig further and came across binary options. The essence is the same as in Forex, but it’s much easier to understand. I started reading forums, studying trading strategies. I tried it on a demo account, then opened a real account. To be honest, I didn’t manage to start earning money right away, until I understood all the mechanics of options, I lost about 3,000 rubles, but as it turned out, it was a precious experience. Now I earn 5-7 thousand rubles a day. I managed to get the car buy after half a year, but in my opinion this is a good result, and it’s not about the car, my life has changed, I naturally quit my job, I have more free time for myself and my family. You’ll laugh, but I work directly on the phone)) If If you want to change your life like me, then here’s what I advise you to do right now: 1. Register on the site 2. Practice on a Demo account (it’s free). 3. As soon as you get something on the Demo account, top up your REAL ACCOUNT and go to REAL MONEY! I also advise you to download the application to your phone, it’s much more convenient to work from your phone. Download here.
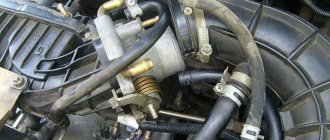
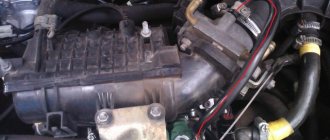
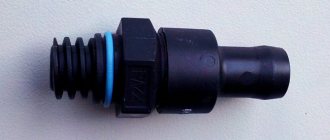
PCV Valve Installation
You will need : crankcase ventilation valve (article) 94580183 (approximate price 400 rubles), a new hose.
The PCV valve is connected in series to a small circuit (in a cable throttle it is connected to the receiver), closing it when the vacuum increases and does not exist. This scheme requires a minimum of alterations and is used on the vast majority of foreign cars. Before installing the valve, make sure it only vents towards the receiver side (not the valve cover side).
The installation process is very simple: remove the old hose, take a new one and put the PCV valve in the cut, with the blue end towards the receiver (photo by Barmalej79).
What does modification give?:
- – reduction of vibration load at idle;
- – better load reception from the air conditioner and other powerful consumers such as windshield heating, seat heating and others;
- – increase in torque from the bottom;
- – reduction of oil consumption through ventilation.
According to owners, this modification has a positive effect on engine performance. Are you ready to try? By the way, read other upgrades to the crankcase ventilation system.
Will you install a PSV valve in the crankcase ventilation system of a VAZ?
Welcome! The crankcase ventilation system is needed so that the atmosphere is not clogged and the exhaust gases are allowed to burn out again, this system was implemented in many cars, starting from the VAZ 2101 and ending with cars such as Lada Priora, Lada Granta, etc., but when the engine is worn out, this system is removed by the people themselves by removing all the hoses of the crankcase ventilation system, usually into a bottle, or just outside, we will analyze this in this article, so if your car has already covered quite a lot of mileage, then this article will be useful to you benefit.
Note! We will only disassemble cleaning the ventilation on 16 valve engines; if you have an 8 valve engine, then go to the article: “Cleaning the crankcase ventilation on a VAZ 2114”, in this article this engine is described; to clean the crankcase ventilation of a 16 valve engine, you will need stock up on: Small pliers, screwdrivers with different heads and all kinds of wrenches; in addition, you will need sealant for the cylinder head cover and a new gasket!
Summary:
What does the crankcase ventilation system consist of? From the hoses, from the oil separator, from the oil deflector, all these parts can be seen in the diagram below, all of this gets dirty over time and therefore the crankcase ventilation system needs to be disassembled from time to time and cleaned inside from dirt and oil, then the engine will work normally and everything the dirt that is in the ventilation system will not fly into the engine to burn out again, but for engines that have traveled quite a long mileage (200 thousand km and more), we recommend simply putting this system in a bottle so that it does not choke the engine of the car and he was driving more or less, and to bring the crankcase ventilation into the bottle, you will need a screwdriver and a suitable (Small) container, for more details on how to do this, see the video clip which is located at the end of the article, it shows everything in detail.
How to clean the crankcase ventilation system on a VAZ 2110-VAZ 2112?
Note! Before you start work, remove the air filter housing, as it will interfere greatly; if you do not know how to do this, then read the article entitled: “Replacing the air filter housing on dozens”!
Removal: 1) The hardest thing is to remove the cylinder head cover, but the remaining parts that relate to the ventilation system (And these are mainly hoses), removing is as easy as shelling pears, in general, let's start, first you will need to disconnect the wires from each other, namely the upper connectors (see photo 1 ) and lower connectors (Indicated by a red arrow), once this is done, remove the connectors, to do this, squeeze the two latches on one connector with your fingers and remove it (see photo 2) and do the same with the other connector, just without removing it, they will interfere, and in general you won’t be able to remove the cylinder head cover without removing these connectors, because the wires simply won’t allow you to do this, both connectors were sitting on brackets, so unscrew the bolts securing them and remove both brackets from the cylinder head cover, in more detail how to do this , look at photos 3 and 4 below.
2) Now remove the exhaust manifold from the cylinder head cover, it is bolted on and by the way, when you remove it, replace all the O-rings, firstly they are not expensive and secondly, after replacement, you will be 100% sure that the collector will not let air through anywhere, since the rings will be new; you can read in more detail how to do this in the article entitled: “Replacing the receiver on a 16-valve car.”
3) Then start removing the hoses, they are held in place by clamps, the clamps are loosened using a screwdriver or wrenches, if it is not convenient to work with a screwdriver, all the clamps that you will need to loosen and all the hoses that you will need to remove, you can see in the photographs a little below:
Note! Rinse the removed hoses with gasoline or kerosene, then dry them in the sun and, if possible, also blow them with compressed air (for example, a compressor), before installation, make sure that the hoses are dry, if necessary, wipe them dry with a rag and by the way, Carefully clean all those places where the hoses are connected with a cloth and remove all dirt from them!
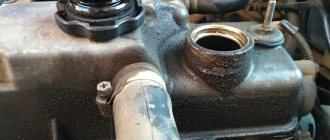
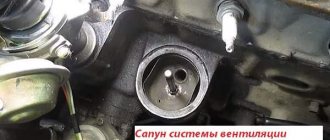
4) When everything is finished, remove the cover from the Cylinder Head, it is secured with fifteen bolts, these bolts are unscrewed with a socket wrench or a socket head and an “8” wrench, then the cover is separated from the cylinder head with a screwdriver and removed from the car, it is most convenient to separate it from the cylinder head in those places where there are special protrusions for this, one of such protrusions is indicated by a blue arrow.
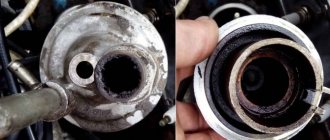
5) After you have the cylinder head cover in your hands, using a wrench or a socket wrench, unscrew the six bolts that secure the separator to it (Several bolts are indicated in the large photo) and disconnect it from the cover (see small photo).
Note! This separator is an integral part of the crankcase ventilation system, it has such a part as an oil deflector, to pull it out, you will need to compress the side clamps using pliers (see photos 1,2), a rubber o-ring will be installed on the oil deflectors, picking it up with a screwdriver , you also need to remove it (see photo 3,4) and replace it with a new one, if such a ring is difficult to find in car shops, then you are allowed not to change it if it is in good condition, namely: It should not be too compressed, the rubber is not should become rough and lose its elasticity, and there should be no cracks or other types of damage on the ring!
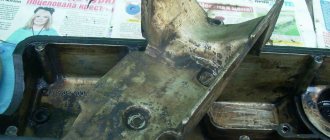
Installation: Installation of all parts is carried out in the reverse order of removal, but before installation, wash everything thoroughly with gasoline or kerosene, this also applies to the cylinder head cover itself, there should be no dirt on it, and also remove old sealant (with a screwdriver or fine-grained sandpaper) the surface where the cylinder head cover is installed, after cleaning, degrease it and apply a new sealant, as it is shown in the small photo below:
Additional video: An interesting video that will give you a little additional information on the crankcase ventilation system is located just below:
Possible heater malfunctions
Your stove is not working or is not heating well. Look for the cause of the problem. The fan does not work or the heater radiator is leaking - obvious breakdowns that occur at any time.
Stove control unit:
- The engine was warmed up, but warm air did not enter the cabin.
- The damper drive cables may have come off. The only solution is to remove the console.
Dampers. Partially open or close. The rubber seal has come off in the air duct or foreign objects have gotten into it.
Antifreeze circulation. Start the engine and check the level in the expansion tank, and also check for any disturbances in the normal flow of antifreeze. Possible reasons:
- Pump. Cannot be repaired, only replaced.
- The cooling system is clogged. Clean or rinse.
Checking the thermostat. Warm up the engine to 75°C. If the upper pipe is cold, then the thermostat does not work correctly and does not allow coolant to move in a large circle. Replace the device.
Airlock. Remove the plug from the vehicle's engine cooling system.
Temperature sensor. Constantly blowing cold or hot air. If cleaning the contacts does not help, then replace the non-working temperature sensor.
Air filter. If the air flow is weak and there is no desired temperature, then replace the filter. Be sure to check the heater resistor, which controls the rotation of the fan and is located under the glove compartment.
Electric fan. The device does not turn on regardless of the selected mode. Check the fuse that controls operation. If the fan is turned on and its operation is accompanied by strange sounds, clean or replace it.
Dampers. It is difficult to determine the breakdown unless you replace the dampers themselves.
The cause of a heater malfunction may be a depressurization of the car's engine cooling system. The types of breakdowns described above cause malfunctions in the operation of the Lada Kalina car's stove. Such breakdowns do not require special knowledge; they are easy to understand and repair.