The popular Russian-made model is very widespread in the CIS countries due to its optimal cost and increased cross-country ability, which is critically important in the conditions of domestic operation. Motorists buy cars for off-road travel and small towns, where the quality of roads leaves much to be desired.
The disadvantages of the car include weak wiring - when the load increases to the design limit, on-board electronic systems often fail, which causes software failures. Chevy Niva error codes appear on the dashboard display or are detected using special equipment, but the common thing is that they all indicate a malfunction of a specific component.
Chevrolet Niva error codes on the dashboard
Chevrolet Niva has a built-in self-diagnosis system. It displays errors in the form of codes on the mileage display. To quickly find a problem, you must be able to enter the self-diagnosis system and be able to decipher the corresponding code.
How to run diagnostics?
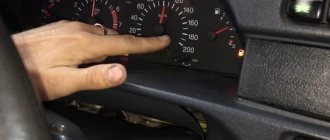
Press the daily mileage reset button and hold it. Turn on the ignition and release the button.
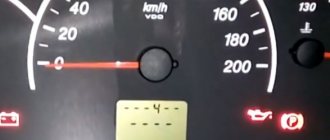
The arrows on the dashboard start moving - this is the entry into the mode. Press the button briefly twice and it will display an error code.
As follows:
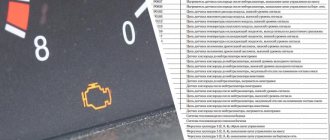
Nothing is clear, but there is a special table that deciphers these codes. It looks like this.
Sometimes it happens that the code we need is not in the table. This is fine. If the figure is not the same as in the table, then this means the presence of two malfunctions at the same time. For example, code 6 means the simultaneous presence of codes 2 and 4. And code 10 means errors 2 and 8.
All other error codes are deciphered in the same way. True, this system is quite primitive. Normal diagnostic tools have more detailed information about faults. The codes would look, for example, like this:
“P0303” - 03 means misfire, and the second 03 is the cylinder number. That is, the engine is tripping.
Error codes on the dashboard provide little information. It is much better to use special diagnostic equipment. Even the cheapest one can scan almost all Chevrolet Niva engine errors.
How is self-diagnosis performed?
Most car enthusiasts prefer to regularly go for computer diagnostics of their vehicles. If you do not have the opportunity to visit a service center or do not have a scanner to check the car, then you can do it differently - run the on-board computer diagnostic program. To do this you need to do the following:
- Press the daily mileage reset button on the odometer and at the same time turn the key in the ignition.
- If you did everything correctly, the speedometer and gauge needles will begin to move along the scales.
- Click the reset button again. The display will show the current firmware version of the on-board computer. After this, you need to repeat the action with the reset button so that the bookmaker displays whether there are errors in the system. If they are present, their numbers will be shown on the display.
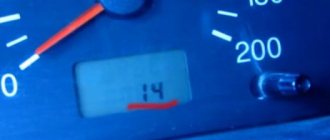
This diagnostic will not take much of your time; you can quickly check the Chevrolet Niva system. If the number 8 appears on the display, then do not be upset - this error with number 8 is not terrible in most cases, you just need to check individual components of the car.
Diagnostics of Niva Chevrolet
The Chevrolet Niva diagnostic connector helps you obtain information about how most units work, into which special equipment is connected via Bluetooth or a cable. Therefore, if you want to conduct independent diagnostics, it is important to know where it is.
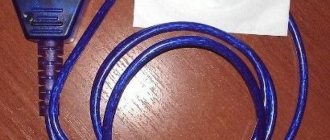
The connector in the Niva is located under the steering wheel on the right side, and the pinout itself is under the dashboard on the driver’s side. To check the on-board computer, you need to use special equipment that transmits all the necessary information to the laptop. Data transfer is carried out using a COM port into which a K-LINE type connector is installed.
When connecting, errors may appear on the laptop screen. At this moment, there is no need to worry, since the appearance of such messages may be due to a lack of communication with the device itself. You should also check whether the standard anti-theft system is installed; if so, check the adapter itself. If there is a standard location, then it is connected to the diagnostic line between the ECU and the immobilizer. And if it is missing, a plug is installed in its place. To restore communication between the contacts, a jumper is installed, as shown in the picture below:
Depending on the year of manufacture of the model, the connectors may differ from each other.
Self-diagnosis
If it is not possible to check with a special device, then this can be done using self-diagnosis, which will help to quickly identify all problems associated with the operation of the car. To do this, press the odometer button and turn on the ignition. The speedometer needle will begin to rise to the top; by pressing again, information about the firmware will appear on the screen, and by pressing again, all existing errors will appear.
Let's take a closer look at the Chevrolet Niva error codes with decoding:
During self-diagnosis, error 8 and error 14 often appear, the first informs about problems in the brake system, and the second is related to fuel consumption, quite often this is a system glitch, but in any case you need to replace the sensor responsible for these mechanisms, or reset the memory by resetting the battery terminals.
As practice shows, knowing how to perform an independent check is very useful, since this knowledge helps to quickly identify a malfunction and eliminate it in a timely manner.
Check engine error
If a check light comes on on a Niva Chevrolet car, this warns that there are malfunctions associated with the operation of the engine. The light comes on at the moment when the engine begins to detect a failure or error and writes a specific code into its memory.
Let's look at the main reasons why this warning may appear:
- The air/fuel mixture is incorrect. This problem is eliminated by filling the tank with higher quality gasoline.
- Low engine oil level
- Engine overheated
- There are problems with the ignition system, which may be due to a faulty spark plug or ignition coil
- The power system is faulty. It is possible that fuel injection into one of the cylinders has stopped.
- Lambda probe faulty
- A separate sensor in the ECM system has failed
We can conclude that in some cases, when the engine starts and the check light is on, this may indicate that the engine is operating in emergency mode and the problem is not very critical. If the engine starts and stalls, then this is most likely a problem with the fuel supply or the crankshaft sensor has failed.
In any case, it is better not to use the car until you find out the exact reason.
Chip tuning
Some drivers do chip tuning of the Chevrolet Niva in order to increase engine power. The essence of this procedure is to remove the established restrictions by adjusting the optimal factory settings in the electronic control unit. This procedure helps to extract the additional performance inherent in the motor.
The whole process can be divided into several stages:
- Reading the necessary data from the electronic control unit
- Making the necessary adjustments
- Updating and recording new data
The main advantage of this procedure is:
- Engine power increases
- Speed limit removed
- You can change the fuel type
- All factory settings can be returned at any time
The disadvantages include:
- High cost of work
- The ECU may fail
- Increases fuel consumption, reduces system life
- Errors may appear
Each specialist has a different attitude towards chip tuning, some consider it useful, while others think that this procedure can negatively affect the performance of the car, while reducing its service life.
To summarize, we can conclude that you can identify error codes on a Chevrolet Niva either independently or using a special device. If malfunctions occur, they must be eliminated as soon as possible, otherwise this may lead to irreversible negative consequences in the operation of the entire system.
Why is error 8 associated with brake system problems?
Some car enthusiasts misinterpret error message 8, believing that they need to check the brake system. This is due to the fact that on VAZ cars this fault number indicates insufficient brake fluid level.
The Chevrolet Niva's on-board computer uses different designations, so you should not interpret them in the same way as in the VAZ. If you doubt the condition of the brake system, you can check it during the repair process. First of all, pay attention to the brake fluid level, and then check the pads.
Sources used:
- https://vaz-russia.com/chevrolet-niva-vaz-2123/kody-oshibok-niva-shevrole.html
- https://xn--80aal0a.xn--80asehdb/do-my-self/repair/repair-lada-niva-chevrolet/5746-rasshifrovka-kodov-oshibok-chevrolet-niva-lada.html
- https://nivachevrole.ru/varia/error-codes/
- https://expertniva.ru/elektrooborudovanie/kodi-osibok.html
- https://ladaprofi.ru/shevrole-niva/kak-ispravit-oshibku-nomer-8-na-shevrole-niva.html
Decoding Chevrolet Niva (LADA) error codes
The fault indicator (Check Engine) on Chevrolet Niva cars is located in the instrument cluster. When the warning light turns on, it signals to the driver that the on-board diagnostic system has detected a malfunction of the ECM and the vehicle continues to move in emergency mode. To determine the cause, you should use a diagnostic tool, with which you can read error codes and decipher them according to the table below.
Check Engine
When the ignition is turned on, the indicator should light up, so the ECM checks the serviceability of the lamp and control circuit. After starting the engine, the indicator should go out if the controller memory does not contain the conditions for turning it on.
- The Check Engine light is constantly on - in this case, the driver is obliged to make the vehicle available to service technicians as soon as possible.
- A flashing Check Engine Light indicates a problem that can cause serious damage to the ECM (for example, a misfire can damage the catalytic converter).
To protect against random, short-term errors that may be caused by loss of contact in electrical connectors or unstable engine operation, the warning light turns on after a certain period of time after detecting a malfunction in the ECM. During this period, the on-board diagnostic system checks for a malfunction.
After eliminating the causes of the malfunction, the alarm will turn off after a certain delay time, during which the malfunction does not appear, and provided that there are no other fault codes in the controller’s memory that require turning on the alarm.
When clearing (deleting) fault codes from the controller’s memory using diagnostic equipment, the indicator goes off.
Self-diagnosis
To carry out repair and maintenance work on the vehicle's engine management system, a diagnostic tool should be used. In service centers, this can be DST 2M (DST-10, DST-12); for self-diagnosis, an ELM327 OBD-II scanner (price about 200 rubles, see the AliExpress catalog) and a smartphone with installed software (for example, OpenDiag) are suitable. or an on-board computer installed in the car.
Oxygen sensor heater before the converter, control circuit open
Oxygen sensor heater before converter, control circuit short to ground
Heater of the oxygen sensor to the converter, short circuit of the control circuit to the board, network
Oxygen sensor heater after the converter, control circuit open
Oxygen sensor heater after converter, control circuit short to ground
Heater of the oxygen sensor after the converter, short circuit of the control circuit to the board, network
Mass Air Flow Sensor Circuit Low Signal
Mass Air Flow Sensor Circuit High Signal
Intake Air Temperature Sensor Circuit Low Signal
Replacing brushes or the generator itself
Current collection brushes wear out most often, so here is a description of how to do this job:
- Remove the negative terminal from the battery and disconnect the wires leading from the generator casing.
- Remove the protective cap from the terminals of the positive terminal of the wires. Unscrew the nut that secures the block to the generator block.
- Disconnect the spring clips and remove the black plastic cover.
- Unscrew the voltage regulator mountings with a Phillips screwdriver. Take it out along with the brushes.
- Disconnect the wires from it. Remove the assembly together with the fastening bar, take off the belt.
- Release the generator from the bracket by unscrewing all the mounting bolts.
The further plan of action depends on what you will change. If the brushes are very worn, they need to be replaced. If the current collectors are visually intact, then the reason may be in other parts of the generator. In most cases, car enthusiasts simply change it entirely.
What you need to know about a sensor malfunction
First of all, it is important to understand the operating principle of the sensor located between the thermostat and the block head. This element has two contacts leading to the fan and control unit. Its main function is to help regulate the fuel mixture, depending on the engine temperature. Thanks to it, all the main characteristics of the VAZ-2114 engine are adjusted.
DTOZH is considered one of the most reliable and rarely fails. If it produces the wrong temperature, the consequences may be:
- increased fuel consumption;
- problems with starting the engine, especially in winter (the computer does not read the engine temperature correctly);
- uneven operation of the power unit, detonation and loss of power;
- change in engine operating temperature (normally it fluctuates between 80 and 90 degrees);
- antifreeze boiling in the expansion tank;
- change in exhaust color due to a different composition of exhaust gases.
If the sensor malfunctions, the computer cannot correctly read the engine temperature, so it incorrectly sends signals to start the fan and fuel injection.
ERRORS ON-BOARD COMPUTER KALINA/PRIOR
0102 MAF Sensor Low Signal 0103 MAF Sensor Signal High 0112 Intake Air Sensor Temperature Low 0113 Intake Air Sensor Temperature High 0115 Coolant Temperature Sensor Signal Invalid 0116 Coolant Temperature Sensor Signal Invalid 0117 Coolant Temperature Sensor Signal Low 0118 High coolant temperature sensor signal level 0122 Throttle position sensor signal low 0123 Throttle position sensor signal high 0130 Oxygen sensor signal low 1 0131 Oxygen sensor signal low 1 0132 Crankshaft sensor signal high 1 0133 Oxygen sensor slow response 1 0134 No oxygen sensor signal 1 0135 Oxygen sensor heater fault 1 0136 Oxygen sensor short circuit to ground 2 0137 Oxygen sensor signal low Oxygen sensor 2 0138 Oxygen sensor 2 signal high 0140 Oxygen sensor 2 open 0141 Oxygen sensor heater fault eno 2 0171 Mixture too lean 0172 Mixture too rich 0201 Open injector 1 control circuit 0202 Open injector 2 control circuit 0203 Open injector 3 control circuit 0204 Open injector 4 control circuit 0261 Short to ground in the injector 1 circuit 0264 Short to ground in the injector 2 circuit 0267 Short to ground in the circuit injectors 3 0270 Short to ground in the injector circuit 4 0262 Short circuit to +12 V in the 1 injector circuit 0265 Short circuit to +12 V in the 2 injector circuit 0268 Short circuit to +12 V in the injector circuit 3 0271 Short circuit in the + 12V injector circuit 4 0300 Failure 0301 Ignition failure in cylinder 1 0302 Ignition failure in cylinder 2 0303 Ignition failure in cylinder 3 0304 Ignition failure in cylinder 4 0325 Knock sensor circuit open 0327 Knock sensor signal low 0328 Knock sensor signal high 0335 Crankshaft position sensor signal invalid 0336 Signal error sensor and crankshaft position 0340 Phase sensor error 0342 Low phase sensor signal 0343 High phase sensor signal 0422 Low converter efficiency 0443 Canister purge valve circuit malfunction 0444 Short circuit or open canister purge valve 0445 Short circuit of the canister purge valve to ground 0480 Cooling fan circuit 1 0500 Incorrect speed sensor signal 0501 Incorrect speed sensor signal 0503 Speed sensor signal interrupted 0505 Minimum regulator error 0506 Minimum low 0507 High minimum 0560 Incorrect on-board network voltage 0562 Low on-board network voltage 0563 High voltage on board 0601 ROM error 0603 External RAM error 06 04 Internal error RAM 0607 Knock channel fault 1102 Lambda probe heater resistance low 1115 Lambda probe heater circuit fault 1123 Idle rich 1124 Idle lean 1127 Part load rich 1128 Part load lean 1135 Oxygen sensor heater circuit 1 open shorted 1136 Rich at low load 1137 Lean at low load 1140 Measured load differs from calculations 1171 CO potentiometer low 1172 CO potentiometer high 1386 Knock channel test error 1410 Reservoir purge valve control circuit short to +12V 1425 C tank ventilation valve control circuit : short to ground 1426 Tank drain valve control circuit open 1500 Fuel pump relay open circuit 1501 Short to ground Fuel pump relay control circuit 1502 Short circuit a +12 V fuel pump relay control circuit 1509 Idle air control control circuit overload 1513 Regulator circuit idle speed: short circuit to ground 1514 Idle speed control circuit: short circuit to +1 2B, open 1541 Open circuit of the fuel pump relay control circuit 1570 Incorrect APS signal 1600 No communication with APS 1602 Loss of on-board voltage on the ECU 1603 E EEPROM error 1606 Bad Rough Road Sensor Signal 1616 Rough Road Sensor Signal Low 1612 ECU Reset Error 1617 Rough Road Sensor Signal High 1620 EEPROM Error 1621 RAM Error 1622 EEPROM Error 1640 EEPROM Test Error 1689 Invalid Error Codes 0337 Crankshaft Position Sensor Short short to ground 0338 Position sensor crankshaft, open circuit 0441 Incorrect air flow through the valve 0481 Malfunction of 2 cooling fan circuits 0615 Open circuit of the starter relay 0616 Short circuit of the starter relay circuit to ground 0617 Short circuit of the starter relay circuit to +12 V 1141 Malfunction of the lambda probe heater 1 after Converter 230 Fuel Pump Relay Circuit Malfunction 263 Injector Driver Malfunction 1266 Injector Driver Malfunction 2269 Injector Driver Malfunction 3272 Fault and 4650 CheckEngine Cuito Lamp Circuit Malfunction
Design Features
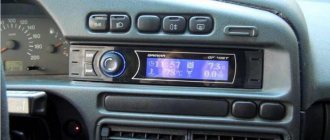
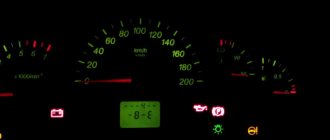
What can the instrument panel tell us? The Chevrolet Niva is designed in such a way that its panel unites all the control devices of the car. It includes:
- speedometer;
- odometer (counter of kilometers traveled);
- tachometer (crankshaft revolution counter);
- coolant and ambient temperature indicators;
- fuel level indicator;
- 12 control (signal) lamps.
In order for the driver to monitor instrument readings at night, the panel is illuminated when the side lights are turned on. How bright is the instrument panel backlight? "Chevrolet Niva" has the function of adjusting the level of illumination of the dashboard. It is provided by six special light bulbs.
Important: the shield has an electronic design and cannot be repaired if it fails! Spare parts in the form of individual panel units are not available for sale. The only exceptions are signal and lighting lamps. In other words, if at least one indicator fails, you will have to buy an assembled panel.
Tuning options
The choice of options for tuning is not particularly large:
- Install a device from another car. In this case, you will need the services of a qualified electrician, since the connectors will have to be redone. You can also install a digital version of the tidy - it will be more than original.
- As a tuning option, you can install LED bulbs instead of regular ones. Many car owners choose this option because it is less expensive and the easiest to implement.
- Another tuning method is to install original instrument scales on the speedometer, tachometer and other sensors. Moreover, you can buy such scales either ready-made or make them yourself in accordance with your preferences.