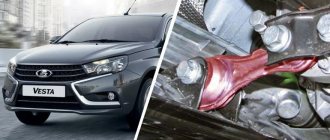
The service life of the rear brake drum is over 100 - 120 thousand km. Usually the part wears out faster and braking efficiency decreases.
The process of self-replacement is simple, but requires compliance with the algorithm. Let's look at the process of replacing the drum step by step.
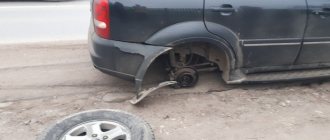
How to remove the drum on a Lada Vesta: step-by-step instructions
- We install the machine within the perimeter of the repair area.
- Jack up the left (right) side.
- We remove the wheel.
- Unscrew the two bolts.
- We press out the element together with the bearing.
After carrying out maintenance and troubleshooting, we install the parts in the reverse order.
Sequence of actions when replacing a brake drum on a Lada Vesta yourself
Necessary tools, materials:
- wheel wrench;
- rags;
- two-fingered puller;
- additional lighting;
- Phillips head screwdriver;
- new rear drum.
Step by step guide:
- Lower the parking brake lever.
- We hang the car with a lifting mechanism.
- “Rip off” the bolts and remove the wheel.
- We press out the drum, inside of which the bearing is installed.
- After carrying out maintenance (replacement), we reassemble the structure.
Related link:
Vesta SV Cross - reviews from real owners 2018
Removal
Place the car on a two-post lift, apply the parking brake and turn off the ignition (electrohydraulic lift type P-3.2G with a lifting capacity of 3.2 tons).
Remove the rear wheel.
Release the handbrake lever.
Raise the car to a height convenient for performing work.
Remove the hub cap (mounting blade, hammer).
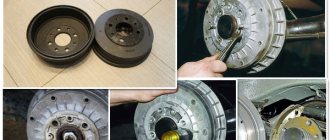
Unscrew nut 1, Figure -1, securing the brake drum to axle 3 of the rear wheel hub and remove drum 2 (replaceable head 30, extension and wrench, puller 67.7823-9519).
Figure -1 – Removing the rear brake brake drum: 1 – brake drum fastening nut; 2 – brake drum; 3 – rear wheel hub axle
Review of Manufacturer Prices
| Name/article | Price in rubles |
| TB bearing with ABS LADA Vesta432008333R | From 6000 |
| Pads 8450006850 | From 3500 |
| Rear disk 8450031131 on IVS drum | From 1400 |
| Drum size for Lada Vesta 203.2 mm | |
| *prices are as of 04/08/2019 | |
Conclusion
You can replace the rear brake element yourself within ten minutes. It is not necessary for a repairman to have special skills, but it is desirable.
The market offers components for the brake system of domestically produced cars. The workmanship is no worse than European analogues, the price is affordable. Service station technicians recommend replacing brake tires in pairs to increase braking efficiency and reduce the risk of an emergency.
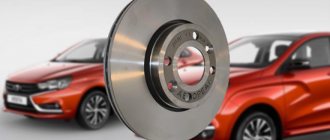
Discs are a good alternative
On the Lada Vesta sedan, rear disc brakes will be installed in three cases:
- If it is a Vesta Sport sedan;
- If we are talking about a concept;
- If the car was prepared for WTCC racing, and the preparation was carried out by LADA Sport.
Photos for each case are presented below.
It turns out that you can install disks
WTCC sports cars do not have ABS systems, and in general we are not talking about road cars. The first two cases are closer to reality. Conclusion: you can install disks, the question is why.
Reviews
| № | Positive |
| 1. | Semyon (www.zr.ru): the car is three years old, the TB has not been changed, wear is no more than 30%. |
| 2. | Andrey (autobann.su): fourth maintenance, the master said that the car was in good condition, there were no critical comments. |
| 3. | Georgy (lada-vesta.net): I won’t slander the car, it’s good, without any special defects. I fix minor damage myself. |
| 4. | Stepan (otzovik.com): several times I tapped the TB, visited a service station, and the technician tightened the fasteners. The car is under warranty, no comments. |
| 5. | Vladimir (www.zr.ru): positive review, no comments. I plan to replace the front and rear pads after next winter. |
| 6. | Alexander (autobann.su): during three years of active operation of the machine, I replaced the right bearing once. Fortunately, the car was under warranty and the cost was minor. |
| 7. | Mikhalych (https://forumvesta.ru): comrades recommend installing imported ones from Renault instead of native ones. They say that the workmanship and service life of the latter are much better. |
| 8. | Vitaly (lada-vesta.net): I won’t criticize it, the car is good, there are no complaints about the engine, chassis, brakes, suspension. |
| 9. | Timofey (otzovik.com): after purchasing the car at the dealership, he immediately re-wrapped the car, lubricated it in places, and replaced the rubber boots with new, imported ones. Now it works like a clock. |
| 10. | Stanislav (www.zr.ru): I’ve heard negative reviews about the Lada Vesta, but I can’t confirm it. The car is solid, there are no special complaints about it. |
| 11. | Gennady (autobann.su): mileage 80,000 km, TB with minor wear, will last the same amount. My comrades advised me to buy drums from an imported company, but I’m still in thought. |
| 12. | Alexey (https://forumvesta.ru): I regularly get serviced at a service station, buy original consumables, have no complaints about the car. |
| Negative | |
| 13. | Konstantin (www.zr.ru): the friction linings at the rear wore out at 50,000 km, the left TB cracked at 100,000 km. I heard that drums from foreign cars fit Vesta, in particular Opel Astra. |
| 14. | Vitaly (otzovik.com): the bearing in the rear brake drum failed at 75,000 km, although it should have lasted longer. |
| 15. | Grigory (autobann.su): after purchasing the car, it needs to be reupholstered, seals and bushings replaced. The manufacturing quality of Russian spare parts is still far from perfect. |
| 16. | Kirill (lada-vesta.net): externally the car turned out to be beautiful, aerodynamic, but the filling is old, with defects from previous generations. I heard that they are coming to Vesta from Renault. |
Related link:
Clutch selection for Lada Vesta (manual transmission, AMT)
Durability
Drum brakes are more durable than disc brakes. Their safety is almost unaffected by different weather conditions: rain, temperature changes, etc. Nor can they become icy in winter.
VAZ regulations: pads in drums must be changed every 60 thousand km, and inspection is carried out every 15 thousand. The pads on the discs are changed as needed, and according to reviews, VAZ pads “live” 30-45 thousand km. By the way, they would live less on the rear axle.
Vesta drums are equipped with TRW pads from the factory - there are no complaints about VAZ here. At the same time, everyone knows that drum brakes are less effective at speed, and they do not withstand prolonged loads (they overheat). Let the reader draw his own conclusion.
Main differences between disc and drum
The braking mechanism consists of several parts and differs in two types of design.
The disk unit has an open design, allowing the device to operate for a long time without overheating. When you press the brake pedal, the brake pads are pressed against the disc mounted inside the wheel rim using a caliper. The degree of compression of the disc by the calipers is very high, which allows the car to brake more efficiently. As a result of heavy loads, the mechanism has a relatively short resource.
The drum mechanism has a closed cylindrical body, which prevents the entry of dirt and dust and has a long working life. The brake pads are pressed against the inner surface of the drum, causing the car to stop. The pressing force of the elements is comparatively lower than that of analogues with a disk, therefore such mechanisms are considered less effective.
The combination of front discs and rear drums is optimal in terms of efficiency and durability. This version of the Lada Vesta justifies itself with its reasonable price and reliability.
Overlays
This is a much easier way to hide rust on Lada Vesta drums, and just hide it. Overlays are a decorative element. They fit directly onto the drums and cover them. The pads are made of ABC plastic, so they can easily withstand impacts from pebbles, sand, etc.
However, these elements also have a protective function, since they cover the drum, which prevents water, snow, dirt, etc. from entering it, and this significantly reduces the chances of occurrence and the rate of spread of corrosion.
Preparation
As in the case of painting, if you intend not only to hide the rusty Lada Vesta drums from the eyes of others, but also to preserve these components, it is recommended to carry out preparatory measures before installation - clean the drums, and then treat the metal surface with a rust converter.
Drum after treatment with a rust converter
Installation
It is extremely simple - just put it on and press the linings tightly to the drum itself. The manufacturer of such an accessory does not provide additional fixation. In addition, it would be a good idea to lubricate the contact area between the lining and the disc with copper grease.
If you want to be sure of the strength of the fixation, then you can stick strips of double-sided tape from the inside of the lining, degrease the metal surface and glue them.
Example of additional fixation with tape
Where can I buy?
You can buy rear drum covers for Lada Vesta in a store or at a car market. In addition, they can be ordered online. The price of Lada Vesta drum covers (set of 2 units) usually varies from 500 to 800 rubles, which depends on the color. Standard plastic covers for Vesta drums are black, however, they can be ordered in a different color by paying extra. The material is smooth on the inside and textured on the outside.
Regarding recommendations, such overlays perform well in the city. However, if you do a lot of active driving on the highway, the pads will not be the best choice, as the drums will become very hot, which can cause the plastic to stick to them.
Which option to choose to preserve Lada Vesta drums from rust - painting or installing linings - is a decision only for each owner individually, depending on his preferences and availability of free time.
Signs of Brake Pad Wear
To accurately understand the degree of wear of brake pads, it is necessary to periodically diagnose them. Diagnostics takes no more than an hour - you simply need to remove the wheels and drums and visually assess the condition of the friction linings. At the same time, make sure that there are no cracks or excessive wear on the drum, the inner diameter of which should be less than 204.45 mm. If the diameter is larger, the drums must also be replaced.
If you nevertheless missed the moment of wear, then when braking, an unpleasant grinding noise will be heard from the rear wheels - this is the “meeting” of two metal surfaces - the drum and worn out pads. Operating the car in this case is strictly prohibited, because one of the wheels at a certain moment may simply jam. At best, you will have to change not only the pads, but also the drums.
Lada Vesta SW Cross Carthage › Logbook › Replacing front and rear brake pads…
I decided to change the brake pads around the weekend. Isn't it too early, you say? The mileage is only 6 thousand km. Vestochka’s brakes with standard TRW pads are simply excellent, very grippy, but that’s why they eat up the brake discs very quickly. Over 6 thousand runs, noticeable wear appeared on the front discs. At this rate, when replacing brake pads, you will have to immediately change the discs. There is no wear on the rear discs, but when moving backwards there is an eerie hum.
In general, I decided to change the TRW pads to Sangsin (Hi-Q), I ordered: 1. Sangsin disc brake pads (art. SP 1564
) – front;2.
Sangsin disc brake pads (art. SP 1709
) – rear;3.
Synthetic lubricant for the brake system Liqui Moly Bremsen-Anti-Quietsch-Paste (art. 7585
);4.
Copper paste Liqui Moly Kupfer-Paste (art. 7579
);5.
TRW grease (art. PFG 110
).
Replacing the pads is not particularly difficult, so I don’t see the point in describing it in detail. To replace the front pads you will need two keys - 13 and 15; for the rear ones - at 13 and 17. Unscrew the two caliper mounting screws, holding the guide with one key. We move the caliper to the side (we don’t hang it by the hose), remove the old pads and guide plates. We clean everything with a brush, lubricate it and install new pads. We check the movement of the guides, if necessary, tighten the boot, remove it and lubricate it with TRW lubricant. Before installing the caliper, recess the brake piston and lubricate the contact surfaces. We install the caliper in place and secure it with screws.
I noticed the absence of hub caps on the front wheels, well, in principle, this is not news. I had two new plugs from the previous car (art.
1J0 501 249 C), but it was impossible to just seat them; I had to use a mandrel to bend the center of the plug.
Before installing the wheel, I lubricated the hub with copper grease. We change the pads on the second front wheel in the same sequence. We're done with the front, let's move on to replacing the rear pads. Before replacing, remove the car's handbrake. In the same way as replacing the front pads, we remove the caliper, clean everything, lubricate it, and install new pads.
But you can’t just press down the brake piston; you need to press it in by screwing it in. To do this, I already had a device for recessing the pistons of the VAG brake cylinder Delo Tekhniki (art. 820 005
), I just had to sharpen the protruding hooks a little.
We screw in the piston, making sure that when installing the pin on the block it fits into the groove of the piston. Lubricate the contact surfaces and put the caliper in place.
We make sure that the pin on the inner block is in the groove, pump the brake pedal and bring the cylinder to the block. We put the wheel on and move on to the second side, doing everything in the same way.
Before starting to move, we pump the brakes well with the pedal and do not brake sharply for the first tens of kilometers, grinding in the pads. After replacing and grinding in the pads, I noticed that the brakes became more “wobbly”, there is no previous tenacity, but there is no squeaking when braking and the hum when moving backwards has disappeared.
Article source: https://www.drive2.com/l/563154738535727550/
Recommendations
Finally, we will give some recommendations on this topic. And the first thing that is important to understand is that the pads must be replaced on the entire axle at once (4 pads on two wheels). It is highly not recommended to replace the pads for only one wheel - this can lead to uneven braking.
Secondly, do not forget to carry out timely diagnostics - this way you will avoid the danger of a stuck wheel, and also extend the life of the brake drum.
Thirdly, buy only proven brake pads for your Lada Vesta. When buying pads, it is not enough to see a photo in an online store. If you come across hard pads, they can create an unpleasant squeak, as well as overheat and quickly wear out the drum. If you get pads that are too soft, their service life may be several times less than the original ones.