For safe driving at any time of the day, low beams must be turned on. Newer cars that are equipped with DRLs do not need to turn on the lights.
The headlights of the VAZ 2114 were not initially designed for constantly switched-on low beams, therefore, with the introduction of new rules that oblige one to drive a car with the headlights on even during the daytime, the load on the headlights and their power circuits increased greatly, which began to lead to breakdowns of the headlights and high heating of wires.
This article describes in detail the possible reasons why the low beam on a VAZ 2114 does not light up, as well as ways to solve this problem.
A little about the design of headlights
The headlights on the VAZ 2114 consist of a block that includes the following elements:
- Turn signals;
- Parking lights;
- Headlights corrector;
- Headlight lamp;
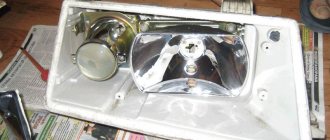
The headlight of the “fourteenth” is made of plastic and glass. A reflector with a hydrocorrector is placed in a plastic case, which corrects the light flux using liquid. This method of adjusting headlights is quite unreliable and for most cars of this model it simply does not work due to seal failure and loss of fluid.
The headlight has one lamp, which is responsible for the high and low beam, that is, it has two spirals, separately for the low beam and separately for the high beam.
The side lights are located under the headlight lamp and are intended for emergency stopping of the car at night.
The high beams on the VAZ-2114 do not light up
Why don't the high beam headlights light up?
The reasons are absolutely the same as for the low beam, but do not forget that the high beam is turned on by the steering column switch, which could also fail.
How to replace the steering column switch? Video
Fact: every third car owner encounters a situation where the low beam headlights are not on, but the high beam is on. Straightforward logic on the topic that if the optics are covered, then there should be no light at all does not work here.
This also happens, for example, to many VAZ owners: on Tolyatti models, for some reason, the right headlight is susceptible to the disease described, even on almost new cars; with the left, this incident happens much less often.
However, you should not blame exclusively domestic, so much-maligned, manufacturers: optics can sooner or later start to act up on any car. And here the point is no longer about the reliability of this or that brand, but rather about the deterioration or fatigue of some parts.
The easiest way, without a doubt, is to entrust everything to the reliable hands of a trusted auto electrician, but it is not too difficult to cope with some problems on your own - if you have the smallest amount of free time and a primitive acquaintance with the basics of electrical circuits.
The low beam of the headlights does not light up, but the high beam is on - this phenomenon can be due to several reasons. And most of them are quite easy to fix. Moreover, this can happen to your car at a completely inopportune moment: on the highway, for example, when you need to switch to low beam so as not to blind oncoming drivers with headlights. Let's try to deal with all the flaws one by one, and consider: what might be the most common options for repairing and troubleshooting such an important segment as low-beam lighting.
Possible causes of failure
There can be many reasons why a VAZ 2114's neighbor fails, and all of them are usually trivial and do not require large material and physical costs to eliminate them.
Causes:
- Burnt out halogen lamp;
- Fuse blown;
- Oxidation of contacts;
- Damage to the power button;
All possible causes of failure of the low beam of the VAZ 2114 were listed above; as you can see, there are very few of them, so making an independent diagnosis is quite simple.
Let's look at each of the reasons in a little more detail.
Problem with fuses, switches and relays
If you notice that your high beam has completely disappeared, then the problem is unlikely to be incandescent lamps. Such simultaneous failure of both lamps is practically impossible and can only occur if the voltage relay regulator on the generator breaks down, but in this case the problem would affect not only the headlights, but also all automotive electrical equipment.
First of all, we advise you to start your search with fuses - look in the instruction manual for information on fuses, namely the exact location of the fuses responsible for the operation of the high-beam lamps. Take them out and check their condition, they may have burned out. The next step is to check the condition of the steering column switch. Note that this problem is quite common in VAZ cars. If the switch and fuses are good, all you have to do is check the status of the high beam relay. You will need a multimeter for this test.
Lamp burnout
The VAZ 2114 uses a H4 type halogen lamp as a head light source. Such a lamp has two filaments of different power inside the bulb. As standard, the low beam filament has a power of 55W, and the high beam filament has a power of 65W. It is the power that depends on the brightness of the lamp, as you can understand, since the high beam filament has more power, which means it will emit a stronger luminous flux. Therefore, the high beam turns out to be brighter than the low beam.
Since the low beam filament has less power, it is made a little thinner, and taking into account the new traffic rules, cars must drive with low beams on if they are not equipped with DRLs.
Since the VAZ 2114 did not have running lights from the factory, it is necessary to move around with light, which greatly affects the durability of the lamps. The filament quickly overheats and fails.
Examination
The lamp can be checked by a simple visual inspection. To do this, you need to remove the lamp from the headlight and inspect its filament for breaks. Also, quite often, when a lamp burns out, a part of the filament appears inside the bulb, which dangles chaotically inside.
Replacement Tips
Speaking about replacing failed components of an electrical circuit, it is worth saying a few words about the correct replacement of light bulbs.
It must be done in the following order:
- Turn off the ignition and remove the key from the lock.
- Open the hood.
- Unscrew the headlight unit (to do this, unscrew the bolts on both sides) and remove it.
- Dismantle the contact group by disconnecting it from the reflector (this procedure should be done extremely carefully).
- Once you find the spring clips, release them.
- Remove the non-working light bulb.
- Insert a new light bulb into the vacated socket.
Reassembly and installation of the headlight unit is carried out in the same sequence, but in reverse order. If necessary, a similar procedure can be performed with the second block. It is worth noting that it is highly advisable to replace lamps not with bare hands, but with light gloves - the glass of the bulbs is quite thin, and with strong pressure it can burst right in your hands.
Fuse blown
Two fuses F12 and F13 are responsible for protecting the low beam power circuit in the “fourteenth”. Each of them is responsible for a separate headlight. When using a car for a long time with the headlights on, the wiring begins to heat up, this is especially aggravated in the heat, which increases the resistance of the wires and, consequently, the current in them, and the increased current leads to a blown fuse.
The fuse must be replaced with the same rated current as was previously installed. From the factory, the rated current of the low beam fuse is 7.5A.
Possible causes and diagnostics of the malfunction
- First of all, if the headlight does not light, we check the light bulb itself; it even happens that by the time you discovered a malfunction of the head light, both low-beam lamps had already burned out. This almost never happens with high beam lamps, since they are used very little.
- One of the most common reasons for headlights not working is a melted fuse thread. However, on most modern cars the power supply circuits of the right and left headlights are not interconnected and are protected by separate fuses. Therefore, the failure of one fuse element leads to the failure of one headlight. This headlight malfunction can be diagnosed visually by opening the mounting block and inspecting the fuses responsible for the operation of the failed lighting element. In cases where access to the mounting block is difficult, you should find out which other circuits are protected by this fuse and check the operation of devices receiving power from these circuits. If these devices also do not work, in 99% of cases the assumption about a failed fuse turns out to be correct.
- If the assumption that the protective element has melted is not confirmed, it is necessary to check the head light relay. Typically, a relay failure leads to the cessation of operation of only one of the lighting systems. Either the low beam or the high beam disappears. You can verify the functionality of the light switch relay by carefully listening to the sounds that occur when you try to turn on the headlights. If short, loud clicks are heard from under the instrument panel when turned on, this indicates that the relay is working properly. The absence of a click confirms the assumption that the relay is faulty.
- It is also necessary to check all the connectors of the electrical wires going to the headlight; perhaps, after the last repair, they simply forgot to put a connector on the headlight terminal and, accordingly, it will not burn as a result. This happens if not a single light bulb is on in the headlights.
- If the headlights still do not light up, then further search is carried out under the hood of the car. You should carefully inspect the existing wires and connections, move the terminals suitable for the headlights, and check the lighting lamps. Sometimes, due to a power surge in the on-board network, it happens that both lamps burn out at the same time. Also, due to water entering the engine compartment, they can oxidize and cease to perform the conductive function of the “chips” at the junctions of the wires.
Actually, the search can end here. If it was not possible to find the fault using the measures described above, further diagnostics of the electrical wiring should be carried out using a multitester and the procedure for “testing” the electrical circuits of the car. The last attempt to determine the cause of the malfunction in the field can be to check the presence of current at the terminals that supply the low beam headlights. To do this, just insert a known-good lamp into the socket or strike the “+” wire against the “-” wire. The start of operation of the lamp or a spark jumping between the wires indicates the presence of electric current in the network and a malfunction of the headlights or lamps themselves. The lack of response to the test gives reason to assume that there is a break in the headlight power supply.
Oxidation of contacts
The contacts on the lamp are often exposed to moisture, especially during the rainy season, which often affects their oxidation. An oxidized contact increases the conductivity resistance or may completely make contact impossible, due to which the voltage will not reach the lamp, and this will lead to the inoperability of the car's low beam.
Oxidized contacts must be cleaned and replaced.
Methods for repairing headlights in the field
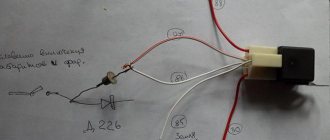
The above-described malfunctions are quite easily eliminated right on the road. No complex diagnostic or repair equipment is required. So, instead of a blown fuse, you can insert several cores from a stranded wire. In this case, one core is approximately capable of withstanding 1 ampere. The wires can be inserted directly into the socket or wrapped around the fuse.
It is important that the contact surface is pressed tightly against the homemade fuse element
A faulty relay can be replaced with a similar one used to switch on other high-voltage circuits. You can dismantle and use to replace a faulty headlight switch relay the element for switching on the power window circuit, heated seats, and additional equipment. In addition, many cars have a special backup socket with an unused relay. The connectors of almost all the elements in question in the car are similar to each other.
To turn on the headlights bypassing any faulty elements of the power circuit, you should use wires of sufficient cross-section and length. In this case, the ends of the wires are stripped of insulation and connected to a car socket designed for a portable lamp. The “cigarette lighter” can be used in a similar way. In this case, it is better to connect from the reverse side of the power point, connecting the wires directly to the terminals. The second ends of the wires are connected directly to the low beam lamp
It is important that only one headlight should be connected in this way.
This is enough to get to your home or repair site while taking the necessary precautions. Connecting two powerful electrical consumers at once can lead to an overload of the power supply circuit of the cigarette lighter or socket, which often causes a fire in the car! You can read how to improve the headlights in your car here
Connecting two powerful electrical consumers at once can lead to an overload of the power supply circuit of the cigarette lighter or socket, which often causes a fire in the car! You can read how to improve the headlights of your car here.
Power button failure
The light on the VAZ 2114 is turned on using buttons separately for the dimensions and separately for the low beam together with the dimensions. Quite often it happens that buttons fail due to burnt contacts or even due to a breakdown of the mechanism inside them.
If all the methods described above did not help in solving the problem, then the light button is most likely faulty. Therefore, it is recommended to replace it with a new one.
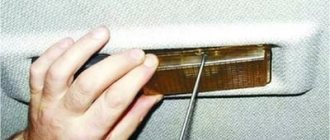
The button pulls out, you just need to pry it off with a thin screwdriver.
Basic lighting
In a standard way, on the base model the issue of interior lighting on this car is resolved quite simply:
- interior lamp of VAZ 2114;
- individual interior lighting lamp;
- dashboard lighting.
There is also lighting for the glove box and interior lighting of the VAZ 2114, which includes illumination lamps for the front ashtray, heater switches and levers, and the hydraulic corrector scale for the front lamps.
The interior lighting is a simple electrical device. Built into the upholstery in the middle, upper part of the body, above the heads of the driver and passengers. It should light up when the doors are opened and go out when they are closed, a simple electrical signal is supplied from limit switches installed on the door pillars. The interior has switches on the front and rear side pillars on each side for manually turning on the dome light.
VAZ 2114 interior lamp
There are times when the light in the interior of a VAZ 2114 does not work. Such issues are often discussed on the forums of fans of this car. In fact, there should not be any special problems in fixing such a problem. There is a proven action plan in such cases.
- Check the functionality of the lamp. If it does not light up, the fuse is faulty and should be replaced. If the brake light works properly, then the fuse is fine and you need to look further.
- Check the condition of the light bulb, if it is working, then you need to check the contacts and limit switches on the door pillars. If an LED lamp was installed, then change the polarity; there could be a mix-up during installation.
- It is necessary to measure the current at the contacts, whether it flows or not. If there is no current, then you need to ring the entire circuit; a breakdown in the wiring is possible.
- The limit switches on the door pillars should be checked very carefully; experts and many of those who communicate on the forums say that this is where problems often occur. There may simply be a bad contact that needs to be adjusted.
Malfunctions of fuses, wires and switches
Another, no less common reason is a blown fuse. It is located in the corresponding block located under the hood, on the left side (along the direction of the car) closer to the windshield. Open the black cover and find the required fuse - in the VAZ2114 it is F12 (right headlight) and F13 (left headlight). Both fuses are 7.5 amps. To ensure their integrity, hold the parts up to the light: whole threads should be visible. If they are missing, the fuse(s) must be replaced. If these elements are intact, but there is still no light, it makes sense to check the relay along the way; it is designated as K9. You need to pull it out and install a known good part (you can use the K8 high beam relay to check).
Location of Priora fuses under the hood
- F1 (30 A) – power supply fuse for the electronic engine control system (ECM);
- F2 (60 A) – fuse for the power supply circuit of the engine cooling system fan (power circuit), additional relay (ignition relay), rear window heating, electrical package controller;
- F3 (60 A) – fuse for the power supply circuit of the electric fan of the engine cooling system (relay control circuit), sound signal, alarm signal, ignition switch, instrument cluster, interior lighting, brake light, cigarette lighter;
- F4, F6 (60 A) – generator power circuit fuses;
- F5 (50 A) – fuse for the power supply circuit of the electromechanical power steering
Relay and fuse box for Halla air conditioner
- right electric fan power supply fuse (30 A);
- fuse for the power supply circuit of the left electric fan (30 A).
- right electric fan relay;
- additional relay (sequential activation of left and right electric fans);
- left electric fan relay;
- heater fan power supply fuse (40 A);
- compressor power supply fuse (15 A);
- heater fan relay;
- compressor relay.
Panasonic air conditioner relay and fuse box
- Heater fan maximum speed
- Right fan
- Fan sequential relay (low speed)
- Left fan
- Left fan fuse (low speed)
- Right fan
- Heater fan
- Compressor
- Heater fan
- Compressor
One headlight is dim, the other is bright.
Several faults can cause the headlights to dim:
- Corrosion or poor connections in the power circuit.
- Headlights or bulbs are worn out.
- The wires in the circuit are damaged.
- Low power output of the charging system.
Make sure the lenses are not foggy. Bulbs can also become cloudy when used for a long time.
You may notice that your headlights dim under certain engine operating conditions.
If the headlights are dim and the engine is off or idling:
- Make sure the battery terminals are clean and tight.
- Make sure your battery is charged or in good condition. You may need to check the battery.
- Check the charging system output and drive belt for proper operation.
- Check the bulbs for proper installation or wear.
If the headlights are dim when the engine speed exceeds RPM:
- Check the charging system output and drive belt for proper operation.
- Check the voltage drop in the headlight circuit.
- Check the light bulbs.
Voltage drop test
A common cause of poor headlight performance is unwanted resistance in the circuit. Since unwanted resistance causes voltage drop, a practical way to find high resistance in an electrical circuit is to use a digital voltmeter to test for voltage drop.
The most common causes of voltage drop are:
Bulb replacement process
- Open the hood, ignition is turned off.
- We find the headlight block and unscrew the headlight protective box on both sides with our hands.
- Having unscrewed the box, we see the picture shown in the figure.
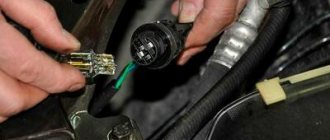
- We take out the contact group from the light bulb (Fig. 1).
- Disconnect the spring holders (Figure 3).
- We take out the light bulb.
Before installation, wipe the lamp bulb with alcohol, otherwise it will burn out. Install strictly in the reverse order and make sure that the lamp sits in its place (one single position).
When carrying out work, it is worth remembering basic safety. If your car's lamp stops functioning on the road, then there is no need to work while standing on the side of the road; it is better to reach the nearest gas station or site. In addition, you should beware of the “treachery” of a burnt-out light bulb, because even the slightest shake can cause the bulb to burst and fly apart, accidentally hitting, for example, the eye, so it is better to work with safety glasses.
We recommend: Checking the operation of the air conditioner in the car
We can draw the following conclusions: although replacing lamps in headlights is not a very complicated process, there is no need to take it lightly; it is better to study the materials relevant to this topic, and also follow basic safety rules. By following these simple rules, you will replace the lamps yourself and be healthy!
Problem with fuses, switches and relays
If you notice that your high beam has completely disappeared, then the problem is unlikely to be incandescent lamps. Such simultaneous failure of both lamps is practically impossible and can only occur if the voltage relay regulator on the generator breaks down, but in this case the problem would affect not only the headlights, but also all automotive electrical equipment.
First of all, we advise you to start your search with fuses - look in the instruction manual for information on fuses, namely the exact location of the fuses responsible for the operation of the high-beam lamps. Take them out and check their condition, they may have burned out. The next step is to check the condition of the steering column switch. Note that this problem is quite common in VAZ cars. If the switch and fuses are good, all you have to do is check the status of the high beam relay. You will need a multimeter for this test.
Why do low beam bulbs often burn out?
According to traffic regulations in force in the Russian Federation, low beam headlights must be on when operating a vehicle, regardless of the time of day. If the headlights on your car work properly, then there will be no problems following this simple rule. But what to do if low beam bulbs often burn out?
Let's look at the main reasons why headlight bulbs can burn out:
- Lamps have a limited service life. This applies not only to the time of constant illumination, but also to a limited number of switchings. In addition, when you replace factory lamps with cheap analogues, you need to understand that their service life is shorter.
- Moisture gets inside the headlight. If the headlight is cracked, or the rubber seals no longer fit tightly between the glass and the headlight housing, there will inevitably be moisture inside. This is easy to diagnose yourself: a headlight whose integrity is compromised constantly fogs up.
- Errors during installation. If you do not follow the basic rules when installing halogen lamps, for example, not using gloves, then greasy marks remain on the headlights, which leads to a reduction in their service life.
- The power of the installed lamps is too high. It is better to choose lamps with reduced power, but with increased brightness, this way you can ensure excellent visibility on the roads in any lighting conditions. It is not recommended to install lamps with a power of 100 W.
We recommend
“The parking brake light is on: how to solve the problem” Read more
- Manufacturing defect of the lamp. If a defective lamp is initially selected for installation - with a displaced spiral or a tilted bulb, it is not surprising that it does not last long and quickly burns out.
- Battery low. If the machine is used for many years, the old unit begins to quickly discharge. As a result of constant recharging of the unit, an overvoltage occurs in the on-board network of the machine. To diagnose this reason, you need the help of an auto electrician.
- Wiring problems. If the car was purchased from another car owner, it is important to check the wiring, as it can be damaged as a result of careless operation of the car. It must be remembered that if the wiring is faulty, it threatens to break not only the headlights, but also any electrical appliances of the car.
- Low-resource lamp. Unscrupulous manufacturers put on the market lamps that initially have a short service life, and accordingly, they quickly fail.
Settings
How to replace low/high beam bulbs on a Lada Granta, step-by-step instructions
If it is not possible to set up the system at a car service center, you can do it yourself. To do this, you will need a flat area with a wall or a solid fence opposite it. This is a prerequisite for any adjustment option.
Low beam
In this case, it is easier to use a universal method, which is almost the same for all cars. Only the distance from the wall to the car can differ, most often it is 7.5 meters, but some models are placed 5 meters away; it is better to clarify this point separately in order to correctly adjust the light. Next you need to prepare the markup.
- The car is driven close to a wall or fence, then marks are made on the surface clearly in the middle of the low beam headlights and opposite them. These will be the main guidelines.
- Then you can drive the car away and start drawing. Two more marks are placed 5 cm below the center of the headlights and connected by a horizontal line. Vertical lines are also drawn through the points to provide a clear reference point.
- The central axis of the machine is determined and also marked on the wall. The end result should look something like the diagram below.
All parameters are determined individually, since the size of the cars and the location of the headlights are always different.
Next you can start setting up
It is important that at least half a tank of gasoline is filled in the car, and that a person is sitting in the driver’s seat or there is a load approximately equal in weight to the driver. The easiest way to adjust headlights near a wall is this:
The car is located at a distance of 5 or 7.5 meters, and the center line should coincide with the middle of the hood
It is important to position the car correctly. The hood is opened and a screwdriver or other tool is prepared for adjustment. The light is turned on and one headlight is covered with cardboard or any other opaque element. The upper edge of the light flux (it is clearly visible) should be located along the line
If it is displaced, adjustment is made with the corresponding screw that regulates the light in the vertical plane. Adjustment in the horizontal plane must be done so that the place where the luminous flux begins to rise is at the vertical mark opposite the headlight.
This is what the adjusted light output looks like.
The second method is in many ways similar to the first, but in this case you will need to place the machine at a distance of 10 meters from the wall. In this case, the horizontal line is drawn 12 cm below the center. Some argue that increasing the distance allows for greater tuning accuracy, so if you have the space, you can try this option.
Video: A visual example of setting up the headlight.
High beam
The high beam headlights do not have clear lines, they distribute the light evenly, so the adjustment will be much easier. The preparation process is almost the same as with low beam, the main guideline will be a horizontal line 5 cm below the center of the headlights and vertical lines opposite the bulbs.
In this case, you need to adjust the light so that the center of the beam falls at the intersection of the vertical and horizontal lines of the corresponding headlight. Here accuracy is not so important, since long-range lighting is used only when there is no oncoming traffic. If the low and high beam are combined in one bulb, then adjusting one option is enough for the headlight to work as it should.
High beam is distributed differently than low beam.
In the video they set the high beams on a Hyundai Tucson.
Fog lights
In this case, there are no screws for adjustment and the position of the light flux can only be changed in the vertical plane. Before you begin, you should loosen the fog lights. They often oxidize, so it is advisable to treat them with a penetrating lubricant in advance.
A line is drawn on the wall; its height should be 10 cm below the location of the fog lights. After this, the car needs to be driven 7.6 meters, positioned opposite the markings and the headlights turned on. In this case, the upper limit of the light flux should coincide with the line; only this position will ensure normal visibility in fog.
Fog lights also require adjustment to function properly.