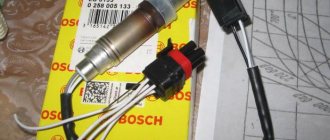
How to check the lambda probe and signs of malfunction? Is this a universal option from Bosch?
- Car shakes when you drive at low speed - 2 answers
Firstly, in the event of a breakdown and malfunction of the labda, several tangible consequences appear in the behavior of the car:
- Increased fuel consumption
- Unstable operation of the car engine (jerks)
- The operation of the catalyst is disrupted (toxicity increases)
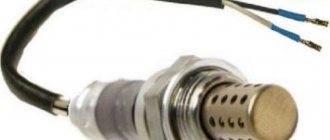
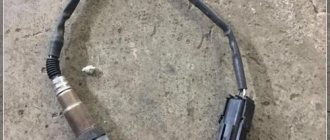
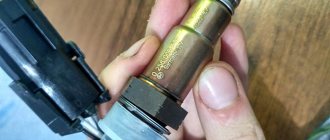
So, to check the lambda probe, you can first unscrew it and do a visual inspection (just like a visual inspection of the spark plugs can tell you a lot).
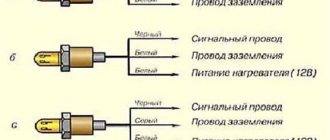
There are several types of lambda installed on cars; the sensors can have one, 2, 3, 4, even five wires, but it is worth remembering that in any of the options, one of them is signal (often black), and the rest are intended for heating (usually white colors).
What and how can you check the lambda?
To check, you will need a digital voltmeter (preferably an analog voltmeter, since it has a much lower “sampling time” than a digital one) and an oscilloscope; if possible, the measurements will be more accurate. Before carrying out the test, it is advisable to warm up the car, since the lambda works properly at temperatures above 300C°.
First, look for the heating wire:
We start the engine, do not disconnect the lambda connector. We connect the negative probe of the voltmeter (regular store) to the body. Using a positive circuit probe, we “hit” each contact of the wire and observe the voltmeter readings. When the positive terminal of the heater is detected, the voltmeter should show a constant 12 V. Next, using the negative probe of the voltmeter, we try to find the negative wire of the heating element. We turn on the remaining contacts of the sensor connector. If a negative terminal is detected, the voltmeter will again show 12 V. The remaining wire is the signal wires.
How does he work
We have already noted that the DC begins to work only after heating to a certain temperature - 350 degrees Celsius. Because of this, the first variations of the probe were installed in close proximity to the exhaust manifold.
Over time, the sensor was improved, a heating element was built in, which made it possible to quickly bring it to operating parameters. Because of this, the location of the probe in the exhaust system has lost its significance.
If you study the design of the device, it will include several main components.
- Ceramic tips with protective screens and sampling holes. On the one hand, they serve to take in exhaust, and on the other, outside air. These elements are contained in a middle element inside a ceramic insulator. They are the main working components of the recreation center. These are electrodes from which readings of potentials and their differences are taken.
- Conductive heating element. It should be looked for inside the tips.
- Electrical signal current collector. This component is located in the middle part of the DC.
- In addition to the sensitive elements of the tips, all other components of the DC are located inside a metal case equipped with a thread. It is necessary in order to fix the device on the receiving pipe body.
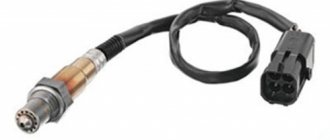
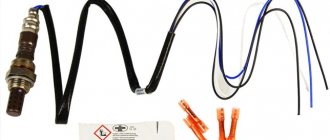
- Modern recreation centers are equipped with wires and a sealing collar. They are called four-wire lambda probes.
- Two white wires are the contacts of the heating system.
- The black wire is the signal wire.
- Black and white striped wiring - grounding.
Checking the lambda probe with a tester:
We take an electronic constant voltage millivoltmeter and connect it in parallel to LZ (“+”, “-” to LZ, - to ground) and the lambda probe must be connected to the controller.
When the engine warms up (5-10 minutes), you need to look at the voltmeter needle. It should periodically change between 0.2 and 0.8 V (that is, from 200 to 800 mV, and if less than 8 cycles occur in 10 seconds, it’s time to change the LZ. Also replace if the voltage “stays” at the level 0.45 V.
When the voltage is always 0.2 or 0.9 V, there is something wrong with the injection - the mixture is too lean or too rich. Because the oxygen sensor voltage must constantly change and jump from 0.2 to 0.9 V.
There is another quick way to check the lambda probe. It should look like this:
Carefully pierce the positive contact of the tester (black lambda wire), the other contact to ground. With the engine running, readings should range from 0.1 to 0.9 V. Constant readings (e.g., always 0.2) or readings outside this range or fluctuations of lesser amplitude indicate a sensor failure.
- always 0.1 - low oxygen
- always 0.9 - a lot of oxygen
- The probe is fine, the problem is different.
If you have the time and desire to bother, you can conduct several tests for a rich and lean mixture, and also additionally check the lambda probe sensor.
- Disconnect the oxygen sensor from the shoe and connect it to a digital voltmeter. Start the car and, by pressing the accelerator pedal, increase the engine speed to 2500 rpm. Using a fuel enricher, set the speed reduction to 200 rpm.
- If your vehicle has an electronically controlled fuel system, remove the vacuum hose from the fuel pressure regulator. Look at the voltmeter reading. If the instrument needle approaches 0.9 V, then the lambda probe is working. A sensor malfunction is indicated by the voltmeter not responding and its readings being less than 0.8V.
- Take the lean blend test. To do this, take a vacuum tube and cause an air leak. If the oxygen sensor is normal, the digital voltmeter reading will be 0.2 V or less.
- Check the operation of the lambda probe in dynamics. To do this, connect the sensor to the fuel system connector and install a voltmeter parallel to it. Increase engine speed to 1500 rpm. The voltmeter readings with a working sensor should be at the level of 0.5 V. Another value indicates a failure of the lambda probe.
Checking the voltage in the heating circuit
A voltmeter is needed to check the voltage in the circuit. We turn on the ignition and connect the probes to the heater wires (you cannot disconnect the connector, it is better to pierce it with sharp needles). Their voltage should be the same as the battery voltage when the engine is off (about 12 V).
If there is no plus, you need to go through the battery fuse sensor circuit, since it always goes directly, but the minus comes from the ECU, so if there is no minus, let's look at the diagram on the block.
Checking the lambda probe heater
In addition to measuring the voltage with a multimeter, you can also measure the resistance to check the serviceability of the heating element (two white wires), but you will have to take an Ohm tester. The documentation for a specific sensor must indicate the nominal resistance (usually about 2-10 Ohms), your task is only to check it and draw a conclusion. The video shows this method:
Checking the oxygen sensor reference voltage
Switch the tester to voltmeter mode, then turn on the ignition and measure the voltage between the signal and ground wires. In most cases, the lambda probe reference voltage should be 0.45 V.
A modern car is an electromechanical system consisting of many parts and assemblies interconnected by a series of different sensors. These sensors keep the vehicle in good working order and ensure it runs productively. Today in this article we will talk about the oxygen sensor (lambda probe). In particular, we will answer the question of how to check a 4-wire lambda probe with a tester. This is the most common type of sensor and is very important. Before you begin to study and test the performance of the LZ, it is advisable to briefly study its design characteristics, types and principle of operation.
Diagnostics
Periodic maintenance involves a range of testing and adjustment work.
Before checking the lambda probe yourself, knowledge of the design features of the engine and specifically the elements of the lambda probe is required.
Diagnostics includes two stages: visual inspection of visible elements and a detailed check with removal of the sensor.
Visual inspection includes:
- inspection of electrical wiring and connection points. Damage, exposure of the live part of the wire or unstable connection of the connector are unacceptable.
- Inspect the external elements of the oxygen sensor for the absence of solid deposits or carbon deposits.
Checking the electrical wiring of the VAZ 2114 oxygen sensor with a multimeter. It will reveal the conductivity and resistance of the wires.
The same method can be used to check the on-board computer. The signal that it supplies to the device we are studying is equal to 0.45 V. If a test with the engine running reveals a deviation in this indicator, diagnostics of the on-board computer is necessary.
To check the lambda probe, you must do the following:
- warming up the engine to a temperature of 80–90 °C;
- stopping the engine;
- connecting a multimeter to a lambda probe;
- starting the engine and raising the speed once to 2500 rpm;
- disconnecting the vacuum pipe from the fuel pressure regulator;
- Check the voltage at the oxygen sensor. The further process will depend on how many volts it produces. 0.8 V or less is an indicator of a faulty lambda probe. In this case, the VAZ 2114 oxygen sensor must be replaced.
To check whether the sensor detects a lean fuel mixture, it is necessary to artificially block the air supply paths to the engine. If the readings on the multimeter are 0.2 V or less, the sensor is working properly. If the indicators are different, it has an internal defect.
Service centers offer a different type of diagnostics. It is carried out using a diagnostic computer connected to the vehicle's on-board computer. All current or past errors remain in its history.
When detecting an error in any vehicle system, it saves it and assigns a personal code. The service center remains to find the decoding of this code and take measures to eliminate the malfunction.
What is a lambda probe, principle of operation and its types
Therefore, an air sensor is a small device that is installed in the exhaust manifold of any modern car and serves to assess the concentration of residual oxygen in the exhaust gases. Thanks to the readings of this device, the computer unit of your car receives data on the basis of which it prepares the combustible mixture. The lambda probe takes into account the residual oxygen concentration in the burned fuel and sends a signal to the electronics that the newly supplied fuel mixture should be enriched or removed into the air. It goes without saying that if the lambda probe malfunctions, the operation of the car's engine may be disrupted.
Remember! To burn 1 kg of a mixture of fuel and air, you need to spend about 15 kg of oxygen.
Lambda probe device
A modern air sensor is a small structural device containing a number of interconnected parts.
Lambda probe design
- Metal body with thread. It is designed to fix the sensor in the mounting hole;
- Ceramic insulator;
- O-ring;
- Conductors;
- Protective cover with ventilation hole;
- Contact;
- Ceramic tip;
- Electric stove;
- Exhaust port;
- Steel shell.
As a rule, the start of exhaust gas measurements occurs at a temperature of 310-400 degrees. It is at this temperature that the special filler in the sensor becomes electrically conductive. Until the temperature reaches the desired value, the car's electronic control unit records the readings of other sensors, and only then the lambda probe. The peculiarity of its operation is that the exhaust gases and atmospheric air are separated by a container with a composition that generates current. Due to a certain chemical effect on this container on the pressure side and on the air side, a difference in oxygen concentration is created, based on which an electrical potential is created. The values of this potential are sent to the vehicle's control unit.
All oxygen sensors are divided into four types depending on the number of wires in their design:
1. Single wire; 2. Two-wire; 3. Three wires; 4. Four threads.
Types of lambda probes
All of the lambda probes listed above are available in narrowband and broadband.
ELECTRONIC INJECTOR CONTROL SYSTEM
The “brain” of the electronic engine control system (ECM) is the electronic unit (ECU), it reads data from numerous sensors located on the internal combustion engine. Having collected all the readings, the unit analyzes the data and, based on the results obtained, sets commands to the ignition system and injectors. The injectors set the required proportion of fuel and air in the cylinders of the internal combustion engine, the ignition distributes the spark among the cylinders and ignites the vehicle at the moment of its compression in the combustion chamber of the cylinder.
Sensors that affect the quality of the vehicle in injection engines primarily include an air flow sensor (MAF) or an absolute pressure sensor (DBP, or it is also called a MAP sensor). It should be noted that the VAZ 2108-15 still uses a mass air flow sensor, although more modern systems have long been equipped with MAP.
The main causes of lambda probe malfunctions and the consequences of its breakdown
Having decided on the concept and characteristics of the oxygen sensor, we can conclude that it performs a key function in the normal operation of the internal combustion engine. So what can cause the lambda probe to break down and fail? There are two aspects to this issue: external factors and internal factors, which we read about below.
- Leak in the coolant or brake fluid sensor housing;
- Caring for the sensor using products not intended for such purposes;
- Low-quality fuel with high lead content;
- Overheating of the sensor, which also occurs when using low-quality fuel.
After the lambda probe fails, your car will begin to show signs:
- Significant shocks when moving;
- Excessive fuel consumption;
- Poor performance of the catalyst;
- Floating motor speed;
- Excess toxic waste in exhaust gases.
The power of all of the above should push the motorist to check the lambda probe almost every 10 thousand km. Its complete replacement is desirable every 40,000 km.
Checking a lambda probe with 4 wires with a tester. Methods for checking LP
So, we come to the question that worries every motorist: how to check the lambda probe at home? To do this, you will need a regular tester (multimeter) or voltmeter.
4-wire lambda probe
The first step is to warm up the engine, then measure the resistance on the heater wires. As a rule, these are two white wires, the polarity of which can be ignored. The normal resistance between them should be from 2 to 10 ohms. If this value is different, the sensor is faulty.
Lambda probe voltage graph
Let's move on. Now you need to connect the negative terminal of the tester to the engine housing. In this case, connect the positive terminal to the signal wire of the sensor itself. This is usually the black wire. With the engine warm, press the accelerator pedal and increase the speed to 3000 rpm. Hold the pedal in this position for about three minutes. At this moment, the lambda probe heats up. You can now check the activation of the oxygen sensor.
The voltage between the motor body and the signal (black wire) of the part should fluctuate between 0.2 and 1 volt. For every 10 seconds that pass, the sensor should light up approximately 10 times. In cases where the tester shows 0.4-0.5 volts and does not turn on, we can conclude that the lambda probe is faulty.
You also need to know that when you press the accelerator pedal hard, the tester should show a voltage of about 1 volt. When the pedal is suddenly released - zero volts.
This is all for us. We hope that your sensor is fully operational and performs its intended functions. If you have questions, leave them in the comments.
General information and principle of operation
As the name of the part suggests, the oxygen sensor (DK) is a device through which the ECU receives information about the amount of oxygen remaining in the exhaust gases.
DC is a rather complex device in design. It consists of a ceramic electrolyte that can withstand extremely high temperatures, up to four hundred degrees. The electrolyte consists of zirconium dioxide, the surface of which is treated with yttrium oxide. The surface of the oxide is coated with platinum. The use of platinum is due to the fact that it is the material with the highest thermal conductivity.
In addition to the main electrolyte, the design of the lambda umbrella consists of the following parts:
- Shielded tips, shielded on both sides from the electrolyte, with holes for air and exhaust gases. The tips, combined with electrolyte, are the main functional part of the oxygen sensor, with the help of which the analyzer device determines the potential difference;
- The tips are a kind of housing, inside of which there is an element with high current conductivity (collector);
- Between the tips there is a device that reads the resulting electrical signal;
- All structural elements of the oxygen sensor are located inside a metal housing. The gland probe is separated by four wires: 2 white wires are responsible for powering the device, and two black wires - the first transmits the received data to the computer, the second - to the ground.
The principle of operation of the lambda umbrella is as follows: the electrolyte located in the exhaust gas flow of the car is heated to temperatures from 300 to 400 degrees thanks to the built-in heating element. This temperature is necessary for the zirconium to reach maximum conductivity and for the system to begin functioning. The central control unit is installed in such a way that the tip on one part of it is in contact exclusively with exhaust gases, and on the second tip - with clean atmospheric air.
When a sufficient amount of oxygen accumulates inside the manifold located inside the tip, the potential difference across the electrolyte changes, data about which is transmitted to the ECU, and the electronic systems of the fourteenth change the amount of fuel supplied to the cylinders.
The optimal ratio of fuel and oxygen in the fuel mixture is 14.7 to 1; it is at this ratio that the maximum efficiency of the power unit is observed.
The cost of a VAZ oxygen sensor for 2114 depends on the type of device: on the first models of the fourteenth, single-wire lambda umbrellas were installed, now they can be purchased at a price of 1.2-2 thousand rubles, on new models - four-wire direct current, they are more expensive, from 2 to 3 thousand.
PRINCIPLE OF OPERATION AND SIGNS OF SENSOR MALFUNCTION
The DC does not start working immediately after the engine is ignited. In order for the device to start sending a signal to the computer, the sensitive element of the sensor must warm up to a temperature of 360 degrees.
All modern devices are equipped with special heaters that allow you to reach operating temperature in the shortest possible time (5-7 minutes, during which the brains of the fourteenth use data stored in memory from the previous engine operating cycle to adjust the ratio of gas and gasoline in the fuel mixture).
The DC is located so that its sensitive element is in contact simultaneously with exhaust gases and clean atmospheric air. When contacting them on opposite parts of the sensor, a potential difference arises (depending on the oxygen content in the environment in which the sensitive element is located), on the basis of which a signal sent to the ECU is generated.
How do you know when it's time to change the oxygen sensor? The device can become inoperable for two reasons: either if the heater breaks down, or if there is a loss of sensitivity due to mechanical damage.
Signs indicating a breakdown of the DC are as follows:
- The fourteenth began to consume more fuel;
- When accelerating, jerks occur in the movement of the car;
- Unstable engine operation at idle;
- The catalyst does not work;
- An exhaust toxicity test shows a result that is off scale above the norm.
If one of the above symptoms occurs, you need to remove the oxygen sensor and check its functionality using a multimeter.
Checking the lambda probe
You can determine a DC malfunction and check the lambda umbrella using the following signs:
- Problems with the engine at low speeds: the fourteenth stops or does not accept speed well;
- Gasoline consumption has increased;
- After turning off the engine, distinct crackling sounds are heard in the DK position.
The fact that it is necessary to check the oxygen sensor is also indicated by the presence of errors 131 and 134 on the instrument panel. These errors indicate that the device is emitting an incorrect signal and the problem should be sought in the sensor wiring or poor grounding of the device to the body. The presence of error 132 indicates that the supplied fuel mixture is too lean (large amount of oxygen in gasoline).
Before you pick up any electronic equipment, you need to familiarize yourself with its characteristics. The oxygen sensor pinout is as follows:
- A - contact of the positive sensitive element;
- C - contact of the negative sensitive element;
- B - power cable of the heating device.
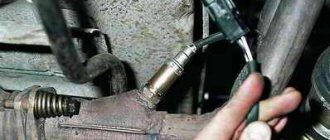
Knowing what the lambda probe pinout looks like, you can start checking the device. First, let's study the location of the oxygen sensor based on the type of engine of the fourteenth:
- In a car with a 1.5-liter engine, it is located at the top of the exhaust pipe, next to the resonator;
- Nawaz 2114 with a 1.6 liter engine, the lambda probe is located in the engine compartment, directly on the engine exhaust manifold. Keep in mind that on new models of the fourteenth, 2 DCs are installed simultaneously - the second one is located next to the first one, it is not difficult to find.
You can check the oxygen sensor on a VAZ 2114 at home with a regular multimeter, which can be bought at any auto store for 300-500 rubles.
Checking the oxygen sensor with a multimeter is carried out as follows:
- We start the fourteenth and warm up the engine so that the central circulation reaches operating temperature;
- We go into the engine compartment to check the lambda probe with a tester. We connect one multimeter probe to the negative terminal of the engine, the second to contact “B” of the oxygen sensor. If the tester shows that the voltage at the oxygen sensor is 12 Volts, the device is completely repaired; if the result is lower, the DC contact circuit is broken.
- Next, we check the contacts of the sensitive elements “A” and “C”. Place the negative probe of the tester on contact “C”, and the positive probe on contact “A”. If the sensor is working, the tester will show 0.45 V. If the readings differ, you need to change the direct current.
Repair
Electrical wiring
If the cause of the malfunction is damage to the electrical wiring of the lambda probe, it is necessary to repair the required area or replace the wire.
Connector
If the connection becomes oxidized, it is necessary to reconnect and clean the contacts.
Mechanical damage to the wiring connector requires its replacement.
Cleaning the device
Accumulated carbon deposits on the oxygen sensor housing or outer electrode may cause a malfunction. Cleaning is a temporary measure and, after a certain time, the VAZ 2114 oxygen sensor will still need to be replaced.
To clean, it is necessary to soak the VAZ 2114 oxygen sensor in orthophosphoric acid or a rust converter. The carbon deposits should go away on their own. Forced cleaning must be performed with objects made of soft material. The use of hard materials (wire brush or sandpaper) is not recommended.
Replacement with a new one
If the sensor is faulty and cleaning from carbon deposits does not lead to its operation, it needs to be replaced.
Replacing the VAZ 211 lambda probe is performed as follows:
- disconnecting the lambda probe wiring;
- removing the oxygen sensor from the exhaust manifold;
- installation of a working sensor;
- electrical wiring connection.
Having repaired or replaced the oxygen sensor on a VAZ 2114, it is necessary to re-check its operation by starting the engine and warming up to operating temperature.
Features of replacing the oxygen sensor
it is necessary to replace the faulty lambda probe with a completely similar device.
When going to a car dealership, take the broken device with you and check the markings located on the device body.
The algorithm of actions is as follows:
- Disconnect all cables from the device;
- Unscrew the DC with a wrench;
- Screw in the new sensor. Be careful because the thread is easy to break;
- We connect the sensor contacts according to the pinout diagram.
As you can see, there is nothing complicated in replacing the DC. Knowing how to check a lambda probe, determine the malfunction and install a new device in an hour and a half. It is worth noting that all of the above technology is also suitable for the VAZ 2115.
We hope this article was useful to you, the car owner!
How to check the oxygen sensor (lambda probe)?
Before replacing the oxygen sensor, you must make sure that it is the cause of the engine malfunction: decreased acceleration, decreased power, increased fuel consumption.
To do this we need to check the oxygen sensor.
List of possible malfunctions of the lambda probe (oxygen probe): -Heating does not work - loss of sensitivity - decreased performance (how to fix the sensor (reset sensitivity)?) As a rule, the death of the sensor on a car is often not recorded if the reason lies in the sensitivity of the sensor. But if the sensor heating circuit breaks, the on-board computer will immediately generate an error.
Indicators
Lambda indicators may vary, but the car requires certain, optimal parameters.
Index
Peculiarity
Lambda equals one
Theoretically, this is the optimal air ratio, at which the actual amount is equal to the required
Lambda is greater than one
Indicates that the air-fuel mixture is lean and therefore the engine is not operating optimally.
Lambda is less than one
Under such circumstances, the mixture turns out to be rich and there is an excess of fuel. Because of this, there is a lack of oxygen necessary to burn such an amount of gasoline
If we talk directly about ideal conditions for the VAZ 2114 and its engines, then the lambda should have a ratio of 14.7 to 1. In other words, the mixture needs to be lean. This is due to the need for a sufficient amount of oxygen on the catalyst to burn CH and CO.
For domestic cars, a modern DC is used, which functions as a threshold element.
Checking the sensor power (voltage at the oxygen sensor)
Before replacing the sensor, you must make sure that it is turned on and all circuits are working properly. To do this, open the hood and disconnect the sensor connector (it is attached with a clamp to the cooling system pipe).
- Checking the heating element circuit. We take the tester and connect its “minus” to the engine, connect the “plus” to contact “B”. Turn on the ignition and look at the meter readings - it should show 12V. If the tester readings are below 12V or there are none, the battery is discharged (which is unlikely) or the power circuit is open (we can eliminate the malfunction). The control unit is also faulty, but, as a rule, the on-board computer immediately shows this error.
- Let's check the sensor circuit. We measure the voltage between contacts “A” and “C” minus by “C” plus by “A”. The voltage should be 0.45 V. If the voltage is missing or differs by 0.02 V or more, the power circuit is faulty (needs to be found and repaired) or the computer is faulty (which is also unlikely).
You can fully check the operation of the sensor only with the help of an oscilloscope, which most motorists do not have, so I see no point in describing this situation. I will only say that to check it you will need to artificially pump out and enrich the fuel mixture and look at the sensor readings.
If the sensor has already worn out a lot - more than 100,000 km, it can be safely replaced. Because even if it is working, the sensitivity has deteriorated significantly, which leads to unnecessary gasoline costs.
There are so-called “lambda probe simulators”. I’ll say right away that they will not fit our cars, because... The ECU does not read their signals.
You need to understand exactly how the sensor works. Please note the following errors.
Low signal level from oxygen sensor 1
Checking the oxygen sensor (lambda probe) on a VAZ 2114
The lambda probe on the fourteenth is part of the system that powers the engine. Estimate the amount of oxygen in the tube exhaust. This is necessary to properly adjust the mixture for the wheelbarrow to operate. By the way, such devices are installed only on the injector.
Oxygen sensor (lambda probe) VAZ 2114
Before checking the lambda probe, you need to imagine the main features of its operation.
The sensor, or rather what works in it, is a ceramic body with platinum. The operating temperature is from 350 degrees, while the lambda probe collects and mixes the mixture with the engine fuel system according to the readings of other sensors.
It works like this: the exhaust is filled with the (working) body of the lambda probe, it reads the difference in oxygen index from the exhaust and from the atmosphere and sends it to the electronic control unit, which is already processed.
DISCONNECTING THE SENSOR
Many car owners ask the question, what will happen if you disconnect the lambda probe from the ECM circuit, and how to disconnect the oxygen sensor? The answer is simple - with the lambda disabled, the control unit will use the standard data of the program embedded in it, and fuel will be consumed almost as much as with a faulty sensor. On average, consumption will increase by 2-3 liters relative to engine operation with a working lambda probe. And disconnecting the sensor is very simple - you just need to disconnect the plug with the wires that fits the probe.
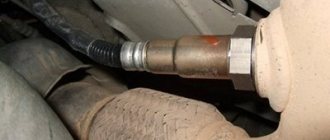
Oxygen sensor location by engine type
On engines of different sizes, lambdas are located in different places in the exhaust system.
- 1.5 liters - located on the suction pipe, screwed on top, exactly in front of the resonator. It's easy to find, it's so lonely on the exhaust system, you can see it by driving a car into a hole.
- 1.6 liters - this engine has two oxygen sensors, they are located on the manifold. There may be one - for euro 2 and for euro 3 - 2 pieces.
As always, parts of the fourteenth plant tend to break down, but don’t rush to the spare parts warehouse. It is necessary to check the serviceability of the lambda probe; diagnostics often reveal completely different causes of malfunctions in the exhaust system.
How to check the oxygen sensor of a VAZ 2114?
For basic diagnostics you will need the following: Get a manual showing what an oxygen sensor looks like, you will also need an oscilloscope and a multimeter. Warm up the engine before checking the oxygen sensor.
But that is not all! Be sure to check the pinout of the oxygen sensor:
- A - wire from the sensing element on the lambda with a positive potential,
- C - wire from the lambda sensor with negative potential,
- B - wire for the heating element on the lambda probe.
Now the check action plan:
- We look at the diagram of the sensor device and check those parts of the system (their sensors!) that are affected by the lambda probe: on-board network leakage, ignition system, fuel supply system, look at the sensor housing and wiring - so that there is no damage.
- The oxygen sensor must be removed and tested with a multimeter, which must be switched to voltmeter mode: start, press the gas to the ground at 2500 rpm, then reduce to 2000.
- Fourteenth - injector, then remove the vacuum hose from the fuel exhaust pressure regulator, load it into a voltmeter, if the reading is close to 0.9 W, the lambda probe is in perfect order, if the reading is below 0.8 or not at all, the sensor has failed.
- You can do a mixture test: take the same vacuum tube and create an air intake. When the lambda is working, the reading on the voltmeter will be up to 0.2W.
- In this case, you should observe the behavior of the oxygen sensor: put it back on the exhaust system, parallelize the multimeter with it. We press the gas to the floor up to 1500 rpm, look at the numbers: if 0.5 W, then everything is fine.
A simple test of the lambda probe requires a basic understanding of what can break and what breaks most often:
- If the heating in the oxygen sensor does not work,
- If the device does not respond, it means that it has lost sensitivity to exhaust gases and the oxygen content in them,
- Break in the contact system.
In the latter case, the on-board computer will give you an error that will indicate a faulty sensor. In other cases, nothing will show the fact of sensor death except self-diagnosis.
Design
Regardless of the name, lambda probe or oxygen sensor, its essence does not change.
The basis of the device is a ceramic solid electrolyte, the material for which is zirconium dioxide. It is additionally coated with yttrium oxide. But that's not all. There is a coating on top of the ceramic element. It is made from conductive platinum electrodes.
The operating principle is similar to galvanic cells. When the DC is installed on the engine exhaust manifold, due to the influence of the exhaust gas flow, it heats up to approximately 300-400 degrees Celsius.
When heated, the zirconium electrolyte acquires the necessary conductivity, thereby ensuring optimal performance of the sensor.
It is important to install a lambda probe. The DC is positioned so that one electrode receives outside air, and the second breathes a mixture of exhaust gases. When the amount of oxygen changes on one of the electrodes, a potential difference occurs. It is transmitted to the electronic engine control unit via a signal. This allows the ECU to adjust the fuel supply through the fuel injection system.
Reading errors
Checking the VAZ 2114 oxygen sensor may be limited to simply reading errors from the board, here are the most common ones related to lambda:
- Error P0131 is a problem with the signal level coming from the device, it is too low, which indicates that the mixture is concentrated.
- Error P0132 is a similar problem with the signal, only if it is an error, then the signal is high, which indicates a poor fuel mixture.
The errors displayed are not a panacea; they relate more to the fuel system and not to troubleshooting the lambda probe. That's why we found errors - look at what's wrong with the fuel pressure gauge and whether there is any air leakage from the atmosphere. Then diagnose the sensor itself.
The voltage on the oxygen sensor is one of the stages of checking its functionality. Before replacing or repairing a lambda probe with your own hands, you need to carefully check whether the device is receiving the necessary power and what condition the contact circuits are in. For this process, you need to open the hood of the fourteenth and remove the sensor (its connector is fixed with a small clamp on the cooling system pipe). We will look at two circuits: the heating element of the device and the oxygen sensing element on the sensor body.
- To see the heating element circuit, you need to take a multimeter, connect its negative terminal to the engine, and connect the positive terminal to wire B. Turn the key into the ignition, look at the numbers on the multimeter: if 12V, then it’s normal, less - this is a dead battery (in rare cases ), broken contacts (most likely). Another option is to make a mistake on the electronic control unit, but here the on-board computer usually gives an error.
- To check the circuit of the sensitive element, it is necessary to measure the voltage between wires A and C. We place the negative terminal of the multimeter on wire C, the positive terminal on wire A. We look at the indicator on the screen: if 0.45V, then everything is in order. If there is no number or it fluctuates within 0.02 V, the problem is in the power circuit. Again, the option is to make a mistake with the ECU, but this is not common.
Complete diagnostics of the lambda probe is only possible using an oscilloscope. Many people do not have such a device (despite the fact that many, in principle, do not know what it is or what it looks like). The test is tedious; measurements require special enrichment and depletion of the fuel mixture.
Many people ask how to remove a VAZ 2114 oxygen sensor, keeping in mind that there are substitutes for such a sensor. I don’t see the point in this: devices that simulate a lambda probe are not suitable for the design of the exhaust system of the Russian automobile industry (at least for Samara). The ECU simply does not read the signal it gives it.
Another point: if the mileage of the fourteenth has exceeded 100 thousand kilometers, you just need to change the oxygen sensor without waiting for it to fail (which rarely happens). If it works, it means it’s bad, the sensitivity is not the same and this is fraught with increased fuel consumption.
Symptoms of a problem
Now regarding the signs of malfunction. There may be several of them. Therefore, carefully monitor the behavior of your VAZ 2114. If you detect one of the signs, immediately take appropriate measures.
Location of the recreation center
- When gas is low, the power unit begins to operate unstably, may stall, and floating speeds appear;
- The dynamic parameters of the machine have deteriorated significantly;
- Under normal conditions, fuel consumption levels increase excessively;
- A cracking sound is observed in the catalyst zone after the engine is turned off;
- You can hear the characteristic smell of spoiled eggs. Such stench is caused by the ingress of a large volume of gasoline into the catalyst, which is not burned.
If you need to replace the DC, check whether such a probe is installed on your car. On earlier versions of the VAZ 2114, single-wire sensors were installed, and then four-wire sensors appeared. Their price ranges from 1200-3000 rubles, depending on the type of recreation center.
If, when removing the device, you find that there is carbon deposits on the device, but the measuring device shows a slight deviation from the norm, it is not necessary to change the DC. You just need to get rid of the carbon deposits.
To do this, heat the sensor very much and then cool it quickly. This will allow the carbon deposits to crack and fall off. All that remains is to lightly wipe the device with a brush.
What if without a recreation center?
Many people ask whether it is possible to disable the recreation center and how this is done. We categorically cannot recommend doing this, since it leads to serious negative consequences:
- The engine will begin to operate unstably and incorrectly;
- Fuel consumption will increase;
- The composition of the exhaust will deteriorate significantly;
- You will need to reflash the on-board computer.
https://youtube.com/watch?v=ns_4VPtpVH8
Therefore, if you find problems with the lambda probe, take the necessary measures to eliminate them. It's not difficult to do it yourself.