A starter is an element of a vehicle - an electric motor that has 4 poles. He starts the engine in the car. As for the principle of its operation, it is based on the fact that it transmits the initial stroke to the engine crankshaft. Thanks to the 4 brushes of this device, the level of power and torque increases. Of course, if the starter is faulty, the engine cannot be started.
Also on the website read everything about tuning the interior of the VAZ 2106
Starter circuit for VAZ 2101, 2102, 2103, 2104, 2105, 2106, 2107
First, let's take a closer look at the VAZ 2101, 2102, 2103, 2104, 2105, 2106, 2107 starter circuit.
VAZ "classics" starter circuit
Deciphering the starter circuit for VAZ 2101, 2102, 2103, 2104, 2105, 2106, 2107:
- — drive side cover;
- — retaining ring;
- — restrictive ring;
- — drive gear;
- — overrunning clutch;
- - drive ring;
- — rubber plug;
- — drive lever;
- — relay anchor;
- — holding winding of the traction relay;
- — pull-in winding of the traction relay;
- — relay coupling bolt;
- — contact plate;
- — relay cover;
- — contact bolts;
- — collector;
- - brush;
- - armature shaft bushing;
- - cover on the collector side;
- — casing;
- — shunt coil of the stator winding;
- - frame;
- — stator pole fastening screw;
- - anchor;
- — armature winding;
- - intermediate ring.
Starter connection diagram for VAZ 2101, 2102, 2103, 2104, 2105, 2106, 2107
Deciphering the starter connection diagram for VAZ 2101, 2102, 2103, 2104, 2105, 2106, 2107:
- — generator;
- - accumulator battery;
- — starter;
- ignition switch;
P1 - pull-in winding of the traction relay;
P2 - holding winding of the traction relay.
The starter of VAZ 2101, 2102, 2103, 2104, 2105, 2106, 2107 does not start
What signs indicate that the starter needs to be repaired or is time to be replaced? Why does the starter sometimes not start?
These questions have their own answers:
- The relay functions without problems. However, the anchor does not respond or makes slow rotational movements. Solution ! As a rule, this is due to burning of the collector. It is also necessary to pay attention to the winding. It must be complete. It is also possible that the relay fastening elements are loose, there is a short circuit in the commutator, the brushes are stuck or have become completely unsuitable for further use. However, the reason may lie in a discharged battery.
- The starter responds, but the armature relays do not function. Solution ! Often the whole point is that the anchor is stuck. In this case, it is worth checking how the tips are fixed. Is there a short to ground and what is the condition of the wiring?
- The armature rotates, but problems arise with the crankshaft. Solution ! It's worth checking the buffer spring. Most likely it's broken. Some components of the coupling may be damaged.
- Powerful noises are heard. This is often the result of damaged bushings and gears.
- In turn, the starter turns, but does not start. You need to take a closer look at the return spring. The device may also be skewed. It is also possible that the relay and drive handle are jammed.
The fastest and most cost-effective upgrade is installing coolers
The standard heater of the VAZ 2105 does not always cope with cold winter weather. Do-it-yourself modification of the VAZ-2105 stove will not require too much labor and money if the car owner decides to modify the standard equipment by installing coolers on the side deflectors. It is worth noting that absolutely everyone should improve the heating equipment of the VAZ-2105, since due to the irrational design, all the air entering the cabin goes down. Thanks to the installation of coolers, which are usually included with PCs, you can adjust the air flow going to the sides. Experts recommend purchasing devices that can make at least 1500 revolutions per minute. Despite the fact that a do-it-yourself modification of the VAZ-2105 stove will not require much expense and time, it will help increase the level of comfort.
Replacing the VAZ “classics” starter
The most common reason why the starter on a “classic” becomes faulty is the inoperability of the retractor relay with which it is equipped. That is why, when turning the key, the driver will hear a characteristic click. Consequently, the engine will not start in this case.
True, sometimes it is necessary to completely replace the starter. But first you need to dismantle the old starter. To do this, use the key to “thirteen”.
Replacing the starter consists of the following steps:
- We remove the battery.
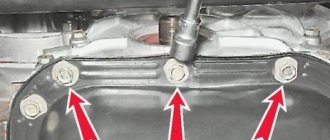
- Then you need to find the fasteners.
- Then you need to unscrew the 2 bolts.
We unscrew the bolts.
Then you should pull the starter and move it towards the right. So it will move away from its previous position and shift to the right side. - Next, you need to lift the left side of the starter and turn it upside down. It is pulled up all the way.
- This element of the vehicle should be lifted until the wiring located at the rear of the starter becomes accessible and the wires can be removed.
- There are 2 wires at the back. One of them is fixed using a standard nut, which initially needs to be unscrewed.
Unscrew the power cable nut - A simple plug serves as the second nut. It needs to be moved to the side. It can be dismantled without much effort.
- Once the starter is free, it can be easily removed.
As for installing a new starter, it is carried out in the reverse order. This procedure will not take much time. It is recommended that you perform these steps in a specific sequence.
In other words, you first need to connect the wires to the starter, and only then install it in its original place. At the same time, the price of a new starter for a six ranges from 2 to 4 thousand rubles. It all depends on the manufacturer and modification of the device itself.
Dismantling and replacement
To make it more convenient to replace the relay, it is recommended not to be lazy and still remove the starter itself. This will allow you to simultaneously check the condition of the starter while replacing the relay.
The removal procedure described below concerns an assembled relay, which has the ability to replace individual structural elements.
- Disconnect the negative terminal from the battery.
- Disconnect the red terminal from the relay. This is a red wire.
- Using an 8 mm wrench, unscrew the nut securing the brush assembly. You will find it behind the relay.
- Remove the contact that this nut held in place.
- Unscrew the fastening of the solenoid relay to ground. We are talking about coupling bolts.
- Next, you need to dismantle the power wire, after which the relay itself is pulled out.
- The fastening nuts are unscrewed from the end part, which allows you to remove the upper part of the relay.
- It is advisable to immediately replace the relay core with a new one.
- Install a new relay.
- Proceeding strictly in reverse order, reassemble the assembly, which will allow you to complete the replacement of the unit.
- When separating the relay into its two component parts, be sure to ensure that the core does not slip out and the spring does not jump out.
We can say that replacing the gearbox on a VAZ 2114 is not so difficult. It is much easier to replace a non-separable relay, since to replace it it is enough to unscrew all the fasteners in the same way and disconnect the contacts.
Starter repair VAZ 2101, 2102, 2103, 2104, 2105, 2106, 2107
Repairing such a vehicle element as the VAZ 2101, 2102, 2103, 2104, 2105, 2106, 2107 starter is a rather painstaking process. The driver must have good self-control and strictly follow certain instructions. Then repairing the starter yourself will go smoothly.
So, it is necessary to repair the starter in the following sequence:
- Remove the old starter from the engine.
- Using a key set to “thirteen”, loosen the nut securing the wiring, which contains the traction relay.
- Disconnect the cable end.
- Apply a voltage equivalent to twelve volts to the relay output.
We supply 12 volts to the starter - Change the housing pole to a negative value. As for the ohmmeter, this device should be connected to contact-type bolts. At the same time, if the solenoid relay is repaired, the armature pulls the so-called “overrunning clutch” into the window of a special cover, which is located in front. But the contact type bolts must be closed.
- Taking a Phillips screwdriver, you need to unscrew the 3 screws.
Unscrew the bolts of the retractor relay - We dismantle the traction relay.
- We free the relay body from the rod, which is equipped with a spring.
- We install a new traction type relay using the reverse sequence.
- To continue further disassembly of the starter using a Phillips screwdriver, unscrew 2 screws.
- It's time to remove the cover.
- In order to check the current condition of the brushes, we use a slotted screwdriver. It unscrews the fastening screw that secures the contact wire.
- When the spring is released, you need to remove the brush. The same method is used to remove the 3 remaining brushes. If the latter have wear of up to 12 mm or less, then they need to be replaced.
- Next, you need to connect the ohmmeter one by one to the terminals of the stator windings. They are checked for short circuits. You should also make sure that the separately located winding terminals do not come into contact with the housing.
Checking the short to body - Use a screwdriver to pry up the retaining ring and remove it.
- We remove the washer from the axle.
- Using a ten key, remove the 2 coupling nuts.
- Then we remove them.
- We disconnect the starter body and remove it from the insulating tubes of the tension type bolts.
- We take a quick look at the commutator and windings. You should never leave charred windings. If the collector has been slightly burned, it is necessary to clean the existing plates with abrasive sandpaper. When severe burning has occurred and serious wear has occurred, it is recommended that the anchors be replaced. As for scuffing and enveloping of bronze relating to the bearings on the special neck of the armature shaft, they are removed using fine-grained sandpaper and are subsequently polished.
- Next, we take the ohmmeter again and check the armature winding to ensure there is no short circuit. A damaged anchor must be replaced.
Checking the armature windings - We release the drive cover from the rubber seal.
- Remove the adjustment washer from the armature axis. During the assembly process it must be returned to its original place.
- The lever axis is being uncoiled.
- You need to use a special bit to select the axis.
- We remove both the anchor and the drive.
- We pry it up with a screwdriver and remove the overrunning clutch drive lever.
- As for the gear, it must make rapid rotational movements in one direction and not move in the opposite direction. Also, it should not be accompanied by chips or nicks that may appear in the leading area of the teeth. When the gears are worn out or the clutch is faulty, the assembly requires replacement.
- Having placed the anchor axis, using a block of wood for these purposes, using a key set to “thirteen” we knock the limiter off the locking type ring.
- We pry it up with a screwdriver and remove the retaining ring.
- We free the axle from the limiter and the overrunning clutch assembly. The drive gear is also dismantled.
- Having replaced the coupling assembly, we return the locking ring to its original place and attach the limiter with part of the conical groove to the winding part of the armature.
- The limiter must be pressed onto a locking ring. To do this, use a hammer to strike. We also use the key for “thirteen”.
- Using compressed air, we remove the coal dust that has accumulated in the body and brush holder. As for the wiring ring and the plastic surfaces in contact with it, they must be treated with Litol-24. Lubricant number 158 is also suitable. In this case, we use engine oil, which is necessary for processing the rotor bushing, screw splines of the armature shaft and hubs touching the overrunning clutch.
- Further assembly is carried out in the opposite order to disassembly.
How to repair a starter yourself
I'll tell you how to sort out and restore the starter using a specific example. I came across a sample with the following breakdown: the starter turns the crankshaft slowly, even with a high battery charge.
Having dismantled and disassembled the device with the connected starting wires, when it starts, it rotates quite confidently. After some time, the device stopped and smoke appeared.
When the back cover of the starter was removed, black dust fell out of it. This means that the brushes are worn out. After removing the brush mechanism, remove the housing with magnets and rotor.
In order to better examine the cause of the problems, you need to sort out the starter, blow out all the mechanisms with a compressed air cylinder and wash them in gasoline. After these manipulations, it becomes clear that the brushes have practically worn out, the springs that pressed them have weakened, the brush holders have turned blue due to overheating, and the coils have melted.
How to resuscitate and repair the starter in this case? You need to take the brush mechanism (assembly) and bring it to a company that repairs automotive electrical equipment. Ask for an analogue. Approximately this will cost you 450-500 rubles. And if you compare it with the price of a starter (5,000 rubles on average, it all depends on the brand), it turns out to be quite cheap.
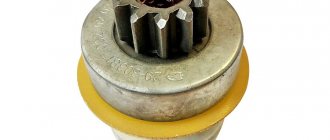
Then we thoroughly clean the rotor and inspect the commutator, which is in constant communication with the brushes. It turns out that the collector is also worn out (marked with arrows in the picture), but it will be able to work for some time without re-grooving it. Therefore, we simply clean the collector using fine sandpaper. As a rule, a commutator can easily work through a couple of sets of brushes. But if the collector fails, then most likely the entire starter will have to be replaced.
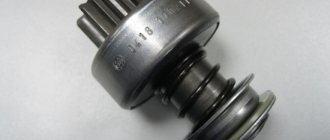
Go ahead. Let's carefully examine the Bendix (overrunning clutch). Let's try to rotate its gear manually. It should spin one way, but not the other. Also, the bendix should move easily along the shaft axis. In my case, everything is fine with him. If there were problems with the overrunning clutch, it would also be quite difficult to find it on the market. Most often, the rollers and springs wear out in the Bendix, which is why the gear does not lock but slips during reverse rotation. As a result, the starter works, but the engine does not. In this case, it is best to replace the bendix or the entire device.
Then he inspects the condition of the gearbox itself. We remove the gears, then wash them with gasoline. If everything is fine, then we apply just a little CV joint or high-quality bearing grease to the bearings and gears.
Additionally, let's inspect the contacts of the retractor relay. To open it you will need a soldering iron. You need to unscrew two screws and solder solder on two contacts (indicated by arrows).
The contacts were in perfect order. Clean them with a piece of sandpaper. Then you need to heat up the pistons that go on the lid and slam the lid on the table with a sharp movement. Extra pieces of solder will come out of the pistons and the holes will become free. Then the cover can be put on the wires without any problems and soldered everything in place.
Under no circumstances should the core of the solenoid relay be lubricated with anything, because in the cold this will cause it to jam. To calm your soul, you can lightly apply motor oil and wipe everything dry.
Then we assemble the starter device in the reverse order. Be sure to apply some grease to the rear rotor hub.
Some people ask how to rewind the starter? If there is a problem with the winding of the device, then re-winding is not entirely effective. Here it is better to replace the entire part or device.
Before installing the repaired starter on the car, grind the brushes to the commutator. To do this, connect the device using battery cables. Let him work for a couple of minutes intermittently. Everything is ready, the starter can be installed on the engine and enjoy a confident start.
Starter relay VAZ 2101, 2102, 2103, 2104, 2105, 2106, 2107
The structural structure, which has a VAZ 2106 starter solenoid relay, has a complex structure. At the same time, many drivers who more or less understand the details of the “six” can disassemble it with their own hands.
As for subsequent assembly, not every motorist can cope with this task. In this case, it is best to trust the professionals.
If you think the relay needs to be replaced but are not sure, it needs to be thoroughly inspected. It is noteworthy that the relay in the six functions similarly to other elements installed in various vehicle models. That is, it performs the functions of an electromagnet.
To check its condition, it is closed with a metal object. For example, you can use a screwdriver. If the starter begins to make rotational movements, then the starter relay will indeed need to be repaired. When clicks are heard from the retractor-type relay, but the starter rotates, then it is the latter that is broken.
Why does the starter relay stop working? There are several answers to this question. The problem may be due to outdated parts (the material deteriorates over time). The winding also . In this case, the reason may lie in the combustion of nickels , which are located in the internal part of the relay itself.
However, for a novice driver who has not previously done repairs, it is necessary to find out where the VAZ starter relay is located. If he does not want to waste his time and think about how to disassemble this part (by the way, there is a visual diagram of the relay, and you can buy all the spare parts yourself), then he can turn to professionals. They will not only disassemble this part, but will also connect the relay. In this case the price will be minimal.
Starter solenoid relay
If the starter is safely removed from under the hood, it must be cleaned. Contaminants are removed from it. As for oxidized contacts, they are processed using sandpaper.
Diagnostics of the starter solenoid relay:
- The starter is located near the battery. In this case, 2 electrical wires are prepared, which must be of sufficient length. Wires intended for “lighting” are ideal. They are equipped with so-called “crocodiles”.
- Initially, the positive terminal is connected to the battery (the corresponding output of the solenoid relay) via one electrical wire.
- Then the other wire is connected to the battery terminal, which has a negative value.
- Finally, you need to touch the free unoccupied end of the electrical wire with a negative value. This contact must take place with the starter housing. Further actions will depend on the results obtained.
If during the connection process the solenoid relay makes a quick and distinct click, then it is operating normally. When the part does not show any signs of “life,” the solenoid relay must be repaired or completely replaced.
Problems with the starter on the VAZ 2114 and their elimination
If the car does not start, the starter does not turn, and the traction relay characteristically clicks, then the problem should be looked for in the power circuit
First of all, attention should be paid to the battery. It should not be discharged. You also need to inspect the battery terminals
The presence of oxides can cause the starter connection circuit to have a voltage drop under load. If a discharged battery is detected, it must be charged using a charger. It is recommended to sand oxidized terminals and coat them with conductive lubricant.
You also need to inspect the battery terminals. The presence of oxides can cause the starter connection circuit to have a voltage drop under load. If a discharged battery is detected, it must be charged using a charger. It is recommended to sand oxidized terminals and coat them with conductive lubricant.
To find problems related to the starter, you need to disassemble it.
First of all, attention should be paid to the brush assembly. A large current flows through it, which leads to thermal damage
It is important to check that the brushes slide easily in the guides and do not jam
Springs must have sufficiently high elasticity
It is important to check that the brushes slide easily in the guides and do not jam. Springs must have sufficiently high elasticity. Any deformation of the brush holders is unacceptable.
Any deformation of the brush holders is unacceptable.
The weakest link of the VAZ 2114 starter is four brushes. They are highly susceptible to wear due to friction against the manifold.
Therefore, when visually inspecting them, it is important not only to control the absence of thermal and mechanical damage, but also to measure the remaining length. If the size is close to 4 mm, then the brushes must be replaced. The planetary gearbox is lubricated
Over time, it thickens and the starter begins to rotate the crankshaft less intensively
The planetary gearbox contains lubricant. Over time, it thickens and the starter begins to rotate the crankshaft less intensively
Therefore, when disassembling it is important to wash the gears. During assembly, the gearbox must be filled with fresh lubricant.