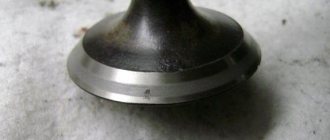
Gravity valve VAZ-2123, cleaning and modification. This is the reason.
Earlier I wrote that a vacuum is created in the tank, but with warming the picture has changed just the opposite.
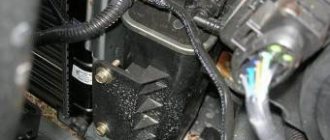
The absorber was purged, the solenoid valve was checked, but the route to the tank was purged with great difficulty and only with a compressor. After driving a little more I only became convinced that the tank ventilation was not working. After reading, I decided that it was worth working on the gravity valve. I poured WD-40 on the rubber, shook it and lubricated it again, but still took out the insides with two slotted screwdrivers.
The valve, in principle, worked, but the coupling field was stuck and was blown through with resistance. I took it apart and it's basically clean. And the most interesting thing is that there is no jamming of the piston in the cup.
But the height of the piston is indeed too high, which in fact prevented the valve from fully opening. I ground the bottom of the piston on a grinder and drilled a couple of holes with a diameter of 2 mm in it. to reduce flow resistance. Well, just in case, I ground down the piston guides a little and cut off the coil of the spring. I also enlarged the holes in the cup.
I assembled it like this: after generously lubricating the cuff with WD-40, I tucked it into a large glass and pushed the valve into it.
The valve vents perfectly and closes when turned over. But before connecting the hose, I decided to blow out the line itself by disconnecting the tube from the absorber
So it is blown very hard and only with a compressor. I poured carburetor cleaner into the tube several times and blew it through, and it seemed to reduce the resistance a little. It seems to me that the tube is squashed somewhere or that the hose has delaminated inside.
I'll go and watch for now. I will change the stabilizer rubber bands and at the same time inspect the ventilation tube. If the pressure continues to inflate the tank and the tube is not jammed, I will change the hose.
Source
Checking the fuel level sensor with a multimeter
After a visual inspection, a check with a multimeter may also be necessary. In other words, to understand why the fuel sensor is not working, the specified sensor is also checked in ohmmeter mode.
The fact is that the resistor can change resistance over time, which leads to incorrect sensor readings. Resistance should be checked with the tank empty, 50% full and full. If it is determined that the resistance is not normal, it is better to immediately install a new sensor.
We also add that if, after installing a new FLS, the sensor does not accurately determine the fuel level in the tank, this is often due to the fact that the resistance deviates from the nominal one. In fact, we can say that the wrong sensor is installed.
As a rule, when choosing, it is important to consider that although fuel level sensors are visually similar, they usually have different resistance values. In fact, this is what leads to errors.
For this reason, you need to purchase a sensor that has the required resistance.
Fuel level sensor float and other problems
In cases where the fuel level indicator does not work, in some cases it is directly related to the float. Floats can be of two types:
- hollow float made of plastic or thin metal;
- the so-called “foam” float, which is made of a porous base;
In the first case, the float may gradually wear out and become damaged; the fuel level indicator needle gradually fails to reach the maximum when filling a full tank.
Fuel can get inside the hollow float, causing the level sensor to show incorrect data. To fix the problem and carry out repairs, it is necessary to replace the float of the fuel level sensor in the tank.
You also need to understand that if the fuel sensor is lying, you should not exclude the possibility of mechanical damage to the gas tank itself. If the tank is damaged, then the float may simply jam.
As a rule, in this case the pointer works accurately, but the range is very limited. The fuel level arrow may also be “stuck” in only one position. In fact, the problem is not the most harmless and often requires a complete replacement of the gas tank to solve it.
By the way, often when buying a used car, you can hear from the seller that the fuel pump screen was recently cleaned or the fuel pump was replaced, after which the fuel level sensor, etc., stopped working.
At the same time, the seller claims that there is simply no time to fix such a minor breakdown. In fact, if the fuel level sensor in a car does not work, this can be caused either by a failure of the sensor itself or the float, or by deformation of the gas tank. Naturally, changing the tank is quite expensive.
We also note that if the FLS does not indicate the fuel level correctly, the bending of the lever may also be the cause. In this case, the pointer arrow is not able to reach the extreme marks.
The lever can be corrected, but it is important to understand that the problem itself occurs as a result of one or another mechanical effect on the tank. Also, after editing, the float may still jam
Again, in such a situation, it may be that the tank itself needs to be repaired or replaced.
The list of possible problems with the FLS is completed by the fuel level indicator. To understand why the fuel sensor does not work, you need to consider that the problem may be not only in the sensor, but also in the indicator.
In this case, the incorrect fuel level is displayed due to the fact that the movable winding of the indicator is jammed. In turn, this leads to the fact that it is not possible to move freely, and the data on the indicator itself will be inaccurate.
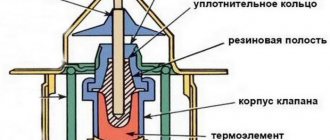
Gravity valve Niva Chevrolet operating principle
It seemed like such an inconspicuous element, which at first glance is not important for the car, but without which it cannot work properly. Dips appear, the engine “troubles” and the gas tank may even collapse! And all this is due to a faulty adsorber valve. Many people don’t know what it is, how it works and MOST IMPORTANTLY what it affects. Today I will try to put everything into simple terms and describe the main symptoms of a malfunction. It will definitely be useful, so read and watch...
THE CONTENT OF THE ARTICLE
First, let's start with a definition.
An adsorber (from Latin sorbeo - absorb) is a car system that serves to capture gasoline vapors that come out of the tank. When the engine is running, they are sent to the fuel injection system, namely the intake manifold . When the engine is turned off, some of the vapors are captured by the separator (it directs them back to the tank), and the remaining vapors enter the adsorber, where they are neutralized.
Do-it-yourself absorber valve replacement
If signs of malfunction are detected, the valve will need to be repaired or replaced. The adsorber valve is inexpensive and easy to replace. To dismantle you need to have a pair of Phillips screwdrivers and know where the canister purge valve is located. Operating procedure:
The markings on the old and new valves must match.
- Open the hood and find a cylindrical device - an adsorber.
- Remove the negative terminal from the battery.
- Disconnect the wire block by pressing the latch and pulling it towards you.
- Loosen the valve.
- Remove the fittings under the latch and disconnect the hoses.
- Remove the valve together with the bracket from the adsorber.
- The new valve is installed in the reverse order.
Thus, even such a small element as the adsorber valve performs important functions and its malfunction can seriously disrupt the operation of the entire engine. Therefore, it is important to monitor the condition of your car and carry out diagnostics on time.
What is an adsorber, what task does it perform, what problems can arise, we’ll talk about this and much more in today’s article.
Many car owners have no idea, let alone the structure of the system, and sometimes even its existence. Therefore, the goal of this article is to “put everything into perspective,” including finding out how the device works, as well as where it is located.
Why do you need an adsorber?
It was originally created as a tribute to environmental standards, more precisely under EURO2. By and large, the motor can be configured so that it can do without it. But, taking into account modern standards, vapor leaks are unacceptable. Plus, the adsorber does not allow fuel vapors to enter the cabin, which, as you understand, is also unpleasant. If on old cars, still of the carburetor type, such a system did not exist, in principle, on all modern injectors, it is mandatory.
What is the adsorber and where is it located?
The adsorber is structurally a cylinder, a hollow one, inside of which there is a so-called filter component. The adsorber also consists of a number of additional modules, for example:
• The first is the container in which the filter is placed.
• The filter element is often simple granular activated carbon.
• Separator, a device that receives and sends retained fuel vapors back to the tank.
• Magnetic valve responsible for changing operating modes.
• The gravity valve prevents fuel overflow if the vehicle rolls over.
• Various connecting hoses and tubes.
Perhaps one of the main elements of the entire adsorbing system is the magnetic valve. The mode of operation and the change of modes depend on it. That is, it is responsible for the timely switching of the accumulation mode, when vapors accumulate in the tank, to the mode of transferring vapors back to the tank.
Depending on the car and even models from the same manufacturer, the location may vary. Here you need to find out specifically by model and even year of manufacture. An excellent example is the Audi A4 B5, where in different years the systems were located under the front and rear fender liner, under the spare wheel, directly on the tank. Therefore, study the operating instructions; it usually indicates where the adsorber may be located. On domestic Ladas, on almost all models, the adsorber is located in the right corner, when viewed in the direction of travel of the car, next to the headlight.
Why was the adsorber created?
Actually, this is a tribute to the environmental standard, namely EURO-2. Essentially this is a large filter that catches light hydrocarbons. According to the new standards, it is unacceptable for gasoline vapors to enter the atmosphere, because this contributes to air pollution.
Also, couples should not enter the car interior, because this is, to put it mildly, harmful! ON old carburetor cars, such a filter and its valve simply did not exist; the system there is a little different. BUT the carburetor went away along with the old standards, now there is only an injector and a filtration system is MANDATORY.
EVAP system components
The main components of the fuel vapor recovery system are:
Fuel tank
Has some expansion room at the top to allow fuel to expand on a hot day without overfilling or leaking the EVAP system.
Fuel cap
Typically contains some type of relief valve for ventilation on older vehicles (pre-OBD II), but is completely enclosed (no vents) on newer vehicles (1996 and newer).
Gas tank separator
Located on top of the fuel tank or part of the expansion tank. This device prevents liquid gasoline from entering the adsorber.
Gas tank separatorLiquid gasoline should not be sent directly to the canister because this would quickly overload its ability to store fuel vapor. The separator is relatively problem-free. The only problems that can occur is that the fluid return becomes clogged with debris such as rust from the fuel tank.
Some separators use a slightly different approach to prevent liquid fuel from entering the canister vent line. A float is installed inside the separator. If liquid enters the device, the float rises and the valve closes the tank vent.
If there is a blockage in the separator or in the vent line between it and the adsorber, the fuel tank will not be able to “breathe” normally. Symptoms include fuel starvation or a warped fuel tank.
If you hear a significant "poof" sound when you open the gas cap, suspect poor ventilation. You can check the tank venting by opening the cap and then disconnecting the fuel tank vent line from the canister. If the system is clear of any blockages, you should be able to blow through the vent line into the fuel tank.
Blowing out with compressed air can sometimes clear the blockage. If not, you will have to inspect the vent line and possibly remove the fuel tank to diagnose the problem.
Ventilation valve
The ventilation valve controls the flow of outside air into and out of the adsorber. In some vehicles it is called the Canister Closing Valve (CCV).
One side of the ventilation valve is connected to the adsorber. The other side is connected to a ventilation hose that has a filter or mesh at the end and is attached to the body or frame of the car.
On some vehicles, the vent valve is attached to the canister. In others, it is installed separately.
Ventilation valve
The ventilation valve is controlled by the engine control unit. Normally the valve is open. It closes when the controller checks the EVAP system for leaks.
Adsorber (canister with coal)
This is a small round or rectangular plastic or steel container. It is usually hidden and may be located in a corner of the engine compartment or near the gas tank.
Adsorber FORD Focus
The adsorber is filled with approximately 0.5 - 1 kg of activated carbon. Coal acts like a sponge, absorbing and storing fuel vapors. The vapors are stored in the canister until the car starts, warms up and drives.
The ECU then opens the canister purge valve, which allows intake vacuum to pump fuel vapor into the engine. The coal container is connected to the fuel tank by a ventilation line.
Under normal conditions, the adsorber causes few problems. Since carbon does not wear out, it should last the entire life of the vehicle.
The most common problem with a charcoal canister is a faulty purge or vent valve. Vacuum purge valves can be tested by applying vacuum directly to the valve using a hand vacuum pump.
Adsorber VAZ
The valve should open and not allow vacuum to pass through if it is good. With solenoid type purge valves, voltage can be applied directly to the coil to see if the valve opens. The solenoid resistance can also be checked with a multimeter to see if there is an open or short.
The purge control strategy in many late model EVAP systems can be quite complex, so the best advice here is to look up EVAP diagnostic procedures in the manufacturer's service literature.
Components
In fact, this is a large plastic jar with activated carbon inside, because it is this composition that perfectly fights gasoline vapors. The main parts can be described as follows:
As you can see, there is absolutely nothing complicated. Separator - serves to catch part of the gasoline, then sends it back to the tank. Gravity valve - almost never used, but it is needed in emergency situations, for example during accidents, it prevents fuel from overflowing from the tank (for example, when a car overturns).
The pressure sensor is a very necessary thing - it monitors the pressure of gasoline vapors inside the tank, if necessary, it opens and resets it, preventing the structure from being damaged.
The filter part is, as I wrote above, a large jar into which coal powder is poured, in fairly large granules. This is done so that vapors can pass and condense freely.
Connecting tubes are needed to connect all the main parts, filters, sensors and valves, I think this is clear.
Solenoid valve - used to switch modes for capturing gasoline vapors, we will talk about it in more detail below.
Diagram of the fuel vapor recovery system on Priora: design and designation of the main elements
The diagram of the gasoline vapor recovery system on Priora is as follows:
In the diagram, each element has a corresponding name and purpose. The name of each item is listed in the description below:
The purpose of each element of the system is described in detail in the material below.
How the system works - operating principle
Why am I focusing on the solenoid valve, because it is practically the key one in this system.
For a better understanding, I am posting a diagram of an injection car, and in this case it is a VAZ of the 10th family.
So, fuel vapor rises to the top of the tank and stops at the separator, which is combined with a gravity sensor (as I wrote above, it prevents fuel from leaking out in the event of an accident - capsizing from the tank). In it they partially condense and return back (in the form of liquid fuel).
However, the other part of the evaporation bypasses the gravity valve and passes into the adsorber, where they actually accumulate. Accumulation occurs when the engine is not running! IT IS IMPORTANT.
After starting the engine, the solenoid valve opens - thereby connecting the adsorber cavity (where the gases are trapped, as it were) with the intake manifold or throttle assembly (in different cars in different ways). THE PROCESS OF THE SO-CALLED PURGE BEGIN! The vapors are mixed with air (from the street), which is supplied through the throttle assembly, then enter the intake manifold and then into the engine cylinders, where they are burned with the air-fuel mixture.
The system is very simple if you understand how it works.
Gravity ball valve for heating. Why and where to put it?
In a gravity heating system, the section of the return pipe in front of the boiler branches into parallel sections.
In one section a circulation pump is installed, and in the second section a gravity valve is installed. Gravity valve for heating - where and why to install it?
In order to understand where and in what heating system a gravity valve is installed, we first consider existing heating systems.
For the efficient operation of any heating systems, circulation of coolant (water) throughout the system is necessary.
According to the circulation method, heating systems can be divided into the following types:
1. Heating system with natural circulation;
2. Heating system with forced circulation;
3. Combined heating system that can operate in these two modes.
Heating system with natural circulation. This system works thanks to the law of attraction of the earth, gravity, which is why it is often called gravitational. When water is heated in the heating system, due to a decrease in density, it becomes lighter and therefore rises upward in the heating system. As it cools (heat is released), the density of the water increases, it becomes heavier and therefore begins to flow downward. The design of the gravity heating system is created in such a way that after the boiler, the coolant is supplied as high as possible in the heated room, and then, due to the slopes, it can naturally flow down and thus naturally circulate.
Heating system with forced circulation. In this heating system, a small pump (about 100 W) is installed on the return supply pipe, which forcibly allows the coolant to circulate through the system. Forced circulation increases the efficiency of the heating system due to greater coolant (water) output. In such a system, the design of the heating system is less demanding regarding the location of the height of the boiler to the radiators. This system is recommended for use where power outages are possible.
Therefore, the combined system, in the presence of voltage and a working pump, operates as a forced circulation system, and when the electricity is turned off, it automatically switches and starts working in a natural circulation system.
So, the main element of pipeline fittings, which is responsible for automatically switching from forced circulation to natural circulation, is a gravity heating valve.
The gravity valve in the heating system works as follows (see diagram).
In a gravity heating system, the section of the return pipe in front of the boiler branches into parallel sections. In one section a circulation pump is installed, and in the second section a gravity valve is installed. When there is voltage in the network and the circulation pump is operating, creating forced circulation, the gravity valve is in the “Closed” , and when the voltage in the electrical network is lost, the valve automatically switches to the “Open” and switches the heating system to natural circulation mode.
You can buy cast iron gravity ball valves for heating in Minsk from the Laboratory of Heat company by going to the company’s website (online store) on the page Accessories and Accessories Check valves or by visiting the company’s representative office at the address: Minsk, st. Slobodskaya, 2, office 15
Source
What does the adsorber valve do?
Many problems are related specifically to the adsorber valve. In essence, this is a very simple device that opens or closes under certain conditions (the engine is running or turned off).
If the valve works well, then there are no problems at all; you may not even know about its presence in your system.
However, when a breakdown occurs, for example, the adsorber cavity itself becomes clogged, or the valve does not work. The car may subsequently suffer serious damage. Because the cavity is not purged, and the pressure from the tank is not relieved.
Knock in the transfer case of the new Chevrolet Niva. Direct from the factory
If leaks occur, replace damaged consumables. Domestic SUVs perform quite well on roads with different surfaces. But quite a lot of problems can arise with them. For example, a knock in the transfer case of the new Chevrolet Niva. This problem is not uncommon. Therefore, every owner of such a car should know the causes of this problem. Let's look at popular reasons When communicating with car owners, you can often hear the question of why the speed on the Chevrolet Niva does not drop.
Operating the engine in this mode is undesirable for any car model; high speeds not only have an unpleasant effect on the hearing, but also lead to increased fuel consumption. Such a problem can arise suddenly, everything seemed to be working perfectly, and then suddenly a high idle appeared. Many drivers, both experienced and beginners, are very puzzled by this problem.
Why the speed on the Chevrolet Niva does not reset will be discussed in this article. Let's analyze all known variants of such a problem and ways to solve it. Many car owners, after such a malfunction occurs, seek help from specialists, but in most cases the malfunction can be fixed with your own hands. We will tell you what needs to be done for this in this article for everyone interested in this issue. Why do you need a properly set idle speed?
When it comes to a car, the concept of idling can be attributed to the operation of the engine when the gear is off or when the clutch pedal is depressed. In such cases, the engine runs without load, that is, there is no transmission of torque from the power plant to the drive wheels.
For different engines, idle speed can range from to rpm. If their indicator is less than the recommended value, the engine will stop when the clutch pedal is pressed. An increase in their number, in addition to a significant increase in gasoline consumption, leads to accelerated wear of engine parts
This is why it is so important to keep their number within the recommended range.
Idle speed adjustment is carried out by several components and assemblies installed on the vehicle. These include an injector, a fuel pump, and various sensors, which can be mechanical or electronic. This also includes the throttle valve, fuel pressure regulator and some other devices. The number of revolutions is greatly influenced by the opening angle of the throttle valve, which regulates the amount of air entering the engine power system.
The idle air valve also takes part in mixture formation, which is needed to provide air supply bypassing the throttle valve. In some cases, an increase in their number may be caused by an incorrectly adjusted gas pedal drive. Why the speed doesn’t drop There are quite a lot of reasons for the appearance of such an unpleasant phenomenon, let’s try to understand this issue together and decide how to get out of this situation.
Most often, in injection engines, speed reduction does not occur due to the fault of the throttle assembly, in which contamination occurs.
This is interesting: Removing and installing the Chevrolet Niva rear door lock drive
Signs of a malfunctioning canister valve
As it becomes clear, problems arise with the power system:
It is also worth noting that the reason is not always in the valve; often the can of activated carbon itself (that is, the adsorber cavity itself) can become clogged. If necessary, it must be replaced or disassembled and cleaned - dried, that is, the filtration of gases must be restored so that they pass unhindered.
Now a useful video.
If you experience these malfunctions, then you definitely need to look - check the valve and, if necessary, change it, fortunately it costs a penny. And also the cavity itself with activated carbon.
Causes of malfunction of the adsorber on Priora and features of its self-check
The adsorber contains activated carbon in granular form, which gets wet over time, which reduces the level of air permeability. Typically, such a malfunction is accompanied by error on BC P0441. However, in addition, a more common problem is when coal particles enter the body of the solenoid valve and, accumulating in large quantities, do not allow it to close, which leads to the problem of floating speed on Priora.
The causes of adsorber malfunction are the following factors:
- Depressurization of the adsorber housing. Usually occurs in case of mechanical damage. If such a breakdown occurs, the part must be replaced.
- Damage to the integrity of the power supply wires of the solenoid valve. In this case, errors P0443/P0444/P0445 and P0446 are displayed. This could be an open circuit, short to ground, or low voltage.
- Air inlet fitting and filter element are dirty. Air enters the device through the inlet fitting, as a result of which accumulated vapors are purged. Through the fitting, contaminants enter the adsorber, which leads to a decrease in the level of air permeability. This causes the device to operate ineffectively.
To determine the cause of the malfunction, you will need to focus on the corresponding errors or symptoms. For example, if there is a suspicion of a violation of the seal of the housing, then it is necessary to remove the adsorber and inspect its condition. If no defects are found, then its tightness is usually checked as follows:
- the connections to the atmosphere and to the solenoid valve are plugged;
- compressed air is supplied to the remaining fitting connecting the device to the gas tank;
- the absence of signs of air leakage indicates the integrity of the adsorber housing.
Be sure to inspect the integrity of the power wires of the solenoid valve, and if necessary, call them. If there is a suspicion that the valve is jammed in the open position, then a simple and reliable way to check is to start the engine and plug the fitting connecting the adsorber to the atmosphere with your hand. If after this the engine operation changes, then the cause of the malfunction has been identified, and all that remains is to eliminate it by replacing the part.
Is it possible to remove
Some motorists neglect environmental standards and remove the adsorber valve. The words are basically like this: “why do I need it, the car has become slower, the consumption has become higher, I’ll throw it away altogether.” But realistically, is it possible to do this? Will this make the car worse?
It is worth understanding that a working system does not affect the operation of the engine at all, and even saves a little fuel, because the vapors that remain in the main body are then burned out in the engine. Of course, you should not expect that the savings will be huge, but you get a few kilometers of mileage.
Of course, you can clean it, the car is simply OK with it! It will even be better, because the evaporation from the tank will not condense (purify), but will go directly into the atmosphere. That is, you kind of remove all the cans - valves and give an open air flow to the tank.
Physically, they do it this way: they hang a fine filter from a carburetor VAZ on the hose from the separator, and gasoline vapors escape into the atmosphere. The hose from the adsorber valve is blocked, the engine is flashed ( chip tuning ), otherwise an error will appear, that’s all!
However, there are also disadvantages to this:
Pros of unplugging:
I think the system is quite useful; personally, I was often annoyed when a carburetor car smelled of gasoline, wherever possible. If you inhale and then get a headache, this system allows you to avoid this, saves fuel a little and does not pollute the atmosphere.
This is where I end, I think my article was useful to you, read our AUTOBLOG, subscribe to the channel.
(
32 votes, average: 4.47 out of 5)
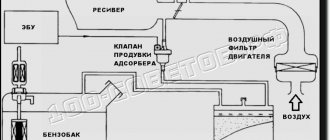
Rice. 2-77a. EURO-2 gasoline vapor recovery system:
1 - hose for adsorber and gas tank valve; 2 — gas tank valve; 3 — gas tank valve hose, steam line; 4 — throttle pipe with receiver; 5 — adsorber and throttle pipe hose; 6 - adsorber; 7 - clamp; 8 - bolt; 9 — adsorber mounting bracket; 10 - nut; 11 — steam line and gravity valve hose; 12 — gravity valve; 13 — steam pipe; 14 - fuel tank.
The gasoline vapor recovery system (VAR) consists of a carbon adsorber 6 (Fig. 2-77a) with a purge solenoid valve, gas tank valve 2, gravity valve 12, steam line tube 13 and hoses 1, 3, 5 and 11.
Gasoline vapor passes through gravity valve 12 and valve 2 of the gas tank. The gravity valve prevents fuel from leaking out of the tank when the vehicle rolls over, and the gas tank valve prevents the pressure in the fuel tank from becoming too high or low.
After passing through the valves, gasoline vapors enter adsorber 6, where they are absorbed by activated carbon. The second fitting of the adsorber is connected by hose 5 to the throttle pipe, and the third is connected to the atmosphere. When the engine is turned off, the solenoid valve is closed; in this case, gasoline vapor does not enter the throttle pipe. After the engine starts, the injection system controller begins to send control pulses to the valve. The valve opens and the sorbent is purged: gasoline vapors are discharged through hose 5 and the throttle pipe into the receiver.
Rice. 2-77b. EURO-3 gasoline vapor recovery system:
1 — hose of the throttle pipe and the adsorber purge valve;
2 — solenoid valve for purge of the adsorber; 3 — hose of the purge valve and adsorber; 4 - adsorber; 5 — steam pipe hose; 6 — throttle pipe with receiver; 7 - bolt; 8 — adsorber mounting bracket; 9 - nut; 10 — steam line hose and adapter; 11 — adapter; 12 — adapter and gravity valve hose; 13 — gas tank plug with safety valve; 14 — gravity valve; 15 — steam pipe; 16 - fuel tank. The ban on the emission of gasoline vapors into the atmosphere was introduced in the Euro-3 standard.
In this case, the evaporation of fuel from the tank is a natural phenomenon. To prevent gasoline vapors from entering the environment, the gas tank ventilation hose (steam line) is connected to a special device - an adsorber.
The filter element of this part absorbs harmful emissions and ensures that the car meets environmental standards.
If you open the tank and hear “Pshik”... — Lada 2114, 1.6 l., 2009 on DRIVE2
...then there is an obvious problem in the ventilation of the fuel tank. Something similar happened last year, but I didn’t pay attention until recently. One day, approaching the car, I smelled a serious smell of gasoline, walked around the car, looked under it and, to put it mildly, gasped! There was a puddle on the asphalt and gasoline was steadily dripping from the tank drop by drop, even if you put your palm up and wet it! Such movement was observed when it was +25 or higher outside, as well as in the tank 3/4 or more. In a lying position, with a flashlight, the leak was found, shown in the photo below.
After scouring the forums, it was concluded that the separator drain hose was plastic and had simply dried out over time and shortened, which is why it was not fixed properly. Having removed the fitting from the tank, some kind of gasket fell out of it. In principle, it became clear why it was leaking, but then the question is, why is excess pressure created in the tank? We search the forums further and find out that on 1.5i engines, a safety valve (8) is installed in the section of the line on the adsorber between the separator (9) and the gravity valve (7).
1.5i
Let's go further and look at the 1.6i engine diagram
1.6i
There is no safety valve in the system; its role is played by the cover itself. But the blow-out lid is very tight; I tested several of them in the store. Having unhooked the fitting from the adsorber and blown into it, I realized that something was wrong in the line, and the culprit was found. The gravity valve had become sour and rusty, and because of this the system was not purged. Next, the ventilation scheme of the carburetor nines was examined.
At number 21 we see a two-way valve that works in both directions, and it works harder to release pressure than to retract. I bought it at the car market for 130 rubles and went to the garage. The old plastic hose was thrown out and replaced with a gas-resistant rubber hose, and the clamps were freshened. At the second end of the separator, which went to the gravity valve->adsorber, I stuck a short hose from the low crankcase ventilation and brought the valve to the filler neck area. There was an elastic band, just for it)
Afterwards a full tank was filled, and active skating took place. There is no longer excess pressure in the tank, no gasoline leaks are observed. There is a slight aroma of gasoline, but only if you get closer to the tank flap. Therefore, you can now throw out the adsorber, since it is also excluded from the system. On the throttle, the adsorber fitting is plugged with a piece of hose with a bolt screwed into the sealant. Long live the free space under the hood)
What is an adsorber for?
When the engine is turned off, gasoline vapors that accumulate in the fuel tank rise to the filler neck. From there they go to the separator, condense and flow into the gas tank. However, some of the vapor does not have time to turn into liquid. They are passed through a gravity valve and sent through a steam line to the adsorber. There the vapors pass through the activated carbon and are absorbed by it.
When the engine is started, the canister purge system comes into operation. The ECU opens the solenoid valve and the accumulated vapors, along with air, are sent into the cylinders. Thus, the evaporated gasoline burns in the engine and does not enter the atmosphere.
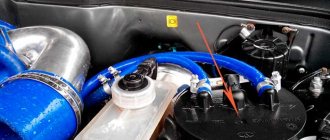
The Chevrolet Niva adsorber is located in the engine compartment near the expansion tank.
What problems occur with the device?
The adsorber often becomes clogged and over time can completely fail. All malfunctions are determined quite easily by a number of signs. This can be seen by the increase in pressure in the tank - the vapors remain in space and begin to affect the walls. You can notice this when the tank cap is unscrewed - you can hear a hissing sound.
There are times when the fuel tank cap shoots out of the filler neck. This indicates that the pressure has reached a critical level and the adsorber must be promptly replaced.
If the cleaning device is faulty, changes in engine speed may occur. VAZ owners often remove the adsorber, but in practice not everything is so simple; there are no unnecessary parts in the car.
If the device is dismantled, it is important to think about what to do with gasoline vapors that will have nowhere to escape. The ECU may need to be re-tuned, because the on-board computer may detect a breakdown in the fuel system and put the car into emergency mode.
Accordingly, it will not be possible to drive a car normally.
The weak point in the adsorption system is the purge valve. You can repair this unit yourself. To do this you will need a flathead screwdriver.
You must act with some caution, because the valve retainer is often made of plastic, and it is very easy to break it. The mount itself is located on the motor cover
There are also clamps here that require careful handling. After dismantling them, you can remove the faulty part.
If you try to blow out the valve and air comes out of it, then the part is broken. A working element will not miss anything. A valve problem can be determined by the sign of a poor start of the car when it is hot. In addition, gasoline consumption increases significantly.
If you do not solve this problem, you should not be surprised that the Check Engine light will soon light up, and acceleration dynamics will also suffer.
If the adsorber seal is broken and the purge valve fails, the engine may run unevenly at idle until the engine stalls.
Valve repair:
- At the top of the part there is an adjusting screw, which is filled with epoxy resin.
- Screw this screw all the way in and don't forget to count the revolutions. This is necessary in order to subsequently return the device valve to the same position as it was previously.
- Drop a little carburetor flushing fluid into the valve fittings.
- Blow out the valve in the open position with compressed air.
- This completes the repair.
The cause of canister valve malfunctions is poor quality fuel. Accordingly, you should not immediately buy a new part. Try to repair it first.
A malfunction of the adsorber also manifests itself in the smell of gasoline in the cabin. This often indicates that there has been a break in some of the adsorber pipes in the cleaning system. Otherwise, it may be a valve failure. You already know what to do with it.
The valve may also fail due to heat from the radiator. In this case, only replacing the part will help, because the quality of the materials used in its manufacture leaves much to be desired.
A solution to the problem may be to move the valve itself closer to the adsorber.
Replacement Instructions
Replacing the purge valve
If the valve knocks loudly, it needs to be adjusted. For this purpose, it has an adjusting screw. Its head is filled with epoxy. The polymer prevents the screw from unscrewing spontaneously. A malfunction in the electromagnet power circuit can be eliminated by cleaning the connector contacts.
The work is performed with one screwdriver in the following order:
Replacing the adsorber
In addition to a screwdriver, you will need a 10mm wrench. The work order is as follows:
Removing the adsorber from the fuel system is unacceptable. This part compensates for pressure differences that occur during cooling and heating of the gas tank. In addition, the operation of the purge valve is controlled by the engine ECU. Therefore, you cannot simply plug the hose outlet - the on-board computer will generate an error. If you leave the tube unplugged, dust and dirt will be drawn into the gas tank.
What elements make sense to repair?
Repair of most parts is not provided.
- Cracked, damaged or clogged fuel lines must be replaced immediately.
- It is impossible to clean dirty fine filters or adsorber. They just need to be changed.
- A clogged coarse filter can be easily cleaned if necessary. It only needs to be changed if the mesh is damaged.
- In some cases, it makes sense to repair the gas tank. Holes that appear as a result of physical impact can be soldered or welded. However, you must follow safety rules. Otherwise, an explosion of gasoline vapors accumulated in the tank is possible.
- There is no point in soldering or cooking a rusted gas tank. As a rule, there will probably be several pockets of corrosion in it. Once you solder one hole, you'll soon find new ones.
- The fuel level sensor and fuel pump also cannot be repaired. The only exception is bad contacts at the connection terminal. In this case, it will be enough to remove the corrosion or contamination to revive the device.
- Repairing injectors involves cleaning the jets. This requires dismantling the parts and washing them with a special cleaner. Similarly, it is possible to restore the performance of the throttle. If washing does not help, the parts need to be replaced with new ones.
- A broken pressure regulator is easier and cheaper to replace than to try to repair.
In most cases, repairs come down to localizing the fault and replacing failed parts.
Smell of gasoline, gravity valve
I got the smell of gasoline in the cabin with the windows open. The smell is coming from the trunk, that's for sure. No visible leaks were found. I checked the drive, many blame the gravity valve. Well, let's figure it out...
There is a lot of dust, apparently blowing from the ventilation valve
The valve itself was pulled out together with the neck, because... It was not possible to remove it locally. And then I had to worry about taking it off. I removed it using WD40, 2 screwdrivers and some kind of mother. Very tightly pressed. The valve was in working order, purged, no dirt. I blew it out and cleaned it to a shine, just in case. It seems to have helped... I only drive the Shnivy on weekends, so time will tell whether I dug there or not
Complete removal of the adsorber from the power system
Some VAZ 2114 owners decide to completely remove this part from their car for reasons of savings and to prevent future malfunctions. There are two ways to do this.
Method 1. After completely removing the adsorber from the VAZ-2114, the hose leading to the throttle valve assembly is closed using a plug. A fuel filter from any VAZ carburetor engine is inserted into the hose running from the gas tank to the adsorber.
Method 2. The adsorber is removed along with the support. The hoses previously connected to it are closed using plugs. A small hole (1-2 mm) is drilled in the standard gas tank plug to connect the cavity to the atmosphere. You can also use the cap from a carburetor “eight” or “nine” to depressurize the fuel tank.
After upgrading the power system, it may be necessary to update the firmware of the engine control unit, since it will perceive the absence of an adsorber as a malfunction in the engine and switch to emergency operation. This threatens to significantly reduce the traction qualities of the car.
The adsorber in the VAZ-2114 is an important element in the engine power system, which allows you to slightly reduce fuel consumption and eliminate the smell of gasoline in the cabin.