Many motorists have encountered the fact that the steering tips on the VAZ-2114 failed. Of course, as practice shows, failure does not occur in pairs one at a time. This may be accompanied by natural wear and tear or falling into a pothole, of which there are quite a few on domestic roads.
Video about replacing steering tips on VAZ cars:
The video will tell you about the process of replacing steering ends on a car, as well as some of the subtleties and nuances of the procedure.
Symptoms of a problem
The first enemy of VAZ 2114 tips is dirt. They are a hinged element, so breaking the integrity of the boot causes solid particles to enter the mechanism. Due to friction, increased wear of the part and destruction of moving elements occurs.
The second “killer” is bad roads. Constant impacts from driving over bumps have an extremely bad effect on the condition of the part: the hinge wears out and vertical play occurs.
Defective parts must be replaced immediately.
People often ask what signs indicate that a tip needs to be changed. It is easy to check their condition. Turn the wheel all the way in one direction and carefully remove dirt from the boot. If breaks are visible or the rubber is cracked over time, the part needs to be replaced. Repeat the operation for the second wheel.
Even if there are no visible integrity problems, insert a pry bar between the rod and the steering knuckle and try to move them relative to each other. There should be no vertical play. If it is present, the part needs to be replaced.
Preparing for replacement
Car service specialists recommend starting to spray the fastening nuts with WD-40 or other penetrating liquid a few days before the planned replacement of the tips.
If the tips on your VAZ 2114 have come off for more than one winter season, the main difficulty will be removing them from the steering knuckle. To unscrew the nut, you will need a wrench with a “17” head.
If the nut is very stuck, the solution will be to heat the connection with a hair dryer or a gas torch.
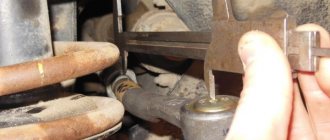
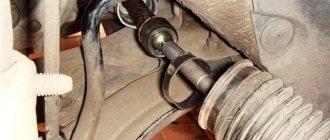
The question often arises about how to remove the tip from the hole in the steering knuckle. There are two methods of removal: the old one (with a sledgehammer) and the modern one (with a puller).
For the first method, you need to turn the steering wheel all the way and hit the steering knuckle hard several times. The vibration should cause the tip to pop out.
Disadvantages of this method:
- skill is required to deliver an accurate and strong blow;
- some experienced car owners claim that by acting in this way, you can shorten the life of the steering rack.
It is better to replace the tip using a puller. A puller for the VAZ 2114 will cost only 250-300 rubles, but will save you from many of the difficulties of replacement now and in the future.
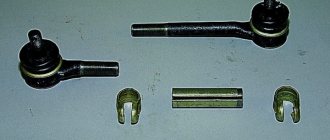
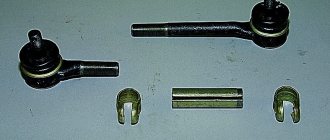
Prices for tie rods per pair:
- Track - 620 rub.
- AvtoVAZ - 620 rubles.
- VIS - 730 rub.
- LEMFOERDER — 830 rub.
- FINWHALE — 860 rub.
Useful Tricks
If the tip nuts are so stuck that they do not want to come off. You can heat them with a gas burner. After which they usually unscrew easily. In the absence of a puller, many use the “sledgehammer” method. That is, they simply knock off the finger. But the impacts caused create vibration in the entire steering mechanism. This leads to accelerated destruction of the slats. Some drivers neglect to measure the tip before removing it.
They focus on the number of revolutions. But this is not always reliable. When using a part from another manufacturer, the speed may be either higher or lower. Do not neglect to lubricate threaded connections during assembly. This will prevent the parts from sticking, and next time it will be easier for you to dismantle the tip.
Conclusion
. Poor quality roads, coupled with low quality spare parts, make suspension and steering repairs quite a frequent process. Therefore, replacing steering tips on VAZ 2114 and 2115 is familiar to many owners of this model. This work is not too difficult. This repair can be done in any garage. This will require a minimum number of tools.
The steering rack is an integral part of the steering mechanism with which the car is steered. This device has a long service life and a significant level of reliability. If problems arise with the steering mechanism, sometimes it is enough to tighten the steering rack.
Repair procedure
The replacement algorithm includes several points:
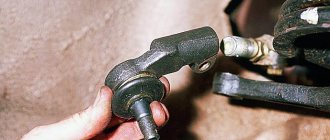
- Jack up one side, remove the wheel, turn the steering wheel so that the tip is in a position convenient for replacement.
- Spray the connections with penetrating liquid.
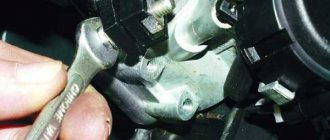
- Unscrew the fastening nut.
- Pull the tip out of the hole in the steering knuckle.
- Check the condition of the steering rods and replace them if necessary.
- Replace the part.
- Reassemble in reverse order, repeat operations for the other wheel.
Service technicians are interested in what measures can be taken to protect threaded connections from dirt and moisture. The main thing is to thoroughly lubricate the threads with graphite lubricant or lithol. Some additionally put a tube of a suitable size at the junction of the rod and the tip or use heat shrink.
After replacing the VAZ 2114, it is best to adjust the wheel alignment. There is a way to avoid this though.
When removing the old tip, count the number of turns, and then tighten the new one by the same number. Then, when driving at low speed, make sure that the car does not drift sideways when the steering wheel is straight.
Sequence of operations
If the steering tips are out of order, knocking noises are heard from the suspension while driving on poor road surfaces, and when accelerating, the steering wheel may begin to vibrate and shake. These parts are for wheel alignment. The work must be carried out in a timely manner, otherwise the rubber will begin to wear unevenly and intensively. Do-it-yourself replacement of VAZ 2114 steering tips is carried out in the following sequence:
- Jack up the vehicle on one side and remove the chassis completely.
- Turn the steering wheel until the tip is in a comfortable position for performing work.
- Coat all fasteners and connections with penetrating liquid.
- Wait and unscrew the fastening nut.
Check the condition of the rods; if problems are found, they should also be replaced.
Press the tip out of the seat using a puller (you can use a pry bar and a hammer).
During dismantling, regularly measure the distances, this will be useful during installation.
Now you can remove the tip.
A new part is installed in its place, but we should not forget that the threaded connections must be thoroughly lubricated.
- Assembly is performed in the reverse order to that described above.
- The operation is duplicated for the 2nd wheel.
What are the best steering tips for the VAZ 2114
Tie rod ends are steering control elements that are present on every modern car. The VAZ 2114 model was no exception.
The purpose of the tie rod ends is to provide a connection between the linkage and the steering knuckle of your car's wheel. When the tips move, the steering rack rods move, turning the wheel. In essence, steering tips provide the ability to make maneuvers, turns, and change the direction of movement of the car.
Element appearance
Diagnostics
Replacement of steering tips on VAZ 2114 and 2115 is required in case of their malfunction. The manufacturer recommends replacement every 30,000 kilometers. But, in practice, the tips last about 2 times less. The first sign of their malfunction is a squeaking sound when cornering. If you do not pay attention to it, then later a knock appears in the suspension.
At the same time, “yaw” of the car may be observed when moving in a straight line. If you move the tie rod by hand, play will be noticeable. At the same time, you should check all steering components. Anything can creak here. Therefore, when diagnosing, be sure to look at the condition of the balls, and also inspect the steering rack.
Choice
. It is advisable to purchase parts from places that are familiar to you. This will allow you to buy a quality part with a guarantee. The selection process itself is simple. There are only a few types of these products available in stores. Most often, you can find AvtoVAZ and Trek. There are also other manufacturers. But their quality is no different, but they are more expensive. Therefore, there is no particular point in buying them.
Signs of breakdown
Tie rods have two main enemies.
- Dirt. PH are hinged parts, therefore, when the boot is damaged, various solid particles of debris, dust, and dirt begin to enter the mechanism. Friction occurs, parts begin to wear out faster, and moving components are destroyed.
- Bad roads. How many bumps, holes, curbs do you have to overcome every day? All these impacts negatively affect the condition of the tips - the hinge begins to actively wear out, and play occurs in the vertical direction.
If a tip is found to be faulty, it must be replaced. It is better not to do with restoration and restoration of functionality.
Many people are interested in the question of how you can check the steering tips and make sure they are worn out or, on the contrary, intact. It is not necessary to go to a service station and pay money for this.
To check the condition of the LV, you need to turn the wheel all the way in one direction and remove all dirt from the boot. If there are breaks or cracks in the rubber, then the part has worn out and no longer performs its functions properly. Do subject to replacement. The second wheel is checked in a similar way.
There is one more important measure that is recommended to be carried out even if there are no signs of wear on the launch vehicle. To do this, a pry bar is inserted between the steering knuckle and the rod, after which the parts are moved relative to each other. If no vertical play occurs during these manipulations, everything is fine. If it is, you will definitely have to change the component.
When to change
how to adjust the clutch on a Priora if there are not enough threads. It is important for the motorist to know.
The structure of the elements is such that they are located at the ends of the steering rods. Hence the name - tips.
The rods themselves have a fairly impressive service life, so they are changed quite rarely. The same cannot be said about the tips.
If you follow the instructions provided in the instruction manual, then replacement should be performed approximately every 40 thousand kilometers. But still the figure is average. Depending on the situations, operating conditions and the quality of the currently installed elements, repairs may be required later or earlier.
The following factors influence the degree of wear of steering system components:
- Vehicle operating conditions;
- The quality of the tips used;
- Driving style of the car owner;
- Quality of roads, etc.
Signs of breakdown
At the first signs of a malfunction of the limit switches, appropriate measures should be taken to eliminate them.
You can determine that the elements are damaged and no longer perform their job as efficiently as before by the following characteristic signs:
- The car is difficult to control. This is especially noticeable when entering sharp turns;
- On tires, the tread pattern begins to wear unevenly;
- Uncharacteristic sounds are heard from the front of the car. Moreover, they can come from one side or from two simultaneously.
These signs of breakdown may indicate not only faulty steering tips. Therefore, mandatory verification is required.
Rubber boot
Preparatory activities
Many experts advise taking certain steps to prepare for the replacement so that everything goes easier and faster. These actions include the following.
- Treat all nuts and fasteners with penetrating liquid. WD40 works great.
- If the tips last longer than one winter, to remove their fist you will need to use a 17 socket to unscrew the nuts.
- If the nuts stick, try heating them with a hair dryer. A gas burner is also suitable, but you need to be as careful as possible with it.
- Prepare tools for removing tips.
Today, two methods are used to dismantle steering tips - modern and traditional. The first involves the use of a special puller, and the second - a sledgehammer.
Jack and WD40 at the ready
The traditional dismantling method involves the following actions:
- The steering wheel is turned all the way;
- Several strong blows are applied to the steering knuckle;
- Vibration causes the tip to pop out.
But the method has two serious drawbacks.
- It will take special skill to deliver precise, but at the same time accurate and strong blows.
- This method can reduce the service life of steering racks.
Therefore, the best option is a puller. You can literally buy it for 200-300 rubles, but it will be useful in the future and will significantly preserve the integrity of the remaining parts when replacing the launch vehicle.
Dismantling works
Replacement
The replacement procedure is quite simple. Especially if you have prepared the connecting elements in advance and acquired a puller.
- Using a jack, lift one of the sides where you will begin to change the tips.
- Turn the steering wheel to such an extent that it is convenient for you to replace damaged elements.
- Treat the elements again with a penetrating liquid.
- Unscrew the fastening nut.
- Remove the tip from the steering knuckle hole. Here you just need a puller or the traditional old-fashioned method using a sledgehammer.
- Check the condition of the steering rods. Sometimes it is better to replace them in the first couple of wears. Besides, you still got into this knot.
- Replace damaged tips with new ones.
- Perform the reassembly procedure.
Assembly
- Do the same with the second wheel.
- We recommend that you think additionally about protecting threaded fasteners from moisture and dirt. To do this, the threads can be lubricated with lithol, graphite grease, a tube of a suitable diameter can be put on, or heat shrink can be used.
- After completing the replacement of the steering tips, visit a service station to adjust the wheel alignment.
- If you don’t want to go to a service station, then count in advance the number of revolutions when removing the old tip. The new one is twisted by the same number of revolutions.
- Drive onto a straight road and check whether the car does not skid to the sides when driving in a straight line.
One of the main conditions for a successful replacement is the choice of quality parts.
New part
What to choose
Finally, we will present several options for the most popular steering tips, which are used today when replacing a VAZ 2114. So you can decide for yourself what to choose and which ones are better.
They vary slightly in price, but are of good enough quality to serve your vehicle faithfully and reliably.
| Manufacturer | Price |
| AvtoVAZ | 620 rubles |
| TRACK | 620 rubles |
| VIS | 730 rubles |
| Lemfoerder | 830 rubles |
| Finwhale | 860 rubles |
The last two tips are foreign made. This makes their price higher. But the quality is somewhat higher than AvtoVAZ products.
Replacing a LV is not so difficult that you need to go to a service station and pay 500-1000 rubles for the work of the craftsmen. You can easily cope with this task yourself, relying on the video and instructions provided.
avtoexperts.ru
There are several types of steering mechanisms, but there is always a common part - this is the steering tip. The main task is to transfer a certain movement from the steering rod to the steering knuckle. Depending on the configurations, there can be from 4 to 6 parts.
For example, if the type of steering system is rack and pinion (the majority of them), then there will be four tips, 2 per rod (2 rods). If the mechanism is of the so-called “worm” type, there will be six, two per rod (rod 3).
Device
Please note that depending on the steering system configuration, they may vary in shape and size. The rod can be of different lengths or have bends, both in horizontal and vertical positions. Therefore, it is important to remember that if there is a bend, then the part is not interchangeable with the same one, but on the other side.
If they are initially the same in shape, there are no bends, then they can be replaced from one side to the other without consequences.
Remember, the main components:
• Directly the housing into which the steering rod is screwed.
• “Finger”, as a rule, on most models there is a thread or another type of connection, for example, a stud.
• Hinge housing uses wear-resistant metal for long service life.
• Various locking rings that prevent the pin, spring (to securely hold the liners) and liners from popping out.
• The “finger” nut is a fairly important part; without it it is impossible to secure the tip to the “fist”.
• Anther. Rubber pad that protects the device from dirt, dust, sand, and moisture.
Looking ahead, I would like to clarify the importance of maintaining this anther in an intact state. Otherwise, failure is inevitable. As a rule, in most cases, breakdowns occur due to a collapsed boot and the entry of foreign objects into it.
Almost all devices have the same shape, regardless of the car model. The only exceptions may be based on the format of the material used for production. For example, SUVs require more wear-resistant parts with increased protection due to the special conditions of possible operation.
Types of steering tips
Depending on what type:
It depends on whether there is a special hole on the support cover for pouring lubricant. As you understand, those being serviced have such a hole, which allows you to periodically add lubricant. The second option does not have this option, so after the lubrication is complete, they are thrown away because their maintainability is zero.
There is a second subdivision group:
Collapsible ones have a thread on the bottom cover (under the “finger”), which allows you to replace the hinge mechanism itself or the liner separately (a rubber or Teflon part that tightly fixes the “finger” in the “cup”). In modern cars, this principle is already difficult to find, because in terms of safety they are seriously inferior to non-separable parts. If the tip has failed in the car, you should inspect whether there is a thread on the cap or a retaining ring. If you do not find something like this, you can safely throw such a part into the scrap yard.
Malfunctions
Often, there are no problems with them, especially if they are new, which cannot be said about worn-out parts. During operation, the liners are necessarily worn down or deformed, causing a noticeable backlash to appear. Apparently the “finger” is already quite loose in the body. If the situation worsens, he can simply pull out the “stopper” and jump out.
Keep in mind that the tip can lead to quite serious consequences; the rod may break, which will lead to more dire consequences, including an accident. You basically lose control of the car, without even being able to turn the wheels.
As a rule, the resource with proper operation is quite long, but one should not forget about the characteristics of the road surface, which directly affects the durability. The service life, on average, does not exceed 100,000 km; it is not uncommon, as on new cars, for parts to break.
Signs of malfunctions and how to check?
• Significant deterioration in controllability.
• The appearance of dull knocks, especially when turning.
• Feedback in the steering wheel, even with the smallest irregularities.
If you notice something from the list, do not aggravate it, check if everything is in order with the node. Doing this at home is quite simple. It is better to carry out the operation with an assistant. So, you need to have a hole, an overpass, or simply place the “front” on some hill so that you can crawl under it. We put the handbrake on, be sure to turn off the car. The person in the cabin turns the steering wheel, the second one at this time, carefully monitoring the movement of the tip. The play will be noticeable even visually, not to mention tactile touches.
In addition, when checking, pay attention not only to the presence of play, but also to the integrity of the anthers, connections to the “fist”, and also pay attention to the bushing (axis) itself, into which the rod is screwed. It is not uncommon for a “break” to occur in that place or a crack to appear.
How to replace tie rod ends without the cost of wheel alignment?
The service life of outer tie rod joints, also called tie rod ends, greatly depends on their original quality, driving style and smoothness of the road surface. In any case, these consumables have to be changed quite often, since the slightest play in the hinges is unacceptable. In addition to the sound, this has an extremely negative impact on the durability of the tires and the overall safety of driving.
The replacement procedure is quite simple and can be done independently, without the use of complex specialized equipment.
Recommendations
As a rule, steering racks without power steering are simple and reliable. However, to preserve the resource and increase the service life, it is necessary to monitor the condition of the boots at the point where the steering rods are attached to the rack.
- If the boots on the rack are damaged, both the steering rod and the rack fail. Water and dirt wash out the lubricant, destroy the swivel and threaded connections, etc.
- Next, active corrosion begins, which also quickly disables the steering mechanism.
Let’s also add that the steering rack quickly breaks when driving over serious bumps at high speed. It is also not recommended to drive onto curbs; you should avoid driving over obstacles with your wheels turned out, etc.
Source
Checking the condition of parts
The presence of play in the connection must be checked during each maintenance of the machine. To do this, it is quite enough, with the suspension loaded with the weight of the car, to forcefully shake the steering rod with one hand and hold it on the tip with the other hand. If there is wear, you can clearly feel the play of the ball pin.
You can use a lever (mount), but there is a danger of mistaking the normal play of the spring-loaded pin for wear. Diagnostics by rocking the wheel has the same potential for errors; in this case, play will be selected in other parts and masking knocks will occur.
Let's summarize
As you can see, the work will require some skill. But, if desired, they can be performed by a beginner who knows how to handle the tool and has common sense. Repeating the operation no longer causes problems.
To protect fasteners with threaded connections from dirt and water, experts recommend using lithol or graphite-based lubricants. Parts must be lubricated carefully. You can further enhance the protection with tubes. They are put on the joints of the steering tips and traction devices (heat shrink can also be used).
For greater clarity of the above actions, you can watch the video:
Source
Working method
You need to do the following:
1. Hang up the car and remove the wheel, not forgetting to install a reliable safety stand.
2. Clean the parts with a wire brush and spray the joints with a penetrating fluid such as WD-40 or equivalent. These are mixtures of white spirit with anti-corrosion and lubricating additives.
3. Loosen the nut securing the pin and the locking connection of the toe adjustment unit. One turn is enough. It is better to go through the thread of the pin nut several times until it rotates freely.
4. Install the puller onto the ball joint. Pullers come in different designs; it is most convenient to use a device in the form of a wedge fork; a couple of strong blows to its end are enough. The screw puller does not always cope on its own; it needs help with a sharp blow of a hammer on the bipod of the steering knuckle.
5. In the absence of a puller, you can create tension in the connection using the same pry bar, and then apply sharp blows to the edge of the bipod. The finger will detach with a characteristic click. All that remains is to unscrew the threaded end of the rod and install a new one.
The disadvantage of such a simple replacement is the need to immediately carry out operations to adjust the wheel alignment angles, as they say, wheel alignment. We must remember that replacing the tip does not affect the camber in any way, only the toe-in of the wheels changes.
If you approach the work carefully, have a sufficiently large caliper or tape measure, and understand the principles of toe adjustment, then additional costs can be avoided.
To do this, you need to perform the following operations with the highest possible accuracy:
1. Before starting to loosen the nuts, make two marks. The first should be located exactly in the center of the circle of the back of the ball joint. There are usually ring stampings or rolling. Their center must be calculated, at least using a caliper. In the found center, it is advisable to make a small depression with a light blow of a sharp core. Carefully check to see if there is any slight shift of the mark from the center. Repeat the procedure on a new tip.
2. On the steering rod, from the inside of the threaded connection, apply an annular mark lying exactly in a plane perpendicular to the axis of the rod. Smooth and neat.
3. Using a caliper or tape measure, measure and record the distance between the applied marks.
After installing the new tip, rotate the adjusting connection to achieve the same result. Lock the threads.
Despite the possibility of preserving the previously existing toe angles in this way, it will still be safer and calmer to visit the stand. The toe-in angle is quite accessible for measuring in a garage yourself; you can find various techniques in numerous tips from home craftsmen for repairing their own cars.