This assembly unit is a key element of the vehicle's chassis, on which the quality of its operation and the safety of all road users depend. Wear of the ball bearing threatens the loss of control over the vehicle's handling, so replacing it is as important as replacing the ball joint on a Renault Logan of any year. Monitoring and timely repairs must be regular and thorough.
Replacing front wheel bearings
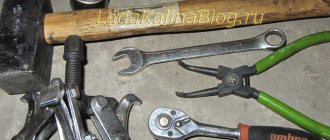
Standard replacement of the Lada Vesta wheel bearing is carried out in a workshop or equipped garage. To perform the operation you will need the following tools:
- set of wrenches;
- wheel removal tool;
- jack and goat stands;
- special bearing puller;
- chisel;
- circlip remover;
- screwdriver;
- hammer;
- pliers with round jaws.
A metal brush, rags, and WD40-type liquid may also be useful for cleaning dirt.
Ball joint knock
After 60 - 65 thousand kilometers, owners note the appearance of a knocking sound in the area of the axle shaft. Most often when turning at low speed.
The tip of the ball joint is rolled into a plastic sleeve. During the systematic operation of the car, the moving surfaces wear out and play forms.
The process of replacing the ball joint yourself is not difficult, but be careful not to violate the installation technology.
To verify that the ball is faulty, just jack up the side of the car. Loosen the wheel up and down, the presence of knocks and clicks will be a sign of wear on the ball joint.
Sequencing
The procedure for removing the hub support bearing is as follows.
- Drive the car into the garage and loosen the bolts holding the wheel. It is important to just loosen the bolts - you do not need to unscrew them completely. Next you will need to remove the terminals from the battery.
- Raise the car with a jack and place it on trestles. If possible, it is recommended to use a lift. This will make the operation more comfortable.
- Remove the wheel from the car. Next, using a soft brush, you should clean all surfaces from dirt, plaque and dust. The further procedure must be carried out with utmost cleanliness. It would also be a good idea to place cardboard or a rag under the work area.
- Next, you need to open the cap of the hub nut and use a 30 socket to unscrew it. In this case, you should use a lever - the device is clamped tightly enough and secured, which prevents it from unintentionally unscrewing.
- When you have access to the caliper, you need to use a flat-head screwdriver to move the piston and spread the pads. During the procedure, you need to monitor the level of brake fluid in the Republic of Belarus. If the liquid overflows, it is convenient to remove the excess with a syringe.
- The next step is dismantling the caliper. Using wrench No. 18, unscrew the two mounting screws and hang the brake on a spring or other element. In this case, you will need to be careful and remove the brake line away from sharp objects.
- Next, the brake disc is unscrewed. To do this, take a TORX head of the appropriate size and unscrew the two fastening screws. The disc itself must be carefully placed on a clean surface. During removal, it is recommended to touch the working surface of the rotor less - this part is sensitive to grease.
- Next, using the same torx, you will need to unscrew the protective covers and speed sensor. For convenience, the sensor can also be attached to a spring.
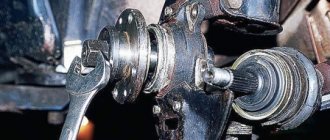
- Next, you should rip off the tie rod mounting nut and, using a squeezer, remove it from the steering knuckle. For convenience, you can hold the ball part from turning with a hexagon.
- After preparation, you need to dismantle the suspension arms and wheel drive. Here the mounting bolts and nuts are unscrewed in order. The master’s task is to completely free the steering knuckle and hub from the suspension elements.
- After all the manipulations, you can begin to replace the bearing itself. The fist is clamped in a yew or fixed in another convenient way.
- Next, using a special puller, you need to remove the retaining rings from the seats. In this case, you need to act carefully - the rings are made of special steel and can bounce off.
- Then, using a tool, you need to knock out the hub along with the bearing from the steering knuckle. The main rule here is accuracy. You need to hit the guide carefully so as not to damage the part.
- Now the hub is completely freed from the knuckle and the bearing can be pulled off.
- Subsequent steps require a special squeeze. If there is no such thing available, you should not even start the procedure. The principle of operation is shown in the photo.
- Next, replacing the support bearing of the Lada Vesta proceeds to the vehicle assembly stage.
- Using a stream of compressed air, you need to clean the seats and completely remove all dirt from the parts.
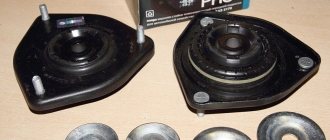
- Install the outer retaining ring onto the steering knuckle and press the new bearing all the way into its seat. Insert the second ring into the retaining groove.
- The final stage is pressing the hub into the inner part of the bearing.
- Subsequent assembly of the mechanism is carried out in reverse order. The most important factor is maintaining utmost cleanliness and precision. Even a small amount of dirt that gets into the inside during installation significantly shortens the life of the parts.
Short recommendations
When choosing a new part to replace the front wheel bearing for a Renault Logan car, carefully study the condition of the packaging and the presence of preservation lubricant. It is important that the part does not jam when rotating. There should be no traces of corrosion on the body; the same recommendations apply when changing the Logan support ball bearing. It is better to purchase spare parts in certified stores, and a price below 1,500 rubles should be alarming.
During repairs, it is worth checking the condition of all elements of the front suspension. Socket heads can be used as mandrels. If you have doubts about your abilities, then it is better to entrust the stage of pressing the ball bearing to the masters. After the repair, the wheel alignment needs to be adjusted at a service center.
A study of Internet forums dedicated to the operation of AVTOVAZ products showed that the happy owners of LADA Granta have accumulated a lot of technical complaints. First of all, we are talking about the reliability and quality of machine components and assemblies. We decided not to be too clever, but simply to give only the most typical quotes from real owners of LADA Granta.
— 38,000 km and 2.5 years of ownership: replaced daytime running lights, the window lift button was malfunctioning — I removed and cleaned the contacts. At 33,500 km, the support bearings of the front struts clicked. In winter, at 30,000 km, the fuel hose dripped in the quick-release coupling.
The sensor is installed on the throttle assembly and connected to the throttle valve axis.
You will need a screwdriver.
Replacing the Throttle Position Sensor 1. Disconnect the wiring harness connector from the sensor.
Read more…
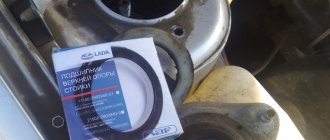
How to replace the rear bearing on Vesta
The standard replacement of the Lada Vesta rear wheel bearing is carried out independently only after measuring the axial clearance and checking the condition of the part. If the troubleshooting results are not satisfactory, the bearing needs to be replaced. The operation will require similar instruments. And the procedure itself looks like this.
- The preparatory work is similar to the procedure for replacing the front wheel.
- The disc is removed from the car and the brake drum is exposed.
- Using wrench No. 17, the hub cap is removed and the brake drum is dismantled.
- When using a magnetic puller, the magnetic ring is squeezed out. The part helps hold the structure in place.
- After disassembling the mechanism, the TB should be installed on a flat surface and an extension should be installed in the inner part of the bearing to press it out. For the best effect, you will need a press; if you don’t have one, you can use a hammer.
- When all parts are removed, the device is purged with compressed air. If you do not have a compressor, you can thoroughly wipe the surfaces with a rag soaked in gasoline or a similar solution. After this, replacing the rear wheel bearing on a Lada Vesta is considered complete.
- Installation of the system is carried out in reverse order.
Basic faults
As a result of regular use of the car, over time, most parts wear out and may break. One of the most vulnerable parts of a vehicle is the suspension, which smooths out road unevenness and takes the blows.
The bearing design consists of two metal rings. Inside there are balls of insulating material. The entire structure is covered with plastic casings. Internal graphite-based lubricant protects materials from abrasion while the internal race of the part rotates along with the hub.
For no apparent reason, car parts usually do not break. The process occurs unnoticed, but allows the driver to have time to react to a breakdown if he pays attention to the characteristic signs in time.
The purpose of bearings is to ensure the rotation of the wheels and also to hold the hubs firmly. Let's look at their main malfunctions and possible causes:
- Front wheel play.
- Vibrations of different degrees of intensity.
- A pronounced hum and other extraneous sounds when the wheel rotates, similar to the grinding of metal, crunching, knocking.
- Vibration in the steering wheel that increases with speed.
- The car skids to the side.
- Off-road driving, extreme driving, with sharp braking, acceleration (drifting), can damage any, even reliable, part of the car.
- The cause of component failure may be vehicle overload.
- As a result of sand, moisture, or dirt getting into the rotating parts of the bearing, the lubricant may evaporate and the inner or outer rim may crack. During long-term operation, the protective elements of the part become unusable, the tightness of the structure is compromised, and dirt can penetrate into the working area, washing out the lubricant.
- The rollers themselves are rarely destroyed. The reason may be inadequate factory quality.
- If the mechanism is replaced incorrectly, another replacement will be required.
Generator repair
The following describes the repair procedure for sliding inserts and power generation devices. Replacing the Lada Vesta generator bearing will require the tools indicated at the beginning of the article. The repair procedure itself looks completely different.
- Place the machine on a level surface and securely fix it.
- Disconnect battery power.
- Loosen the tension roller of the crankshaft belt and accessories.
- Using a Phillips screwdriver, unscrew the power conductors of the generator device and remove them from the repair area.
- The generator is removed using a 13 mm wrench and a screwdriver. To do this, you need to find and unscrew the two bolts on the bracket securing the device to the engine block.
- Next, you can carefully remove the device itself from the machine for subsequent repairs.
- After dismantling, use a screwdriver to unscrew the two screws of the cover and remove the latter.
- Under the cladding there is a diode bridge and a regulator. The parts are fixed on a special panel, which is pulled off the shaft along with the bearing.
- The next stage of repair involves unwinding the anchor. Next, you need to remove the shaft; it is additionally held by magnets. Therefore, it will go quite tightly.
- As soon as the insides are removed, the rear bearing cover is opened and the sliding element is pressed out according to the standard pattern.
- Assembly is also done exactly the opposite.
Knocks and noises in the front suspension of Lada Vesta
- Many car enthusiasts note the appearance of a squeaking sound in the front axle area immediately after purchasing a car from a dealership. Driving through speed bumps turns into real hard labor. The culprit is the rubber bushings on the stabilizer bar.
Service station technicians do not recommend lubricating sealing products with grease or transmission oil. The creaking will go away, but for a short time, then it will resume again. To get rid of annoying squeaking, use polyurethane stabilizer bushings from Chevrolet Niva. (Cat. Art. 17012680).
- The play of the tip in the ball joint can also cause knocking. According to the regulations, replacement is carried out complete with suspension arms.
- Often inexperienced drivers confuse the creaking of suspension elements with a dull knock in the exhaust system area. The muffler mount is another defect from AvtoVAZ. The rubber retainer must be lubricated with silicone grease. The unpleasant sound will go away for a long time.
- The front suspension is knocking or rattling - contact a service station for help. Specialists identify the source of the breakdown with high accuracy. Self-diagnosis does not always bring the desired result due to the lack of special equipment.
- Do not forget that play in the chassis of the car can also be perceived as a malfunction in the suspension. Carry out diagnostics carefully and take a comprehensive approach to identifying the breakdown.
Sequencing
- Drive the car onto a viewing hole or lift.
- Remove the terminals from the battery.
- Go under the car and disconnect all structural elements, including crankcase protection, gauges, sensors and rods that can prevent removal of the gearbox.
- Next, use wrench No. 13 to unscrew the 12 bolts holding the gearbox housing to the engine block.
- Next, you should remove the gearbox module from the engine compartment and move it to the table.
- The next stage is dismantling the squeezing device. The element itself is located on the input shaft and is an unusually shaped bearing.
- Using a special puller, you will need to pull the part off the shaft.
- Reinstallation of the entire structure is carried out strictly according to the instructions. For proper installation, you will need to correctly center all parts of the structure.
Important! Replacing a release bearing is a complex procedure. Therefore, the operation must be performed by sufficiently qualified professionals with the necessary tools.
The machine itself is modern technology. A room with a minimum set of wrenches and a hammer will not work here. If the required tools are not available, you should not even undertake the maintenance and repair of complex components.
Similarly, replacing the Lada Vesta air conditioner bearing requires a major approach. Due to the use of specific coolers in the device, it is recommended to entrust the operation to professionals.
Wear of stabilizer link joints
Catalog number of the original stands (bones) - 8450006750, length - 283 mm. Due to poor-quality road surfaces, pins (hinges) often fail prematurely.
Replacing the “bones” yourself is not at all difficult if you follow the instructions for using the technical device.
- wrench 16, 19, Torx 30;
- a set of new “bones”.
- Jack up the car and remove the wheel on the right.
- Unscrew the upper and lower fastenings of the “bone”.
- We insert a new one, tighten the nuts, and screw the wheel.
- By analogy, we repair on the left.
Bottom line
On Lada Vesta, replacing bearings is carried out in the same way as on other cars. There are no fundamental differences. Still, to access the sliding insert, you will need to disassemble the serviced mechanism and use special squeezes and attachments to dismantle the assembly. In principle, such a procedure can be performed independently, but in the absence of experience and the required tools, the procedure should be entrusted to professionals. A penny saving on labor costs can result in serious costs for replacing damaged parts.
Content:
- 1 Installation principle/drilling
- 2 Which disks to choose
- 3 Parameters of factory-installed tires and their characteristics
- 4 So, what about the sizes in the end?
- 5 Effect of tire and wheel size
- 6 Acceptable dimensions
- 7 What do additional parameters mean?
Even when the car was under development, there were rumors that the wheel size would be R15 inches. But it turned out that these were just rumors, and the car rolled to the “people” on tires with a radius of R16 and R17. To say that this surprised many would be an understatement. There were also those people who at first tried to change the car to wheels with a smaller diameter, but their efforts were in vain thanks to the efforts of the car plant designers.
Reviews
| № | Positive |
| 1. | Stepan Vasilyevich , 42 years old (otzovik.com): the suspension is mounted on a subframe, the levers and steering knuckles are of a new shape. Obstacles on the road are overcome smoothly, without impacts. |
| 2. | Gennady Semenovich , 39 years old (www.zr.ru): at speeds up to 125 km/h the suspension works as comfortably as possible. The problems start from above. |
| 3. | Timofey , 22 years old (autobann.su): pleased that gas shock absorbers are installed by default. This is just right for the urban cycle. |
| 4. | Kirill , 33 years old (lada-vesta.net): before the Lada Vesta I had a Granta, it has an old type suspension design. Vesta uses frame technology. The steering rack and stabilizers are fixed to the beam. |
| 5. | Semyon Nikolaevich , 44 years old (otzovik.com): my positive review of the chassis and suspension of the Lada Vesta. The car is in its second year - no complaints, minor bumps are absorbed silently. |
| 6. | Lev Nikolaevich , 45 years old (www.zr.ru): I live in a rural area, you know what the roads are. The suspension works great. My recommendations to motorists. |
| 7. | Dmitry , 20 years old (autobann.su): springs are installed separately from shock absorbers, semi-independent type with a number of improvements that were so lacking in previous generations. |
| 8. | Mikhail Gennadievich , 43 years old (lada-vesta.net): the angle of inclination of the front pillars is 5 °, which has a positive effect on the handling characteristics of the car. The steering from the second generation Renault Megane is better than its domestic counterpart. |
| 9. | Kirill , 40 years old (otzovik.com): good car, good build, no comments on the chassis or transmission. |
| 10. | Petr Semenovich , 42 years old (www.zr.ru): the car is three years old, there are no comments on the components, I systematically carry out technical inspections and diagnostics, and treat the equipment with care. |
| 11. | Alexander , 35 years old (autobann.su): during two years of active operation of the car, I replaced the rubber bushings on the stabilizers once. I am satisfied with the build quality of the domestic car. |
| Negative | |
| 12. | Konstantin Stanislavovich , 43 years old (www.zr.ru): the chassis has not lasted even two years, it thumps, the suspension creaks in the cold. The officials said that this is not a warranty case and they cannot help. I replaced the rubber bands myself with polyurethane ones. |
| 13. | Vitaly , 27 years old (otzovik.com): instead of standard rubber bands, I installed polyurethane ones from Chevrolet Niva. The service life of the last 60 - 70 thousand km. As it turned out, the reason for the knocking was premature wear of the rubber seals of the stabilizer link. |
| 14. | Grigory Vladislavovich , 45 years old (autobann.su): a model with obvious defects, after purchase it needs a comprehensive re-upholstery of components, mechanisms, and partial noise reduction. |