Print this article Font size 16
Already on new cars of the VAZ 2110 series, buyers noted the insufficient effectiveness of noise insulation and wind protection by rubber on the doors. Therefore, there is no need to talk about used cars.
Over time, creaking and rustling noises appear, and the driver and passengers experience discomfort from the cold seeping through worn-out seals. Plus, loose fitting of the doors leads to the appearance of moisture inside the cabin during snow or rain.
It would seem that such an insignificant element as a seal, but how many problems it can cause in case of wear or mechanical damage.
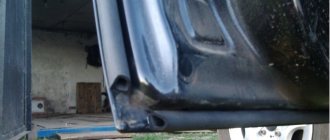
The seals at the bottom of the doors, near the thresholds, are subject to the greatest wear. Therefore, every buyer of a used VAZ 2110 or the owner of a rather old car must first replace these same rubber bands.
Appearance of the gum
Purpose
Color marks are also drawn in a certain place where there is a filler in the form of a porous rubber rod. The insert in the body of the seal is necessary so that when installing it in the door opening, it does not break and become deformed in the corner of the opening, where the transition is not so smooth.
Thanks to the insert, the product becomes level without breaking, which guarantees a tight fit in this area of the opening, which provides a reliable seal.
Differences
An ordinary, cheap sealant has no filler, and therefore there are no color marks. They are mounted on any side of the doors, both left and right. Ask salespeople at your auto store for universal door seals. They also fit on front or rear doors. The only thing you need is to cut off the excess part at the junction with a margin. Rubber sags over time.
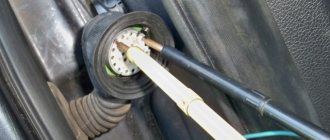
Blowing from the doors of a VAZ 2110
Today we are talking about seals. I turned the spit slowly for probably a month or so. There is a lot of different information on the Internet, for example, sticking door D-shaped seals, installing Priora, 3-chamber, gazelle, silicone hose, etc. The best option for me is the Priorovsky ones. I did just that, bought a set of seals 2170 for 4 doors. The trunk has the original 2112 and the original gutters. I installed the driver's one first for testing.
Pros:
- looks more solid from the outside; - presses better; — two-circuit; — principle of operation of the accordion; — the composition looks, feels, compresses/decompresses better.
Minuses:
— wide, fits into the spacer with the door trim (the trim is not standard). On any bumps or irregularities the creep is significant; — does not quite fit the ceiling trim, parts of the interior trim. The body is visible from above, the side of the seal sticks out, which should lie down and cover the interior elements.
Operating principle of seal 2170. The outer part/second chamber is pressed, working. The first chamber is in the form of a hose, a return amplifier. It is compressed by an accordion at the bottom of the reinforcing hose of the first chamber. More air layers are obtained, more material, more pressing forces. We get warmer, quieter, resource.
The disadvantages turned out to be significant for me specifically. Overall, it was bad, I didn’t like it... A week later I went back to the market and replaced 3 2170 seals with 4 original 2110 ones.
What is bad about 3-chamber seals (type 2109) in my opinion, not counting the fact that they are unlikely to block the ceiling lining. With strong compression, excessive deformation; cramming more does not mean better. Everything has its own elasticity threshold. While new, everything is great, but the resource will be small. Moreover, it depends on the execution, form, location. The outer part should not be stronger than the inner, or be equal. Shapes of working angles, thickness, etc. The outer chamber takes the shape of the door more, the inner chamber increases the pressure/return with slight deformation. Which is what was done at Prior. This can be seen after a little use, when the seal presses a little, and not when it comes from the store.
Since the native 2110 is logical that they lose to the 2170, it cannot be otherwise. AvtoVAZ, although it is moving in small steps, is still moving. It was necessary to somehow strengthen them... The idea was born immediately.
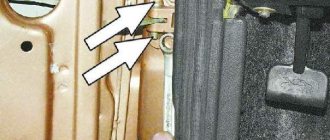
In the corners of 2110 there are trimmings of seals/porous rubber from the factory so that there is no breaking bend in the upper corner of the door.
The intended angle itself is marked with a dot of paint.
I took my photos with these angles and points. Then I sent it to my phone, but suddenly the body died. I had to take photos from IvanVRN36.
Since such a sealing harness/cord made of porous rubber is classified as a rubber-technical product, finding it at least in our city is practically equal to 0. By the way, I asked a question about this harness/cord, there is also a photo there: www.drive2. ru/communities…orum/465065382076482147?m
First I wanted to insert the silicone hose without any extra hassles. I bought a couple of meters, first testing it in a chest freezer at -22, I was disappointed. The hope was not justified. The hose becomes “Wooden”. You need a frost-resistant silicone composition, and this is again a product... Only this time it’s silicone-technical, not at the household level. There is almost no chance of getting it either. So come to the store and buy a couple of meters.
I started looking in stores for what I could use. Call different offices in the city for all kinds of sealants, products, etc. It was necessary to have something like a cord shape, elastic, frost-resistant. At first everything was unsuccessful, I was already desperate and wanted to install it as is. Then, once again, while looking for a suitable material in the store, I accidentally “stumbled upon” Vilaterm!
Of course, this is not exactly what we would like for an ideal, but as an analogue it was 100% suitable.
"Vilatherm"
- an environmentally friendly material, made using modern technologies from foamed polyethylene, for insulating and sealing joints of prefabricated elements of building envelopes. High-quality, elastic material, which, due to its increased (for this type of material) density, can withstand multiple cycles of tension and compression, which allows it to work perfectly in expansion joints of various designs. Fine-celled, lightweight white material with closed pores, made from high-density polyethylene by foaming with a butane-propane mixture. It is characterized by a unique combination of physical-mechanical, thermophysical and acoustic properties. It is produced in the form of bundles and round pipes of various diameters, 3 meters long.
Of course, everything is beautifully described in the advertising description, but after excessive compression/overcoming the elasticity threshold of the tourniquet, you understand that it will not withstand prolonged heavy loads for long. What they honestly write about in the technical specifications, and the tubular version exists only in large sizes.
Replacing glass frame seal elements
External polymer elements are gradually destroyed under the influence of moisture, solar radiation and dust and need to be replaced. The step-by-step guide for replacing seals is as follows:
- dismantling old elements using a screwdriver, being careful not to damage the coating,
- removing dirt under the old linings and wiping the seats with a rag,
- We install new seals in place, while trying not to hit or apply much force.
Having completed all the work on one door, we move on to the next one, considering that their design is similar, then there are no special features in them. This is how we consistently eliminate natural ventilation of the car interior. Photos with step-by-step operations allow you to perform all actions quickly and get good results.
Additional door seals for VAZ 2110-2112
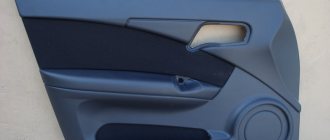
Very often, after soundproofing a VAZ, we begin to pay attention to the wind noise that appears in the doors. This is natural, because our hearing aid gets used to silence and begins to pay attention to fairly quiet sounds that we had not noticed before. The issue can be resolved in two ways - by installing additional seals, or by replacing old ones.
Let's consider installing an additional seal on the VAZ 2110-2112.
The thinnest thermal insulating tube is ideal as a seal. It is made of a specific black material that looks like foam rubber. Often such thermal insulation is used when working with refrigeration or heating equipment.
It is necessary to install an additional seal on a VAZ 2110-2112 only in the upper and rear parts of the doors, and not on the door itself, but on the body. An additional seal on the threshold will lead to the accumulation of dirt and water and, accordingly, corrosion, and a seal on the side of the hinges will interfere with their operation, which will lead to premature wear.
In order to secure the seal to the body, it is best to use good glue, and, first of all, you should pay attention to the reliability of its interaction with the paintwork of the body. You need to start gluing the seal from the front edge of the door, and apply the glue so that it is only in the inner corner of the recess (if the glue is quick-drying, such as “superglue”), into which the seal will then lie. If the drying time of the glue is long, then you need to coat the vertical wall of the body.
After the seal is glued in, you need to close the doors and see if the seal comes out in the corners of the opening. If such an effect occurs, then mark the places where the seal is cut and then cut off the excess. This process is primarily of decorative value. At first, the doors may be difficult to close, but after a few days the additional seal will adapt to the shape of the door profile, and the door will work normally.
If you don’t have the desire or time to bother with gluing an additional VAZ door seal, you can install a denser new seal instead of the old one. Practice shows that the seal from the VAZ-2170 (Lada Priora sedan) is quite suitable for this - it has two chambers instead of one, which improves the tightness of the fit to the door. You just need to remove the old seal away from you and lay the new one, tapping it in order to seat it in place. It is easy to cut off the excess seal, and the connection point is best located on the front side of the door between the hinges.
As you can see, there is nothing complicated when performing such work; the only thing you need is to follow the technology exactly. And believe me, you will feel the result immediately - there will be much less noise and extraneous sounds in the cabin.
Some people recommend using rubber meter seals from windshields as an additional seal, but this option is impractical. It is quite difficult to select such a seal, and when gluing you need to be extremely careful to ensure a sufficient seal. Moreover, their cost is quite high.
Additional door seals for VAZ 2110-2112
3.4 — Ratings: 34
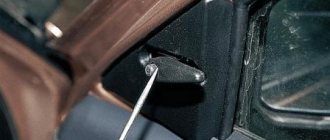
Removal
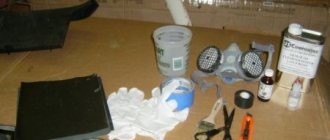
When you have purchased the required number of seals, you can begin to work.
The first step is to remove the old rubber elements, after which the installation of new parts begins.
Let's tell you more about the dismantling procedure.
- Remove the plastic trim panels installed on your vehicle's door sills. To do this you will need a thick screwdriver. Remove carefully, being careful not to damage the plastic caps. But it’s better to buy new ones in advance if you can’t carefully dismantle the threshold.
- Now remove the old pieces of rubber from the seats. Simply tear off the sections that are torn off by hand.
- Remaining rubber can be cleaned off with any available tool. Only be careful with sharp objects so as not to damage the metal and paint layer.
- Very small residues and traces of glue are removed using solvents. Make sure that the solvent you choose will not damage your paintwork.
- Go over the doorway with a vacuum cleaner, remove all dust and dirt. Take special care to clean the bottom part. If wet cleaning was used, wait until everything is thoroughly dry.
Upcoming work
Installation
This process cannot be called complicated. You are not required to have any special training or extensive experience. Although you should at least be able to handle glue.
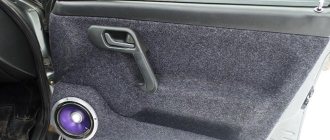
Working with the back door
Each stage is performed consistently and carefully to achieve the desired result and create comfort inside the cabin.
- Even if you have already measured the required length of the seals for your doors, we advise you to do it again. Anything can happen.
- Cut the required length, plus leave a couple of centimeters of reserve. Although if we are talking about a ready-made set of rubber bands, you won’t have to cut or leave anything. Skip the first two points.
- Insert a tube made of silicone or polymer inside the sealing tape. They are sold everywhere, so there should be no problems finding them.
- The length of the tube must match the length of the rubber. This tube will serve to create the necessary elasticity and allow the elastic to press more tightly to the door. This way, ventilation gaps will not appear, and the cabin will become much quieter.
- A shaped side rubber seal is glued to the bottom.
- If the tape is solid, you can start putting it on from either side, as is more convenient for you.
- If it is a measuring rubber band, then start from a point between the door overhangs, or 30 centimeters from the bottom of the threshold. Moving up or down is a personal choice for each master. There is no difference here.
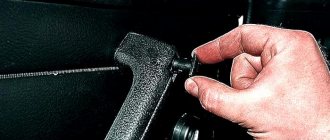
- Push the figured profile all the way down. To do this you will need a rubber or wooden hammer. He's a mallet.
- When the seal is installed around the entire perimeter, an extra piece will be revealed. Cut the tube straight and end-to-end, and make the elastic itself seem slightly deformed. It's like you tore it off by hand. This will avoid the unpleasant phenomenon of siphoning through the joint.
- Replace the pistons; if some were damaged during removal, replace them with new, intact ones.
- Replace the plastic cladding removed from the threshold.
- The second contour of the seal is glued along the edges carefully, but as tightly as possible, after which time is given for the glue to dry completely.
Almost immediately you will feel the difference between the old and new seal. This is a useful exercise that allows you to get rid of unpleasant sounds, knocking, whistling and cold air flowing directly onto your feet.
What to choose?
Sometimes you are amazed at the imagination and thoughts of those who are trying to save money on car repairs. If we talk about rubber seals, some advise using drip tubes instead, others go the other way, inserting window seals.
Do not follow such advice under any circumstances. They won't lead to anything good.
There are several truly correct and effective options, which we will introduce you to using the table.
| Option | Peculiarities |
| Ready-made kits from the manufacturer | They are designed specifically for the VAZ 2110 model. These are mass-produced rubber bands that fit perfectly on the dozen doors. Their design is double-circuit, which allows you to install additional seals if necessary. |
| Measuring rubber bands for VAZ | In stores you can purchase ready-made or soldered seals for each door. Or a solid tape, from which they will cut you a piece of the required length |
| Seals from Priora | Experts believe that these are the most effective and reliable seals. This is due to the three-chamber design with a steel fixing strip and high quality. These elastic bands do not wrinkle and keep their shape perfectly. |
| Rubber bands from GAZelle | A frequently encountered option that has similar characteristics to the standard elements for the dozen. The price is about the same |
When choosing the length of the required piece of seal, measure the internal length of the installed rubber bands on both doors separately. Take it with a reserve, because you can always cut off the excess.
The fixing elements should be caps and high-quality, effective glue. When purchasing the rubber itself, they will tell you which glue is best to use.