This car from Russia belongs to the second group of small class cars. Manufacturers began developing the design of the Lada Kalina back in 1993, and it went into production in November 2004.
According to the results of a customer survey, this car took fourth place in the ranking of the popularity of cars in Russia. The engines of this model are equipped with a belt drive of the valve mechanism, so it will be useful for the owners of this vehicle, as well as everyone interested, to learn how to replace the timing belt on an 8-valve Lada Kalina.
Replacing the timing belt on an 8-valve Lada Kalina yourself
This car from Russia belongs to the second group of small class cars. Manufacturers began developing the design of the Lada Kalina back in 1993, and it went into production in November 2004. According to the results of a customer survey, this car took fourth place in the ranking of the popularity of cars in Russia. The engines of this model are equipped with a belt drive of the valve mechanism, so it will be useful for the owners of this vehicle, as well as everyone interested, to learn how to replace the timing belt on an 8-valve Lada Kalina.
Engine VAZ 21114
This power unit is an injection gasoline engine with a displacement of 1600 cm3. This is a modernized version of the VAZ 2111 engine. The cylinder block is cast from cast iron, four cylinders are located in one row. The valve train of this engine has eight valves. The injector made it possible to significantly improve the car’s dynamics and fuel economy. Its parameters comply with Euro-2 standards.
The valve mechanism drive uses a toothed belt, which somewhat reduced the cost of the power unit, but requires high-quality, timely maintenance of the timing drive.
The design of the piston head provides recesses that completely eliminate the possibility of damage to the valve mechanism if the timing belt is damaged or installed incorrectly. Manufacturers guarantee a motor life of 150 thousand km; in practice, it can be more than 250 thousand km.
Replacement procedure
The operation is not particularly difficult, does not require any special equipment, and can easily be done by the hands of the machine owner. In addition to a standard set of wrenches, you will need a good slotted and flat-head screwdriver. Car jack, car body stand, wheel chocks, key for turning the roller in the tensioner. When replacing, you can use any flat horizontal platform on which the machine is installed. The vehicle operating instructions recommend replacing the belt at 50 thousand km, but many owners perform it earlier, at approximately 30 thousand km. Replacing the Kalina 8-valve timing belt will take place in the following order:
- With the vehicle installed, apply the hand brake and install wheel chocks under the rear wheels. Use a wheel wrench to remove the wheel bolts of the right front wheel.
- Using a car jack, lift the front side of the car on the right side, install a stand under the body sill, and remove the front wheel on this side.
- Open the hood of the engine compartment, since further work will be carried out there.
- To dismantle the timing belt in the timing drive, it is necessary to remove the plastic protective cover, which is secured with three 10mm socket bolts.
- The next step is to remove the belt in the generator drive. You will need a “13” wrench, which is used to unscrew the tensioner nut of the generator set and move the generator as close as possible to the cylinder block body. After such actions, the drive is easily removed from the pulleys.
- Now install the timing drive according to the marks. You will need a socket wrench or a “17” socket, which is used to rotate the pulley on the crankshaft until they match.
- To dismantle the belt in the timing drive, it is necessary to stop the crankshaft pulley from turning. You can ask an assistant to engage fifth gear and press the brake pedal.
If this does not help, open the plug on the gearbox housing. Insert the blade of a flat screwdriver into the hole between the flywheel teeth and the gearbox housing, and unscrew the bolt securing the pulley to the crankshaft.
- To remove the belt, release the tension roller. The bolt securing it is unscrewed, the roller rotates, the tension weakens, after which the old belt is easily removed. It is recommended to simultaneously change the tension roller, which is removed from the block, at the same time as the drive. There is an adjusting washer installed under it, which some “repairers” lose.
- Inspect the pulleys on the crankshaft and camshaft, paying attention to the wear of their teeth. If such wear is noticeable, the pulleys should be replaced, as the contact area with the belt teeth is reduced and they can be sheared.
- Install the new tension roller in its place. Do not forget about the adjusting washer between the cylinder block and the roller, otherwise the belt will move to the side when rotating.
- Installation of a new belt is carried out in the reverse order, but before that, check again how the gas distribution marks match. You need to start the installation with the camshaft pulley, then put it on the crankshaft pulley and the pump pulley. This part of the belt should be tensioned without any possible sagging, and the opposite side should be tensioned with a tension roller.
- Installing the pulley on the crankshaft will again require securing it from possible rotation.
- Next, put the protective covers in place and adjust the generator drive.
After installing the timing drive, be sure to turn the engine crankshaft several revolutions, while checking that all installation marks match.
Setting marks
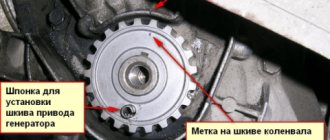
The efficiency of the motor depends on the correctness of this operation. There are three of them on the engine, which are located on the camshaft and rear protective shield housing, crankshaft pulley and cylinder block, gearbox housing and flywheel. There is a pin on the camshaft pulley that must be aligned with the bend on the rear timing cover housing. The crankshaft pulley also has a pin that is aligned with a mark on the cylinder block. The mark on the flywheel must coincide with the mark on the gearbox housing; these are the most important marks that show that the piston of the first cylinder is at the TDC point.
Correct belt tension
The tension roller is an important part of the gas distribution system on the Lada Kalina. If you tighten it, this will greatly accelerate the wear of the mechanism; if the tension is weak, ignition failure may occur due to the belt slipping. The amount of tension is adjusted by turning the tension roller on its axis. To do this, there are two holes on the roller into which a key is inserted to rotate the tensioner. It is also possible to rotate the roller using pliers to remove the retaining rings. “Craftsmen” act differently; they use drills or nails with a suitable diameter, which are inserted into the holes.
A screwdriver is placed between them, the handle of which is used as a lever to turn the tension roller to the left or right until the desired result is obtained.
The correct tension will be when the body of the belt between the pulleys can be turned 90 degrees with your fingers, and after releasing the belt returns to its original state. If this condition is met, tighten the fasteners in the tensioning device.
Which belt to buy
The efficiency of the car engine depends on the quality of the parts used in the timing mechanism drive (tensioner roller, belt). When repairing or servicing a car, it is advisable to use original parts, but in some cases, non-original spare parts for automobile components have worked well. The article number of the original timing belt is 21126–1006040 , which is produced by the RTI plant in Balakovo. Experts recommend confidently using parts from Gates, Bosch, Contitech, Optibelt, Dayco. When choosing, you should be especially careful, since you can buy a fake under the brand name of well-known manufacturers. Replacing the timing belt on an 8-valve Lada Kalina yourself Link to the main publication
Replacing the timing belt on Kalina
Replacing the timing belt on a Lada Kalina takes approximately 2 hours of work. During this time, the owner can save about one and a half thousand rubles. The main nuances, as well as incomprehensible points, are discussed in the article. Contents of the article:, according to the manufacturer’s recommendations, it is produced after 40 or 50 thousand kilometers. However, due to the design features of some engines, it is advisable to carry out this procedure a little earlier. So, let's look at the engines, their advantages and disadvantages.
1.6 liters, 8 valves
The motor has proven itself since the eight, as reliable and very durable. It is this Lada Kalina engine that does not bend the valve when the timing belt breaks.
Other Lada Kalina engines
Of course, it would be possible to consider each power unit separately in more detail, but this is not necessary, because it is the other two engines that bend the valves. First of all, you need to stock up on a set of tools. It includes a screwdriver with a flat blade; a set of wrenches with heads and a ratchet is desirable, because it will be quite difficult to carry out operations with a spanner or open-end wrench. You may also need a special key to turn the crankshaft; we will consider a slightly different option for installing marks when replacing the belt. To begin with, we hang the front wheel. We either mount the car on a jack or use some kind of support. This is necessary in order to install the crankshaft according to the mark; to facilitate the procedure, you can unscrew the spark plugs. This will help avoid compression resistance.
Then remove the plug from the handle for the flywheel mark. It is located on the clutch basket. In general, this procedure must be carried out with an assistant, but if you have very long arms, you can do it alone. Carefully rotate the wheel in small jerks, having previously engaged fourth gear.
In this case, the mark on the flywheel should coincide with the small cutout that can be seen on the box body. After this, loosen the tension on the generator belt and remove it. Then we take a ratchet and a socket for 12. We need them to unscrew the casing that covers the timing belt on Kalina. Now we unscrew the tension roller and turn it around so that the tension of the timing belt decreases, enough to remove it. At this point, it is important to pay attention to the camshaft mark. It must coincide with the plate, which is specially installed on the head body. If the mark does not match, then you need to check the flywheel mark again; if it is in place, you need to adjust the timing belt setting.
To do this, install the camshaft according to the mark, then remove the belt, and then set the crankshaft separately from the camshaft.
Once we have made sure that all the marks match, we can remove the belt and then replace it with a new one. After installation, you need to make sure that the tension is sufficient. Between the pump and the camshaft, the belt should rotate 90 degrees. If all requirements are met, we assemble in the reverse order.
Replacing the timing belt on Lada Kalina 1.4 liters
This engine is available only in a 16-valve version, and it bends the valves in the event of a timing belt break. This has already been mentioned above. The service life of this unit, according to the manufacturer, is about 60 thousand kilometers, but repairing the gas distribution mechanism cannot be compared with the cost of the belt. So, to replace it you will need a set of heads to unscrew the crankshaft gear, the belt itself, and a device for fixing the camshafts . We start by removing the upper part of the belt casing. Next, remove the alternator belt. Then we remove the lower part of the casing, align the crankshaft with the mark on the oil pump, and then unscrew the nut and remove the thrust washer. Now we unscrew the tension rollers. It is advisable to make sure that none of them are humming and the pump is not leaking. Then we remove the belt, install a new one and tighten the rollers to a torque of 33-42 Nm. You will also need a circlip remover for this procedure.
They need to turn the tension roller so that the marks on it coincide, hold the marks and tighten the bolt with a 15mm wrench. During the entire operation, it is important to ensure that the shafts do not rotate.
In general, the factory sets an error tolerance of one tooth, however, this will not have a very positive effect on engine performance.
Causes of breakage and consequences
There are several factors why a part fails. Here are just the main ones.
| Factors |
Why is this happening
It is also important to change parts on time. The consequences of untimely replacement may vary. If the timing belt breaks on a Kalina with an 8-valve engine, the valves do not meet the pistons, which means the consequences are not as catastrophic as when the belt breaks on an internal combustion engine with 16 valves.
Untimely replacement can cause the following problems:
- severe wear of the piston group and liners;
- increased oil consumption;
- camshaft wear;
- valve bend;
- gear deformation.
Every car owner should periodically inspect the timing belt and know the signs indicating the need for replacement. You can do it yourself. This way, you will be able to avoid serious troubles in time that will lead to expensive and time-consuming repairs.
Replacing the timing belt on a Lada Kalina takes approximately 2 hours of work. During this time, the owner can save about one and a half thousand rubles. The main nuances, as well as unclear points, are discussed in the article.
Replacing the 8-valve timing belt on a Lada Kalina: instructions, photo and video review
The annotation that comes with the car states that replacing the 8-valve timing belt on Kalina is recommended every forty to fifty thousand kilometers, as well as on a car with a 16-valve engine. And the check should be much more often. New belt for replacement If the belt breaks on an 8-valve Lada Kalina, then the valves will remain intact, but if this happens on a 16-valve Lada Kalina. engine, they will definitely bend. The replacement process itself is simple and very similar both on 8-valve units and on 16-valve units.
What is the timing belt used for?
The main purpose of the timing belt on the Lada Kalina is to synchronize the crankshaft and camshaft of the power unit. In order to avoid expensive work on restoring the engine, simply replace it on time and it will last as long as provided by the manufacturer. The timing belt of the Lada Kalina urgently needs to be changed if damage is found on it. It doesn’t matter which ones: tears, abrasions. Replacement is also necessary if lubricant stains are found on its surface.
How does the replacement take place?
The process of replacing the timing belt on a Lada Kalina with 16 and 8 valves follows a similar scenario, but there are some differences, so we will consider each separately.
Required Tools
To replace we will need:
Stages of work
The process itself is not complicated, and after reading the instructions we offer, you will be able to cope with it without much difficulty and it will not take much time. Let’s say right away that to replace it it is better to purchase the original kit, although it costs more. But in any case, whichever case you choose, follow the recommendations given in this article. It is better to change with an assistant because some work will be difficult for one person.
On 8 valve
- First of all, we remove the plastic protection; to do this, you need to unscrew three bolts.
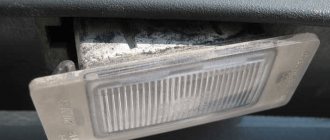
- Remove the front wheel on the right. This is necessary in order to gain access to the shield that protects the power unit.
- After unscrewing the two screws, pull the shield down to gain access to the pulley, which is located on the crankshaft.
- Next, you need to rotate the crankshaft so that the shaft stars align with the marks.
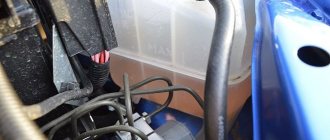
- To unscrew the flywheel, lock the crankshaft. On the side where the clutch is located, there is a small gap on the engine through which you can see the flywheel. We remove the rubber band and lock it with a screwdriver. You may need outside help for this.
- Next, remove the alternator belt.
- We unscrew the tension roller until the timing belt loosens.
- We remove it, but the gears should not move out of place.
- The new one is pulled onto the camshaft gear on the right. Don't forget about the tags. Then you need to pass it through the roller and then pull it onto the pump.
- The tension should be such that the belt can only turn 90 degrees.
- Having turned the crankshaft, we look to see if the marks are off. If this happens, the work done will have to be repeated.
- Assembly work is carried out in the reverse order of disassembly.
- We remove the cover that is located on top and covers the timing belt of Kalina with a 16 cl engine.
- We dismantle the wheel located on the right front.
- We remove the power unit mudguard and the generator belt to make it easier to replace.
- We turn the crankshaft until the marks on the exhaust camshaft pulley and the intake camshaft pulley align with the marks located on the cover.
- Unscrew the bolt that secures the shaft pulley and remove it.
- Remove the limit washer.
- After unscrewing the bolts, remove the front cover.
- Using the roller mounting bolt, reduce the tension of the timing belt.
- We remove the belt.
- The new belt is installed exactly as shown in the photo. Installation diagram
- When installing a new one, monitor the tension of the belt branch. In this state it is put on the pulley.
- Turn the tensioner in the direction of the arrows until the marks on it line up.
- Tighten the bolt securing the tension roller.
- If the shaft rotates, loosen the tightening and repeat the work.
- After installation, turn the crankshaft several turns. Here you need to make sure that the alignment of the shafts is not disturbed.
- If all the marks match, then you can proceed to installing all the removed parts in their proper places.
- How to replace the cabin filter in Lada Kalina?
- How to change the alternator belt on Kalina with your own hands
- We independently change the fine filter in Lada Kalina
Pull back and secure the shield
The marks must be aligned
Window closed with rubber band
On 16 valve
Wheel removal key
Aligning marks
Do not lose sight of the fact that the mark on the crankshaft pulley should be opposite the tide on the oil pump housing.
As you can see, there is nothing complicated and we hope that this article helped you understand all the intricacies of this process. You can now independently determine which belt is best for your car, how to change it correctly and how much you can save on it.
Video “Replacing the timing kit”
This video shows how to correctly change the timing belt and tension rollers on a Lada Kalina car. It also shows which one is better to choose.
STAGE 1
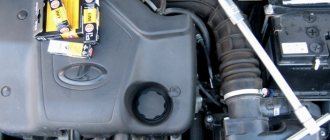
We drive the car into the inspection hole and lift the front right wheel with a jack. We remove the wheel and, opening the hood, let the engine cool. It is desirable that the engine temperature is approximately 60 degrees Celsius. Before getting to the Kalina timing belt, you need to remove the generator belt and its drive pulley on the crankshaft.
The generator drive device is shown in the photo below:
FIGURE 4 Installing the generator belt for 8 valve Kalina
As can be seen from the photo, the generator belt is tensioned using a roller. To remove the poly V-belt, you need to loosen the tension on this roller. To do this, you first need to loosen the rod locknut with a wrench (19). We loosen the lock nut and use a wrench ( we tighten the rod itself until the belt loosens and it becomes possible to remove it. Now it’s time to get to the generator drive pulley on the crankshaft. To do this, you need to go down into the pit and remove the engine “boot” protection on the right side. Also you need to remove the flywheel protection, which is secured with three bolts (10) from the bottom of the engine, on the gearbox housing. We remove the protection and, by inserting a flat-head screwdriver between the teeth of the ring gear and the gearbox housing, we will lock the flywheel. This is necessary so that when the bolt is unscrewed, the crankshaft does not turn. Bolt ( the key 17) is tightened very tightly, so to unscrew it, you will need to apply some force. To do this, it is better to use a socket with the same size and a pipe as a lever. After tearing off the bolt, unscrew and remove the generator drive pulley.
STAGE 2
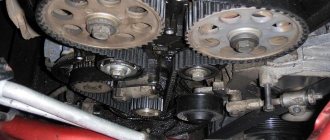
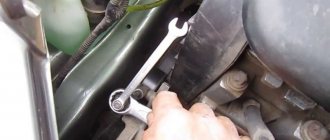
We leave the pit and remove the upper plastic engine protection. It is attached to the engine with four clips; you just need to carefully pull it off from each clip in turn. Next, remove the timing belt protective cover of the Lada Kalina. To do this, you need to unscrew the three mounting bolts with a wrench (10). One of them is located in front of the casing, and the other two are on the side. Having unscrewed the bolts, we removed the casing, and the entire gas distribution mechanism drive opened in front of us (see photo).
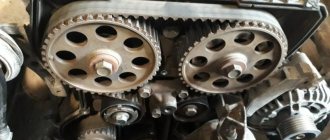
FIG.5 Timing drive Kalina 8 Cl
Now the crucial moment has come! It is necessary to install the entire Kalina timing belt drive strictly according to the marks. To do this, you need to take a socket head (19), preferably with an extension, and screw back the bolt that we unscrewed when removing the generator drive pulley.
Using this bolt, turn the crankshaft clockwise until the marks on the crankshaft and camshaft gears match. The locations of these marks are indicated in the illustrations above.
It is better to turn it by the crankshaft, but it is not advisable to do this with the camshaft. This must be done because the Kalina timing mechanism is driven precisely by the crankshaft, and not by the camshaft.
Next, you need to use a wrench (17) to loosen the bolt securing the tension roller and loosen the tension of the timing belt. Remove the belt and tension roller to check the condition. Usually, when replacing the Kalina timing belt, the roller is also changed, since most often the bearing on it has, albeit a small, play. And this is unacceptable. Checking the condition of the pump. You need to tug on the pulley without removing it, and if there is play, it is better to replace it immediately.
The pump may work for a while, but then it will still fail, and to replace it, you have to open the entire drive again and replace it. And it also happens that it jams and because of this the belt breaks. Then you have to open this entire system again and repeat all the work again. It is advisable to check the condition of the crankshaft and camshaft seals. To do this, you need to remove the corresponding gears and the rear cover of the gas distribution mechanism.
After checking the condition of the seals, we will replace them if necessary, which will save you from unnecessary work in the future.
STAGE 3
So! We removed the timing belt, checked the condition of the pump and seals, and, if necessary, replaced them with new ones. Next, we can begin assembling the Kalina timing belt drive.
We install the previously removed camshaft and crankshaft gears into their seats. If during the process of removing them the marks have shifted, then they must be installed strictly in their places.
Before you start installing a new Kalina timing belt, you need to either count the number of teeth, there should be 111, or carefully read the markings. Their number should be indicated there. You can also simply compare the new belt with the old one, they should have the same length. Important point! When installing a timing belt, you must carefully ensure that during the installation process the marks remain strictly in their places.
First you need to put the belt on the crankshaft pulley. Then put the belt on the camshaft pulley on the right side of the camshaft. This is done so that the tension roller can be used to tighten the drive more easily. We install the tension roller, screw it on, but do not tighten it. It should fit against the back of the belt. We put the belt on the pump pulley and tighten it with a roller, turning it counterclockwise with a special key.
To check the belt tension, take it from the right side of the camshaft and turn it along itself. A properly tensioned belt should rotate no more or less than 90 degrees or flex no more than one centimeter when you press it.
After the drive belt has been tensioned, you can already tighten the roller mounting bolt. Here you need to make sure that the belt on the right side of the camshaft pulley is properly tensioned and does not sag.
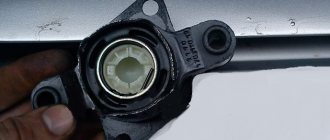
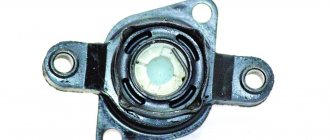
A photo of the roller is shown below, it also shows which holes need to be used to turn the roller: FIG. 6 Tension roller for Kalina 8 valve
Roller adjustment key:
FIG. 7 Tension roller adjustment key
Using a wrench (17), turn the crankshaft three to four turns so that the crankshaft pulley is aligned with the mark in its place. After that, we check them again. All marks must be strictly in place.
Replacing Timing Belt Kalina 8 Valves
Replacing the timing belt on KalinaThe Lada Kalina is an annular toothed belt made of rubber reinforced with nylon threads. Its role is to transmit torque from the crankshaft pulley to the camshaft sprocket, reducing the number of revolutions by half. The smooth operation of the engine’s gas distribution mechanism depends specifically on the condition of the timing belt and its options.
Basic faults
There can only be three main defects in a timing belt:
- violation of the integrity of the structure;
- under- or overtension;
- break.
In the first case, the belt may simply delaminate, as evidenced by dangling reinforcing threads. In addition to this, belt teeth are often cut off. These difficulties are the result of mechanical damage, incorrect adjustment:
- camshaft stars;
- crankshaft pulley;
- toothed roller;
- pumps;
- tension roller.
The tension roller is designed to tension the belt by rotating around its own eccentric axis. If it is not adjusted correctly, the belt may be too tight, which will sooner or later render it unusable. The same problem will occur if the belt is loose.
Replacing the timing belt on an 8-valve 1.6l engine!
Video report on timing belt replacement
on an 8-valve VAZ engine! Camshaft marks, crankshaft marks, how to set them.
Replacing the timing belt Kalina 8 cl from RussianTuning
Hello. My name is Vitaly Martynov ViTL. This is my show “RussianTuning” Every week a new video Show about. The most unpleasant surprise, especially on the road, is a broken timing belt. In this case, the engine will immediately stall, and it will be possible to start it only by installing a new belt .
Why is replacement needed?
The manufacturer recommends replacing the timing belt in a Lada Kalina car every 50 thousand kilometers. However, this indicator is provided for a standard part, and given the quality of spare parts in our stores, it is better to replace it every 30 thousand km. It is advisable to visually inspect the belt at least once a month by removing the protective cover. If the slightest mechanical damage or deformation is detected, it must be replaced immediately.
A deformed or damaged belt can cause failure of the water pump (pump), bent valves and tension roller. It also happens that its detached parts (threads) are wound around the generator shaft, blocking its operation.
To the great joy of the owners of any eight-valve Lada Kalina (except for new eight-valve engines), we inform you that when the timing belt breaks in their engines, the valves do not bend and the cylinder head does not hit. In other words, the worst thing that can happen if it breaks is that the engine will stall. All you need to do to move on is to replace the belt and adjust it correctly.
Cost of replacement work
Lada Kalina timing belts in our auto stores vary from 400 to 1000 rubles per unit. If you also need to replace the tension roller , be prepared to shell out another 400-600 rubles. The cost of replacing the belt is 500-800 rubles. With a roller - up to 1000 rubles. When buying a timing belt, it is better to give preference to a branded VAZ product. If this is not possible, you can purchase an analogue produced by a well-known brand. Below are samples showing the catalog numbers of the original belt and worthy imported analogues.
After how many thousand kilometers does it need to be changed?
It is impossible to accurately predict the life expectancy of a timing belt, especially if it has already been changed and a non-original mechanism part has been installed. Installing a non-original part is generally quite a risky endeavor, which can lead to unpleasant consequences for the mechanism and the engine as a whole.
When determining the frequency of replacement, you should also take into account the operating conditions of the vehicle. A number of factors affect the life of a timing belt. In addition to the fact that the part is constantly exposed to dynamic loads, temperature changes in the engine compartment, contact with random objects, ingress of liquids, dirt, etc., have an adverse effect. Damage and incorrect operation of other elements of the gas distribution mechanism can also accelerate wear.
When to change the timing belt can be found out from the technical documentation for the vehicle, since for a specific brand of car the frequency of replacement may differ due to design features, as well as the material of the product itself. On average, the timing belt needs to be changed after 50,000 kilometers of a car’s mileage, and no matter what mileage is indicated by the manufacturer, it must be taken into account that this refers to ideal operating conditions. So if the documentation states a figure of 120,000 km, then it can be safely reduced by 30-40,000 km.
For a new domestically produced car, the part usually needs to be replaced after 60,000 km, for an imported car after 70-80,000 km. If the timing belt on the car has already been changed, the timing is reduced to 50,000 and 60-70,000 km, respectively.
When a car was purchased second hand, it is not at all clear how many kilometers later a replacement is needed, whether the part is a factory one or whether the previous owner has already changed it. In addition, it is unknown how and under what conditions the car was operated. If it is not possible to clarify these points, taking into account the mileage, change the belt (if it has not been changed) immediately. When the part has already been replaced, you can travel with it about 30,000 km for a domestic car or 50,000 for an imported one.
In winter, many motorists warm up the car before driving, then the engine and, accordingly, the belt run idle, and since the vehicle is stationary, the speedometer also does not keep track of kilometers. This fact should also be taken into account and the belt should be changed not strictly within the prescribed period, but according to the circumstances. The design of the engine also plays an important role. If the model assumes two camshafts, there will be more loads on the part, and accordingly, the degree of wear will be higher.
Together with the work on changing the timing belt, the tensioner rollers are also changed, if there is no desire to check whether the mechanism will jam, whether the new belt will break or will slip this time. The tensioner roller is designed to hold the belt in a certain tensioned position. Seals and seals that prevent lubricant from leaking must be replaced. The pump (water pump) also needs to be changed, since its service life also approximately coincides with the service life of the belt. All detected leaks must be repaired when replacing the part.