Rice. 8.28. Front seat: 1 – base of the cushion; 2 – pillow; 3 – back; 4 – headrest; 5 – headrest frame; 6 – cotter pin; 7 – headrest guide; 8 – base of the back; 9 – lining of the backrest tilt adjustment mechanism; 10 – gasket; 11 – holder for the handle of the backrest tilt adjustment mechanism; 12 – holder fastening bolt; 13 – handle for adjusting the backrest tilt; 14 – skid mounting bolts; 15 – slide guide; 16 – handle of the movement mechanism; 17 – base stand; 18 – front bracket; 19 – torsion bars; 20 – bracket fastening pin
Rice. 8.29. Front seat slides: 1 – lock for the movement mechanism of the internal slides; 2 and 9 – sliders; 3 – latch axis of the internal slide; 4 – latch spring; 5 – staples; 6 – internal slide latch; 7 – latch rod; 8 – outer slide latch brackets; 10 – roller; 11 – guide of the outer slide; 12 – rod of the handle of the movement mechanism; 13 – handle of the movement mechanism
Rice. 8.30. Mechanisms for adjusting the backrest tilt and reclining of the front seat backrest: 1 – hook; 2 – hook spring; 3 – lower link of the backrest tilt adjustment mechanism; 4 – upper link of the backrest tilt adjustment mechanism; 5 – rod for reclining mechanism; 6 – rod shells; 7 – handle of the backrest reclining mechanism lever; 8 – bracket; 9 – synchronizer
The arrangement of the front seats is shown in Figures 8.28, 8.29 and 8.30.
To remove the seat, move it to the extreme forward position and remove the torsion bars 19 (see Fig. 8.28). Move the seat to its rearmost position, unscrew the nuts of the studs 20 securing the brackets 18 and remove the brackets. Lift the seat by the front part and remove the front bolts 14 securing the slide to the body. Then move the seat forward without distortions, unscrew the rear bolts securing the slide and remove the seat and slide assembly.
Install the seat in reverse order.
Unscrew the two bolts securing the pillow hinges and remove it from the passenger compartment. Move the backrest lock drive handle to the right (if you look along the vehicle) and release the seatback. Unscrew the two bolts securing the hinges and remove the backrest assembly with the luggage compartment carpet.
Install the rear seat in reverse order.
The dangers of uncomfortable car seats
Safety and driver comfort in any vehicle begins with the driver's seat. An insufficiently developed design significantly affects the general condition of the driver during long trips. It is possible that your back, arms and other troubles may become numb, which significantly distracts you from driving. The presence of comfortable seats is the primary factor when buying a car. Because not everyone wants to exercise after a long trip.
What can be done to the interior of the VAZ 2114 to improve comfort:
- improve appearance through tuning;
- reupholster the interior with covers;
- replace standard seats with sports or anatomical options;
- perform complex tuning.
We improve the interior with covers
How to install covers on a VAZ 2114
It is entirely possible to cope with this task yourself, so no additional costs are expected. The standard set of covers includes upholstery for seats, backrests and headrests.
Before installation, it is advisable to accurately understand each element. That is, it is important to determine where each cover will be installed. The tensioning process must begin from the front seats. Step-by-step instruction:
- Remove the head restraints.
- Pull the covers over the backs.
- Using hooks, secure the elastic bands that are located along the central seam. It must be threaded through the gap between the seat and backrest.
- Next, the cover is pulled over the seat and secured in the same way.
- The final stage is the installation of head restraints.
- To install the covers on the rear seats, they must first be dismantled and removed from the car.
During work, keep in mind that the covers with zippers are pulled over the backrests, the rest are intended for chairs. Is the factory trim already worn out? Then, before installing the covers, you need to bring it into proper shape (alter it or dry clean it).
If it is necessary to carry out a complete reupholstery of the interior, then it is better to entrust this work to professionals.
Do-it-yourself seat upholstery 09/01/2015 02:48
Dear friends! We very often receive questions about how to independently replace factory seat covers that are already worn out with new ones. That is why we decided to publish a few tips that will make the replacement procedure much easier. In fact, the main part of the questions disappears after removing the old covering, when you get a visual understanding of how to reupholster the seats.
1. If you don’t have a garage or a dry and comfortable room for this type of work, it’s realistic to replace the upholstery in your apartment; you won’t need a lot of space, of course, if you don’t take on the entire interior at once. So, let's start with the front seats. We remove the seat and disassemble them into three parts: the seat, the back and the headrest. To better understand the principle of operation, start with the simplest thing, with the headrests, remove the old trim and put on the new one (see photo No. 1)
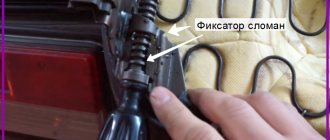
2. After you have removed the old covering, you will see that the cover (covering) is fixed with special metal hooks to the seat frames. From the back of the back they are located below. To speed things up and simplify it, instead of hooks you can take plastic clamps or otherwise called nylon ties (see photos No. 2, 3 and 4)
3. To give the skin shape, they use special metal knitting needles; they need to be removed from the standard kit, because They are not included with the new ones. (see photo No. 5)
4. There is still a point that cannot be ignored! If the service life of the old seats is already long, most likely the foam rubber under the covers is not in the best condition. If it is not possible to buy new foam rubber for both front seats at once, replace at least the driver’s seat, or, as a last resort, swap places with the passenger seat (they are interchangeable, see photo No. 6), as a rule, the driver’s seat wears out more. If you still don’t want to replace the foam rubber, the advice is as follows: When putting on a metal knitting needle, leave a little space on each edge, approximately 3 cm. That is, the casing is fixed in 3 places, if you make an indent of a few cm, then there will be fastenings along the edges knitting needle to knitting needle, but only from the middle part through the material.
5. Let's return again to the problem with old foam rubber. If you do not have the opportunity to replace it, we advise you not to install vertical spokes on the seats (see photo); dismantle them, marked in the photo.
6. We change the rear cover using almost the same principle. We insert the already removed knitting needles from the old upholstery into a new cover and fix the fabric. The type of fastening will depend on the car model. On some cars, rubber laces or already known metal hooks, etc. may be used as fastenings.
7. It is extremely rare, but it does happen that after replacing old covers with new ones, in some places there may be minor and practically invisible dents. In order to eliminate this and make everything perfectly smooth, you need to iron the surface with a steamer (see photo No.
8. By the way, do not forget that reupholstering the seats is the most convenient time to install or replace heated seats, clean the lower parts of the frames/slides from rust, and also, if you removed all the seats at once, you can also clean the ceiling, it will be more convenient.
At first glance, it seems that this process will take you a lot of time and it is very difficult, but if you have a positive attitude, you can handle it in five to six hours of work. And then what a pleasant feeling you will get from driving in the updated interior
How to choose anatomical or sports seats for a VAZ 2114
Covers often improve only the appearance of the interior, sometimes slightly increasing the anatomical properties of the seats. If comfort is the main issue during modifications, then completely replacing the seats is an excellent solution. The selection of anatomical or sporty seats is limited only by the amount of money and the owner’s imagination. Do you want a lower back massage or heating? Buckets or comfortable seats? All this is real, even without any special modifications to the fastenings.
You can make a choice both in favor of new products and in the direction of used seats from foreign cars. The supply market is quite extensive.
Anatomical seats have good lateral support, which will prevent the driver or front passenger from flying out of it when cornering. In addition, the correct position of the back is maintained. Such seats significantly reduce the risk of musculoskeletal diseases - this is one of the important selection criteria for drivers who spend most of the day behind the wheel. Typically, anatomical seats are equipped with headrests and armrests.
The dangers of uncomfortable car seats
Safety and driver comfort in any vehicle begins with the driver's seat. An insufficiently developed design significantly affects the general condition of the driver during long trips. It is possible that your back, arms and other troubles may become numb, which significantly distracts you from driving. The presence of comfortable seats is the primary factor when buying a car. Because not everyone wants to exercise after a long trip.
What can be done to the interior of the VAZ 2114 to improve comfort:
- improve appearance through tuning;
- reupholster the interior with covers;
- replace standard seats with sports or anatomical options;
- perform complex tuning.
How to completely replace seats on a VAZ 2114
The standard process is carried out through the following steps:
- Preparation of tools: flat screwdriver, set of sockets, wrench, ratchet.
- First, you need to move the seat forward as much as possible and remove the cables, which are designed to ensure smooth movement of the seats while adjusting the seating position.
- After this, the seat is pushed back all the way and the four nuts that secure the structure to the bracket are unscrewed.
- Raise the seat and unscrew the two bolts securing it to the slide.
- The seat can now be pulled out of the car. Be careful not to damage the casing with metal parts.
Among the available options, you can choose seats from foreign cars. Ford seats fit perfectly. To choose the right seats, you need to consider several factors:
- Is the design suitable for the original mounts? Is it necessary to carry out additional welding work or drill new holes?
- The size of the chair is critical. If the chair is very large, it is impossible to move it back and forth. Also, exceeding the dimensions often limits the ability to engage reverse gear.
- Large seats contribute to problematic maintenance.
To avoid creating additional problems, select seats whose installation will require minimal modifications. As mentioned above, Ford or Audia4 cars can be donors.
If radical modifications are needed in a VAZ 2114 car, essentially such an undertaking can become a waste of time and money, and the desired comfort will not be achieved.
Dismantling
Before installing new chairs, you will have to get rid of the old ones. Accordingly, dismantling work cannot be avoided.
To work you will need:
- Flat-head, durable screwdriver;
- Set of heads;
- Collar;
- Ratchet.
Dismantling process
The procedure itself looks like this:
- Pull the seat forward all the way.
- Remove the metal cables that allow the seats to move forward and backward more smoothly.
- Now move the seat as far back as possible.
- You will have access to the four nuts that hold the chair to the bracket. They need to be unscrewed.
- Raise the seat slightly to remove the two rear mountings to the skid. There are regular bolts there.
- Now carefully remove the seat from the car.
- Do a similar procedure with the second chair.
The installation of new seats depends entirely on the features of their design. There are no universal instructions for installation.
Remove and remove
Next comes the process of installing new chairs. Before doing this, be sure to clean the mounting points, the bottom of the cabin, and get rid of all existing traces of rust.
How to remove a VAZ 2114 seat: we consider all options
Many car enthusiasts are wondering how to remove seats on a VAZ 2114 or how to replace them?
The reasons for such manipulations can be very different:
- wear or serious damage to seats;
- the need to replace the floor covering;
- the need to glue the floors with soundproofing material;
- reupholstery of seats with new material (for example, leather);
- installation of alternative seats (both rear and front).
When choosing new seats to replace the basic ones, you should first of all pay attention not to their convenience and performance, but to the compatibility of their fastening with the fastening of the car.
In addition, various other situations may arise in which it may be necessary to dismantle and subsequently install the seats. We’ll look at how to do this as quickly and correctly as possible below.
Rear passenger seats
How to remove the rear pair of passenger seats? Removing seats in VAZ models, starting from 2108 and ending with 2115, is done in exactly the same way. The set of tools remains unchanged from the first example. Here is the sequence of actions:
- The rear seats do not need to be moved, they are fixed. To access the fastenings, use a flat screwdriver to pry up the protective pad just below the seat cushion.
- First, unscrew the two bolts that hold the pillows on the side. Here you need a 10mm head.
- Next, the same fastenings must be removed in the lower part of the seat backs using exactly the same key.
- After unscrewing all the bolts, you can safely remove the rear seat.
Ford or Audi A4 series rear seats are recommended as replacements. Why these options? They will require minimal correction of the frame and fastenings from you, in addition, they will fit perfectly into the interior of the cabin.
Of course, you can choose other seat options, but it will require more modifications, parts and time to properly attach the new passenger seats.
Removal and installation of front seats
And so, let’s look at the question - how to remove the front seats on a VAZ 2114.
VAZ 2114 seat design
To perform this operation we will need the following set of tools:
- flat screwdriver;
- ratchet;
- knob;
- 8 mm head (or Torx 10 - in late models);
- 13 mm socket or a simple 13mm wrench.
Seat Removal Tools
The front seats are dismantled according to the following scheme:
- Disconnect the heated seat wiring harnesses (if equipped).
- Using a 13mm wrench, unscrew the four nuts securing the front seat tube.
Unscrew the seat mounting nuts
- If necessary, remove the torsion bars by pulling forcefully at their edges.
Removing torsion bars
- Raise the seat (you need to do this with a jerk) to its highest position (as far as possible), after which access to its fastening will open.
Raise the seat
- Unscrew the bolts securing the seat slides in the front (on both sides). Pull the locking lever to move the seat forward.
Unscrew the skid mounting bolts
- Unscrew the bolts securing the seat slide at the rear (on both sides). Remove the vacated seat.
- Installing the seat in the car is done in exactly the same way, but in the reverse order (it should be noted that this diagram is relevant for both front seats - the driver's and the passenger's).
When purchasing new front seats, the best option would be to give preference to the so-called anatomical ones, which allow you to feel comfortable behind the wheel even on long trips.
Useful video
You can find more information in the video below:
Not all Lada car seats are equally comfortable. One of the main requirements for the driver's seat is height adjustment. The owners of Lada XRAY were the luckiest in this regard, because... All crossover configurations have this useful option. Other Lada models have a driver's seat lift only in richer versions, or not at all. Let's look at how you can modify the driver's seat with your own hands.
Owners of cars that do not have seat height adjustment can raise the cushion themselves in one of several ways:
1. Place a piece of plywood on the bottom of the seat between the springs and the cushion (the safest and fastest way).
2. Place nuts under the front part of the slide (most often they are raised by 2.5..5 cm). Only the front part of the chair rises.
3. Place a profile pipe under the slide. The front and back of the seat lifts up.
Alternative seating
As we can see from the above, the answer to the question - how to raise the rear seat of a VAZ 2114 - is quite simple, since it is attached using a minimum number of fixing elements and does not require the use of a large number of tools. But another, no less important issue is the choice of new, alternative seats.
Many motorists, as already mentioned, install on their VAZ 2114 seats from other models and even other brands of cars (for example, seats from Ford). At the same time, when choosing them, you should pay close attention to their dimensions and fastening features (although very often motorists look specifically at the “performance” characteristics - convenience, wear resistance, anatomy, etc.).
New front seats
The same rule applies to the front seats - the fewer modifications that need to be made during installation, the better. It should also be noted that when replacing the front seats, you should pay attention to the so-called “anatomical” seats (for example, manufactured by UNP).
They allow you to spend long periods of time driving and travel for many hours without feeling any fatigue or discomfort in your back and joints (such seats are especially recommended for frequent and long drives in urban environments).
Which seats fit on a Priora without modifications?
Anyone who has installed a seat from a foreign car, please share your experience
Comments 44
They offer me seats from the Accord 7. Do you think it will be difficult to install them in a Priora?
I don’t know myself from the BMW 735 in the E32 body
one of these days I’ll install a Subaru B4 for myself... while I’m preparing a neat frame for them...
From Lancer 9 2.0 to Priora we got up with some difficulties! but the impression is great
from Nissan Almera, BZ) everything is bolted and to the original fasteners) all functions are height adjustment, lumbar support, normal working slides, heating)
From paper 530 xi 2008. You buy adapters for the unp bride bucket and a similar plate on top because the bucket ones are narrower... and screw it on stupidly. I got by with 1500 without a collective farm. You can do it like this for any type of seat
The standard seats of Lada cars may not be entirely comfortable. Some people lack more developed lateral support, others want height adjustment or adjustable lumbar support. All the shortcomings can be solved in one way - installing alternative seats, for example, from a foreign car.
The front seats themselves are different for Granta and Kalina (first or second generation), but the fastenings are similar. Distance between skid mounting bolts:
- width - 450 mm;
- length - 340 mm;
- diagonally 560 mm.
Luxury trim levels have similar seat mountings, which now have height adjustment. Seats from Lada Granta Sport, Kalina Sport or Kalina Cross are also perfect. The seats of sports versions of cars are more rigid (the seating position will be higher) and have little lateral support.
If you decide to choose seats from a foreign car, then pay attention to two things:
- Overall dimensions of the seats. They should not only fit in the cabin, but also be adjustable in all positions;
- The width of the slide (the distance between the fastening bolts). If the width of the seat slides of a foreign car is 45 cm, then it becomes possible to install them on a Grant or Kalina without alterations (with minimal modifications).
We analyzed reviews from owners on the Internet and compiled a list of “which seats are suitable for Granta or Kalina without modifications” (where the seat mounts for foreign cars have a similar width of the slide). The table is updated as new information becomes available:
| Automobile model | Note |
| Mazda 6 (2008 onwards) | Width 450 mm. Lumbar support, seat lift up/down, larger pillow under the knees ( source ). |
| Kia Rio | The slides are not symmetrical; the seats move inside the cabin by 1-2 cm. |
| Hyundai Solaris | The slides are not symmetrical; the seats move inside the cabin by 1-2 cm. |
| Skoda Fabia | Width 450 mm |
| Chevrolet Lacetti | Width 450 mm |
| Hyundai Tucson | Width 450 mm |
| Honda CRV | Width 450 mm |
| Opel Vectra C | Width 450 mm |
| Renault Megane | Width 450 mm |
| Nissan Qashqai | Width 450 mm |
| Mazda CX-5 | Width 450 mm |
| Volvo V40 | No fastening measurements were taken |
| Skoda Octavia | No fastening measurements were taken |
| Peugeot 308 | No fastening measurements were taken |
| Toyota Camry | No fastening measurements were taken |
| Opel Astra H | The width at the edges of the slide is 455 mm, in order to tighten the bolts you will have to cut off the edges of the slide |
All that needs to be modified is to saw off the excess parts of the foreign car's seat slide and drill new holes for the fastening bolts. The tools you need to have are a grinder, a drill, a hammer and a file. An example of a simple installation of seats from Hyundai Solaris/Kia Rio on Kalina:
If the width of the seat slide of a foreign car is more or less than 450 mm, then to install them you will have to make an adapter/plate and may require removing metal parts of the floor. Welding and other additional tools may also be required. An example of installing seats from a Mazda 3 on a Kalina:
Thus, before purchasing seats from a foreign car, make sure that the width of the slide exactly matches the standard one, and that the seats themselves can easily be placed according to their dimensions in the cabin of a Grant or Kalina, taking into account all the adjustments.
Secure fixation
When choosing new seats for your VAZ 2114, pay attention not only to their price and convenience, but also to the method of fastening. Some seat models are very difficult to fit into the cabin, although they may suit your preferences. Improperly securing the seats can cause injury, especially at high speeds or in accidental collisions. If you have found a suitable model of seat, but it is not securely attached to its future installation location, take the car to a workshop where all the work will be carried out for you.
As mentioned earlier, it is better to take the recommended models of seats from foreign cars for replacement from Ford or Audi. Many drivers have noticed that Opel seats are also excellent for replacement and require a minimum of additions. Even chairs from Hyundai can become a more or less comfortable and quite acceptable option, if you slightly alter the design of the frame and fastenings.