- Functions and types of towbars
- Towbar options for Lada Vesta
- Towbar installation
- Wiring diagram for tow bar on Lada Vesta
- Is it possible to connect an electrician without a matching unit?
As a rule, every motorist is faced with the need to transport cargo that cannot be put in the trunk - a bicycle, a motor boat, building materials, and finally potatoes from the garden.
Therefore, the problem of choosing, purchasing and installing a tow bar for attaching a trailer for moving cargo is familiar to many. There is a huge selection of trailer hitches for Vesta brand vehicles on sale. The body model (sedan, station wagon, SV Cross) is not of fundamental importance.
You can figure it out yourself, or you can resort to the help of employees of specialized stores (leave a request and we will call you back) or centers for installing towbars. They will help you find the right option, meeting all the requirements of your car manufacturer.
Installing a towbar on Vesta is not tuning the car. Therefore, if you have a certificate and passport, registration of the device with the traffic police is not required.
Functions and types of towbars
The functional purpose of various trailer hitches is one - towing a trailer, and the design features offer the following options:
- Conditionally removable design. The most favorable in terms of cost and functionality. Disadvantages – it will raise questions among traffic police officers, spoils the modern appearance of the car;
- Removable device - high degree of reliability and excellent functionality. Easily dismantled;
- American type trailer hitch made of 4 components. Low popularity due to its complex design and many installation nuances.
Trunk volume on Kia Sportage crossovers of different generations
- T-VAZ-41A Leader-plus. This is a removable hook that is secured with bolts. A type A ball is used. The hitch does not imply the need to cut out the bumper. Electrics are not included in the kit, but must be purchased separately. The cost of the towbar will be from 3.4 thousand rubles;
- Bosal 1234-A. An excellent trailer hitch with a type A ball. Also, there is no need to cut out the bumper to fit the structure. Includes wiring and socket. This set costs from 3.5 thousand rubles;
- Leader Plus T-VAZ-44A. Suitable for station wagon, bumper trim required. Socket and wires included, but costs about the same
The final choice is yours. Each product has its own article number, according to which you can easily find a suitable option. Search, watch, consult with specialists.
Towbar options for Lada Vesta
The following models of towbars (TCU) are suitable for installation, depending on the manufacturer:
- Leader-Plus, VAZ-41A maximum weight 900 kg;
- Avtos, VAZ-65, weight up to 900 kg;
- Bosal, 1234 A – weight up to 900 kg;
- Trailer, 2180 – weight up to 900 kg, 2180.01 – weight up to 500 kg;
- Sheriff, 3034.12 – weight up to 900 kg;
- Motodor, 92104-A – weight up to 900 kg;
- PT GROUP, 01411501 – weight up to 1500 kg;
- Galia , L025A, L025C - weight up to 1400 kg;
- Auto-Hak , N 10V – weight up to 1400 kg.
Models differ in the need to make a cutout on the rear bumper. The driver needs to keep this nuance in mind, and the body model of his car also matters.
For all presented towbar models
The mounting points are provided by the car manufacturer.
The permissible trailer weight for a car can be found out from the summary plate with the manufacturer's data, located on the right central pillar, below, in the sill area. The fourth digit is the total permissible weight of the vehicle, the fifth is the permissible weight with a trailer.
All presented models have standard certificates.
How to choose a device
When choosing a towbar for Vesta (station wagon or sedan), you should proceed from criteria such as the trailer's carrying capacity and the weight of the cargo that is supposed to be transported. For a passenger car with a small gasoline engine, a 3.5-ton trailer hitch would be a dubious choice. You simply won’t be able to tow such a trailer comfortably and will waste your money.
Which is more practical?
| Situations | Recommendations |
| If you plan to use the trailer hitch infrequently and are concerned about the appearance of your car. | It is possible to purchase a removable towbar, which can be quickly installed only if necessary. |
| If you plan to use the trailer hitch regularly. | Here it makes sense to consider non-removable trailer hitches, the acquisition of which is cheaper. |
Among other things, it is worth paying attention to the power supply socket of the trailer hitch; they come in 9- and 13-pin types. Accordingly, you need to choose a tow bar so that the socket fits the trailer plug, and you don’t have to redo it later or look for an adapter.
When choosing a trailer hitch of the desired type and size, you should give preference to certified products from leading European manufacturers: Baltex, Bosal, Thule and HAK. By purchasing a reliable imported towbar, you will avoid the need to regularly repair the towbar later. Of the domestic towbars at more reasonable prices, we can recommend the TSU. The cost of a trailer hitch for Vesta varies from 800 to several thousand rubles, depending on the type, functionality and manufacturer. An original tow bar for a particular car model can be purchased at official dealerships.
When inspecting the towbar on Vesta, you need to pay attention to the paint layer. The presence of defects on it should alert you. Moisture penetrating through scratches will cause corrosion.
Homemade towbars are an unsafe thing.
They did not pass the necessary tests for strength, compatibility, and welding quality. They can let you down at the most inopportune moment. The trailer hitch will come off along with the trailer, which may cause an accident. You should purchase trailer hitches only at specialized retail outlets. You must provide the seller with all the necessary information about your car, the weight of the loaded trailer, the load on the tow ball, etc.; specify the equipment (hitch ball, wiring); find out the details of device installation.
In addition to the trailer hitch itself, you may also need a block or coordination module designed to coordinate the actions of the on-board computer and the trailer hitch electrics. The price for a standard Lada Vesta tow bar coordination unit varies in the range of 2-3 thousand rubles.
Towbar installation
Installation of the tow hitch is simple. Simply install a design adapted to the Lada Vesta model (using the example of the Bosal 1234-A model):
- Remove the decorative interior trim of the trunk;
- Remove the rear bumper housing;
- If necessary, disconnect the parking aid connector;
- Remove the special shockproof buffer located under the bumper;
- Remove the plastic plugs from the holes on the lower plane of the side members;
- Insert the guide pins of the trailer hitch into the holes inside the side members;
- Tighten the mounting bolts supplied.
If you decide to install a structure that is not adapted for the Lada Vesta, additional drilling or welding will be required:
- Remove the decorative trim from the inside of the trunk;
- Remove the rear bumper housing;
- Align the vehicle axis with the axis of longitudinal symmetry of the trailer hitch;
- Place the device on the bottom of the car's side members (under the bottom of the car), and use the fastening pads of the brackets to mark holes for drilling;
- Treat the holes with an anti-corrosion compound;
- Secure the trailer hitch frame with the bolts from the kit.
To avoid unplanned repairs, do not forget about periodic preventive maintenance measures for the trailer hitch (tightening bolted connections, treating the coupling ball with a special lubricant solution, applying a cap to the ball).
Is it possible to avoid a fine for a towbar?
Firstly, it is worth conducting a dialogue about the fact that Article 12.5 of the Code of Administrative Offenses of the Russian Federation provides for an alternative to warning. That is, first of all, it is necessary to say that everything will be corrected in the near future and ask to stop at the warning. It will be especially good to use this tactic if you have no relapses, that is, traffic violations over the past six months or a year. Secondly, you can use a removable towbar. In this case, it will be difficult to logically argue that such design changes affect the likelihood of an accident and its outcome. After all, in essence you have no protruding parts. Which negates the influence of such a semi-tow bar in the final results of an accident. Of course, a reasonable inspector should accept this point of view. Another case would be when the tow bar is installed from the factory or there are fastenings provided for it. We don’t know if there are such cars, that is, those that come straight from the factory with a towbar (tow hitch) and how to confirm that the towbar was installed at the factory. But if there are any, then essentially the towbar cannot be considered a change in the design of the vehicle. Since neither you nor anyone else interfered with the design. Everything was as is. Thirdly, which may be the most popular argument, you can take advantage of the loophole under Chapter V of the Technical Regulations..., section 4, paragraph 77
...that is, if, say, the towbar is certified in accordance with the requirements of the Technical Regulations of the Customs Union for the car on which it is installed, then it has thereby passed the assessment, which means you can drive with it. Well, there is no need to repeat about those provided by the manufacturer, since this is practically akin to what is provided by the design. This is naturally possible, as we have already talked about.
In general, if you have a towbar, then you must have a certificate for compliance with the Technical Regulations, and also that the models in which it was received are mentioned. It is this certificate that will become a kind of guarantee that you won’t be fined for the tow bar. To confirm this information, we will attach a letter from the traffic police.
Well, one thing can be said about homemade towbars: they remain “outside the law” here.
Wiring diagram for tow bar on Lada Vesta
The towbar kit does not include electrical equipment. Requires a matching unit (see Towbar Matching Unit), which is purchased separately. It is recommended to connect the towbar wiring harness to the wires in the rear light unit, through the trunk.
- Disconnect the terminals on the battery;
- Remove the rubber plug on the side of the body and lay the trailer hitch wiring harness into the luggage compartment of the car;
- Direct connection to the machine wiring is prohibited due to the increased load level in the circuit. Wiring is connected only through the matching controller. The coordination unit allows for uninterrupted operation of the vehicle and trailer electronics and protects the vehicle wiring from overloads;
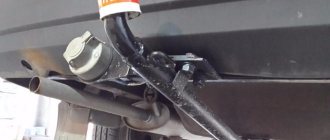
- Secure the socket using screws to a special platform next to the tow hook.
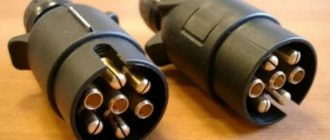
Don't forget about the number of contacts on the trailer plug. They come in 7 and 13 pins. The towbar socket must have an identical number of contacts. Or you will need to look for special adapters 7/13 or 13/7.
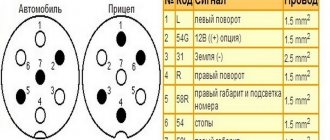
Diagram A corresponds to the towbar socket, B to the trailer plug.
Wire matching:
- Yellow wire - left turn signal.
- Lilac - fog lights (may not be used)
- Gray – ground type cable
- Lilac - left side
- Red - stop light
- Black – starboard side dimensions.
Installation
The design of LADA vehicles provides for the possibility of installing a trailer hitch without additional mechanical influences (drilling holes, welding) on the vehicle body.
For each LADA car model, several trailer hitch options are offered for installation, differing in design, but identical in the method of attachment to the car body.
The trailer hitch, regardless of the model and design of the device itself, is attached to the rear power elements (side members) of the car body.
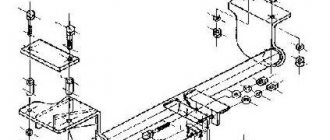
Figure 2-1 shows two main versions of the trailer hitch installed on the LADA VESTA vehicle.
Figure 2-1 – Options and delivery set of LADA VESTA trailer hitch: 1 – left support bracket; 2, 7 – rod; 3 – right support bracket; 4, 9 – socket box; 5, 8 – hook; 6 – embedded strip; A – collapsible design of the trailer hitch; B – welded design of the trailer hitch
Remove the rear bumper.
Unscrew bolts 1, Figure 2-2, securing the rear bumper beam 2 brackets to the body, remove the beam assembly with brackets. Subsequent installation of the beam is not provided (replaceable head 10, knob).
Figure 2-2 – Rear bumper beam: 1 – rear bumper beam bracket mounting bolt; 2 – rear bumper beam
In the rear of the left 1, Figure 2-3, and right 3 rear side members, locate and clean two holes 2 from the faceplate layer (using a flat-head screwdriver).
Figure 2-3 – Location of mounting holes in the side members: 1 – rear left side member; 2 – mounting holes; 3 – rear right side member
Place the left 1, Figure 2-4, and right 5 support brackets into the cavity of the rear side members of the body. Fix the brackets through the holes in the side member without tightening them with the bolts and washers included in the delivery kit.
Install rod 2 on the brackets and secure with the bolts and washers supplied (replaceable head 17, knob).
Tighten the bolts securing the brackets to the body side members (replaceable head 17, extension, knob).
Figure 2-4 – Installation of a collapsible trailer hitch: 1 – left support bracket; 2 – rod; 3 – socket box; 4 – hook; 5 – right support bracket.
When installing a trailer hitch of a welded structure, insert rod 2, Figure 2-5, with brackets into the cavity of the body side members.
Insert the mounting strips 1 inside the brackets, and aligning the threaded holes of the mounting strips with the holes in the rod brackets and side members, fix the rod to the body using the bolts and washer supplied, without tightening.
Align the holes at the end of the rod brackets with the threaded holes for attaching the rear bumper beam to the body and secure the rod with the bolts and washer supplied (replacement head 10, extension, wrench).
Tighten the bolts securing the rod to the side members (replaceable head 17, knob).
Figure 2-5 – Installation of the trailer hitch of a welded structure: 1 – embedded strip; 2 – rod assembly with brackets; 3 – socket box; 4 – hook
Install hook 4 and socket 3 on the rod (spanner 19, replaceable head 19, knob).
Install and connect the electrical equipment of the trailer hitch (see below).
Install the rear bumper.
Note
: Before installing the rear bumper of a CROSS car, modify (trim) the rear bumper according to the attached template, Figure 2-6, to avoid contact and deformation of the bumper at the place where the towing hook is attached.
Figure 2-6 – Rear bumper modification diagram
Tightening torques for threaded connections:
- M6 – 9.8 Nm (0.98 kgf/m);
- M8 – 24.0 Nm (2.4 kgf/m);
- M10 – 47.0 Nm (4.7 kgf/m);
- M12 – 81.0 Nm (8.1 kgf/m).
Is it possible to connect an electrician without a matching unit?
The inclusion of a Smart Connect matching device in the wiring diagram is determined by the power consumption of the lighting equipment from the tow hitch. This figure can be reduced by installing LED lamps on the trailer. The power of such lamps is very low, which will be at the same level or even less than the power of the electromagnetic coils used in the matching unit. Therefore, installing a Smart Connect Coordinator may not be necessary.
In this case, there is no need to rely on Russian maybe. We are talking about the safety of both the vehicle and the life of the driver.
The matching unit must be installed on vehicles equipped with the following systems:
- Electronic control system with variable voltage.
- A car with multiplex wiring.
- CAN BUS data system (with on-board computer)
- CHECK CONTROL system
- Burnt out lamp detection system (SFL)
- Low voltage lighting power supply system.
- LED lighting system.
The Lada Vesta brand car is a modern vehicle designed taking into account the latest developments in the field of mechanical engineering. Such a car requires only a professional approach to maintenance and repair. This can be provided by certified specialists, whose work will save the driver both nerves and finances.
Lada Vesta SW Cross Lasta › Logbook › Floating socket: installing towbar electrics
Circumstances, as usual, suddenly make adjustments to plans. This happened with the installation of the towbar electrics: there was an urgent need to transport a trailer against the backdrop of a deadline at work. Well, there was nothing left to do but abandon the intention to install the electrics yourself, turning to trusted specialists.
Let me remind you that all my fuss around the towbar is connected with the desire to make it the most compact and neat from the point of view of the geometric cross-country ability of the car and overall aesthetics. Therefore, the towbar itself (beam and rod with a ball) is made according to my specifications, and the designer also proposed the option of installing a floating bracket for the towbar socket: the unused socket should, according to the plan, go behind the bumper, and, if necessary, move out from there. I spent a long time thinking through the technical details of this option and the only question that remained open was fixing the bracket, especially in the “hidden behind the bumper” position, because the basic option provided a flat plate on a spring-loaded bolt, for which an additional eyelet was specially made on the towbar beam. There were and still are doubts that the weight of the socket and plate while the car is moving can be supported by friction so that the socket can be removed without the use of additional devices.
The solution was successfully found thanks to a good friend Andrey: a ready-made rotating bracket for the towbar socket with fixation in two positions! Exactly what you need! Art. podrozetnik-avtomat.
Previously, I had already purchased an original electrical kit art. 99999215007182, who was just waiting in the wings. Included: - so-called coordination block (a box with an assembly of relays); - a wiring harness in HDPE corrugation for connecting the socket itself to the coordination block and the vehicle wiring (at one end there is a block installed to the mating part on the block, at the other end the wires going to the towbar are crimped onto sleeves for securing them with bolts in the grooves of the socket); - the seven-pin socket itself; - a hanging bracket for the power supply and the power supply itself; - a ground connection wire crimped onto the terminals and a handful of other small items (terminals, ties, etc.).
Having left the car at a non-working time for Ugon.net (they waited for me in the evening, having satisfied my urgent request) and explained to the magician Sasha - the foreman of this company - on the spot what and how I wanted, I flew away on work matters. Thank you uv. Andrey for delivering the socket bracket directly to the craftsmen the very next day!
Upon returning, everything was ready. Thank you uv. Sasha understood the idea and wishes immediately and despite our agreement (to call/write in case of any misunderstandings or tricks) he never distracted me from work. At the same time, the result when accepting the car (again, during non-working hours for Ugon.net - on a Saturday evening) made me break into a wide smile of satisfaction =) When closed, the bracket and socket are practically invisible in the general view of the car, hiding in the neatest cutout of the bumper (looks like , like a standard opening). The bracket's eye, designed for its extension, protrudes just enough so that it is not possible to catch it with anything on rough terrain. But at the same time, it (the ear) is quite accessible so that, bending over or crouching, you can put your finger in the ear and pull out the socket.
I present to the public a number of photographs of the installation process and result, as well as a video demonstration of the operation of the socket's swivel bracket (I apologize for the background noise - the weather was windy):
Basic criteria for selecting a part
Towing hook for Lada Vesta There are different types of towing hook for Lada Vesta:
- Trailer couplings equipped with a rigid mount are secured with bolts and a welding machine. Outwardly, they do not look entirely acceptable, but they are suitable for installation if you pay attention to the advantages that are associated with price and functionality.
- Just as reliable as a fixed one, the towbar has a ball joint that can be removed if necessary. Remove the top and the tow bar frame becomes almost invisible. This convenient overview costs a little more than a fixed hitch.
- Experts consider the best option to be a device with a flange. It is already designed for the fact that the car is equipped with prepared seats that provide an even distribution of traction force. If the requested area is not included in the purchased vehicle, then installation of the equipment will not be possible.
- There are four-piece American-style tow hooks on the side. Its metal frame is attached under the bumper, and a bracket is attached to it using a special stop. Installing such accessories can be difficult because the response balls are slightly larger than necessary. Since tow hooks are designed for American niche vehicles, the seats may also not be suitable for installation and adjustment.
Installing a tow hitch on Vesta yourself
Installing a tow bar
The work depends on what type of device the owner of the Lada Vesta is going to buy. Before starting installation, be sure to lubricate all the holes and the coupling ball, which will be covered with a cap afterwards. The part will therefore not become contaminated. Installing the Lada Vesta towbar is quite simple:
- The first condition will be to dismantle the rear bumper, which will be useful for the convenience of further work and maintaining the integrity of the body.
- In some situations, it becomes necessary to drill the bottom of the trunk. Otherwise, they simply combine the technological holes of the body and the towbar to install the device.
- After checking the correct connections, all that remains is to tighten all the fasteners.
Required
Towbar
(original catalog numbers):
- Lada Vesta sedan (article 99999218007282), price about 6800 rubles;
- Lada Vesta SW/SW Cross (article 99999218107282), price about 7,000 rubles;
- Lada XRAY (article 99999215007216), price about 5,000 rubles.
A non-original towbar can be found at a price of 2,200 rubles.
Control unit (coordination)
:
- 99999215007182, price about 2900 rubles.
This block is necessary to connect the towbar to the car and is designed to coordinate the actions of the towbar electrics and the on-board computer. Instead, you can assemble a matching block of five relays (see below).