VAZ 2109 carburetor charging relay where is it located
The VAZ 2108 device, like any other vehicle, involves powering electrical circuits from a battery. To ensure that the battery is always in good condition and does not let you down at the most inopportune moment, a generator is always connected to it.
The battery is especially important when the engine is ignited; while driving, when the car develops sufficient speed, the entire electrical circuit is powered by the generator.
When the question arises about connecting additional powerful electrical appliances to the car, it is very important to match their load with the permissible power of the generator. To do this, it is important to know its technical characteristics. And if the battery lack of charge indicator suddenly lights up, it’s better not to even look under the hood without understanding how the electrical charging circuit, voltage regulator and ignition work.
After reading today's article to the end, you will learn about the connection diagram and dimensions of the VAZ 2108 generator, the main reasons for failure and how to check the voltage in the circuit. If trouble happens to the generator, then don’t worry, we will clearly show you the process of removing and installing it.
Determining electrical system faults
One of the main advantages of the new VAZ 2109 is fuel injection. This type of supply of the fuel mixture is significantly more economical than the carburetor method. In addition to fuel consumption, the injector also improves the vehicle's driving characteristics. For the injector to work properly, the computer or, as motorists call it, “brains” must also work correctly.
In turn, the operation of the computer, as well as all electrical sensors and devices, directly depends on the constant current power. The device that is responsible for supplying power to the vehicle's devices is called a voltage regulator. The main sign of a malfunction of this element is the readings of the voltmeter on the instrument panel.
Also, if while driving the car your fuel consumption has noticeably increased, but at the same time the car began to pull worse, then this is one of the main signs of failure of the voltage regulator relay. This type of breakdown manifests itself especially well in the dark. At this time, dimensions and other electrical appliances are involved, which significantly increase power consumption. If it is not enough, then the instruments and dimensions light up very dimly - it’s time to change the relay!
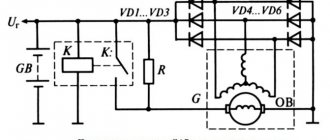
VAZ 2108 generator circuit
The VAZ-2108 generator has a rather massive stator winding, since it uses a large cross-section wire. It is with its help that electricity is generated. The wire is wound evenly over the entire inner surface of the stator into recesses specially provided for this purpose in the magnetic core.
It’s worth talking about the latter separately. The middle part, the generator stator, consists of a series of thin metal plates pressed tightly together. They are often boiled on the outside to prevent separation.
- Alternator. The 37.3701 or 94.3701 series can be installed.
- Negative diode.
- Additional diode.
- Positive diode.
- Alternator warning lamp, also known as battery discharge lamp.
- Instrument cluster.
- Voltmeter.
- Relay and fuse box located in the engine compartment in the compartment between the engine and the vehicle interior.
- Additional resistors built into the fuse mounting block.
- Ignition relay.
- Egnition lock.
- Accumulator battery.
- Capacitor.
- Rotor winding.
- The voltage relay is located in the engine compartment.
Diagnostics of the relay voltage regulator of the VAZ 2109 generator
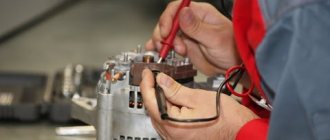
Today we will tell you how to check the VAZ 2109 generator voltage regulator relay. In the early 90s, the VAZ automobile concern released the 2109 model car. As in any mechanism, the health of the car is ensured by the VAZ 2109 generator voltage regulator relay as one of the main components of the electrical system. Most of the machine functions depend on constant current power.
In the Zhiguli 2109, as in many other cars of modern brands, on-board computers are used to synchronize the operation of the equipment and for its correct operation. Motorists call them the “brain” of the car. And for a computer to operate, a constant current must be maintained in the electrical network. This is impossible if the VAZ voltage regulator fails.
The following generator models are installed on VAZ 2108 cars:
Technical characteristics of the first:
- The value of the delivered current (at 6000 rpm-1 and a voltage of 13 V) – 55 A — The voltage value – 13.6 – 14.6 V
- Rotor rotation direction – right – Maximum rotor speed – 13000 rpm-1
- Engine/generator gear ratio 1/2.04
Technical characteristics of the second:
- The value of the delivered current (at 6000 rpm-1 and a voltage of 13 V) – 80 A — The voltage value – 13.2 – 14.7 V
- Rotor rotation direction: right
A normally working, serviceable generator of VAZ 2108, 2109, 21099 cars and their modifications produces a voltage in the range of 13.6 V - 14.6 V. This can be visually tracked using a voltmeter on the instrument panel, but it is better to measure the voltage with a voltmeter (multimeter, autotester
Replacing the old-style voltage regulator with a new generator model
Let's consider an example of replacing an old model RN with a new one (14.5V with RN number 9333.3702-04) on the generator 9402.3701 KZATE. According to reviews from owners of VAZ cars, it is the standard KATEK, KZATEtm (Samara) that is the best generator.
| Old-style voltage regulators do not see the real voltage in the vehicle's on-board network, but only try to guess it from the voltage on the additional diodes of the bridge, which does not work very well. Since April 2004, generators began to use voltage regulators of a new type, which see the real voltage in the on-board network thanks to feedback and adjust it in real time, which avoids voltage sag when consumers are turned on. |
The replacement process begins with removing the old LV and capacitor (new LV with a built-in capacitor). Then, in accordance with the connection diagram for the new LV, we cut off the additional diodes from the “D” terminal on the diode bridge, turning it into “D+” by cutting the jumper. For those who do not plan to use terminal “D” in the future, simply remove all 3 additional diodes. Point “W” is marked on the generator cover.
Reasons for failure of the VAZ 2108 generator
Experts believe that the main reasons for the failure of the VAZ 2108 generator are:
- voltage regulator failure;
- damage to the diode bridge (aka rectifier);
- wear of current collecting brushes;
- defects in the charging circuit wires;
- damage or operational wear of the pulley;
- wear of slip rings or commutator;
- short circuit of individual turns on the stator winding;
- bearing failure.
Every self-respecting car enthusiast should understand what causes generator malfunctions most often and how they can be dealt with. It is also necessary not to forget that timely prevention helps to avoid serious problems. Towards the end of the article, we will look at some tips that will help you learn how to test the generator yourself. But let's first learn about the internal structure of the node.
First aid for a car
The first thing to do in such cases is to check the battery terminals; perhaps they are not making good contact. If there is poor contact at the battery terminals while driving, it will not be charged sufficiently, which may cause problems during further operation of the car. To fix this problem, you need to lubricate the terminals and tighten them.
If your car's alternator fails, you need to have it repaired immediately. Most often, the voltage regulator fails. The failure of this generator element has rather unpredictable consequences. While driving, the regulator controls the required amount of current for the car; if it fails, the voltage in the network changes and can be either more or less. Very often, fuses blow at high voltages.
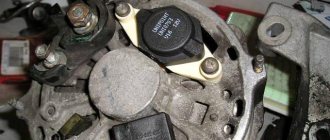
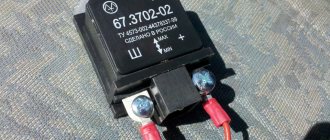
The VAZ 2109 voltage regulator is located directly in the car’s generator itself. When it fails, most often the generator relay breaks. It consists of several elements such as an electromagnet, an armature and a switch. These elements interact with each other when electric current is applied to them.
VESKO-TRANS.RU
AutoNews / Reviews / Tests
Where is the Charging Relay on the VAZ 2109
Voltage regulator of the VAZ 2109 generator. installation and repair
VAZ 2109 car models began to be produced in the early 90s. Currently, this model is very different from older versions. it is more convenient and easy to operate. The performance of a machine depends on almost everything, constant power. relay voltage regulator .
Determine electrical system malfunction
One of the main advantages of the new VAZ 2109 is fuel injection. This type of fuel mixture is much more economical than a carburetor. In addition to fuel consumption, the injector improves the vehicle's performance on the move. For the injector to work properly, the computer must also work properly, or, as motorists call it, the “brains”.
In turn, the operation of a computer, like all electrical sensors and devices, directly depends on constant power. The device responsible for supplying power to the car unit is called a voltage regulator. The main symptom of this element is the voltmeter on the dashboard.
Also, if you noticeably increased your fuel consumption while driving, but the car began to pull worse, this is one of the main signs of a failed voltage regulator relay. This type of breakdown is especially good in the dark. At this time, dimensions and other electrical appliances are involved, which significantly increase energy consumption. If that's not enough, the devices and sizes glow very dimly. time to change the relay!
ambulance
The first thing to do in such cases is to check the battery terminals; they may not be touching. If while driving , they will not be sufficiently charged, which can cause problems during further use of the vehicle. To solve this problem, lubricate the terminals and re-tighten them.
If the alternator in your car fails, it needs to be repaired immediately. the voltage regulator that fails . The failure of this generator element has rather unpredictable consequences. While driving, the controller controls the required amount of current for the car; when it breaks down, the voltage in the network changes and can be either higher or lower. Very often fuses burn out at high voltage.
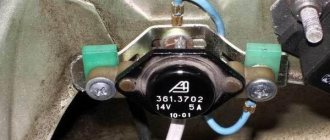
Relay VAZ 2109 3-level relay
This clearly shows a three-level operation. relay
-controller after replacement instead of the factory one (faulty).
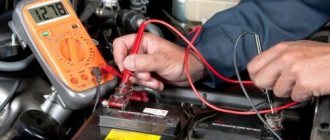
How to check the voltage of the VAZ 2108 generator
In order to check the performance of the VAZ 2108 generator, you need to perform the following steps:
- Using a voltmeter, diagnose the voltage at the battery terminals. When the engine is running and the generator unit is operating normally, this parameter should be around 13.8-14.5 volts.
- Try placing your palm on the unit body with the engine running, you need to feel the vibration. If there is vibration, you will notice it immediately. Moreover, it may be due to wear of bearing parts.
- It is also necessary to diagnose the tension of the device strap, while the motor must be turned off. Press the strap with your finger - the deflection should be no more than 1.5 cm
Description of the procedure for checking the functionality of the voltage regulator
In the event that a malfunction is nevertheless detected in the specified relay, the vehicle’s maintenance manual clearly describes the procedure for identifying a breakdown. It’s worth noting right away that the main advantage of the 2109 model is the fuel injector. This significantly improves the machine's performance. And the injector is directly connected to a computer, which constantly monitors the quality of work and the condition of the injector itself. If this component fails, then the injector also fails.
The failure in question is accompanied by such problems as:
- increased fuel consumption while reducing vehicle traction;
- dim light from the parking lights, turn signals and instrument panel in the cabin.
If these breakdowns occur, then it is necessary to replace the generator current regulator relay. We will describe the correct procedure for checking the voltage regulator of a VAZ 2109 generator. If you have a car model with the described part installed, then:
- you need to take a voltmeter;
- start the car engine and set the speed to 1500-2000 per minute;
- turn on the low beam headlights;
- measure the voltage at the battery terminals.
In this case, the result of the measurement in the range of 13.5-14.2 Volts is considered normal. If the indicator deviates in one direction or another, we can confidently say that the VAZ 2109 voltage regulator is faulty. The generator voltage regulator cannot be repaired, and it simply needs to be replaced.
Generator check
It is necessary to check the car generator for the VAZ 2109 to find out the cause of the malfunction:
- If there is extraneous noise in its operation, the bearings of the electric generator shaft are most likely worn out.
- Reduced voltage at the “output” of the electric generator means wear of the brushes (see VAZ 2109: replacing the generator brushes yourself) or low tension of the drive belt
- An increase or decrease in voltage at the “output” may be the consequence of a malfunction of the diode bridge of the electric generator
To perform initial diagnostics of faults, you just need to follow these simple procedures:
- Using a voltmeter, we check the voltage at the battery terminals. When the engine is running and the electric generator is working, the voltage at the battery terminals should range from 13.8 volts to 14.5 volts
- Turn on the engine and place your palm against the body of the electric generator to detect vibration. When the wear of the bearings increases, the vibration that is transmitted to the housing of the electric generator will be easily perceptible, and it is simply impossible to confuse it with other extraneous vibration
- We check the tension of the electric generator belt: with the engine stopped, press the belt with your finger - the deflection under the influence of your finger should not be more than 1 - 1.5 centimeters
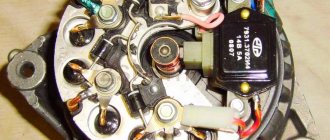
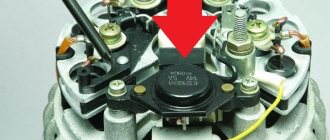
Before removing the electric generator itself, in order to avoid unnecessary and unnecessary work, first remove the relay located on the body of the electric generator with your own hands and check the condition of the brushes and the relay itself in particular:
- Removing the relay does not require removing the generator from the engine
- The relay in the generator is located at the rear, and is attached to it with just two bolts
- To unscrew them you will need a Phillips screwdriver.
- The bolts should be unscrewed carefully, otherwise you will drop their crankcase protection, and getting them out will become an additional problem
- To finally remove the relay you will need to disconnect the wiring with the “female” contact
Checking the relay status
After removal, you must immediately check the functionality of the relay - the voltage regulator, as well as the brush holder and, just in case, the capacitor removed from the generator:
- To carry out the test, you will need a power source with the ability to switch (change the value) of the voltage
- For example, a charger for your battery will do
- A standard voltage test light will also come in handy.
- We connect the control light to the brushes of the relay-regulator
- Then we connect the voltage to 12V, connecting the minus to ground, and the plus to the terminal of the relay - voltage regulator, as in the photo below
- The indicator light should light up
- Now we increase the supplied voltage to 15-16 Volts
- The indicator light should then go out
Such a test will show us if the light did not go out when the voltage increased, or if it even came on in the first case, then replacing the relay on the VAZ 2109 generator with brush holder assembly is inevitable.
Checking the generator voltage regulator for VAZ 2108, 2109, 21099 cars
To check the voltage regulator of the generator of VAZ 2108, 2109, 21099 cars, you need a DC power source with the ability to regulate the output voltage.
For example, a charger with a manual voltage adjustment function. If it is not there, then you can check the serviceability of the voltage regulator only by indirect signs: the charging current has disappeared and the battery is not charging, or, conversely, the charging current is too high and the battery is “boiling.” You can also check the voltage at the battery terminals with the car engine running (if the voltage regulator is working - at least 13.2 V for generator 9204.3701 or 13.6 V for generator 37.3701).
Necessary tools and equipment
— Power supply with the ability to manually adjust the output voltage
— Indicator lamp 5 W 12 V
Preparatory work
— Assembling an electrical circuit
We connect the negative terminal of the power supply and the negative probe of the multimeter to the ground of the voltage regulator.
To the “plus” terminal of the regulator we connect the positive terminal of the power supply and the positive terminal of the multimeter.
We connect the test lamp to the brushes of the voltage regulator.
It is necessary to strictly observe polarity when assembling the electrical circuit, since if assembled incorrectly, the regulator will burn out.
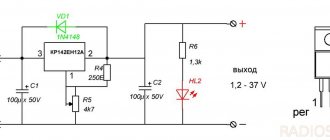
The procedure for checking the generator voltage regulator for VAZ 2108, 2109, 21099 cars
We check the generator voltage regulator 37.3701 produced after 1996 for “breakdown” and “breakdown”.
— Apply 13 V to the voltage regulator
Turn on the power supply and set the multimeter to voltmeter mode. See diagram above. The control lamp in the circuit should light up. A working regulator supplies the optimal voltage current to the generator rotor winding. If the lamp does not light up, then there is a “break” in the regulator and needs to be replaced.
- Gradually increase the voltage
At a value of 14.5-14.7 V, the control lamp should go out. A working regulator does not allow the voltage to rise above this limit. If the control lamp continues to light, then the regulator is “broken” and must be replaced.
— Gradually lower the voltage
The control lamp should turn on at a voltage of at least 13.2 V.
Notes and additions
— The voltage regulator of VAZ 2104, 2105, 2107, 21213 cars is checked in the same way.
— Before carrying out the inspection, we inspect the regulator: if it is too dirty, clean it, are too worn (less than 5 mm) or hang when moving the brush, then replace the regulator with a new one.
— Scheme for checking the voltage regulator of the generator of VAZ 2108, 2109, 21099 cars up to 1996.
Checking the voltage regulator 2108 before 1996
Source
Interchangeability of the VAZ 2108 and VAZ 2106 generator
The idea of replacing a generator on a classic is as old as the history of the car itself, because everyone who installs more bells and whistles on their own car than a weak Chinese radio, the native 42A G-221 is no longer enough for everyone.
True, even those who neglect the hassle of installing a more powerful generator are annoyed by the weak low beam at idle and poor battery charge. Once, an acquaintance fitted me with a 55A generator on a ball and the idea arose about telling you how to install it in our classic.
Having scoured the Internet to find at least something about installing and connecting it to a car, I didn’t find anything useful, a lot of comments like “Plug it in and forget it” or long discussions of professional electricians, but they spoke in a language that would suit a simple Russian to a person, it’s like a Chinese song, nothing is clear.
In this regard, it was decided to write an understandable article for ordinary people in order to help them do this simple procedure of replacing the generator themselves, without any problems and special skills in working with electricity, but with their hands. It is important to know: There are many alternatives to a standard generator, since with the appropriate skills, means and desire it is possible to install any generator. In the provided article I examine only “economical” VAZ generators from other models, because:
- They are cheaper.
- They are more common.
- They are easier to change - you don’t need to find or make any special fasteners and completely change the electrical system.
Battery and generator breakdowns
If the battery or generator malfunctions, first of all, check the integrity of the fuses responsible for their operation in the mounting block.
If the generator on a VAZ 21099 does not charge, this may be due to the following reasons.
- Bearing failure. This problem is indicated by extraneous noise during generator operation. Fixing the problem is quite simple. You need to remove the generator, disassemble it, change the bearing, reassemble it and put it back in place.
- A broken belt connecting the generator to the engine. Using the car for a long time causes the belt to wear out, and it may eventually break. You can replace the belt almost in the field, and it does not take much time.
- Reducing the voltage at the “output”. The owner of the VAZ 21099 should be notified of this malfunction by a lit lamp on the dashboard. The cause may be worn brushes or poor contact between the winding and the rotor. Fixing the problem depends on what caused it.
- Increase in voltage at the “output”. For this reason, as a rule, fuses burn out. And the reason for this is the failure of the diode bridge of the generator.
VAZ 21099 owners often encounter this problem: the generator does not charge the battery. This usually involves the wiring system running from the alternator to the battery.
If the generator does not charge, a special multimeter is needed to identify the problem. This device measures voltage. If the battery is charging, then numbers from 13.4 to 14.6 appear on the device. If the generator does not provide it, then the voltage on the multimeter will be exactly 12 V.
There are several ways to eliminate the problem of lack of charge in the battery from the generator.
- Belt tension. Do not allow excessive sagging of the belt. If the belt cannot be tensioned as needed, you should simply replace it with a new one.
- When the brushes are worn out, they are replaced.
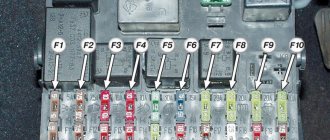
- If the cause is the fuse, it should be replaced in the mounting block. The fuse number F10 is responsible for the generator.
If the cause of all malfunctions of the generator, battery and other parts of the electrical circuit are blown fuses in the mounting block, they need to be replaced with new ones.
Repairing a generator - VAZ features
To check the car's power supply, you need to take measurements at the battery terminals. To do this, you need to start the car and let it run for a few minutes. After this, take readings with a terminal tester. Next, turn on all possible car devices, dimensions, tape recorder, heating and repeat the measurements. With a properly functioning voltage generator, as well as its regulator, the average voltage in the network should be 12–13 Volts.
The most normal voltage in a VAZ 2109 car is 14.1 Volts. If your readings are more or less than the acceptable average, then you need to start repairing your generator. First of all, you need to check the ground on the generator block. It often happens that it oxidizes under the influence of moisture. Because of this, it may not carry enough current to the vehicle. This terminal is located on the generator block; it needs to be cleaned and lubricated.
Another reason for a lack of vehicle current is a sufficiently worn or loose alternator belt. Using a belt, the generator is driven by the operation of the car engine. If the belt is not tensioned enough, it will slip while driving. Thus, the car generator will not perform the required number of revolutions, and accordingly, the required amount of current will not flow.
If the generator does not produce enough voltage, the battery is not fully charged, which significantly affects its service life. To fix the problem, you need to replace the belt or tighten it. It is very important not to overtighten it, as during movement it will stretch much faster or may even burst. You should not buy belts of dubious production - a low-quality belt wears out very quickly, dries out and stretches.
How to remove the generator on a VAZ 2108 yourself step by step instructions
In order to remove the VAZ 2108 generator with your own hands, you must perform the following procedure:
During the dismantling process, the VAZ generator must be removed together with the bracket, since its fastening bolt will be impossible to pull out due to the position of the body side member.
Now disconnect all electrical terminals from the generator
Then you need to loosen the adjusting nut and the generator mounting nut from below.
Move the generator forward and remove the loose belt
Unscrew the bolt and remove the adjusting bar
- We find it at the bottom of the engine compartment (shown in the photo) and unscrew the two bolts securing the bracket.
- Then, carefully pushing down, remove the VAZ 2108 generator
- After repairing or purchasing a new generator, we install it in the reverse order, taking into account the fact that the long bolt securing the bracket should be closer to the generator drive.
- After completing the installation of the VAZ 2108 generator, tension the drive belt
How to install and connect a VAZ 2108 generator - step-by-step instructions
Installation of a new generator is carried out in the reverse order. Take a close look at the condition of the bottom bolt. If there is damage to the threads, it is better to replace it.
It will be easier for you to repair the generator later. When installing, pay special attention to belt tension. If it is not tensioned enough, your battery will not charge well. But if you tighten the belt too much, the bearing in the front cover will be destroyed. As a result, you will get an unpleasant whistle when the engine is running. And the reason for this is the appearance of play in the bearing.
The installation of the generator on the VAZ 2108 must be carried out in such a way that even the slightest distortion does not occur.
Electrical circuits VAZ 2109
“Nines” are divided into those that were released before 1998, and those that were after. Accordingly, the machines were then equipped with different fuse mounting blocks. On the first models the marking was 17.3722. Structurally, the unit consists of a housing with a cover and an engineering board, to which wire contacts are soldered, into which fuses and relays are inserted.
On the new models of the “nine”, as well as on all variants of the Samara 2 family, a new model unit marked 2114-3722010-60 was installed. The main feature is the presence of fuses. The type of mounting block installed is not affected by the type of fuel injection, injector or carburetor, which means that the mounting blocks on different engine types can be identical.
The unit is located in the engine compartment, next to the windshield wiper motor, on the driver's side. Depending on the marking, the blocks differ from each other in the location of the parts, the current strength and the absence in the new block of a relay for the electric motor of the SOD fan, as well as a time relay for the windshield washer on the rear window.
Dismantling the mounting block
When electrical equipment fails, you should always start your search by checking fuses and relays. However, we must also remember that they rarely burn out on their own; there is always a reason. If it is not corrected, the new fuse will quickly burn out after replacement. Anyone can remove and replace a relay or fuse; no special skills are required.
- Open the hood and remove the negative terminal from the battery (this must be done during any work with electrical equipment to prevent a short circuit).
- Release the cover latches and remove it.
- On the back of the cover is a diagram of the location of each fuse and relay. Use this diagram or the tables above to find the part you need.
- Using special pliers, remove the burnt out element and install a working one in its place.
As for the relays, they are easy to reach by hand. Identifying a faulty fuse is easy. Visually you can detect a metal thread inside. If it is melted, it is faulty. When melted, the thread breaks the electrical circuit. Thus, electrical equipment does not burn out due to short circuit or high voltage. After replacement, you need to replace the cover, connect the negative terminal and check the functionality of the required element of electrical equipment.
Source