How to check the generator voltage regulator relay
The electrical network of any car is powered by a generator, which is driven by the engine using a belt drive. Its revolutions are constantly changing, ranging from 900 to several thousand, causing the rotor to rotate accordingly. For the normal operation of all electrical appliances and charging the battery, the voltage in the on-board network must be stable, which is ensured by the relay regulator. Being the weakest link in the power supply system, the device first of all needs to be checked when problems with battery charging and other breakdowns in the vehicle's electrical network are detected.
Principle of operation
The autogenerator voltage regulator is designed to maintain the voltage of the on-board network within the required limits under any operating mode and at different generator speeds, load changes and changes in external temperature. It is also capable of performing additional functions - protecting the generator from overloads and emergency operation, automatically connecting the excitation windings or the generator failure alarm system to the on-board circuit.
The operation of any voltage regulator is based on the same principle and is determined by the following factors:
- Rotor speed.
- The current strength that the generator delivers to the load.
- An indicator of the magnetic flux created by the field winding current.
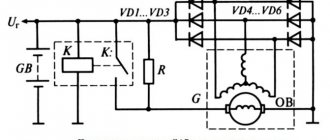
Higher rotor speeds determine an increase in generator voltage. An increase in current strength on the excitation winding makes the magnetic flux stronger, and at the same time the voltage. Any voltage regulator stabilizes it by changing the excitation current. When the voltage increases or decreases, the regulator decreases or increases the excitation current, regulating the voltage within the required limits.
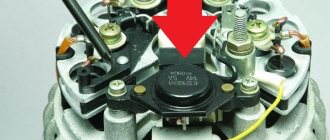
The relay regulator itself is an electronic circuit with outputs to graphite brushes. It is installed both in the generator body itself next to the brushes, and outside it, and then the brushes are attached to the brush holder.
Malfunctions
Most often, the relay regulator fails for the following reasons:
- When the battery is working properly, there is no charging current, which is why it does not charge. This happens when the wires are poorly connected to the relay terminals or when the circuit from the generator to the battery is broken. Eliminated by fixing the wire in the circuit, checking and adjusting the voltage regulator and relay regulator.
- Insufficient charging current with a discharged battery or high current with a fully charged battery is caused by a malfunction of the voltage regulator. It can be eliminated by adjusting the device or replacing it.
- Burning and burnout of lamps with excessive heat occurs when the adjustment of the relay regulator is violated or the contacts are closed. Eliminated by disconnecting and cleaning the closed contacts, adjusting or replacing the voltage regulator.
- High discharge current after stopping the motor. Occurs when the relay-regulator contacts close (contacts sintering, armature spring breaks) or the electrical wire short circuits. It is repaired by finding and eliminating a short circuit with the battery disconnected, checking and adjusting the current limiter, opening and cleaning the contacts, replacing the spring and adjusting its clearance and tension.
What is the advantage of three-phase regulators
The main advantage of such devices is the ability to preserve the life of the car battery. This is very important for any driver. The list of benefits does not end there:
- Eliminates heating problems.
- In cold weather the engine will start faster.
- Problems with alarms disappear, which quite often happens to vehicle owners. Such surprises especially happen in winter.
- The power of light emission from lamps increases. Visibility will improve both with low and high beams.
- The regulator can also affect the operation of the vehicle's heating system. There is an established opinion among experienced drivers that the stove works much better with a fully charged battery.
- Some car enthusiasts have noted that power windows work faster with a working battery.
As you can see, a high-quality battery with an additional three-level regulator can save you from a lot of problems.
Replacing the generator regulator relay
Relay replacement is necessary in the following cases:
- Wear of the brushes, in which contact with the relay-regulator disappears and the generator does not work.
- A breakdown in the device circuit, which causes an increase in voltage in the system.
- Damage to the fasteners or housing, which can lead to a short circuit.
The process of replacing a device is considered using the Lada-Kalina generator as an example. Replacing the relay regulator is associated with dismantling the generator, and is carried out in the following order:
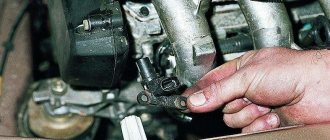
- Removing the minus terminal from the generator.
- Dismantling the generator.
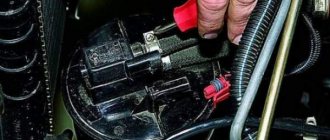
3. Unsnap the plastic clips on the generator cover and remove it.
4. Disconnect the diode bridge connector.
5. Unscrewing the nut and dismantling the contact group bushing.
6. Unscrewing a pair of screws holding the relay regulator.
Source
VAZ "classic" - installation of a new type voltage regulator
Unfortunately, the voltage regulators installed on standard generators of cars of the good old “classic” VAZ line are very far from perfect and their main drawback is that they are not able to determine the real voltage in the on-board network, but only, not always successfully , they are trying to analyze the “voltage” on the additional diodes of the rectifier bridge. Around the spring of 2004, such regulators were completely discontinued and were replaced by more advanced models, which, thanks to the presence of feedback, are able to accurately measure the voltage in the on-board network, quickly respond to current changes and, thereby, smooth out voltage surges when changing loads.
Compatibility of voltage regulators with generators of various series
When starting to solve the problem of installing a voltage regulator of a new type, it is necessary to take into account that, depending on the version of the generator being modified, the modification can be carried out practically without alterations, or you will have to change the terminals of the “B+” and “D+” terminals, as well as make some changes to the diode circuit bridge.
In general, no modifications will be required when creating the following combinations:
- Installation on generator 372.3701 RN 1702.3702-01 – VTN;
- Installing on the generator 9402.3701/3202.3771 RN 9111.3702 – VTN (9333.3702-02 – VTN or 9111.3702I2 – VTN);
- Installation of voltage regulator 846.3702 - Orbit on generator 5102.3771.
In cases of combining the generator 9402.3701/3202.3771 with such regulators as 93.3702 - Astro, 844.3702 Orbit, 845.3702-Orbit, 941.3702 - Autoelectronics, 7931.3702 I4 - Electromodul, 611.3702-05 (Energomash), 611.3702-07 (Energomash), as well as 9333.3702- 04 - VTN (9444.3702 - VTN, 7931.3702-01 - VTN) you will have to modify the diode bridge and change the terminals indicated above.
The procedure for replacing the voltage regulator (old model with a new one)
We will consider the sequence of actions aimed at replacing the voltage regulator using the example of installing RN 9333.3702-04 on the generator 9402.3701 KZATE, which, according to many years of reviews from VAZ car owners, is the most reliable and successful version (this refers to products manufactured specifically at KZATEtm in Samara).
First of all, it is necessary to remove the old voltage regulator from the generator, as well as the capacitor (on the new regulator the capacitor is built into the overall structure). At the next stage, guided by the basic connection diagram for a new generation voltage regulator, by cutting the jumper, we carefully disconnect the additional diodes from the “D” terminal of the diode bridge, thereby turning it into the “D+” terminal.
In principle, if you do not plan to use “D” in the future, then these three diodes can simply be removed.
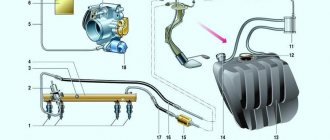
1-generator, 2-voltage regulator, 3-control lamp, 4-excitation winding, 5-ignition switch contacts, 6-stator winding, 7-rectifier unit, 8-rechargeable battery.
Next, we install a new regulator, for which we connect the wire coming from the “D+” terminal to the regulator, and attach additional leads to the “B+” pin, as well as to the “W” winding contact (the location of the contact is indicated on the generator cover). Do not forget that the wire of the “W” winding must be laid under the textolite gasket and not ring against the housing. In this case, the terminals are for additional terminals, such as we need (8mm for “W” and 6mm for “B+”), so there is no need to modify them. In general, the installation of the new regulator is complete and all that remains is to close the generator cover and install it in the car.
It may be necessary to additionally remove the resistor located in the instrument cluster. It is quite simple to check whether it is present in the circuit - you need to disconnect the wire from terminal “D” of the generator and turn on the ignition. If the battery charge control lamp lights up at full intensity, the resistor is present; if not, it is not provided.
After this modification, the quality of voltage regulation is significantly improved, as evidenced by measurements taken at idle and with a load. A certain drawback of the modernization is the complete loss of self-excitation of the generator when the wire going to “D+” is broken, and here it is necessary not to miss the signal from the battery indicator.
Tags Voltage regulator, VAZ, generator
Similar materials
VAZ 2110 generator voltage regulator - how to check and replace
The vehicle's electrical circuit includes a device such as the voltage regulator of the VAZ 2110 generator. Its task is to limit the output voltage of the generator and bring it to optimal values in accordance with the parameters of the on-board equipment. In this article we will tell you how this device works, what malfunctions are typical for it, how to check and replace. We will also give you detailed recommendations that will allow you to continue driving with a faulty regulator.
Is it worth making the regulator yourself?
If you are new to electronics, then such an undertaking will be quite difficult.
As we mentioned earlier, the main element of the circuit is a certain number of diodes. Finding three-stage switches for them is quite problematic. In addition, you need to correctly calculate and install radiators for cooling. Otherwise, the risk of diode burnout increases significantly.
During the development of the regulator, long wires will be needed, because the connection is made directly to the device through the cover.
Additionally, you will need to make or find a suitable plastic case for such equipment. All internals must be securely fastened inside the device.
What is a generator voltage regulator?
The voltage regulator is a relay that closes and opens the electrical circuit at the right times. In cars, this relay works to limit the output voltage. The fact is that a generator with a certain rotor speed can produce a specific voltage. Since the rotor speed constantly depends on the crankshaft speed, the voltage changes accordingly. To maintain a given voltage, a special device was developed that helps create an output voltage within the range of 12 - 14 Volts.
Advantages of installing a three-level regulator
The three-level voltage regulator on the VAZ 2107 is capable of maintaining a constant voltage supplied by the generator to the vehicle network.
With this product it is possible to save and increase the battery life. In addition to regulating voltage, three-position regulators are capable of maintaining current within a certain range. Some of the main advantages of the device in question include:
- The main board of the device is located not in the generator itself, but away from it, which contributes to less heating of the product, as well as extending its service life.
- Possibility to regulate the voltage level manually thanks to a special switch. The device operates from a switch.
- The charge level is significantly higher, in contrast to standard products.
Problems with starting the engine, especially on frosty days when it is very difficult for the starter to start the engine, can be avoided by replacing the standard device with a three-position one. Large loads on the electrical circuit in a car, such as headlights, heater, heated glass, can contribute to battery discharge, even if the engine is running and the standard product is in good working order.
Types of regulator relays are simple, three-level and with temperature compensation. In the brush section of a standard seven generator, in most cases, a temperature-compensated option is installed. But, as practice shows, in terms of thermal regulation, these regulators are mostly ineffective. Recently, among drivers of the VAZ 2107 and other Lada models, the three-level type is gaining more and more popularity. Car owners who have installed such a regulator overwhelmingly recognize it as more effective than the standard one.
Characteristics of the Energomash device for VAZ 2107
The Energomash voltage regulator for the VAZ 2107 is equipped with three “25C” type diodes and a mode switch. With their help, a three-stage voltage change is carried out. A three-level balancer is also called a current injector, since the device is capable of maintaining it at a level of up to 6A. The main functionality of the three-level voltage regulator for the VAZ 2107 model "Energomash" is based on changing the current from the generator, thereby increasing the voltage of the on-board circuit to 13.6-14.7 V.
The first operating mode provides for maintaining the voltage at the generator output at 13.6 Volts. The switch should be installed in a position where the ambient temperature is +20 degrees and above. The switch in the neutral position should be set at temperature values from 0 to +20 degrees. And in the third position, the generator will produce a voltage of 14.7 V when the air temperature is from 0 to -20 degrees.
Changing the brush assembly
Replacing a standard product with a VAZ-2107
Connecting a three-position regulator, or rather, changing a standard product, does not present any difficulties. After purchasing the product, you must complete the following steps:
- Initially, you need to remove the protective cover of the generator. Don't forget to disconnect the negative terminal from the battery.
- The standard part is removed by unscrewing two bolts using a screwdriver or a “6” key, which depends on which VAZ generator is installed on the car. It is also necessary to remove the terminal.
- After this, we compare the standard device with the three-level one. The brushes and fasteners must be identical in design, otherwise the product will need to be replaced.
- A new product is installed in place of the standard “tablet”, after which it is fixed with fasteners (bolts).
- The body of the product should be secured to the ground of the car in any convenient place (pictured below). This is not difficult to do, since the wire is long enough.
After installing such a product, the owner of a VAZ-2107 car will be able to forever forget about constant problems with a dead battery, since the new regulator will recharge it more stably under certain temperature conditions.
Malfunctions and checking regulators on a VAZ
During operation, the voltage regulator may fail. In VAZ 2110 cars of all editions, a semiconductor relay is used, which contains graphite generator brushes. A relay malfunction can lead to the following consequences:
- Failure of all vehicle network devices. Usually, the first thing that happens is that all the lamps in the lighting devices burn out. If this suddenly happened, the relay has failed because the output voltage exceeded the rated values.
- Recharging the battery . Overcharging a galvanic cell is also unacceptable. This can lead to boiling of the electrolyte and subsequent damage to the battery.
- Small charge . As many car enthusiasts say, “undercharging” occurs. A weak battery will not be able to fully ensure reliable engine starting.
In total, there are only two malfunctions of the voltage regulator relay. These are: failure of the relay (charging does not occur, or the battery is overcharged) and its incorrect operation (the relay works, but passes too little voltage, which is not enough to charge the battery). All relay malfunctions can be identified by many external signs, as well as through diagnostics.
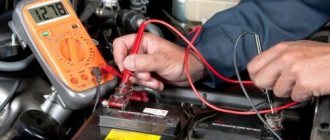
The most reliable way to check the voltage regulator is to measure the electrical value at the battery terminals with the engine running and idling. The normal voltage is considered to be between 13.5 and 14.2 Volts. If the voltage level exceeds these values or is lower, it means that the voltage regulator is faulty and must be replaced.
In addition, there are other signs of a relay failure, after which the device usually begins to be checked:
- The charging indicator light came on while the engine was running. As the speed increases, the lamp goes out.
- Dim headlights when the engine is running. Likewise, as the speed increases, a brighter glow can be observed.
- Too bright headlights and subsequent burnout of the lamps also indicate incorrect operation of the relay.
- If the battery charge is sufficient for a small number of starts, it means that the relay does not fully provide the required charge.
How to remove a generator on a VAZ 2114 and 2115 Available methods
Lada 2107 Arkano-mobile Samara Logbook Replacing the heater tap in a VAZ 2107 with a tap from a VAZ 2108 with its removal from the passenger compartment under the hood
- The terminal is removed from the battery; this should be done for all work on the car’s electronic systems;
- The car is jacked up, the right wheel is removed;
- The mudguard is unscrewed;
- Remove connector block D from the generator;
- After that, using a 10mm wrench, unscrew the wire from terminal B++. The wires are removed;
- The generator adjusting screw is loosened. The belt is removed. The screw should be completely unscrewed. Remove the tension bar;
- Using a 17 socket, unscrew the 3 screws securing the generator bracket to the cylinder block;
- The generator is removed;
- Remove the bracket, to do this the nut is unscrewed, this is done with a 13 key. The screw is removed.
- Unlock the cover fastening latches and remove it;
- Use a Phillips screwdriver to unscrew the 2 screws securing the voltage regulator;
- The block of wires from the regulator is disconnected, and it is finally removed from the generator;
- Using a 10mm wrench, tighten the nut securing the capacitor wire. Next, unscrew the screw securing the capacitor itself;
- We remove the diode bridge. To do this, unscrew the screw securing the block with a Phillips screwdriver. Next, unscrew several screws securing the winding terminals. There are insulating washers on the screws;
- We remove the winding leads and remove the diode block;
- While holding the head from turning with a gas wrench, use a hexagon to unscrew the pulley;
- Using a Phillips screwdriver, unscrew the 4 screws holding the covers together;
- We mark the position of the covers relative to each other. Separate both halves;
- We remove the stator;
- We clamp the cover with the rotor in a vice. We knock it out with a punch;
- All that remains is to remove the bearing using a puller.
AutoFlit.ru
What to do if the voltage relay fails?
It happens that the relay fails at the most inopportune moment, when you still have a drive home and the battery is not charging. The battery capacity in economical mode can ensure fairly long engine operation, which will allow you to get to the repair site without any problems. Below we will provide a list of recommendations that will help you drive, as they call it, “on battery power” and not stall.
- If the battery is overcharged, the relay must be disconnected from the circuit. To do this, the contact wires are removed from it and left hanging. In the case of the “ten”, it is enough to unplug the plug with the wire from the generator brush connector. Thus, battery charging is turned off, and further movement will no longer harm the battery.
- Many experts suggest going the other way - turning off the generator excitation winding . To do this, remove the corresponding fuse. However, this can be done if you know where the fuse is located.
- If the battery is weakly charged, then there is practically no reason to panic. To get to your destination, you need to maintain high speeds in order to, at least a little, bring the voltage value to the nominal value. to maintain the speed at 3000 rpm for a few seconds using the gas pedal This will prepare the battery for the next start.
- Avoid using music, power windows, headlights (especially high beams), and other electrical devices unless their use is absolutely necessary. This will save battery power well.