Payment for goods and downloading of the book in electronic form (PDF format) is made on the website.
To do this, you need to find the book you are interested in and click on the “Buy” button. The price of the book is indicated on the button.
For convenience, the price on the website for residents of Russia, Belarus and Kazakhstan is presented in rubles.
For residents of Ukraine in hryvnias, and for all other countries - dollars.
After clicking on the “BUY” button, a payment window will open where you can select a payment system with which you can pay for the selected book using any bank card (Visa, MasterCard, MIR, etc.)
When you click on the “Pay by bank card” button, the Portmone payment system will open, which is the easiest way to make a payment.
In addition, the website offers four payment systems for payment:
- Yandex (payment from any bank cards, Yandex Money account, QIWI Wallet, terminals, etc.);
- Portmone (payment from any bank cards, Portmone account);
- PayPal (payment from any bank cards, PayPal account);
- WebMoney (payment from any bank cards, payment from WebMoney wallets).
Payment via Yandex Cashier
After selecting payment via Yandex, the Yandex Cashier payment system will launch, where you need to select a convenient payment method (bank card, QIWI, Yandex Money account, etc.)
After specifying payment details and confirming payment, payment for the goods will occur.
If you have a bank card in a currency other than the ruble, then the money will be debited from the card at the rate of the Central Bank of Russia at the time of the purchase.
This payment method is optimal for residents of Russia, Kazakhstan and Belarus.
Official website of the Yandex Kassa payment system https://kassa.yandex.ru
Maintenance of contact type distributor
In order to repair the distributor yourself, you need to understand its structure and the purpose of all its parts. The operating algorithm of the mechanical distributor is as follows:
- The rotating roller periodically presses the cam onto the spring-loaded movable contact, as a result of which the low voltage circuit is broken.
The gap between the contacts appears as a result of pressing the cam on the spring-loaded pusher - At the moment of rupture, the secondary winding of the coil generates a pulse with a potential of 15-18 kilovolts. Through an insulated wire of large cross-section, current is supplied to the central electrode located in the distributor cover.
- A distribution contact rotating under the cover (in common parlance - a slider) transmits an impulse to one of the side electrodes of the cover. Then, through a high voltage cable, current is supplied to the spark plug - the fuel mixture ignites in the cylinder.
- With the next revolution of the distributor shaft, the sparking cycle is repeated, only voltage is supplied to another cylinder.
In the old version, the unit was equipped with a manual octane corrector (item 4)
In fact, 2 electrical circuits pass through the distributor - low and high voltage. The first is periodically broken by the contact group, the second is switched to the combustion chambers of different cylinders.
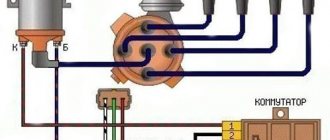
The design of the distributor, operating in conjunction with the electronic ignition system, is identical to the design of a mechanical distributor. There is also a plate with a bearing, a slider, a centrifugal regulator and a vacuum corrector. Only instead of a contact group and a capacitor, a magnetic Hall sensor is installed plus a metal screen mounted on the shaft.
In a contactless distributor, the main role is played by a magnetic sensor that sends signals to the switch
How a contactless distributor works:
- The Hall sensor and permanent magnet are located on a movable platform, and a screen with slots rotates between them.
- When the screen blocks the magnet field, the sensor is inactive and the voltage at the terminals is zero.
- When the roller turns and passes through the slot, the magnetic field reaches the sensor surface. At the output of the element, a voltage appears that is transmitted to the electronic unit - the switch. The latter gives a signal to the coil, which produces a discharge that goes to the distributor slider.
In an electronic ignition system, spark generation is carried out by a switch and a coil; the distributor only determines the moment the discharge is applied to the spark plugs
The non-contact distributor is more reliable in operation - the Hall sensor and bearings become unusable much less often due to the lack of mechanical load. A sign of meter failure is the absence of a spark and complete failure of the ignition system. Replacement is easy - you need to disassemble the distributor, unscrew the 2 screws securing the sensor and pull the connecting connector out of the groove.
The magnetic sensor is attached with two screws to the bearing pad
Malfunctions of the remaining elements of the distributor are similar to the old contact version. Troubleshooting methods are described in detail in the previous sections.
Payment via Portmone
After selecting payment through Portmone, the payment system will launch, where you need to select the payment method: bank card or Portmone account.
The price in the Portmone payment system is converted into dollars at the exchange rate of the Central Bank of the country where you are located.
If you have a bank card in a currency other than the dollar, then the money will be debited from the card at the rate of the Central Bank of your country at the time of the purchase.
After specifying payment details and confirming payment, payment for the goods will occur.
Official website of the Portmone payment system https://www.portmone.com
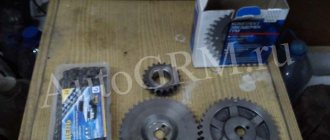
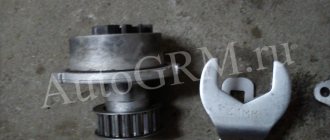
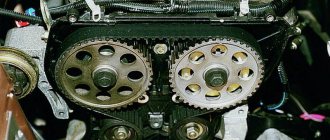
How to set the VAZ 2109 timing belt correctly?
To work, you will need keys 17 and 19, a flashlight and a flat-head screwdriver. Remove the old belt and roller completely (just be careful not to lose the washers placed under and on it). Install a new tension roller VAZ 2109, and then begin adjustment.
Using a wrench, turn the camshaft pulley until the mark on it aligns with the bar attached to the engine block. After this, try not to touch the camshaft so as not to knock it down (although this is quite difficult to do, but if desired, everything is possible).
A few photos that will give a clear idea of which marks need to be aligned when installing the timing belt on the nine:
1. Place a mark on the camshaft:
2. Checking the alignment of the marks on the crankshaft pulley
3. Check the marks on the flywheel for more accurate installation
Place a bolt on the crankshaft so that you can align the pulley to the marks. Rotate the crankshaft until the mark on the pulley is clearly vertical - this is the very first guideline. Afterwards, to ensure correctness, remove the rubber plug in the clutch housing.
A viewing window will open, through which you can see the flywheel. So, the latter should have a mark - a line that, under normal settings, coincides with the slot on the bar attached to the engine block. This is your second reference point, which directly speaks to the accuracy of the setting. Now all that remains is to put the belt on the crankshaft pulley first, then the camshaft.
To adjust the belt tension, you need to install a special key in the timing belt roller of the VAZ 2109 (if you don’t have one, you can adjust the tension using a screwdriver and a pair of screws or nails). Normal tension is when in the longest section you can turn it a maximum of 90 degrees. Yes, it should turn, but it should turn.
If you can’t turn it at all, then the tension is excessive and needs to be loosened. This is why the VAZ 2109 tension roller exists. Loosen the nut and perform the procedure again. After this, use a wrench to turn the crankshaft several turns and double-check that all marks match. If everything is fine, assemble the unit and start the engine.
Replacement photo gallery
The photos show some of the steps to replace a timing belt.
Removing the cover mounting bolts Removing the cover from the engine Plug on the gearbox housing Unscrewing the crankshaft pulley bolt Removing the pulley Aligning the mark on the camshaft gear Loosening the belt tension Removing the belt from the gears Marking the crankshaft Tensioning the belt with a roller
Instructions for replacing the belt on a car with an injection engine
The injector was installed on only one type of “nine” engine - with a cylinder displacement of 1.5 liters. The use of a fuel injection system did not cause any adjustments to the camshaft drive pattern. The procedure for replacing the timing belt on a VAZ 2109 with an injection engine is practically no different from the list of work on a carburetor car.
The difference is the removal of the old belt, which will require:
- Remove the crankshaft position sensor located next to the pulley from the engine. To dismantle, you need to unfasten the wiring plug and then unscrew the sensor mounting bolt. After this, the sensor is removed from the guide hole.
- To loosen the tension of the auxiliary drive belt, you need to unscrew the M13 nut installed on the generator.
The intricacies of replacing the timing belt on an injection machine are shown in the video from the Alex ZW channel.
There are also several differences when reassembling:
- The crankshaft pulley needs to be installed accordingly. To do this, you need to set the top dead center in the first cylinder - according to the mark on the flywheel and on the crankcase. In this case, the mark of the camshaft gear will coincide with the notch on the plate. The installed pulley should be located opposite the sensor with the beginning of the 20th tooth, counted from the two missing ones.
- The gap between the sensor and the pulley should be 0.4-1.0 mm.
- After completing the assembly, start and check the operation of the engine.
Check points on the pulley
Checking the timing belt tension
With the correct belt tension, the long leg should rotate 90º using the thumb and index finger. The test should not require much physical effort to complete. When retightening, additional loads occur on the bearings of the pump and tension roller, which damage them. Excessive tension is also harmful to the belt itself, which can break while the engine is running.
Preload check location
Payment via PayPal
After selecting payment via PayPal, the PayPal payment system will launch, where you need to select the payment method: bank card or PayPal account.
If you already have a PayPal account, then you need to log into it and make a payment.
If you do not have a PayPal account and you want to pay using a bank card via PayPal, you need to click on the “Create an Account” button - shown with an arrow in the picture.
PayPal will then prompt you to select your country and provide your credit card information.
After specifying the information required to make the payment, you must click on the “Pay Now” button.
Official website of the PayPal payment system https://www.paypal.com
Payment via WebMoney
After selecting payment via WebMoney, the payment system will launch, where you need to select the payment method: bank card or WebMoney wallet.
If you already have a WebMoney wallet, then you need to log into it and make a payment.
If you do not have a WebMoney wallet and you want to pay in another way, you need to select any of the methods that WebMoney offers and make the payment
After specifying payment details and confirming payment, payment for the goods will occur.
Official website of the WebMoney payment system https://www.webmoney.ru/
Downloading a book
After successfully completing the payment (by any method) and returning to the KrutilVertel store from the payment system website, you will be taken to the successful payment page:
On this page you need to indicate your e-mail, where access to download the book will be sent.
If you are already registered on our website, then simply follow the link to your personal account.
The book you purchased will be in your personal account, from where you can always download it.
Please note that after making the payment, you need to return back from the payment system website to the KrutilVertel website.
If for some reason you did not return back to the site and closed the payment system tab with a message about the successful completion of the payment, please let us know - we will send you a letter indicating access to download the book.
We set the ignition by ear
As mentioned above, the best way to set the ignition is only with the help of a strobe light. But you still need to somehow get to the service station.
For such cases, a quick method of setting the ignition “by ear” is perfect:
- First, loosen the ignition distributor mounting nut.
- After warming up the internal combustion engine and without turning it off, rotate the distributor housing alternately in both directions.
- The speed should be approximately 2000 rpm.
- Listen to the engine. The best position is when the maximum possible number of revolutions is produced with smooth operation of the power unit without failures.
- Once this position is found, you can tighten the fastener.
Problems when paying with bank cards
Sometimes difficulties may arise when paying with Visa/MasterCard bank cards. The most common of them:
- There is a restriction on the card for paying for online purchases
- A plastic card is not intended for making payments online.
- The plastic card is not activated for making payments online.
- There are not enough funds on the plastic card.
In order to solve these problems, you need to call or write to the technical support of the bank where you are served. Bank specialists will help you resolve them and make payments.
That's basically it. The entire process of paying for a book in PDF format on car repair on our website takes 1-2 minutes.
If you still have any questions, you can ask them using the feedback form, or write us an email at [email protected] .
Preparation process
This procedure is quite simple, but before you put the tags on the VAZ 2114 and for complete convenience, you will need an assistant and a little preparation.
So, for everything to go quickly you need to:
- We find a flat surface that allows us to easily fix the car so that it does not roll (put a shoe under the left rear wheel).
- We tear off the fastenings on the right wheel and lift the car with a jack so that the wheel can be removed freely.
Jacking up the car
- We unscrew all the fasteners and finally dismantle the wheel.
- We completely remove the belt protection, for this you will need a 10mm wrench, with which you unscrew the 3 head bolts, at this point the preparation stage is considered completed, now you can safely get to work.
Removing the timing belt protective cover
IMPORTANT! Some believe that if you fix the position of the shafts when replacing the belt itself, then there is no need to make further adjustments; this is not entirely correct. A competent car enthusiast, along with the timing belt, also changes the tension-regulating roller along with the oil seal on the crankshaft. The first one tends to wear out quickly and leaves the possibility of breaking a completely new belt, and the second one is simply a disease of the entire VAZ family; over time it leaks and the car begins to “eat” oil.