Home » Domestic auto industry
Reading time: 14 minutes. Updated 08/04/2019
The need to manually configure certain parameters is a key feature that sets discontinued cars apart from the automotive industry of recent years. We are talking about the VAZ-2106, where adjusting the valve clearances is relevant due to the noticeable heating of the engine during operation. How should the VAZ-2106 valves be adjusted, what must the car owner prepare and what preliminary work needs to be done?
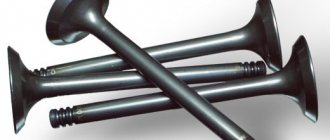
The gas distribution mechanism is one of the key elements that requires adjustment. The valve is the main part of the mechanism in question. It is responsible for opening access for the mixture of fuel and air to enter the corresponding chamber and can be inlet or outlet. The valves also release exhaust gases. Thermal gap can be detected over time in the valve contact area and must be carefully adjusted. How often should the VAZ-2106 valves be adjusted, and what points in this procedure are the most important?
Why adjust valves?
Constant operation of the motor under conditions of elevated temperature influences provokes active wear of the parts of which it consists.
The dimensions of the thermal clearances of the valves also change, as indicated by the following signs:
- fuel consumption increases;
- dynamics during acceleration are lost, as is the power of the power unit;
- Idle speed is accompanied by characteristic tapping sounds.
Even if the above signs are not observed, you should still play it safe and make adjustments if you have not carried out this procedure for a long time. What does “for a long time” mean and how often should this be done?
Symptoms
The engine reports any malfunctions in advance by uneven operation. Among the main signs of valve clearance violations:
- metallic knocking when the engine is running;
- deterioration of acceleration dynamics;
- tripping at idle;
- increased fuel and oil consumption;
- “breathing” effect on carburetor cars.
First of all, pay attention to the knock. Other signs often indicate simpler malfunctions: incorrect ignition, a carburetor that requires adjustment, failure of one of the sensors (on the injector), etc.
On the 7th model, it is recommended to set the gaps every 17-20 thousand kilometers. But in everything that concerns the engine, the principle “do no harm” prevails. If the engine is running smoothly, “just in case” there is no need to crawl under the valve cover. There are many known cases when the “Seven” went without adjustment for 30-40 thousand km. This depends on operating conditions (cars that do not drive in winter need the procedure less often) and driving style (“retired” driving also extends the period between adjustments).
Frequency adjustment
The procedure in question should be performed after every 30 thousand km according to the manufacturer’s recommendations. The condition of the gaps must be checked three times more often. If you dismantled the cylinder head and replaced its gasket, the procedure for adjusting the gap is advisable in any case, even if the mileage has not reached the extreme mark. If you ignore this need, you will soon find out what it is like to drive under the above circumstances, since the clearances of different valves will be unequal.
How to set the gap correctly?
Adjusting the VAZ-2106 valves with your own hands requires strict adherence to the sequence of actions and careful preliminary preparation.
Tools
First of all, make sure you have the necessary tools:
- socket wrenches;
- screwdrivers equipped with a flat blade;
- adjustment probe or micrometer;
- crankshaft turning key.
The adjustment sequence and instructions can also be found on the probe cover. Since the tool in question has standard parameters, and its thickness is 0.15 mm, its width does not cover the entire gap, and its use for fine tuning is not advisable. Moreover, the accuracy of adjustment with this tool decreases even more, since over time the gap width is deformed due to wear of cylinder head seats, valves and other parts.
Preparation
First of all, make sure that the battery is disconnected, otherwise you risk shorting out the wiring.
- There should be supports under the rear wheels, activate the neutral speed mode.
- Open the hood, wait until the engine cools down, otherwise there is no hope for accurate adjustment, and the risk of getting burned increases.
- Buy a rubber gasket under the cover; it will not deform when exposed to high temperatures. If you choose the old part, oily smudges will appear on the lid.
- If necessary, remove the gas pedal cable along with the carburetor cover.
- Get rid of the cover bolts, use a 10mm wrench for these purposes, make sure that the washers under the bolts are not lost.
Timing chain tension
After preparation, you must also make sure that the timing chain tension is at the optimal level and adjust it if necessary. Stretching the chain contributes to increased wear, the appearance of tapping sounds during engine operation, and disruption of the timing belt functionality.
There are two ways to check.
- Remove the engine from the protective casing, insert a screwdriver into the chain and try to bend it in two places where there is a little free space. With optimal performance, you won’t succeed and the chain won’t bend.
- Listen to the engine running when active. If noises are clearly audible, but a short activation of the gas eliminates them, the tension has weakened.
To adjust the tension, use a special tensioner.
Step-by-step adjustment of gaps
The following algorithm of actions allows you to study the procedure for adjusting the VAZ-2106 valves:
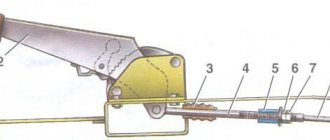
- Stick to the position aligned with the marks, make sure that the gap on the pair of cams (8 and 6) matches, you need to start with them. The gap should be calculated from the mark closest to the windshield. Place the dipstick on top of the rocker under the camshaft. Free penetration of the feeler gauge indicates that nut 17 needs to be loosened. Loosen the nut by 13 to avoid scrolling and tighten the nut by 17 in the next step, once again make sure that the gap corresponds to the required value. The feeler gauge should not bend at the entrance to the gap, but it should also go in tightly, you must apply a certain force.
- For 6 moves at this stage it is necessary to turn the crankshaft and achieve the merging of the marks on the pulley and the sprocket, corresponding to the position at 9 o’clock. Adjust the next pair of cams (7 and 4) in the same way.
- Rotate the crankshaft 180 degrees to reach the 6 o'clock position. Make sure it matches the pulley mark exactly. Adjust cams 3 and 1.
- Place the marker at the 3 o'clock position and begin working with the next pair - 2 and 5.
- Use the starter to crank the crankshaft, check all parameters again. Install all previously removed parts, following the reverse procedure.
Step-by-step instruction
The procedure for adjusting the VAZ 2106 valves is as follows (table below):
The valve numbering order is from the windshield towards the radiator.
In the initial position, valves 6 and 8 are adjusted.
Then the crankshaft is rotated 180 degrees and the next pair of valves is adjusted.
Then another rotation: 360 degrees to adjust the next pair.
And the last rotation is 540 degrees to adjust the last pair.
The work itself is carried out as follows:
- Park the car on a level, bright place. You should have enough space on either side of the motor. You will have to work for a long time, so the conditions must be comfortable.
- Wait until the engine cools down. It should not exceed the air temperature around.
- While the engine is cooling, prepare a set of tools: a set of wrenches, a dipstick, a crankshaft wrench, a flathead screwdriver, a new valve cover gasket.
- Check the timing belt tension. If necessary, adjust the belt tension.
- Open the air filter cover and remove the filter itself.
- Disconnect all pipes from the filter
- Remove the choke cable.
- Remove the accelerator linkage
- Remove the cylinder head cover.
- To make it more convenient to work, it is also better to remove the ignition distributor cap.
- Typically, when the timing belt is properly tensioned, the marks on the pulley and on the oil seal should match. Check it. There should be a pulley mark near the longest mark on the distributor. The mark on the camshaft should coincide with the protrusion on the VAZ valve cover. If this is not the case, rotate the crankshaft until the marks align. This will ensure that the piston is positioned in the fourth cylinder during the compression stroke.
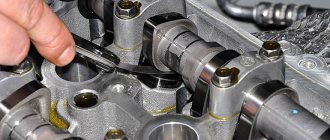
- We place the dipstick under the camshaft a little higher above the rocker. The probe should not penetrate easily. If it fits easily, then you need to loosen the nut 17 on the rocker. Then the nut at 13 is loosened. The nut at 17 is tightened and a new measurement is taken using a probe. The feeler gauge should fit tightly into the gap, but not bend.
- We adjust the remaining pairs of valves using the described method. (adjustment order and crankshaft rotation angles)
- Finally, you need to crank the crankshaft using the starter and measure all the gaps again. If the adjustment is made correctly, tighten the nuts.
- Reassemble in reverse order and replace the valve cover gasket.
- To make the correct adjustment, you need to use special probes that are designed for Zhiguli engines. They differ from ordinary ones in their large width. Since standard feeler gauges for modern engines are small, they cannot measure the entire width of the gap. As a result, you will lose the opportunity to correctly measure the size of the gap.
- If it is difficult for you to remember the adjustment order and crankshaft rotation angles, look for a diagram in the dipstick cover. Typically, manufacturers apply it directly to the probe, which makes work easier. If you are unlucky and could not find the diagram, you can simply print this article and take it with you to the garage.
- The most suitable temperature for correct adjustment is 20 degrees Celsius. If the adjustment is carried out in winter, the engine can be slightly warmed up to the specified temperature.
- Some people use a distributor slider for convenience during adjustment. To do this, they remove the cap and monitor the slider on the distributor. The degree of rotation of the slider is different here. Each subsequent pair of valves is adjusted after turning the slider by one quarter (or 90 degrees). You can make your own marks with paint or chalk.
- If you use gas as fuel, then the gaps need to be set a little larger than usual.
This is how you can easily and naturally adjust the valves on a VAZ 2106 with your own hands. And although most car enthusiasts entrust this work to service station specialists, you can adjust the valves yourself. An engine with adjusted valves will run quieter and more efficiently. The procedure will take some time, but will save a significant amount of money if you do it yourself.
Stages of work, tools
All adjustment work is carried out in several stages:
- Preparatory work, partial disassembly of the motor to provide access to the valve mechanism;
- Adjustment;
- Assembly.
Adjusting the valve clearances of the VAZ-2106 is carried out with the following tools:
- A set of socket and open-end wrenches (open-end wrenches for 13 and 17 are required);
- Gap gauge;
- Screwdrivers;
- Rags;
- Marker.
Regarding the dipstick. Checking and adjustment is carried out with a feeler gauge with a thickness of 0.15 mm. In this case, a regular measuring element will not work; a special one with an increased width is required.
Removing the valve covers
To remove the valve cover of a VAZ 2106, a 10mm socket wrench is used; as a rule, this action does not cause problems for anyone.
After the valve cover is removed, check the condition of the gasket; if there are defects on the surface, it is advisable to replace it immediately.
The marks are set, the cover is removed, we proceed directly to adjusting the valves.
Preparatory work
So, the engine is cooled down, and the car itself is placed on a flat surface and immobilized. You can start working:
- Remove the carburetor air filter cover and remove the filter;
- We unscrew the filter mounting bolts and remove it, having first disconnected the pipes going to it;
- We remove the cable for manual control of the air damper (choke) and disconnect the throttle linkage;
- Unscrew the bolts securing the valve cover and dismantle it;
- Check the chain tension (it must be normal, otherwise you will have to adjust the tension first);
- Remove the distributor cap.
Now you need to set the TDC of the piston in the 4th cylinder and the marks on the knees will help with this. camshaft drive shaft and cover. shaft, as well as on the camshaft gear and its cover.
To do this, you can use a key of appropriate size, which you need to rotate the knees. shaft for the drive pulley bolt. Or use one of the drive wheels. To do this, you need to hang it with a jack, engage 4th gear and slowly turn the raised wheel. In this case, the transmission will ensure rotation of the crankshaft. But with the second method, you will need an assistant, since it will be difficult to check the coincidence of the marks.
Preparation for work and disassembly
I would like to immediately note that this procedure requires time and is conditioned by an understanding of the process. There is a certain algorithm for implementing this task. To begin with, place your car on a level surface and provide free and well-lit access to the engine compartment.
The engine must be cooled and at ambient temperature.
Before starting the adjustment process, you need to prepare:
- a set of different wrenches in sizes “10”, “13”, “14”, “17”;
- 0.15 mm feeler gauge;
- key for turning the crankshaft;
- screwdrivers;
- spare valve cover gasket.
The disassembly process includes removing the air filter, disconnecting all pipes from the air filter cover, removing the choke cable, accelerator linkage and cylinder head cover.
It is advisable to remove the distributor cover so that it does not cause inconvenience during the adjustment process. There will be marks on the pulley and oil seal cover. The crankshaft must be turned until they coincide.
Adjustment sequence
So, we aligned the mark on the camshaft with the bevel on its cover and checked that they matched the knees. shaft Additionally, you can check the correct installation using the distributor slider. Its contact protrusion should be directed towards the output of the high voltage wire of the 4th cylinder.
If all marks match, you can begin checking and adjusting.
The procedure for adjusting the valves of the VAZ-2103 is given in the table:
The procedure for adjusting the valve mechanism of the VAZ “Classic”
| Knee rotation angle. shaft | Adjustable valves |
| 8, 6 | |
| 180 | 4, 7 |
| 360 | 1, 3 |
| 540 | 5, 2 |
Check and adjustment
The table shows that after installation in the 4th cylinder TDC, the 8th and 6th valves are checked and adjusted. That is:
- We are looking for the 8th valve. To do this, we count from the camshaft drive gear. shaft, that is, from the front of the engine. It turns out that valve 8 is the last;
- We install the dipstick between the rocker and the camshaft cam. With a normal gap, it should fit between them with a slight interference, that is, there should be a small but noticeable resistance;
- If the measuring plate does not fit, or vice versa, does not experience any resistance, then adjustment is performed;
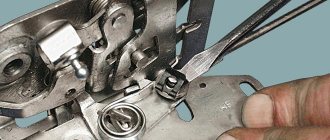
- On the side of the rocker there is a 17 wrench nut, which is screwed onto a bolt with a 13 head. This bolt allows for adjustment, and the nut prevents unauthorized unscrewing of the adjusting element. To adjust, loosen the nut by 17, holding the bolt with a second wrench. Then we rotate this bolt, which allows us to change its length, and as a result, the gap between it and the lever. And since the rocker is located on the axis, the gap on its other side will change. By rotating the bolt, we achieve the required clearance (the feeler gauge moves with force), hold it in this position and tighten it with a nut.
- We check the correctness of the adjustment. If, when tightening the locknut, the bolt still moves and the gap is broken, repeat the adjustment steps.
- We move on to valve 6 and do the same thing - check the gap, adjust if necessary and check again.
This described the procedure for adjusting the VAZ-2105 valves using the example of one crankshaft position and two valves . But there are still 6 valves left and, according to the table, 3 crankshaft positions.
To adjust the next two valves - the 4th and 7th, you need to turn the knees. shaft by 180 degrees, which will correspond to TDC of the 3rd cylinder. At the same time, it will be inconvenient to control the rotation angle along it. This is where a marker comes in handy. The fact is that 180 degrees. The rotation of the crankshaft corresponds to the rotation angle of the distributor slider by 90 degrees. That is, on the end of the housing you can put 4 marks spaced at the same distance around the circumference, starting from the zero position (TDC of the 4th cylinder).
And then, using the existing marks, we first set the crankshaft angle to 180 degrees. (check and adjust the 4th and 7th valves), then 360 degrees. (1st and 3rd valves) and 540 deg. (5th and 2nd).
After all the adjustment work, we install the removed elements on the engine.
Replacing the valve cover gasket
The need to dismantle the cylinder head cover arises in the following situations:
- when tensioning the chain in the engine;
- when replacing the valve cover gasket;
- when adjusting valves;
- when replacing other engine parts.
The process is simple and will not take much time with minimal plumbing skills. To do this you will need:
- heads for 8 and 10;
- extension for keys;
- crank or ratchet;
- pliers.
Valve cover removal is carried out using a minimal set of tools
Valve cover gasket replacement procedure
The valve cover gasket is changed as follows:
- Unscrew the three nuts and remove the cover from the metal air filter housing.
- Remove the air filter from the housing.
- Unscrew the four nuts securing the filter housing to the top of the carburetor.
When replacing the valve cover gasket, the air filter housing must be removed.
- Disconnect the hose leading from the breather to the air intake.
- We dismantle the carburetor damper drive rod by lifting it up and slightly moving it to the side. First remove the retaining ring (if it is provided for in the design).
- Loosen the nut and disconnect the air damper (choke) drive.
- Use pliers to slightly release the cable clamp.
- We remove the air damper drive cable.
To access the valve cover, you must remove the choke cable
- Unscrew the eight nuts securing the valve cover.
The valve cover is installed on eight studs and secured with nuts through special metal spacers
- Carefully remove the cover from the studs, having previously determined the position when it can be easily removed.
- Remove the remaining gasket on the cover and cylinder head.
- We carefully wipe the seats with a rag.
- We install a new gasket on the studs.
When installing a new gasket, it is not necessary to use sealant
After replacing the gasket, assembly is performed in the reverse order.
Video - Adjusting valves VAZ 2101-06
On absolutely any classic engine, including the VAZ 2106, the thermal valve clearances must be adjusted from time to time. If this is not done, then over time some valves may be clamped, or, on the contrary, the gap will be too large and they will knock. To avoid this, adjustments must be made in a timely manner. To begin with, I will give a list of tools that will be needed to complete this work with the VAZ 2106.
- Open-end wrench 13
- 17 open-end wrench
- A set of probes, or rather, we need exactly one probe, 0.15 mm thick
- And also a list of tools needed to remove the valve cover
Useful tips
Particular attention should be paid to the timing chain before adjusting the valves. The chain must be installed correctly.
Traffic warning signs. You can find out what these signs are on our website.
This article contains a rating of DVRs with two cameras.
Here you can read how to make panel tuning for a VAZ 2114.
The degree of tension should be carefully monitored.
An uneven knocking sound in the area of the upper part of the valve cover is evidence that the thermal clearances of the valves are increased and their adjustment is necessary. To adjust and measure the gap, it is necessary to use special feeler gauges aimed at adjusting classic VAZ engines.
These probes are wider. Standard feeler gauges are quite narrow and are not able to cover the entire width of the gap in the area of the pressure arms and camshaft cams. This makes it impossible to determine the correct gap size.
In most cases, the cover accompanying the dipstick contains a valve adjustment diagram. It is presented and designed in the form of a table. A well-tuned engine on a VAZ model 2106 is a fairly reliable design.
Adjusted valves reduce engine noise, ensure maximum performance and fuel efficiency. To achieve and maintain the maximum performance indicators specified by the manufacturer, adjustments must be made at a preferable frequency of 15 thousand kilometers traveled.
Step-by-step guide to adjusting valve clearances on a VAZ 2106
Before starting this work, it is worth considering that the car engine must be cold, that is, its temperature should be as close to room temperature as possible. It is also worth noting that the timing chain tension should be normal.
The first step is to remove the valve cover. After this, align the crankshaft and camshaft pulley according to the marks. If the chain was put on correctly, then the marks should match, but it’s still better to check it again. So, the mark on the crankshaft pulley should match the long mark on the front engine cover. This is how everything looks visually:
I specially made it closer so that it could be seen better:
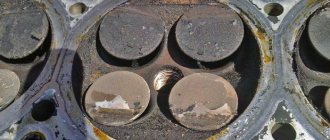
Now we look at the camshaft sprocket and there, too, the mark on the gear should coincide with the protrusion on the cover. The photo below shows everything:
With this position of the crankshaft and camshaft, the piston of the fourth cylinder is at top dead center (TDC). It is at this moment that it is necessary to adjust the clearance of the 6th and 8th valves. If this is your first time, keep in mind that the valve numbers are counted from the left side, that is, from the front of the engine. To understand which valves need to be adjusted in this position, I will show you everything, literally:
Now we take a feeler gauge 0.15 mm thick and insert it between the rocker and the camshaft; the photo below shows all this more clearly using the example of the 8th valve:
If the feeler gauge passes without effort, then the gap is too large and needs to be made smaller. If, on the contrary, the dipstick does not pass between the rocker and the camshaft of the VAZ 2106, then the gap must be reduced to 0.15 mm. The gaps are adjusted using an adjusting bolt and a control nut as follows. First, slightly loosen the locking nut with a 17 wrench, and with a 13 wrench we set the required gap by unscrewing it or, on the contrary, tightening it.
Once you have achieved the required clearance with the adjusting bolt, you can tighten the locknut. But it is worth considering that during tightening the clearance may decrease, so check the clearance after tightening the nut and adjust again if necessary.
The remaining valves are adjusted in exactly the same way, but in a strictly defined sequence, which I will write about in detail below.
Freeing up work space
You need to understand that you won’t immediately remove the valve cover, you need to get to it.
Using a size 8 wrench, unscrew the three bolts and remove the air filter cover, and then remove the filter element.
Disconnect all the hoses that go to the air filter.
Using a size 8 wrench, unscrew the four bolts securing the air filter housing to the carburetor and finally remove the air filter.
Go ahead.
Using the same key number 8, disconnect the choke cable.
Disconnect the washer spring, and then the gas pedal linkage itself.
Then we remove the distributor cover and move the high-voltage wire harnesses to the side so that it is convenient to work.
We take out the oil dipstick, while inserting a clean rag into the hole to prevent dirt from getting in.
Now we can freely make the adjustments we need.
The procedure for adjusting valve clearances on a VAZ 2106
The valves are regulated in a strictly defined sequence, as mentioned above. Below you will find data on how much you need to turn the crankshaft (in degrees) to adjust a particular valve:
- Matching marks (initial position) - 6th and 8th valve.
- Rotate the crankshaft 180 degrees - 4th and 7th valves.
- 360 degree rotation - 1st and 3rd valves
- Shaft position rotated 540 degrees - 5th and 2nd valve.
For convenience, you can put your marks on the crankshaft pulley, that is, divide it into two parts, making another mark opposite the factory one.
After completing this VAZ 2106 maintenance procedure, we replace all the removed parts in the reverse order of removal. If you have any questions, ask below in the comments, maybe I can help!