Any car with a manual transmission needs to have its clutch replaced regularly. Replacing the clutch yourself is not particularly difficult if you have the necessary equipment and you know the procedure. The mileage of the disc is 70–150 thousand kilometers and depends on the operating conditions of the vehicle. Other clutch parts are changed as needed. After reading the article, you will learn how to change the clutch without going to a car service center.
Equipment and tools required for work
Clutch alignment guide
To work you will need:
- pit, overpass, lift or jack;
- a set of open-end and socket wrenches;
- mount;
- winch;
- input shaft of the gearbox (manual transmission) or a special mandrel corresponding to the type of gearbox;
- brake fluid (for vehicles with a hydraulic clutch);
- extension cord with carrying lamp;
- assistant.
Clutch replacement
Complete replacement of the clutch kit involves the following procedure:
- removal and installation of manual transmission;
- replacement:
- disk;
- baskets;
- master and slave cylinders (if any);
- cable;
- release bearing.
Removing and installing the box
Technologies for removing and installing manual transmissions on cars with rear-wheel drive and front-wheel drive are different. On rear-wheel drive vehicles, it is necessary to disconnect the clutch connecting the manual transmission to the driveshaft. On front-wheel drive vehicles, you will need to remove the drive shafts and insert plugs in their place. After this, disconnect the cables or links of the gear selection device, unscrew the fastening nuts, then remove the gearbox input shaft from the bearing in the engine flywheel.
Be sure to check the condition of the gear selector seal. Oil stains in the area of the rod indicate oil seal wear.
When installing, it is necessary to rotate the box shaft so that it fits into the flywheel splines. When removing or installing a manual transmission on vehicles with all-wheel drive or a large engine capacity, use a winch. After installing the manual transmission on the car, it is necessary to adjust the length of the rod that presses the fork.
How does a chainsaw engine work?
The devices released in the near future have a single-cylinder, two-stroke, carburetor-type engine. Or rather, how to unscrew the clutch cup on a stihl. How to remove the shaft on a trimmer. It contains several devices that work harmoniously. Replacing the clutch on a lawn mower. hd. #clutches, #how to remove the clutch. Main components of the motor:
- Flywheel;
- coupling;
- Incendiary module;
- Muffler;
- Mounting sleeve.
The engine installed in the saw operates at a frequency of 13.5 thousand revolutions/minute, and therefore requires treatment with high-quality oil. A high level of system cooling is required during operation. The engine of the unit is equipped with a cooling system that supplies air to cool the systems.
Brushcutter repair and review.
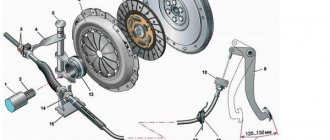
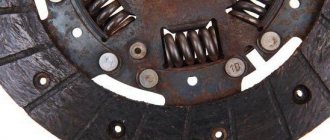
Replacing the disk and basket
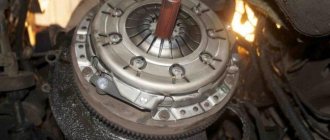
Replacing the clutch disc is done as follows. Unscrew the basket mounting bolts, then remove all parts from the flywheel. There should be no traces of oil on the flywheel or driven disk surface. If there are marks, it is necessary to check the condition of the gearbox oil seal, otherwise the oil leak will continue, which will reduce the service life of the disc. Droplets of oil falling on the surface of the lining or driven disc damage them. If the condition of the oil seal is unsatisfactory, replace it. If the surface of the driven disk is covered with deep scratches or cracks, change the basket.
Wipe with a rag, then degrease the surface of the flywheel and the basket driven disk with gasoline. Insert the disc into the basket, then slide both parts onto the manual transmission input shaft or mandrel, and then insert into the hole in the flywheel. When the mandrel reaches the stop, guide the parts along it to the flywheel and screw the basket with standard bolts. Pull out and then reinsert the mandrel a few times to make sure the disc is seated straight. If everything is normal, insert the mandrel and tighten the bolts with a force of 2.5–3.5 kgf-m. More precisely, the force is indicated in the repair instructions for your machine. This completes the replacement of the clutch disc. Replacing the clutch basket is done in the same way. The maximum mileage of the basket is 150–250 thousand kilometers and depends on many factors.
Remember, replacing a clutch disc is a responsible operation, so do not perform it in a hurry or while intoxicated.
Vibration after replacing the clutch appears due to improper alignment of the disc or weak tension of the basket. If this happens, you will need to remove and reinstall the drive and cage.
How to remove
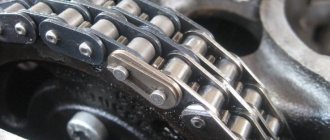
The drive sprocket also serves as a drum. The coil on the trimmer has stopped rotating in order to remove it. And if it’s behind the clutch cup. One of the main reasons for the breakdown of this block is the grinding of the sprocket teeth. In a solid drum version, the chain may cut through the sprocket during operation. This mechanism requires replacement. If the drum has a replaceable crown, it must be removed and replaced during maintenance. After which the drum can continue to operate.
When there is a need for repairs, you should seek help from a service center where experienced specialists work. But if there is no such thing nearby, the question arises - how to remove the clutch without the help of others? If you have the necessary set of tools, you can easily implement your plans. Of course, there are some differences in models from different companies, but the disassembly scheme remains the same:
- First, remove the chain brake cover by turning the lever. Lightly unscrew the nuts to release the tension on the chain. After loosening, you can completely unscrew the nuts and remove the cover;
- The chain and guide bar are disassembled, as well as the mechanism is cleaned of dirt;
- The cylinder head spark plug is turned out and the piston is fixed. To do this, the crankshaft must be rotated until the exhaust port is blocked, and then a piece of rope is placed in the cylinder to lock the piston. After completion of the work, the rope is removed from the mechanism;
- The nuts on the clutch are unscrewed using the special wrench included in the kit. In this mechanism they are made with a left-hand thread, and this must be taken into account when dismantling. After this, the mechanism is disassembled and all its parts are inspected for damage. Although I already have it on my trimmer in order to remove the clutch assembly once as in the photo. I hope my tips on how to remove the mowing head on the Black&Decker GL716 trimmer How to replace. Worn parts must be removed and replaced with new ones.
After repairs and replacement of parts, it is necessary to reassemble in the reverse order. The disassembly process is presented in more detail in the video.
In order to independently repair such chainsaws as Shtil, Husqvarna, Partner, Goodluck, you need to know some of the features of the models. For example, some types of saws have a washer installed (between the drive sprocket cup and the motor). During assembly, it must be installed in its original place.
If the model is equipped with a special spring that transmits rotation to the pump drive, then its correct installation after repair is extremely important. Otherwise, the device may be seriously damaged. After preventive and repair work, it is necessary to check whether the mechanisms are working properly.
Replacing cylinders
- Replacing the clutch master cylinder is necessary if installing new O-rings does not improve system performance.
- Replacing the clutch slave cylinder is necessary if brake fluid continues to leak even after installing new seals.
b - working cylinder pusher
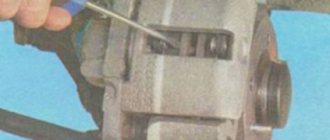
To remove the slave cylinder, remove the spring that returns the fork when the pedal is released. Next, remove the 2 nuts that secure the slave cylinder to the transmission housing. Holding the working cylinder suspended, unscrew the rubber hose that fits it.
To avoid brake fluid leakage, immediately screw the new slave cylinder to the hose. To remove the master cylinder, pump out all the fluid from the reservoir. Unscrew the fitting with the copper tube that goes into the cylinder and close it with a rubber plug to prevent brake fluid from leaking out. Move the tube to the side so it is out of the way, then unscrew the two nuts securing the master cylinder to the car body. Pull towards you and unclip the joint to which the pedal is connected. Pull out the pin and disconnect the cylinder from the pedal. Install the master and slave cylinders in the reverse order. Don't forget to adjust the length of the rod that pushes the clutch fork.
Master cylinder
After installing new cylinders, pour new brake fluid into the reservoir and be sure to bleed the clutch. To do this, put a rubber tube on the valve and lower it into a transparent container, pour brake fluid into it, then ask him to smoothly press/release the pedal 4 times. After this, ask to press the pedal again and not let go without your command. When the assistant presses the pedal for the fifth time, unscrew the valve to drain the fluid. Then tighten the valve, and then ask an assistant to release the pedal. It is necessary to pump the clutch until you are sure that the fluid comes out without air. Add brake fluid to the reservoir in a timely manner so that the cylinder does not suck air. If the brake fluid level drops too much, re-bleeding will be required.
Chainsaw
The woodworking machine's clutch is centrifugal and automatically engages when the engine speed changes. If the speed is low, the elements of the mechanism are pressed against the shaft. Thus, the rotational motion is not transmitted to the sprocket. As the speed increases, the elements move apart and are pressed against the drum, thereby causing the chain to rotate.
A characteristic feature of this type of device is braking, where the chain slows down. This way it turns out to avoid some glitches. But still, this system is subject to enormous load, so it is necessary to systematically carry out preventive inspection and repair.
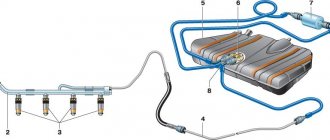
Replacing the cable
The cable replaced the hydraulic clutch. Higher reliability, low maintenance requirements and low price made the cable very popular. The cable must be changed if the mileage has exceeded 150 thousand kilometers or more than 10 years have passed since the previous replacement. Replacing the clutch cable is not difficult even for an inexperienced driver. Release the fork from the return spring, then remove the cable. After this, unpin the connection and remove the cable from the pedal. Pull out the pin, then remove the old cable through the interior. Install the new cable in the same way. This completes the replacement of the clutch cable. The cable must be changed if even slight damage is found on it. If this is not done, the cable will break while driving, making it impossible to change gears.
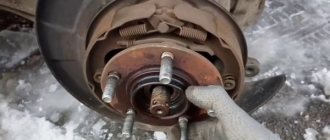
Replacing the release bearing
The mileage of the release bearing should not exceed 150 thousand kilometers. In addition, replacement of the release bearing will be required if the gears begin to shift indistinctly or if there is noise when pressing the clutch pedal. The procedure for replacing the release bearing is described in detail in the article replacing the release bearing.
Chainsaw clutch
The clutch of the device for processing wood is centrifugal and is activated automatically when the engine crankshaft speed changes. If the speed is low, then the elements of the mechanism are pressed against the shaft. This way the rotational motion is not transferred to the sprocket. As the speed increases, the elements spread out and are pressed against the drum, thereby causing the chain to spin.
A corresponding property of this type of device is braking when the chain slows down. This way you can avoid any damage. But still, this system is subjected to heavy load, so it is necessary to systematically carry out preventive inspection and repair.
Chainsaw
The woodworking machine's clutch is centrifugal and automatically engages when the engine speed changes. If the speed is low, the elements of the mechanism are pressed against the shaft. Thus, the rotational motion is not transmitted to the sprocket. As the speed increases, the elements move apart and are pressed against the drum, thereby causing the chain to rotate.
A characteristic feature of this type of device is braking, where the chain slows down. This way it turns out to avoid some glitches. But still, this system is subject to enormous load, so it is necessary to systematically carry out preventive inspection and repair.
Is it necessary to remove the gearbox?
Car enthusiasts on the forums warn that it is impossible to replace the basket or disc without dismantling the VAZ-2107 gearbox, but experts immediately correct it - it is not always necessary to remove the gearbox; in most cases, it is enough to slightly pull out the gearbox and do this so that the input shaft comes out unhindered clutch baskets.
This option is the most convenient, but only if you are sure what exactly the problem is. Auto mechanics, when getting to work, prefer to inspect the entire device; there will probably be shortcomings, which will also soon make themselves felt, and therefore the clutch will have to be changed again. A visual inspection should be carried out for the following components:
- clutch housing;
- oil seal suitable for the primary type gearbox shaft;
- crankshaft oil seal located at the rear.
Check the serviceability of the brake system; in the VAZ-2107 it often malfunctions.
Like a chainsaw engine
The newly released devices have a single-cylinder, two-stroke carburetor engine. It includes several mechanisms that work together. Main engine components:
- Flywheel;
- Connection;
- Incendiary module;
- Muffler;
- Bushing installation.
The motor installed in the saw operates at a frequency of 13.5 thousand revolutions per minute and therefore requires treatment with high-quality oil. During operation, a high level of cooling system is required. The engine of the unit is equipped with a cooling system that supplies air for the cooling systems.
Support the channel. turn off ( AdGuard\AdBlock ) the ad blocker. Please support our channel in any way you can.
how to unscrew the clutch on a chainsaw
for repair how to loosen the grip on the chainsaw for repair.
Design of the mechanism for connecting the internal combustion engine and transmission of a car
In order to carry out work with such an important unit for the machine, you need to know its structure and how it interacts with other transmission elements.
There are several types of automobile clutch, which differ in different ways:
- according to the nature of friction, it can be dry, that is, the clutch basket and friction disc work in an air environment, and wet - when the clutch elements are immersed in an oil bath;
- By the number of driven or friction disks, single-, double- or multi-disk devices are distinguished;
- These units are distinguished by the drive with which they are controlled - this is a mechanical, hydraulic, pneumatic or combined method of controlling the mechanism.
The most common is a dry friction single-disc mechanism connecting the gearbox to the engine, which is installed on passenger cars with a manual transmission.
Air blockage
If air gets into the cooling system, a pneumatic plug is formed, due to which antifreeze simply does not circulate through the radiator. Mostly this occurs when small holes appear in the pipes or in the radiator itself (air is “sucked in” through them). In this case, antifreeze almost immediately boils in the expansion tank after starting the engine.
Repair involves eliminating the hole; the easiest way to find it is through a thorough inspection of the cooling system with the engine running. It is necessary to find exactly where the liquid is leaking.