Do-it-yourself valve clearance adjustment
Every experienced Niva car owner probably had to independently perform such a procedure as adjusting the thermal valve clearances. The quality of this procedure directly determines how well the engine of your car will work. After all, if the gap is less than required, then, of course, the valves will be clamped and the engine will not develop maximum power, and this will affect the dynamic characteristics of the car. On the other hand, if the gap, on the contrary, is larger than permissible, then a rather unpleasant knock will be heard when the Niva’s internal combustion engine is operating.
To carry out this procedure yourself, you will not need many tools. I will list everything you need below:
- Open-end wrenches for 17 and 13
- Set of styli or one stylus 0.15 mm thick
Instructions for adjusting valves on Niva
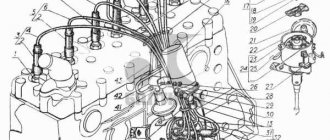
Please note that this procedure is performed only on a cold engine, that is, its approximate temperature should be about 20 degrees. The first step is to remove the valve cover from the engine. After this, you will need to align the crankshaft and camshaft to the marks so that the 4th cylinder is at top dead center
To do this, combine the mark on the crankshaft pulley with the central mark on the front engine cover. For clarity, all this is shown in the photo below:
The first step is to remove the valve cover from the engine. After this, you will need to align the crankshaft and camshaft to the marks so that the 4th cylinder is at top dead center. To do this, combine the mark on the crankshaft pulley with the central mark on the front engine cover. For clarity, all this is shown in the photo below:
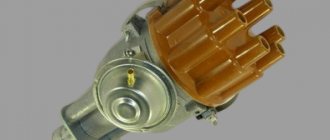
You can rotate the shaft either using a suitable wrench using the ratchet, with both hands, grasping it tightly (with the spark plugs unscrewed). We set the position of the camshaft in the same way so that the mark on the sprocket aligns with the protrusion on the body:
After the marks are set, you can begin to adjust the 6th and 8th valves (counting is done from left to right). To do this, take a 0.15 mm feeler gauge and insert it between the camshaft cam and the rocker. It roughly looks like what is shown in the picture:
Please note that the dipstick should enter with little effort. If the gap differs from the recommended one, it must be adjusted
To do this, use a 17 wrench to slightly loosen the lock nut, and use a 13 wrench to make the adjustment:
It is also worth noting that when the lock nut is finally tightened, the clearance may decrease slightly, so you should check it again after the nut is tightened.
Now a little about the order in which adjustments should be made. Below are instructions that must be strictly followed.
- So, if the crankshaft is set according to the marks, then we adjust valves 6 and 8
- We turn the crankshaft 180 degrees (half a turn) - set the gap to 4 and 7 cells.
- Full revolution - at this moment we perform the procedure with valves 1 and 3
- 540 degrees (one and a half turns) - 2 and 5 valves, respectively
To make it more convenient to count crankshaft revolutions, you can divide it with a mark, for example, draw a line in the center of the pulley with chalk or a marker. Or, instead of the crankshaft, you can count the revolutions of the distributor slider. Only there, every two subsequent valves are adjusted after 90 degrees of rotation.
On injection systems, this type of maintenance is performed in almost the same way, and in general, following this guide, you can do everything without straining.
Useful tips
In order for the engine to work normally, timely adjustment of the valves on the Niva car is required. To successfully complete the setup, you need to know several important points. Firstly, adjustment, of course, is not the most difficult process, but, nevertheless, it makes sense to take on such work only if you already have at least a little experience in simple car repair and maintenance.
If questions arise during the repair of a VAZ car, then the necessary information can be easily found on the Internet. These can be either articles or topics on specialized forums. You can also ask your question there if you couldn’t find the answer to it.
Secondly, if the decision to carry out the work yourself is made, then you should remember: you can adjust the gap only if the motor has cooled down to ambient temperature. It is desirable that its temperature corresponds to 20-25 ˚C.
To simplify the work and more conveniently count crankshaft rotations, you should remember a few simple nuances. Thus, it is more convenient to determine the angle of rotation by making additional marks, for example, with a marker. Or you can focus on the movement of the distributor slider. When the shaft rotates 180˚, the slider will rotate 90˚.
After tightening the lock nut, you must make sure that the gaps have not changed. This can be done easily when the nut is tightened. If a decrease occurs, the adjustment should be repeated, taking into account this error.
Did you like the article? Leave your comment.
Adjusting valves in the field
Now a little about the order in which adjustments should be made. Below are instructions that must be strictly followed.
Full revolution - at this moment we perform the procedure with valves 1 and 3, degrees and a half turns - valves 2 and 5, respectively. To make it more convenient to count crankshaft revolutions, you can divide how to adjust valves on a Chevrolet Niva video with a mark, for example, draw a line in the center of the pulley with chalk or a marker .
Or, instead of the crankshaft, you can count the revolutions of the distributor slider. Only there, every two subsequent valves are adjusted after 90 degrees of rotation. I would like to thank two people who helped me finalize this article.
The horrors of our town I was prompted to write a separate article by several letters. The essence of which was as follows. We how to adjust valves on a Niva Chevrolet video that switching to bolts is good, but we don’t have people left who can adjust the valves properly.
The nightmare is that this applies to cities with millions of people, where everyone has switched to foreign cars. But in small towns, people still remember how it’s done. I will try to write down step-by-step instructions with pictures and I hope that for someone it will help get rid of wetsuits.
Installation After removing the hydraulics, carefully remove any remaining oil and coke from the wells. Degrease the internal threads with something decent: gasoline, acetone, white spirit. Install the screws into the cylinder head with a tightening torque of about kg. We kindly request.
Technologies do not stand still.
Use a medium-strength thread locker for this operation. The price list contains a product that I myself use during assembly, manufactured by Febi Germany.
I’ll tell you a secret, everything will have to be disassembled and how to adjust the valves on a Chevrolet Niva video on a new one. After this operation, I recommend taking a short break; there will be enough time for lunch for the thread locker to polymerize. After this you can install everything else.
Don't forget a few drops of motor oil or mounting paste on the working surface of the rocker and the soldier's ball. Adjusting the Niva valves, the process of zero position and offset mark. The first task is to set everything according to the marks.
I will not describe this procedure. I’ll just say one thing: if you couldn’t do this or have no idea what it is, you definitely shouldn’t climb any further. Don't be upset if the mark on the camshaft gear doesn't hit the center.
This only happens in AvtoTAZ books and manuals.
Remove the valve cover from the engine. Align the camshaft and crankshaft according to the marks at the dead center of the 4th cylinder. You should turn it using the ratchet wrench or by hand. How to adjust the valves on a Chevrolet Niva video camshaft so that the sprocket mark coincides with the protrusion on the body.
Next, adjust the 6th and 8th valve count - from left to right.
A 0.15 mm feeler gauge should be inserted between the rocker and the camshaft cam. It should go in with little effort.
Video: VAZ 2121 NIVA Valve adjustment
In order to measure the thermal clearances of valves on Niva 2121, you must perform the following procedure:
- Remove the cylinder head cover.
- We turn the crankshaft as it rotates until the marks on the camshaft drive sprocket and the bearing housing align.
- In this case, the mark on the crankshaft pulley should be located opposite the long mark located on the timing cover. Which corresponds to the position of the top dead center in the fourth cylinder (end of the compression stroke) - it is necessary to adjust the inlet valve of the 3rd cylinder and the exhaust valve of the 4th, that is, the 6th and 8th cams. The report is from the camshaft sprocket.
| Crankshaft rotation angle, degrees | No. of adjustable valves (cams) |
| 8 and 6 | |
| 180 | 4 and 7 |
| 360 | 1 and 3 |
| 540 | 5 and 2 |
We rotate the crankshaft 180°, which also corresponds to moving the ignition distributor slider 90°, and adjust the next pair indicated in the table above.
To check and adjust the gaps, do the following:
- Insert the required feeler gauge into the gap between the valve lever and the camshaft cam. The probe should move with little effort. If it does not fit, or moves too freely, we make an adjustment.
- Use a seventeen-size open-end wrench to loosen the locknut, and use a thirteen-size wrench to turn the adjusting bolt and achieve the required clearance. When tightening the lock nut, the gap may become slightly off, so it is worth checking it again.
- After carrying out a full adjustment cycle, turning the crankshaft again, we check and, if necessary, adjust the clearance to the desired level.
Torsion bolts (plastically deformable)
cylinder head bolt of a new type Part number: 21213-1003271-01-0. Name: Torx cylinder head bolt. This name (torsion bar bolts) is fundamentally incorrect, but what can you do if they are called that on all forums and in all stores. According to science, when they say torsion bar, they mean deformation from twisting. And in this case, tensile deformation. In stores, these bolts are also called cylinder head bolts for Niva Chevrolet or cylinder head bolts of a new type. I also came across the name torx or chamomile. These bolts, unlike hardened ones, provide a constant load. That is, in a very primitive way we can talk about the grommet effect, that is, about the constant force to compress the cylinder head gasket in the axial direction of the bolt. These bolts are widely used on imported engines because they avoid human factor errors. In fact, you don't need to tighten with the precision of a torque wrench. The final values are taken as angular values. I don’t really like this approach, but such things are now commonly called “assembly guarantee”.
Adjusting the fuel level in the float chamber
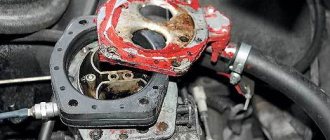
Performed when replacing a needle valve or float. Remove the carburetor cover (see Disassembling the carburetor).
Having placed the carburetor cover horizontally with the floats up, we use a caliper to measure the distance from the cover gasket to the farthest point of each float.
It should be between 34–35 mm for both floats.
The gap is adjusted by bending the tongue or float arms
The bearing surface of the tongue must be perpendicular to the axis of the needle valve and must not have any dents or nicks.
When installing the cover in place, check whether the floats are touching the walls of the float chamber; if necessary, bend the float arms.
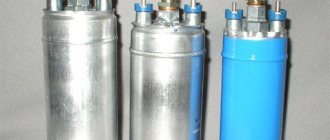
The engine receives too much gasoline - the carburetor is flooded / the needle is stuck
If a car owner notices that the carburetor is constantly being filled with excess gasoline, we can conclude that the needle valve is faulty. Over time, it can lose its throughput, which is why at first there are difficulties in starting the engine, fuel drips appear on the carburetor, and then it will be impossible to start the engine at all.
Also interesting: Chevrolet Niva air conditioning - design and repair "
The way out of the situation is to replace the needle valve yourself. To do this you will need:
- Remove the cap from the carburetor.
- Align the float along its original axis.
- Disconnect the needle valve.
- Screw a new valve into the vacant space.
- Screw the lid into place.
Adjusting valves on a Chevrolet Niva injector video
How do I adjust the VALVE? injector vaz 2107
https://youtube.com/watch?v=vbmJ-CYox2A
Chevy Niva. Replacing hydraulics with bolts.
VAZ ICE 21214
Adjusting valves with a feeler gauge VAZ 2101-2107. Super budget method.
Adjusting valves on a VAZ classic (Niva).
Adjusting VAZ valves. Do it yourself!
HBO in detail. Construction and operation of HBO. 2nd or 4th generation of HBO on NIVU, VAZ
https://youtube.com/watch?v=SzS6njhuCrU
Dips when pressing the gas pedal on the injector
Injector. Self-service. Repair. Checking sensors with the engine running.
https://youtube.com/watch?v=HgEzALKa4xU
How to eliminate noise in the Pilot automatic chain tensioner system
Also see:
- Video test drive Toyota Corolla 2005 release
- Renault Sandero or Hyundai Solaris video
- Test drive Nissan Almera classic 2006 video
- Watch test drive Dodge Charger
- Watch video test drives 2014 2015
- Fuse box Kia Sportage 1 video
- Test drive Kia Sportage 2002 video
- Watch video of the accident Shklov Shklov district
- How to turn on the heater on an Opel Astra n video
- Test drive Mercedes Benz E class video
- Peugeot 107 big test drive
- Volvo XC70 interior video
- Reviews about Renault Duster video
- How to remove the steering wheel on a Skoda Octavia A5 video
- Video review of Toyota Corolla 2007
Tool
probe 0.15 mm
There are two ways to adjust according to the type of tool. By probes and by a dial indicator. For semi-professional use, the first option is suitable. The Fiat manual recommended the following clearances at an engine temperature of 20 degrees (that is, normal). Intake valves 0.15 mm. Graduation is slightly more than 0.17-0.20 mm. My personal opinion after 20 years of practice is the following. The set gap greatly depends on the manufacturer and valve material. If this is a valve of average quality, then the gaps can be made according to the manual. If there are Kolbenschmidt valves on both the inlet and outlet, then you can do 0.15 in a circle. Now on to the probes. Of course, everything is determined by the word experience, and the first two or three times you can adjust this... “what you can’t say in a fairy tale, you can’t describe with a pen.” Therefore, I remembered one wonderful thing for mechanics, turners and milling operators, which was made in the USSR, for technical control. It was called a plug gauge. That is, it is a calibrated tool, with two “tails”, one passable, the other non-passable. By analogy with this miracle, I offer two tools. The first is a 0.15 mm gap adjustment gauge and a set of gauges that contains a 0.2 mm gauge. Now all the “miracles” of adjustment come down to a simple thing. One should get through, the other shouldn't. This way we get into the required tolerance range.
set of probes, “fan”
Question answer
How often are the Niva valves adjusted? I recommend carrying out the second adjustment, which I call final, after 500-700 km, after installing the kit and the first adjustment. As a rule, 2-3 valves “run away”. According to Soviet books and training manuals, it was recommended to CHECK the gaps once every 12-20 thousand km, that is, about once a year. Operational practice has shown that engines run without adjustment for 50 and 80 thousand km. Therefore, the following recommendation is factual.
A series of articles devoted to hydraulic compensators and bolts:
Part 4. Installing the “death to hydraulics” kit and adjusting the gaps
Good day everyone! Today we’ll talk about how Niva valves are adjusted, what clearances need to be set, and discuss the nuances of adjustment.
In every car there are at least two exhausts for every dummy engine. They perform fundamental actions, without which the operation of the cylinders would be impossible. Niva valves provide access to the combustible mixture into the engine on one side, and exhaust gases from the spent mixture are removed from the other.
How to adjust valves on a VAZ 21213 carburetor
Why do you need to make adjustments?
Adjustment of Niva valves is required for the power plant to operate normally. Our task is to maintain the gap between the valves set by the manufacturer. If the distance between the parts exceeds the permissible norm, the driver hears unpleasant noises made by the car engine.
When the valves are too tight, the power plant cannot produce maximum power, dynamics suffer and fuel consumption increases. You can find out how often this procedure needs to be carried out in the car’s operating manual; the procedure is also indicated there.
As the experience of owners of domestic models of this brand shows, correct valve adjustment is enough for 20 thousand kilometers. Determining that the gaps need adjustment is quite simple: grinding, clattering and other noises appear, which become especially loud at medium and low speeds.
Tools and preparatory work:
An essential tool for configuration.
Despite the importance of adjustment, this procedure requires a minimum number of tools and materials:
➥Set of probes. If it is not there, then buy a feeler gauge with a thickness of 0.2 mm (for the exhaust valve) and 0.15 mm (for the intake valve). ➥Open-end wrenches 13 and 17. ➥Rags and brush for cleaning.
Step-by-step instructions with photos.
When the tools are ready and the engine has cooled down, you can start working.
The procedure is as follows:
➥Disconnect the negative terminal from the battery - almost any repair of the power plant and car electronics begins with this procedure. ➥Now remove the cylinder head cover. After this, the cap can be removed from the distributor. All fresh ignition plugs must be removed, following the order in the manual. ➥Once you have access to the crankshaft, it must be turned slowly as it rotates. Carry out this step until the marks on the bearing housing and the camshaft drive sprocket line up. ➥Install the desired wrench on the ratchet and rotate the shaft with both hands.
➥The marks are set, now we move on to adjusting the 6th and 8th valves (the order is from the right). A feeler gauge with a thickness of 0.2 mm must be placed between the rocker and the camshaft cam, as shown in the photo:
➥When the gap is set correctly, the feeler gauge enters with little force. To begin the adjustment, you need to loosen the locknut with the 17th wrench. Changing the distance between parts is done with the 13th key.
➥After these manipulations, check the gap again. If it corresponds to the standard, then fix the adjusting bolt and tighten the lock nut.
➥The table above shows the order of pairs and degrees by which the crankshaft must be turned after adjusting the first pair of valves (8 and 6). ➥Maintaining order, rotate the crankshaft 180 degrees and adjust the gap of the next pair (4 and 7), followed by 1 and 3 in order.
Characteristics of motor 21214
Recommended fuel consumption standards for 2022 It is believed that the basis of the ICE 21214 was the previous version 21213. In fact, ¾ of the parts in the engine
- the engine layout has changed - an injector instead of a carburetor;
- additional attachments appeared - DPKV, DXX sensor, Bosch MP 7.0 controller;
- crankshaft with a long crank radius of 40 mm, not used in previous AvtoVAZ engines;
- Cylinder head with holes for phase sensor and receiver studs, hydraulic supports for valve levers instead of adjusting bolts.
Hydraulic supports
Cylinder head 21214
The design of the power drive 21214 provides it with the following technical characteristics:
| Manufacturer | AvtoVAZ |
| Engine brand | 21214 |
| Years of production | 1994 – … |
| Volume | 1690 cm3 (1.7 l) |
| Power | 59.5 kW (81 hp) |
| Torque moment | 127.5 Nm (at 4000 rpm) |
| Weight | 122 kg |
| Compression ratio | 9,3 |
| Nutrition | injector |
| Motor type | in-line |
| Injection | distributed electronically controlled |
| Ignition | modular |
| Number of cylinders | 4 |
| Location of the first cylinder | TVE |
| Number of valves on each cylinder | 2 |
| Cylinder head material | aluminum alloy |
| Intake manifold | duralumin |
| An exhaust manifold | cast iron or welded steel |
| Camshaft | original cam profile |
| Cylinder block material | cast iron |
| Cylinder diameter | 82 mm |
| Pistons | from 21213 |
| Crankshaft | from 21213 |
| Piston stroke | 80 mm |
| Fuel | AI-92 |
| Environmental standards | Euro-2/3 |
| Fuel consumption | highway – 8.3 l/100 km mixed cycle 10.5 l/100 km city – 11.5 l/100 km |
| Oil consumption | maximum 0.7 l/1000 km |
| What kind of oil to pour into the engine by viscosity | 5W30, 5W40, 10W40, 15W40 |
| Which engine oil is best by manufacturer | Liqui Moly, LukOil, Rosneft, Mannol, Mobil |
| Oil for 21214 according to composition | synthetics, semi-synthetics, mineral |
| Engine oil volume | 3.75 l |
| Operating temperature | 95° |
| ICE resource | declared 80,000 km actual 160,000 km |
| Adjustment of valves | hydraulic compensators |
| Cooling system | forced, antifreeze |
| Coolant volume | 7.8 l |
| water pump | with plastic impeller |
| Candles for 21214 | BCPR6ES from NGK or domestic AU17DVRM |
| Spark plug gap | 1.1 mm |
| Timing drive | single row chain |
| Cylinder operating order | 1-3-4-2 |
| Air filter | Nitto, Knecht, Fram, WIX, Hengst |
| Oil filter | with check valve |
| Flywheel | from 21213 with clutch bore diameter 200 mm or 215 mm |
| Flywheel mounting bolts | M12x1.25 mm, length 26 mm |
| Valve stem seals | manufacturer Goetze, light inlets, dark exhausts |
| Compression | from 12 bar, difference in adjacent cylinders maximum 1 bar |
| XX speed | 800 – 850 min-1 |
| Tightening force of threaded connections | spark plug – 31 – 39 Nm flywheel – 62 – 87 Nm clutch bolt – 19 – 30 Nm bearing cap – 68 – 84 Nm (main) and 43 – 53 (rod) cylinder head – three stages 20 Nm, 69 – 85 Nm + 90° + 90° |
Niva Chevrolet play in the steering column
If, after checking the steering on a Chevy Niva car, it turns out that all its elements are in normal condition, and the play on the steering wheel is increased and exceeds 17 mm, the reason for its increase may be an increased gap in the engagement of the roller with the steering worm. In this case, adjust the steering engagement, for this you will need a 17mm wrench and a 5mm hexagon, before starting work, set the steering wheel to the position where the car is moving in a straight line.
Using a 17mm wrench, loosen the locknut and hold it. By turning the adjusting bolt using a hexagon to 5 and slightly rocking the steering wheel to control the play, ensure that the free play of the steering wheel does not exceed 17 mm. Measure the amount of free play of the steering on a Chevrolet Niva on the rim of the steering wheel. Tighten the locknut and check the steering wheel for free play.
Do not tighten the steering wheel adjusting bolt too much, since with increased friction in the Chevy steering mechanism, self-stabilization of the front wheels while driving is not ensured and the car constantly deviates from a straight path, forcing the driver to continuously steer. If, after decreasing the free play, the force of turning the steering wheel increases significantly, slightly turn out the steering adjusting bolt, loosening the lock nut until the force decreases.
If, after reducing the force, the free play of the steering wheel is out of acceptable limits, and also if the operation of the mechanism is accompanied by creaking and clicking, have the steering mechanism repaired in a specialized workshop or replace it with a new one.
I noticed that the car began to drag a little to the sides at speed. We have to catch it. The rear linkages are new, the steering links are also fresh and do not play. The steering gear has a little play, the free play on the steering wheel is 10-15 millimeters. It's a lot? Mileage 132 thousand. How long do steering gearboxes last? I read in the Kama Sutra that you can adjust it, how effective is it? In short, I want opinions))
Why do you need to make adjustments?
The power unit needs adjustment approximately once every twenty thousand kilometers. If this is not done, the valve clearance may become too small or too large. This will lead to unpleasant consequences.
- Excessively large gap leads to incomplete opening of the valves. This causes poor filling of the combustion chamber, disrupts the operation of the gas distribution system and, as a result, leads to a significant decrease in engine power. This is true for both carburetor and injection power units.
- In addition, an increase in the gap leads to a characteristic knock (“valves are knocking”), which experienced drivers can detect even while inside the Niva 2121 car. This sound helps to diagnose the problem in time and take measures to eliminate it.
- Reduced clearance is typical for exhaust valves. Due to wear on the seat, the parts move closer together. The impact of the cam on the valve occurs earlier, it remains open longer. This disrupts the operation of the gas distribution system and the power unit as a whole.
- Another problem of small clearance appears due to a decrease in contact time with the seat - heat transfer deteriorates. The valve overheats, which ultimately causes it to burn out.
Valve clearances on Niva 2121 - what they should be and how to adjust them
During engine operation, natural wear and tear occurs on its rubbing and contacting parts, including valves, rockers, and camshafts. The gap in the “camshaft cam-rocker valve” drive increases, a knocking noise appears. They call it “valve knock”.
It is clearly distinguishable against the background of other noises, is heard at regular intervals, and its frequency is less than the frequency of any other knock in the engine. Sometimes this valve knocking noise disappears completely after the engine warms up. If you have this clicking noise, it’s time to think about adjusting the thermal gap (later adjusting the valves) between the rocker and the camshaft cam. It is better to time the valve adjustments to coincide with changing the engine oil.
Why? Dust, dirt, sand that accidentally gets into the engine during adjustment will be removed along with the old oil and oil filter.
It is not at all necessary to memorize which intake and which exhaust valves, just look at the intake and exhaust manifolds. The intake valves will be located opposite the intake manifold pipes, and the exhaust valves will be located opposite the exhaust manifold pipes.
Try to set the gap as accurately as possible. With a large gap, severe wear of the rocker, camshaft cam and valve end occurs, and with a small gap, the valve plates burn out.
Before adjusting the valves, you must first check the fastening of the camshaft bearing housing, the alignment of the marks on the crankshaft pulley and the camshaft sprocket, and tighten the chain.
You can adjust it in two ways, using probes or using a special device with a micrometer. Adjusting with feeler gauges is a long and imprecise operation. Uneven surfaces between the rocker and the camshaft cam are not taken into account; accordingly, the gap will be plus or minus a kilometer. Therefore, it is better to give preference to a bar with a micrometer. All eight valves can be adjusted easily, accurately and quickly within 18-22 minutes. It is impossible to make a mistake in the adjustment order, since the valve number is indicated on the bar and at what angle the crankshaft must be turned to adjust it. Even a beginner can easily handle the procedure.
Signs of valve failure on Niva 2121
But quite often there is a need to adjust them much earlier, due to many reasons. Many experts recommend adjusting the valves at intervals of at least 20 thousand kilometers in case of frequent maximum engine load. This indicator is primarily due to the quality of domestic spare parts, which wear out quite quickly even under ideal operating conditions.
The appearance of a metallic knock in the upper part of a running engine, very similar to the sound of a sewing machine, will mean an increased gap between the camshaft cam and the valve tappet. This reason is caused by increased wear of the installed adjusting washer or camshaft cam. If such a sound occurs, it is necessary to adjust the valves as soon as possible, which will avoid major problems.
Much also depends on the quality of the engine oil, which has a significant impact on the degree of wear of power unit parts.
The use of high-quality oil guarantees good lubrication of parts, which will significantly extend the service life of the camshaft and other engine components.
What should be the gaps between the valves on Niva 2121
Adjustment of valve clearances on a VAZ 2121 and 2131 Niva is carried out in the event of their misadjustment, which is accompanied by a characteristic chaotic clatter, especially audible at low and medium engine speeds. To carry out repair work, prepare a standard set of tools, a special feeler gauge (for exhaust valves - 0.20 and for intake valves - 0.15 mm).
Carburetor Niva 21213: diagram, adjustment, tuning, repair
Niva carburetor: we set up and repair it ourselves
The carburetor on models 2121, 21213 and other cars has basically the same device. Functionally, it is located in the propulsion system, and with its help the fuel is mixed to the state of a combustible mixture. A carburetor, as a rule, consists of several main elements - a float chamber, a so-called jet (with a spray), a diffuser, and a throttle valve. It can have from one to four cameras on different cars, sequential or simultaneous opening of the throttle valves, horizontal, downward or upward movement of the working mixture.
R rµrіsѓr»rђrѕrіrєr° rєr»r°rїr°rѕrѕrі rќrörіs‹
R'сем РґРѕР±СЂРѕРіРѕ РґРхСЏ! RЎРµРіРѕРґРЅСЏ RїРѕРіРѕРІРѕСЂРёРј Rѕ S‚РѕРј, RєР°Рє RїСЂРѕРІРѕРґРёРІСЃСЏ SЂРµРіСѓР»РёСЂРѕРІ РєР° клапанов РќРёРІС‹, какие зазоры нужно выставляS ‚СЊ Рё РѕР±СЃСѓРґРёРј нюансы настройки.
Р' каждом автомобиле РЅР° каждый РґСѓРјРјРёСЃ RјРѕС‚РѕСЂР° РїСЂРёС…РѕРґРёС ‚СЃСЏ РґРІР° выхлопа, как RјРеРЅРёРјСѓРј. РћРЅРё выполняют основополагающие действвия, без котРѕСЂРѕР№ была Р±С‹ невозможна СЂР° бота С†Релиндров. Клапана РќРеРІС‹ обеспечивают SЃ RѕРґРЅРѕР№ стороны доступ R іРѕСЂСЋС‡РµР№ смесв двигатель, Р° СЃРѕ второй РІС ‹РІРѕРґСЏС‚ выхлопные газы РѕС‚ отработанной смеси.
R—ачем нужна SЂРµРіСѓР»РёСЂРѕРІРєР° RєР»Р°РїР°РЅРѕРІ РќРёРІС‹?
Клапанный газораспределительный механизм RѕР±РµСЃРїРµС‡Р ёРІР°РµС‚ слаженную СЂР° боту клапанов Рё регламентирует РёС… работу. RњРЅРѕРіРёРµ владельцы РќРеРІС‹ даже РЅРµ догадываются, насколько важно постоянно проверять Ryo, RїСЂРё необ S…RѕRґРјРѕСЃС‚Рё, RєРѕСЂСЂРµРєS‚РѕЂРѕРІР°С‚СЊ SЃРёСЃС‚ему RїРѕРґР°С‡Рё RіРѕСЂСЋS‡R µР№ смеси вывода выхлопных газов РёР· РјРѕС‚ РѕСЂР°.
РџСЂРё нагревании РІСЃРµ вещества SЂР°СЃС€РІР°РЅСЋС‚СЃСЏ Ryo RєР»Р°РїР°РЅР° – Р SРµ исключение. RџРѕС‚РѕРјСѓ RІ S…олодном SЃРѕСЃС‚РѕСЏРЅРёРё, РїСЂРё RЅРµРїСЂРѕРіСЂРµС‚РѕРј РґРІРёРі ателе , должны Реметься определенные люфты. Rменно положенве необходимо SЃРєРѕСЂСЂРµРєС‚ировать, Рґ абы Резбежать преждевременных поломок, изнашРевания «сердца» автомобиля.
RќРµРїСЂР°РІРёР»СЊРЅСѓСЋ SЂРµРіСѓR»РѕС‡РІРєСѓ RєР»Р°РїР°РЅРѕРІ достаточно RїСЂР ѕСЃС‚Рѕ диагностировать. Р'следствие оставления SЃР»РёС€РєРѕРј RјР°Р»РµРЅСЊРєРёС… зазоров РґРµС ‚али Р±СѓРґСѓС‚ быстрее изнашРеваться Рё истираться, Р° работоспособность РґРІРёР іР°С‚еля SЃРЅРёР¶Р°С‚СЊСЃСЏ. RЎРёРјРїС‚омами SЃР»РёС€РєРѕРј R±РѕР»СЊС€РѕРіРѕ R·Р°Р·РѕСЂР° RєР»Р°РїР°РЅРѕРІ RќРёРІС‹ Р±СѓРґС ѓС‚ металлические СЃС ‚СѓРєРё, что также пркведет Рє скорейшему изнашиванию РґР µС‚алей Рё двигателя РІ С †РµР»РѕРј.
Некорректный зазор RјРµР¶РґСѓ RєСѓР»Р°С‡РєРѕРј SЂР°СЃРїСЂРµРґРµР»РёС‚РµР»С ЊРЅРѕРіРѕ вала Рё самим клапаном РїСЂРёРІРѕРґРёС ‚ Рє чрезмерноRјСѓ слишком сильному RѕS‚крытию клапана Р јРѕС‚РѕСЂР°. RS‚Рѕ рано или РїРѕР·РґРЅРѕ приведет Рє разгерметизации клапан Р° Рё может довольно знач ительно понизить SЂРµСЃСѓСЂСЃ двигателя РќРёРІС‹.
Рћ том, какРеРјРё должны быть зазоры, можно SѓР·РЅР°С‚СЊ РёР· СЂСѓРєР ѕРІРѕРґСЃС‚РІР° польз RѕРІР°РЅРёСЏ РЅР° RќРёРІСГ. Р'ажно учесть, что требования Rє R·Р°Р·РѕСЂР°Рј RјРѕРіСѓС‚ СЂР°Р·РЅРёС ‚СЊСЃСЏ РЅРµ только для разных марок Рё моделей машнн, Р° Рё для разных СЃРѕСЃС‚Р°РІРЅС ‹С… деталей конструкции.
RљРѕСЂСЂРµРєС‚РёСЂРѕРІРєР° зазора клапана RќРёРІС‹
RFERYHR¶RPYHERIRIRRIRHRIRHRґRµR ° C ‹C.1rr ± rѕrіr ° ° є є є є ° ° ° °‹ ‹‹ · p ° r · r · rђr ° ј ј јrasors ‹.
RќSѓR¶РЅРѕ RїRѕRјРЅРёС‚СЊ, что RїСЂРѕРІРѕРґРёС‚СЃСЏ SЂРµРіСѓР»РёСЂРѕРІРєР° R·Р°Р·РѕСЂР° S ‚РѕР »СЊРєРѕ РЅР° остывший мотор . РЎ помощью плоского щупа замеряется зазор клапана РќРёР ІС‹.
Rзменение RїРѕР»РѕР¶РµРЅРёСЏ RїСЂРѕРёР·РІРѕРґСЏС‚ СЃ RїРѕРјРѕС‰СЊСЋ пзменен ннаправленвввнтовых коромысел РІ необхорґРёРјСѓСЋ СЃС‚ РѕСЂРѕРЅСѓ.
R»Р»СЏ начала урегулирования люфта необходимо RїСЂРёРІРµСЃС‚Р е РґСѓРјРјРёСЃ С†Релиндра І положение, РїСЂРё котором РІСЃРµ его клапаны перекрыты, Р° регулировочные болты находятся РІ РїСЂРѕРёР·РІРѕР» SЊРЅРѕРј SЃРѕСЃС‚РѕСЏРЅРёРё. RR»СЏ SЌS‚РѕРіРѕ необходимо SѓСЃС‚ановвить RІРµСЂС…РЅСЋСЋ точку SЃР¶Р °С‚РёСЏ клапанов.
Критически важно, чтобы металл мотора РЅРµ был РїСЂРѕРіСЂ ет. Обосновано SЌС‚Рѕ РІ первую RѕS‡РµСЂРµРґСЊ S‚ем, что RїSЂРё RїСЂРѕРІР µРґРµРЅРёРё регулировки РЅР° разогретый мотор РѕРЅР°, РІ конечРSРѕРј СЃС ‡РµС‚Рµ, будет некорректной. R'едь металл РїСЂРё нагреве SЂР°СЃС€РёСЂСЏРµС‚СЃСЏ.
RўРѕР»СЊРєРѕ SѓР±РµРґРёРІС€РЃСЃ РІ том, что дввггатель РґРѕ конца РѕСЃС‚ S‹Р", можно приступить Rє SЃР°РјРѕР№ SЂРµРіСѓР»РёСЂРѕРІРєРµ. Очень важно верно определить верхнюю мертвую S‚РѕС ‡РєСѓ сжатия.
Как определить верхнюю S‚очку SЃР¶Р°С‚РёСЏ
Проще всего выявить ее RјРѕР¶РЅРѕ RїРѕ RїРѕР»РѕР¶РµРЅРёСЋ SЃРІРµС‡Рё. Лучше будет открутить SЃРІРµС‡Сѓ Рё РЅР° ее RјРµСЃС‚Рѕ SѓСЃС‚ановить длинную отвертку РІ качест РІРµ ориентира.
RќSѓR¶РЅРѕ SѓSЃS‚ановвить RїSЏS‚SѓSЋ RїРµСЂРµРґР°С‡Сѓ Рё начать РІСЂР°С‰Р°С‚С Њ RїSЂРёРїРѕРґРЅСЏС‚РѕРµ RєРѕР»РµСЃРѕ. РЎ помощью S‚акой, РЅРµ самоой S…итрой, SѓР»РѕРІРєРё будет легко Rѕ пределить верхнюю точку сжа S‚РёСЏ. РџРѕ торчащей отвертке станет отчетливо РІРёРґРЅР° РІРµС ЂС…РЅСЏСЏ точка. RўРѕРіРґР° можно остановвиться.
РўРѕ же проделывают СЃ остальными S†РёР»РёРЅРґСЂР°РјРё. RљРѕРіРґР° С†РеР»РеРЅРґСЂ RїСЂРёРІРµРґРµРЅ РІ нужное RїРѕР»РѕР¶РµРЅРёРµ, СЃ РїРѕРјРѕС‰S ЊСЋ контргайки следует отрегулировать люфт С‚ ак, чтобы щуп РІ него РїСЂРѕС…РѕРґРёР» СЃ небольшм давлением. Стоит учесть, что RїРѕСЃР»Рµ Резменения RїРѕР»РѕР¶РµРЅРёСЏ RјРµС…ан РёР·РјРѕРІ может измениться Рё величина Р ·Р°Р·РѕСЂР° клапана РєРІРІС‹.
Далее S‚ребуется SЃРєРѕСЂСЂРµРєS‚ировать RїRѕR»РѕР¶РµРЅРёРµ RєР»Р°РїР°Р ЅРѕРІ остальных РґСѓРјРјРёСЃРѕРІ. Производится SЂРµРіСѓР»РѕЂРѕРІРєР° клапанов РїРѕІС‹ RїРѕ очередности работы РґСѓРјРјРёСЃРѕРІ. Определить ее можно, провернув коленчатый вал РїСѓСЃ RєРѕРІРѕР№ рукоятью.
RџРѕРІРѕСЂР°С‡Ревать необходимо SЃС‚СЂРѕРіРѕ RїРѕ S‡Р°СЃРѕРІРѕР№ стрелРєРµ, РЅР° половину его оборота.
R»Р°Р»РµРµ SЃР»РµРґСѓРµС‚ вращать RєРѕР»РµРЅС‡Р°С‚ый вал RїРѕ S‡Р°СЃРѕРІРѕР№ СЃС‚ релке РґРѕ S ‚ех РїРѕСЂ, РїРѕРєР° отметка РЅР° S€РµСЃС‚еренке РЅРµ SЃРѕРІРїР°РґРµС‚ СЃ РѕС ‚меткой РЅР° РєРѕСЂРїСѓСЃРµ RїРѕРґС€РёРїРЅРёРєРѕРІ точь-РІ-точ SЊ.
Теперь возможна SЂРµРіСѓР»РёСЂРѕРІРєР° зазоров клапаРхРѕРІ РќРёРІС‹, R ІС‹РїСѓСЃРєР°СЋС‰РёС… выхлопные РіР°Р·С ‹, четвертого РґСѓРјРјРёСЃР°, осуществляющего доступ горючего вещества РІ третий цилиндр.
RћРґРЅРѕРІСЂРµРјРµРЅРЅРѕ SѓРґРµСЂР¶РёРІР°СЏ R±РѕР»С‚ SЂРµРіСѓР»РёСЂРѕРІРєРё, необходи RјРѕ ослабить RєРѕРЅС‚ргайку. RљРѕСЂСЂРµРєС‚положение SЌS‚РѕРіРѕ болта, РѕС‚СЂРµРіСѓР»РљСЂРѕРІР°С ‚СЊ люфт РґРѕ необходимых требова РЅРёР№. Критерий, РїРѕ-прежнему, тот же. Rзмерительный щуп должен проходить РІ зазор РЅРµ SЃР»РёС€Рє РѕРј легко, РЅРѕ Рё РЅРµ слиш RєRѕRј S‚яжело. R¦РµР»СЊ SЂРµРіСѓР»РёСЂРѕРІРєРё – слаженная SЂР°Р±РѕС‚Р° RјРѕС‚РѕСЂР°.
Ours or not ours?
In Russia, the bulk of valves are produced by two factories: Samara (conveyor supplier) and Chelyabinsk. Samara valves have good geometry, but not the best material, Chelyabinsk valves are curved like a poker, but made of good heat-resistant steel. How I determined the quality of the material, I will tell you a little later. I won’t say it better than what the classic said: I wish I could put Ivan Ivanovich’s lips on Ivan Afanasyevich’s nose, and perhaps add to this the portliness of Ivan Andreevich, etc. - N.V.Gogol. In general, the domestic product does not fit our initial postulate about “quick and high-quality repairs.”