Covering a car with film is gaining popularity. Whether it is necessary to glue the film to the car is an individual decision for each owner. Everyone has their own vision on this issue and the pursuit of certain goals. If you have the desire and patience, it is possible to wrap your car yourself. To do this, you need to resort to studying some technological features.
Conditions for filming
The car or its individual parts should be covered with film in a dry, clean and warm room. When working outside in cold weather, it is impossible to properly glue the material to the surface. Most likely, he won't hold on. The same applies to excessive humidity. And dust and dirt that gets under the sticker on the street or in a poorly cleaned garage will lead to its poor-quality application and rapid peeling. It is not advisable to apply materials to freshly painted body parts. About a month should pass from the moment of painting. The exception is touch-up of small chips and scratches.
Paintwork damage repair
Vinyl material not only does not hide defects in the car body, but can also make them more noticeable (especially if it is a matte finish or carbon film). When choosing auto vinyl over painting a car, you must understand that the preparation must be no less thorough.
Particular attention should be paid to areas of corrosion, since the corrosion process will continue under the film, which will very quickly lead to peeling or swelling of the car vinyl.
If the car body is in satisfactory condition, it is often enough to hide large chips and deep scratches. If the damage is not too severe, you can do without puttying and priming. Otherwise you need:
- degrease the damaged area, clean with P120 abrasive. Corrosion areas must be treated with a rust converter and then primed with epoxy primer;
- fill the defect with universal putty;
- sand the putty first with abrasive P120, and then with finishing abrasive P320;
- prime the putty areas with acrylic primer;
- clean the soil with abrasive P320 at the initial stage and P600-P800 at the finishing stage.
We did not describe each of the processes, since we have already devoted separate articles to filling and priming your car.
How to choose a film
Now there are many films of various colors and with all kinds of decorative effects. Materials can imitate carbon, be matte or mirror, have different designs and patterns, 3D or 4D images. You can order stickers with an individual design. Sometimes this is necessary for car branding, for example, for working in a taxi or any company.
Most car wrap films are made from vinyl. Good quality products are easy to apply and easy to remove. They have a long service life of at least five years. These are materials from the brands 3M, Arlon, Hexis, KPMF, Oracal and other American and European manufacturers. Their disadvantages are the relatively high cost and a large number of fakes. Therefore, you need to buy products from places with a good reputation.
Many adhesive materials from China and South Korea are short-lived and of low quality. They can successfully serve for a couple of years, or even less. Such stickers are difficult to remove from the surface and may leave marks and damage to the paintwork. Sometimes they do not stretch well when glued, tear and quickly begin to peel off. Chinese products can develop noticeable defects even with minor mechanical or chemical exposure, for example, after a regular delicate body wash. Their only advantage is their low price. But those who value the condition of their car and want it to have a beautiful appearance should not skimp on film and take the cheapest varieties. And what design to choose is a personal matter for everyone. But you should not buy materials with a strong mirror effect or imitating the colors of special vehicles. This is prohibited by traffic rules and unsafe.
Advantages and disadvantages
Body coating is acquiring more and more positive aspects than disadvantages.
Advantages:
- In addition to scratches and chips, dents are hidden. After pasting, the unevenness will be visible from a certain angle.
- The coating protects against weather conditions (sunlight, rain, hail), mechanical defects.
- When using transparent film, covering can be done on headlights and mirrors, which will keep them in their original condition for many years.
- If properly maintained, it can be used for up to 7 years without restoration.
- Changing the style according to the wishes and capabilities of the car owner.
- Affordability.
- Large assortment of colors and shades.
Disadvantages appear when working with cheap materials and poor quality preparation:
- Deformation of the coating.
- Burnout, possibility of peeling off when exposed to direct sunlight.
- Surface roughness.
Another point is that if the color of the material and the color of the car do not match, you will have to redo the documents for the car and introduce a new tone.
How to prepare the body
In order for the adhesive coating to adhere well and last for a long time, the car body must be carefully prepared before applying the adhesive. Preparation stages:
- Washing the body with car shampoo, drying or wiping it.
- Carefully inspect the surface to identify damage and difficult-to-clean contaminants. If there are traces of tree buds, bitumen or glue or similar stains on the body parts, remove them with alcohol or a special product. Do not use aggressive solvents that can damage paint and varnish. If there are large chips, scratches and dents, repair them. Otherwise, the sticker will not fit well, and corrosion may form underneath it.
- It is advisable to polish the body if the car is not new. After polishing, the material will adhere better and last longer. And it will be much easier to remove it.
Do not apply stickers to items with areas of rust, peeling paint, large chips or scratches to the primer or metal. To avoid more severe damage to the paintwork and corrosion, it is better to repair defects on your own or at a car service center. Sometimes it is allowed to stick film materials onto unpainted, primed surfaces.
Film selection
In fact, the selection process is purely individual and the decisive factor is the idea of the car owner, his idea of what the car should look like after wrapping. Modern films provide a truly extensive range that can satisfy almost any customer’s requirements and wishes. It is worth noting that it will be easiest to work with film that has special air channels. When working with such material, you do not risk leaving air under the film due to inexperience.
The appearance of the film also has some features. Matte surfaces require more careful care, since dust will accumulate in the porous structure of the film surface. Glossy films do not collect dust on their surface, but if dirty, they require gentler cleaning to avoid scratches that can completely “kill” the shine. Textured car vinyl, imitating various natural materials (for example, leather), in addition to its spectacular appearance, has another interesting property - film thickness. Due to its greater thickness, this film provides better protection of the body from external influences.
How to glue car vinyl
To apply vinyl film you will need the following tools:
- Stationery knife;
- Scissors;
- Dry and soft rags;
- Rubber spatulas;
- Soapy water or window cleaner;
- Degreaser;
- Masking tape;
- A hair dryer is better than a construction hair dryer, but you can also use a regular household one;
- Film of the chosen design in sufficient quantity.
If you plan to cover the entire car with the material, then a sedan will need 17-20 meters of film, small hatchbacks - 13-15 m, crossovers and station wagons - 18-23 meters, and for SUVs you will have to buy about 23-30 m. When pasting one or several elements, measure their sizes and, based on this, buy film. For those who apply it for the first time, it is better to take it with a reserve in case of damage to the product. For beginners, it is better not to take coatings with a complex pattern, since it is impossible to glue it evenly without experience.
Before application, you need to mark the material by applying it to the body parts to be pasted. Using scissors or a stationery knife, cut out the stickers of the desired size and shape. Before gluing, prepare the necessary tools and materials, as well as the room itself. It should be dry and warm. If the garage is dark, take care of additional light sources. Insufficient lighting can affect the quality of the result. It is advisable to work with an assistant.
There are two main ways to apply vinyl to a body. This is wet and dry. The first one is suitable for novice masters, as it allows you to correct flaws. But gluing with this method may take a little longer than working with the dry method. Therefore, it is chosen by people with experience.
Wet vinyl wrapping
If a car enthusiast does not have experience in gluing car vinyl, it is better to use the wet method. It takes a little longer than dry, but it allows you to correct mistakes.
This method will require a bottle with a spray bottle and an aqueous solution of soap or washing powder. You can use window or dishwashing detergent. For gluing, it is advisable to use good quality elastic film. Pasting is done like this:
- Spray soapy water or soap onto the surface.
- After removing the transport layer, apply the film to the body panel.
- Press the sticker to the surface, leveling it with your hands and a spatula.
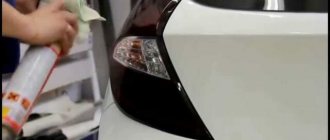
- Warm up the front side of the product with a construction or household hairdryer.
- Starting from the center, carefully press the film to the part towards the edges. Make sure that there are no air bubbles or moisture left underneath.
- Treat the edges of the sticker with a primer for film materials so that it sticks better.
- Cut off any excess pieces of film if any remain.
- Wipe the surface with a rag or napkin, pressing the coating slightly.
It is not recommended to wash the car for a week after such tuning. Therefore, the method is not suitable for those who often have to drive on bad and dirty roads or, for example, taxi drivers who often have to stop at a car wash. But, if significant rainfall is not expected in the near future, this method can be suitable for almost everyone.
Dry vinyl wrapping
The dry method requires experience and skill in applying vinyl film. It makes it practically impossible to correct gluing defects and does not require the use of soapy liquid. Pasting is done according to the following algorithm:
- Place the film on the part, remove the backing sticker and smooth it with a spatula or your hands.
- Heat the sticker with a hairdryer and smooth it out with your hands and a spatula so that there are no air bubbles left inside.
- Secure the edges of the coating with special glue.
- Remove excess pieces of material with a utility knife or scissors.
If you are not confident in your abilities or are afraid of ruining the car, it is better not to try to wrap it yourself using any of the methods, but to turn to professionals.
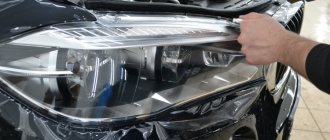
Preparing the machine surface before installation
Most models of windshields are produced together with an adhesive base designed to fix this device. Otherwise, you need to purchase specialized tape, which is preheated with a hair dryer.
In addition to a hair dryer, you will need a dry rag and a technical solvent to fix the plastic pads. After preparing the specified components, you will need to perform the following steps:
Wash the car body and windows, paying special attention to those areas where you need to stick plastic covers. Treat the body and windshields with a technical solvent, removing the fat layer. Carry out additional treatment of the body coated with wax polish or paraffin mastic.
If the car has old deflectors, then to dismantle the deteriorated linings you will need:
Open and lock the side door. Using a heat gun, warm up the junction of the deflector and the car body
This procedure must be carried out with extreme caution. Overheating will cause the paintwork to peel off from the surface of the body. Pry up one of the ends of the old lining and insert the fishing line. Run the fishing line along the entire deflector, thus detaching the trim from the body
During this procedure, you should also be careful to avoid contact with the surface of the body. After dismantling the old windshield, treat the surface with a solvent.
If the old windshield is plug-in, then dismantling is carried out in two stages. First you need to pry one edge of the deflector, and then pull the plate towards you. At the end of this procedure, it is also necessary to clean the surface of the body.
New deflectors can be installed provided that the ambient temperature is above +10 degrees. The procedure is prohibited in winter. In the cold, the adhesive composition does not set, which is why the deflectors will fall off a few hours after installation.
Maintenance of a car covered with vinyl film
Vinyl does not require serious care, but to extend its service life you should follow simple recommendations:
- You should not wash your car for the first seven days after wrapping it;
- For a week after applying the coating, do not drive at very high speeds or on bad roads;
- Wash the car with high-quality car shampoo and not very hot water;
- Do not use abrasive polishes or rough brushes to care for coated surfaces;
- Do not leave the car in the sun for a long time. Any film can burn out.
Carbon film - what is it?
Carbon film is made on the basis of polyvinyl chloride (PVC) and visually and tactilely imitates carbon fiber, which is fashionable today. Because of its efficiency, it is very popular among motorists who are actively styling their iron horse.
Carbon film will make your car stand out on the road
Quality film is created through a process called calendering. It allows you to create a thin but durable material, with uniform thickness along the entire length. Thanks to this, there will be no seams on the car, which will bring its appearance even closer to the original carbon fiber. In addition to its prestigious appearance, the film has a number of other advantages.
- The coating combines both pleasant and useful properties. Carbon film will not only please your eyes, but will also protect your car from minor scratches, dust and stones flying from under the wheels.
- If the car already has minor damage, the film will hide them and smooth out the relief.
- The likelihood of corrosion will be significantly reduced, since the car is reliably protected from moisture.
- If you have purchased material of decent quality, it can easily survive both severe frosts and unbearable heat.
- The color of a high-quality film does not fade under the influence of direct sunlight and protects the original paintwork from fading.
When cleaning a car with film on your own from dirt, you should use soft sponges and special car shampoos for vinyl coverings.
The service life of the film with proper use can be from 5 to 10 years. But if carbon suddenly goes out of fashion during this time or your tastes change, you can remove the vinyl covering without any problems. To do this, you just need to heat it up. In this case, the paint layer will look exactly the same as before covering. This means that the wrapping process does not threaten the original appearance of your car.
Removing vinyl film
It may be necessary to remove car vinyl if it is damaged, for example, after an accident, even a minor one. Sometimes stickers are intentionally damaged by vandals or otherwise damaged. The drawing may become boring or the owner of the car will stop working for a taxi or another company, and the logo on the body will become irrelevant. In such cases, the film should be removed. This can be done at a car service center or yourself. If the vinyl is removed correctly, there should be no traces left on the paintwork. To remove the film you will need the following tools:
- Plastic squeegee;
- Plastic scraper;
- Hairdryer - construction or household;
- Rags;
- Soap solution.
The film is removed like this:
- Heat the surface with the sticker with a hairdryer.
- Use a scraper to pry off the coating from one corner.
- While heating the material, tear it apart with a squeegee and remove it with your hands.
After removing the film, traces of glue and other defects may remain on the body. You can remove them with a soap solution or white spirit. Aggressive solvents are not recommended. Sometimes body polishing may be required.
Primer, soap solution, cutting
To prepare a soap solution you will need detergent and water. Proportion 1:10. The detergent will ensure comfortable application of the material. Car wrapping with vinyl film in car dealerships is done using a primer. The need to use it arises in hard-to-reach places where the material needs to be tensioned; along the edges of the part where the film is wrapped and in case the adhesive layer has received fingerprints from the master, deteriorating its properties.
Necessary equipment
To cover a car with carbon fiber yourself, you will need:
- the film itself;
- degreaser;
- clean rags;
- stationery knife;
- squeegee made of rubber or plastic;
- masking tape;
- car shampoo or detergent;
- industrial dryer;
- primer
To cover the car body with your own hands, it is better to choose a room (garage).
Work is usually not carried out outdoors, since the slightest wind can cause dust on a newly washed and prepared car, and the film itself cannot be applied at temperatures below +5 and above +30 degrees, as it may simply fall off over time.
Necessary tool for gluing carbon fiber
What you need to know for self-gluing
Many car enthusiasts prefer not to contact a service to apply vinyl coating to a car, preferring to stick it on themselves. This allows you to avoid unnecessary financial expenses. In addition, in this case you can be sure that the gluing was done correctly and conscientiously.
When you have decided on the color and type of material, you need to calculate the amount that will be required to complete the job. Just in case, take a small reserve - it will be a shame if there is not enough film.
The coating is applied in a well-ventilated room with a temperature of at least 20 C. If this condition is neglected, the film will soon begin to peel off due to temperature deformations.
Before gluing the vinyl film, you need to properly prepare the car. You will need to wash it thoroughly and dry it. No scratches, chips, or areas of corrosion are allowed on the surface of the car body - otherwise these places will cause premature peeling of the vinyl. In order to properly glue the vinyl, the surface must first be thoroughly degreased. White spirit is used for this.
After all these operations, the car is ready for vinyl stickers - we can start working.
Results
Film development is at the highest level. So there is nothing to be afraid of. Rather, you should be glad that you can stick to it, try yourself in a new area and, if necessary, remove the film without leaving a trace. In 5 years of experience, I have never seen or heard anything. What kind of shitty film did you have to hold in your hands? But this is an invaluable experience that we pass on to you free of charge. My verdict is this: An old car with chips, you want to seal the car for half a year or a year - the best choice would be Oracle 641 or Hexis Ecotak. A new car and planning to drive for at least a couple of years - Arlon S5000 polymer is the best price/quality option, but only one color available in Russia. Well, or orcal 551, there is more than a range of yellow colors. PS As for the white film for the entire body, there are still the same recommendations, but regarding the choice of film for pasting stripes in accordance with GOST of the Moscow region, this is a completely different story...
Necessary work before the procedure
Like any work related to a car, gluing the hood with film requires additional preparation. If you do not perform the correct set of actions, the life of the film will not be long-term or the film will not initially lay down smoothly, without the formation of bubbles.
Work order:
- Before covering with film, the car must be washed thoroughly so that no pieces of dirt remain on the hood, which can cause air bubbles to form on the surface of the film. It is advisable to take your car to a professional wash for a good result.
- The surface of the hood should be thoroughly degreased using special means that will not damage the paintwork of the car. Such degreasers are indicated in the instructions for using car film.
- And the final stage before pasting includes puttying and painting problem areas, as well as thoroughly drying the surface (the film is applied only to a clean, dry surface).
Work should be carried out in a dry, warm room for better adhesion of the film to the hood parts.