Owners of domestic cars have long gotten used to the idea that VAZ cars are easy to drive and relatively simple to repair. Therefore, it is preferable for drivers to choose their own hands for these works rather than the experience and knowledge of service station employees. This decision is fully justified, and everyone is happy: the car is intact, the driver is confident in his abilities, money is saved. But such zeal often leads to new breakdowns, imbalances within the technical part of the machine, and other troubles. Therefore, in order to begin even a small and seemingly simple repair, you need to have an adviser on hand.
Let's consider the procedure and conditions of repair work if the time has come to adjust the valves on the VAZ-2015. But before you start practicing, a little theory and preparation.
VAZ 2105: do-it-yourself valve adjustment
Device for adjustment Do
-it-yourself adjustment of VAZ 2105 valves is carried out in the same way as on cars of other models, for example, 2107 or 2109. You need to stock up on 0.15 and 0.2 mm feeler gauges. The work can be carried out on a cold or even hot engine, but the first option is preferable. In this case, the gas distribution phases will work more accurately, and gasoline will burn more efficiently. If the adjustment is carried out on time, the engine will run cleaner, there will be no knocking, and the service life of the VAZ 2105 valves will increase. All operations can be performed with your own hands.
Many car owners know how to adjust valves. It is necessary to set the gaps correctly. If they are less than normal, they may burn out. The valve tries to seat itself in the head seat, but the gap located between the drive lever and the cam prevents it from doing so. Gases break through from the chamber, and if their temperature exceeds 2000 K, they burn out the edge of the exhaust valve and quickly seat the seals. As a result, the oil becomes clogged.
Engine valves need to be adjusted constantly. It is advisable to do this every 15 thousand kilometers, so as not to spend money on repairing your VAZ 2105 later.
Necessary tool
If you know the sequence of work and have the necessary tools, adjusting the VAZ-2105 valves with your own hands is not difficult. As for the tool, you will need:
- Special key for turning the crankshaft;
- Open-end and socket wrenches (for 8, 10, 13, 17);
- Flat screwdriver;
- Probe with a thickness of 0.15 mm;
- To perform the work, you will need a special wide probe, designed specifically for adjusting valves on VAZ cars.
Let's get down to business
Adjusting the gaps with a lever
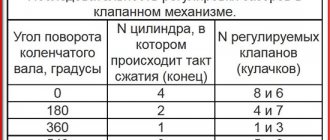
The procedure for adjusting the VAZ 2105 valves is as follows. When the crankshaft and camshaft rotation angle is 0 degrees, the sixth and eighth valves are adjusted to the third and fourth cylinders. The next turn of the crankshaft by 180 degrees and the camshaft by 90 degrees on the second and fourth cylinders - the fourth and seventh are adjusted. Then, at 360 and 180 degrees, the first and third valves are adjusted to the first and second cylinders. Finally, at 540 crankshaft degrees and 270 camshaft degrees, the fifth and second valves are adjusted to the third and first cylinders.
First you need to tighten the chain. To do this, the valve cover is removed and marks are set, and the counting of the holes must begin from the camshaft sprocket. When working, it is advisable to use a VAZ wrench and washers for adjustment. The piston of the fourth cylinder must be set to the TDC position. As soon as one pair is adjusted, the engine must be turned half a turn and the same operations must be carried out with the second. The mark on the sprocket and on the cover are aligned, as well as the mark on the pulley with the marks on the chain cover on the drive. The valve timing will then be set correctly. We adjust the phase as necessary until the marks coincide. After installing the piston 4 of the cylinder at TDC 8 and 6, the valves will be closed.
We tighten the camshaft drive chain. The locknut on the adjusting post is released with the lower wrench, after which the tension is changed with the upper wrench. The feeler gauge should fit tightly into the small gap between valve cam 8 and the lever. Then the locknut is tightened, but without overtightening. Then valve 6 is adjusted. You will need a key to turn the crankshaft 180 degrees, but if you don’t have a tool, you can roll the car until the marks match.
Then valves 4 and 7 are adjusted. How to adjust them better? The distributor slider will best show how the camshaft turns. If you take the sprocket hole between the two sides of the bed as a guide, you can also trace the position of the crankshaft. If after one turn the hole is not visible, then you need to focus on the slider.
At the end, you need to check the condition of the sealing gasket between the head and the head cover and reassemble the parts. At the end, the valve cover is installed, and this is where the independent adjustment of the valves of the VAZ 2105 car ends.
Adjustment of valves
If knocking, unstable operation, or increased vibration occur, you should pay attention to the valves.
If the valve timing of the gas distribution mechanism is disrupted, they do not operate accurately, that is, the full volume of gas does not enter the working area of the cylinders, complete combustion of the fuel-air mixture in the working chamber does not occur, and the cylinders are not purged. This is all accompanied by the appearance of a shock load on the camshaft cams on the drive lever and the shaft rod. Fuel and engine oil consumption also increases. What happens if you drive with unadjusted valves? Answer: rapid wear of engine parts, increasing cost and repair time.
Rubber oil deflectors, also known as oil deflectors, also burn out due to a burnt valve cap, which leads to increased engine oil consumption. If the wear of engine parts is large, then it may be better and easier to do an engine swap with your own hands or at a service station.
The procedure for adjusting valves VAZ 2101-2107
First we prepare the car:
- wait until the engine cools down if it was running;
- park the car on level ground;
Valve adjustment procedure:
- Remove the air filter cover and the filter itself.
- Remove the air damper control cable (choke).
- Remove the throttle linkage.
- Unscrew the nuts securing the valve cover and remove it.
- Before adjusting the valves, immediately check how the chain is tensioned. If the tension is not normal, you will have to do the work again.
- Remove the distributor cover.
- We install the piston in the 4th cylinder at top dead center (TDC). TDCs are set using marks on the internal combustion engine crankshaft pulley and the camshaft drive cover, and marks are also applied to the camshaft gears and camshaft cover. The mark is set with a special key for the internal combustion engine crankshaft pulley bolt. If you don’t have a key, you can set the 4th piston to TDC by rotating one of the rear wheels. Raise one side with a jack and place the gear shift lever in 4th gear to make it easier to turn and turn the wheel slowly. When setting marks without a key, you will need an assistant to look at the marks.
- When the marks on the camshaft and the camshaft cover are aligned, check that the marks on the crankshaft are also aligned. You can also check whether the marks on the distributor slider match. The contact terminal should be directed to the high voltage wire terminal of the fourth cylinder. We have already discussed how to determine whether ignition is early or late in another article.
- After the marks match, we proceed to adjusting the valve clearances.
The correct procedure for adjusting the valve mechanism of the VAZ “Classic” 2101-2107. Crank angle Adjustable valves 8 and 6 180 4 and 7 360 1 and 3 540 5 and 2
Disconnect the filter mounting tubes and remove the mount.
From the table we see that if the 4th piston is set to top dead center, then we measure and adjust the 6th and 8th valves.
Execution Sequence
Remove the air filter cover, remove the filter and unscrew the four nuts securing the air filter housing to the carburetor. Remove the air filter housing and cover the carburetor with a clean, lint-free cloth.
Disconnect the throttle linkages and the carburetor choke cable. Remove the timing belt protective cover. To make it easier to crank the engine, you can also remove the spark plugs.
Set the piston of cylinder 1 to TDC. To do this, you need to align the mark located on the crankshaft pulley and the long mark on the front engine cover. In this case, the mark on the camshaft pulley and the ebb on the valve cover must also align. If these marks are not aligned, turn the crankshaft one more revolution.
On the 03 engine, the 4th cylinder is installed on the compression stroke.
Unscrew the 8 nuts and remove the top cylinder head cover. The cover gasket must be replaced, regardless of its condition, to avoid oil leakage.
When installing 1 cylinder at TDC, the clearance of valves 1 and 3 is checked and adjusted. To do this, insert the feeler gauge between the rocker arm and the camshaft cam; the feeler gauge should fit tightly, with slight pinching.
If the dipstick dangles or does not fit in, loosen the locknut with a 17 wrench, holding the adjusting bolt with a 13 wrench. Then rotate the adjusting bolt to set the desired gap.
After adjustment, rotate the crankshaft 180 degrees and adjust valves 5 and 2. Rotate the crankshaft another 180 degrees and adjust valves 8 and 6.
Rotate the crankshaft 180 degrees again and set valve clearances 4 and 7.
The sequence for adjusting engine valves 03 is shown in the table.
The correct adjustment must be carefully checked several times. If the adjustment is carried out correctly, the knocking of valves on a warm engine should completely disappear.
A feature of VAZ cars belonging to the “Classic” category, namely the VAZ-2101-2107 model, is the use of power plants that are structurally very similar. The engines of these models differ mainly in some technical characteristics. Thanks to this, many perform maintenance and repair work themselves.
For stable operation of the power unit of these cars, periodic adjustment of the valves is required. It is worth noting that this operation for VAZ “Classic” engines is performed by adjusting the gap between the valve drive lever and the camshaft cam. Since on the “Classic” this operation is performed the same way for different models, let’s consider the sequence of work using the example of one model – VAZ-2105
The adjustment can be carried out both on a cold engine and on a warm one; for this, a 0.15 or 0.20 mm probe is used, respectively.
But for more precise adjustment of the valves, work must be carried out on a cold engine.
How to adjust valves on a VAZ 2105?
The operation of the gas distribution mechanism (GDM) has a significant impact on both the completeness of fuel combustion and the level of cylinder compression. A particularly important role is played by the timing valves, which create that very compression, allowing the fuel to show its full energy potential. Like any other mechanisms, valves require periodic maintenance, that is, VAZ 2105 valves need to be adjusted.
When should adjustment be made?
It all depends on the experience and skills of the driver. If the owner of the five knows all the whims of his vehicle and knows how to ensure a competent driving process, then the valve clearance will need to be checked and adjusted no more than 25,000 (km). If the vehicle is in the hands of an inexperienced driver, then valve adjustment on the VAZ 2105 can be carried out after 10,000 - 15,000 (km).
Signs of improper valve operation
- The presence of extraneous noise when the engine is running. The noise is concentrated in the upper part of the internal combustion engine. Extraneous sound can appear at a certain speed or at all speeds (this is already an advanced case). That is, when you hear a suspicious knock in the timing belt, immediately look for the procedure for adjusting valves 2105 and begin repairs.
- Noticeable loss of power. A valve that is not tightly pressed does not allow the optimal degree of compression of the cylinder to be created, which is why the piston is pushed out with incomplete force. A pressed valve that is not pressed in time does not allow full release of exhaust gas, which reduces the efficiency of the next detonation stroke of the combustible mixture. If you feel a lack of traction power, feel free to look for information on how to adjust the VAZ 2105 valves and start adjusting the timing belt.
What's the problem with the valves?
The concept of “adjustment” is that a specialist should restore the original clearances of the power unit. The signal for the need for repairs is a sound - tapping when the engine is running. As a rule, with minor changes in the gap, knocking is present only at the beginning, and then under certain loads. But over time, the condition worsens and the knocking becomes constant. You can miss it at first. But over time, when the noise becomes constant, even an inexperienced driver should not miss it.
The problem can be not only an expanded, but also a narrowing of the gap. The balance of the engine is set during assembly so that all the internal combustion power is transferred to the pistons at a certain pressure and speed. The gap (no matter which way it changes) will introduce an imbalance into the operation of the machine, which promises a drop in power under loads necessary for powerful operation.
Procedure for adjusting valve clearance
It should immediately be noted that it is best to adjust the operation of the valves when the engine is cold. This will allow you to more accurately diagnose and adjust the operation of the timing belt. So, let’s let our top five cool down thoroughly after the last race. The road will stand overnight, and in the morning you can begin repairs.
So, the valve adjustment itself on the VAZ 2105:
- We get under the hood, remove the air filter housing, the timing belt guard and the valve cover. For this task we will need a set of open-end and ring wrenches (8,10, 13 and 17).
- We pay attention to the 4th cylinder (it is closest to the driver). It is necessary to move its piston to the top dead center (TDC) position. To do this, take an open-end wrench 17 and rotate the crankshaft pulley clockwise until the TDC mark on the pulley coincides with the mark on the casing body (immediately behind the pulley). Let's look at the further procedure for adjusting valves 2105.
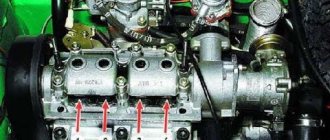
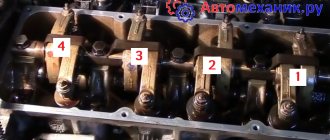
- Let's move on to the camshaft drive gear (on the opposite side). There is a mark on its pulley, make sure that it coincides with the pointer on the head of the blocks (as in the photo).
- From this point on, we move on to checking the valve clearances. TDC on the 4th cylinder allows you to check and adjust, if necessary, valves numbered 6 and 8.
- We turn the crankshaft (by the pulley, with a key) 180°, while the camshaft pulley will only turn 90°. This will set TDC on the 2nd cylinder. The VAZ 2105 valves numbered 4 and 7 are being checked and adjusted.
- Rotate the crankshaft 180° again. The VTM of the 1st cylinder will be installed. We control and adjust valves numbered 1 and 3.
- We turn the crankshaft 180° again to set TDC on the 3rd cylinder. We work with valves 2 and 5.
Marking the camshaft pulley
By the way, here is a video of valve settings:
Signs of poor valve clearance
Before describing the adjustment process, you should understand the signs of incorrect clearance, as well as what this leads to. So, the main sign of a broken timing gap is a metallic knock at the top of the engine. Usually this knocking sound initially appears only in a certain operating mode, but over time it will be heard in all modes.
Of course, the gap can either decrease from the nominal value or become larger. Both decreasing and increasing the gap will primarily lead to a loss of power. With a smaller gap, the lever will tighten the valve, which will significantly reduce the tightness in the cylinder and ensure a drop in compression. As a result, this can lead to burning of the valve edge and its seat.
An increased gap will affect the filling of the cylinder combustion chamber, since its opening time will be reduced, and exhaust gas removal will also be incomplete.
To avoid the above problems, it is necessary that the VAZ-2105 valves be adjusted after approximately 15-20 thousand km
, as well as at the first manifestation of a violation of the thermal gap.
How to adjust the gap between the valve and the cylinder block?
- We use a probe with a thickness of 0.15 (mm). It should fit under the valve with a slight tension (neither strong nor weak). If the dipstick falls into the gap or, on the contrary, does not fit, then from this moment the adjustment of the valves on the VAZ 2105 begins.
- We loosen the lower lock nut with one key, and with the second key we turn the valve stroke screw (up or down, depending on the result of checking with the feeler gauge).
- Tighten the locknut without much fanaticism.
- We do a control check with a feeler gauge at 0.15 (mm).
I hope the instructions are clear and understandable.
Additional Information
After adjustment, we assemble all the engine elements into place (valve covers, timing belt cover, air filter housing).
We make a test drive and listen to the sound. At this point, independent maintenance of timing valves can be considered successfully completed.
Please note that the VAZ 2105 is a classic of the bygone Soviet automobile industry. The classic line also includes the VAZ 2101, VAZ 2102, VAZ 2103, VAZ 2104 and VAZ 2106. Starting with the VAZ 2107, cars use an injection system for preparing the combustible mixture. That is, seven is no longer a classic. The procedure for adjusting valves 2105, as well as 2101, 2102, 2103, 2104 and 2106, is completely the same. That is, the classics are configured according to the same principle.
Starting from the VAZ 2107, you need to configure the timing in a different way. Valve adjustment on the VAZ 2107 is carried out at a more subtle level. Only a properly qualified car mechanic can handle this work. Without solid experience in handling vehicles, it’s better not to go into the timing belt of VAZs, starting with the seven. It’s easier to take the car to the nearest service station.
I hope the article on how to adjust valves on a VAZ 2105 was useful. Have smooth roads and fewer breakdowns.