Primer is a mandatory process both before painting the entire car and when refreshing the paintwork on individual parts. The primer layer is intermediate between the car body and the base paint. Before priming the car, you need to carry out some preparatory work necessary to obtain a better result.
Procedure
The entire priming process can be divided into several simple steps, each of which is equally important. Additionally, before starting work, you can watch a video that will help you clearly grasp the essence of the process.
All priming work before painting a car includes the following steps:
- preparing the premises for work;
- preparation of all necessary tools;
- preparing the car for priming;
- preparing a primer mixture;
- applying the first layer of primer;
- drying and processing the first layer of primer;
- applying a second layer of primer;
- final drying and polishing.
Crash test (How can you check the quality of body paint before repainting)
Before starting work, craftsmen study the layer covering the parts. To do this, use a napkin previously moistened with a solvent. Wipe the selected area, checking whether a mark remains on the napkin or not.
If the paint is factory, then there is a high probability that it will darken. Amateur will leave a mark on the napkin.
Crash test
In cases where a car is spray painted over old paint without a primer, wiping can simply ruin the surface. This effect is called a crash test. This is due to the fact that the old coating reacted to the new: as a result of a chemical reaction, swelling or cracks appeared.
To avoid this, do not paint your car over old paint without a primer. The insulating coating will prevent the solvent in the original layer from reacting with the new one.
Preparing the premises
It is highly undesirable to carry out priming in an open space, as flying dust, scorching sun and other factors will negatively affect the result. To carry out this type of work, it is best to prepare a sterile room, which is pre-cleaned and slightly moistened. To get an idea of the priming room, you can watch the corresponding video, which will tell you the dimensions and conditions of the work area.
It is very important to take care of the ventilation of the room, since the vapors of the primer material are very harmful to human health. In this case, drafts should be avoided, as this can lead to an uneven result. The room must be provided with adequate lighting. If you work in low light, then when inspecting the car on the street you will find many defective areas and defects.
Primer Basics
After pasting the car, you can start diluting the soil. First of all, you need to mix it thoroughly to lift heavy components from the bottom of the jar, and then dilute it with a hardener (it is highly advisable to use only the original one) and a solvent (preferably the original one, but 646 is also possible). The proportions must be indicated on the can. It is better not to dilute by eye, but to use a special container where you can see the grams.
It is advisable to filter the finished mixture through a proprietary filter or ordinary gauze, folded 3-4 times. Usually it is enough to apply the primer in 2-3 layers. It is extremely important to maintain a drying time of 5-10 minutes between coats. Otherwise, the soil may boil, which is highly undesirable.
On a note
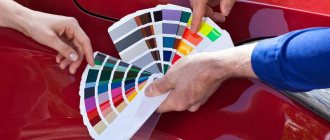
The choice of soil color is of great importance. The paint should cover the primer so that it does not show through at different angles. The universal color is grey.
There are also primers in black, white, red and other colors. Using this palette you can mix primers and get the desired color. It is important to remember that the materials being mixed must be from the same company.
On a note
Before applying the primer, you must wipe the car with an antistatic cloth, then degrease it with anti-silicone or alcohol.
According to technology, the first layer needs to be filled normally. But, if the primer is applied to the old paintwork, which in some places has been rubbed down to the old primer, then it is in these places that the new primer can be undermined. To prevent this, you need to spray the first layer and dry for about 10 minutes. The second and third layers can be poured, then let dry for 24 hours.
The soil can be treated either dry or with water. It should be remembered here that soils partially absorb water, which over time leads to metal corrosion, therefore, it is better to process dry. A special grinding machine can help with this. For metallic paint, the body should be sanded with R-600 and R-800 sandpaper, but for regular acrylic, R-400 and R-500 will be sufficient.
New parts need to be given extra attention, because they are covered with shipping primer (usually black). In order for the repair of the machine to be of high quality, the transport soil must be cleaned with R-240 sandpaper down to the metal. After this procedure, you can put 2-3 layers of soil.
It is also useful to read: Technology of painting a car hood and eliminating shagreen
After 10-15 minutes, you need to develop the primer with paint of a contrasting color. The next day you can start cleaning. During processing, development may show minor unevenness. In this case, you will need to re-prime the flaws or the entire part.
Do-it-yourself car priming is absolutely safe if you approach it correctly. The fact is that during any paintwork, including body priming, it is necessary to use personal protective equipment (respirator, gloves, suit). Primer fumes are very harmful, so be careful about your health.
Set of tools and consumables
- Spray gun. It is needed to uniformly apply primer to the surface of the car. You should not expect a good result from doing the job with a cheap and low-quality spray gun.
- Sander. Sanding can be done by hand, but it will take much longer and will affect the quality of the work.
- Primer. When choosing a primer, you should consider the color of the car and the type of paint that will be used in the future.
- Alcohol. Before priming work, it will be necessary to degrease the surface.
- Fine sandpaper. Usually R-800 and R-1200 are sufficient.
How to set up a spray gun for priming?
To understand the settings of the spray gun, you can read a detailed article about this.
I unscrew the flow of the sprayed material completely (you can unscrew it two full turns for a smaller flow), and set the pressure to not very high (I’m used to navigating without a pressure gauge, just by feel). The size of the torch, depending on the primed area. If you have no experience, then you need to do test sprays and adjust the adjustments as you need. The primer should not be applied dryly or too thinly.
Preparing the car
If the entire car will be primed, then before doing this it is necessary to cover all the windows, headlights and other parts with special materials. If a separate part is primed, it is either dismantled or isolated from the rest. To properly cover individual parts, it is better to use high-quality tape from well-known or trusted manufacturers.
Before priming, the surface must be thoroughly cleaned of rust and old weakened paint. All defects on the body or parts are eliminated using putty and returned to the original geometry.
Next, you should clean the body from dust and degrease the entire surface. For these purposes, you can use either alcohol or a non-aggressive solvent. Additionally, care should be taken to dry the parts, as moisture will prevent the correct application of the primer layer.
What kind of primers are there? How to choose?
Globally, there are two types of soil: one-component and two-component. The first does not require special preparation and is sold in the form of jars or aerosols, which can be applied as the manufacturer did.
Two-component, as the name suggests, consists of two liquids: a polymer and a hardener, which are supplied in different containers. Before applying to the surface, the painter mixes the components in the required proportions and applies them to the parts. But the speed of application is important here, since the mixture hardens quickly and the minutes count.
If we divide the primer into components, then it comes in three types: acid, epoxy and acrylic.
- Acid primer.
Used for rough coating and protects the body from corrosion. - Acrylic.
The most common two-component primer, which is prepared no earlier than an hour before application. It is often applied to putty, and it dries from three to eight hours in a heat chamber. - Epoxy.
A primer that is applied before painting. It has the most durable anti-corrosion properties. It also fills microcavities well and creates good adhesion. But it takes a very long time to dry - at least 12 hours - and high temperatures cannot be used, because the epoxy will bubble.
Primer preparation
Before purchasing a primer, you should consider in advance several options that the market offers. The primer must be correctly selected in color and composition. This will make the work much easier and improve quality.
Before filling the spray gun, the primer is thoroughly mixed until smooth. If a primer with a hardener is used, it must be added as accurately as possible. In this case, you should not mix the entire volume of primer with the hardener, since its application will occur in several stages, and the pre-prepared primer may set during the drying period of the previous layers.
After mixing all the components, it is advisable to strain the primer through a special filter to cut off large particles. If this is not done, the spray gun may become clogged, which will lead to the ejection of large drops of soil and the formation of smudges. For straining, you can also use ordinary gauze, which is folded into several layers.
Particular attention should be paid to obtaining a primer of the required consistency. For this purpose, the spray gun kit includes a special device that allows you to measure this parameter. To dilute the soil, it is necessary to use an appropriate solvent. Ideally, the solvent should be from the same manufacturer as the primer.
Let's sum it up
As you can see, it is not at all difficult to perform high-quality priming of a car. This procedure allows you to prepare the car as well as possible for painting and giving it a new appearance. Remember that every flaw made in this case will be very clearly visible on the finished car body. After painting, all the imperfections will be revealed, it will be clearly visible what and where the imperfections are on the car body. This is what provides a certain motivation for doing quality work.
It must be admitted that it is not so easy to carry out the procedure of puttying, priming and washing the car body on your own. Most likely, if you do not have prior experience in this work, it is better to entrust the procedures to specialists. Interestingly, in most cases, the artisanal unskilled work is not very visible until a coat of paint is applied. Once the car is painted, there is an understanding of where more effort should have been put in, but it is no longer possible to do anything with this result. Have you ever primed your car yourself?
Applying the first layer of primer
After the preparatory work, you can begin the first application of primer. The first layer can be applied with small smudges, which are subsequently corrected by sanding. In general, the initial layer should be applied to the edge of the drip, ensuring sufficient thickness and adherence to the surface.
The primer should be applied with uniform movements of the gun from a distance of 25-30 centimeters. This uses cross movements to distribute the material more evenly.
After applying the initial layer, it must be given the required time to dry. If primer with hardeners was used, the drying process will not take more than 15-20 minutes. In cases where soil is used without special additives, drying can take a very long time. Some primer mixtures take about 24 hours to dry. But they are used extremely rarely.
Application, drying and sanding
Before applying primer with your own hands, you should properly prepare the surface:
- blow out;
- easy to wipe with a dust-collecting cloth;
- degrease with anti-silicone.
Typically, the primer is applied with a sprayer under a pressure of 2-4 atmospheres. You should first adjust the torch and practice on some surface. After this, you can prime the car using the following recommendations:
- primary primers should be applied in a thin transparent layer, which will have strong adhesion to the metal and subsequent coatings;
- it is necessary to take into account how long the first layer dries in order to dry it well to avoid “preservation”. Drying time - 30-90 minutes at room temperature;
- Secondary primers are applied in 3 layers. It is necessary to observe how much filler primer should be applied in order to obtain a layer of average thickness. Each subsequent layer can be poured only after the previous one has become matte, which requires an exposure of 5-10 minutes.
After the soil has dried, the presence of defects is checked.
If necessary, sanding is performed dry or wet, for which in the first case an eccentric sander with a soft pad is used, in the second - P600-P800 sandpaper.
Do not rub the primer onto the putty or metal. Rubbed areas should be primed and sanded.
Sanding the initial layer
Sanding the first layer of primer is a rather time-consuming and labor-intensive process, even with the use of a sander. However, the final result depends on the execution of this operation, so it should be treated with great responsibility and patience. Sanding the first layer is carried out with fine sandpaper until a uniform matte surface is obtained. If defective areas were identified during the work, then at this stage it is not too late to correct them using putty, which is also sanded to a perfectly smooth surface.
Particular attention is paid to areas where primer leaks have formed. They are ground to zero until a smooth surface is obtained. You should also pay attention to translucent areas. If old paint or metal protrudes from under the primer, priming will have to be repeated several times.
Why prime your car before painting?
Vehicle owners often want to save money when selecting materials for upgrading the body. Painting a car without primer means violating technology. This is due not only to savings, but also to the attitude towards the car. After minor accidents and damage, the value of transport decreases. Car owners believe that they can do without a primer if they immediately apply new paint to the car. This manipulation will save from 15 to 25% of money, but this is fraught with consequences. Painting a car over old paint without a primer is a common practice for resellers. They own approximately 40% of the secondary market, which is why this method is popular.
It is impossible to understand the quality of the work done by looking at a fresh coating. Have all technological steps been followed? If a car was painted over old paint without a primer, then after 6 months the coating will begin to flake off.
It is advisable not to skimp on materials and choose the best. Then the coating will last a long time - from 7 to 10 years.
Benefits of car body priming
Treatment with a primer is carried out before applying the final paint coating. Acid soils are used to protect metal body elements from moisture, salt and other adverse external factors, as well as corrosion.
Acrylic and epoxy primers for cars increase the adhesion of metal surfaces of the car body with the final paint coating. They allow you to get an even, durable layer of paint. Depending on the purpose of priming, other types of primer compositions are used:
- Passivating. Increases the resistance of metal to moisture.
- Soils with inert particles. They create a durable film for mechanical protection of the car body from liquid penetration.
- Rust modifiers. Used for application to metal elements and parts without preliminary cleaning of rust.
- Protective . The composition contains metal dust, which acts as a “protector”.
Note! The features and procedure for applying primer depend on its type and composition, so before purchasing consumables, you should carefully read the instructions provided.
Alkyd primer for cars: customer reviews
Mikhail: “For small jobs I use aerosol primer mixtures, the KUDO KU-200x company is especially impressive. I primed the brake drums to paint them later, because I was tired of looking at years of rust. The result was amazing - the paint applied perfectly, the product looks like new. I also liked that the primer is sprayed with a spray can - this is very convenient for novice auto repairmen. And by the way, alkyd primer for metal is suitable not only for cars, but also for household appliances. I haven’t tried it myself, but a friend used the mixture in a microwave and was pleased with the result.”
Grouting the primed body
Each stage of car painting has its own purpose. The primer is an intermediate layer between the paint and the metal. If the part is puttied, then the primer is placed on the putty. However, the primer layer itself needs to be sanded, since it initially has some bumpiness.
Grouting of the soil can be done either manually or by machine. You need to work with abrasives very carefully, since a thin layer of primer can be easily wiped off. If this happens, it is convenient to cover the wipes with epoxy primer in an aerosol can.
The finishing primer is sanded with 800 grit. This size is considered optimal for applying paint. If, as a result of grinding, the developing layer indicates defects, then it is necessary to eliminate them with finishing putty, which will then have to be primed again, but this time spot-on. These places are then sanded again, and so on until the part is perfect.
Color selection
The primer can have different colors, the choice of which depends on the shade of the composition that is going to be used for painting. A correctly selected color scheme is invisible on the repaired surface and during operation, if chips and scratches appear on the paint surface, the place where it was applied will not be visible.
It is also possible to mix primers of different colors to obtain the desired shade, but only of one brand. You cannot mix compositions from different manufacturers, as they may have different chemical compositions and painting with such a mixture is not recommended. In addition, before starting work, it is possible to add paint to the primer mixture to obtain the desired shade.
It is desirable that the color of the primer in the shade matches the pigment contained in the composition for painting the car. It is difficult to achieve one hundred percent identity, but it is necessary to strive for it.
Can I paint with acrylic paint over varnish?
If it was just acrylic varnish, then there are no obstacles. And if it is a construction or industrial varnish, with a dense glossy varnish film that does not absorb moisture, then the varnish surface must first be prepared before applying acrylic paints or acrylic primer.
Interesting materials:
How to enable hyper v on Windows 10? How to enable or disable Hibernation in Windows 10? How to enable kernels on a Windows 7 laptop? How to enable processor cores on Windows 7? How to enable Game Mode in Windows 10 1803? How to enable game mode in Windows 10 on a laptop? How to enable game mode in Windows 10 pro? How to enable the camera on an Acer Windows 10 laptop? How to enable the camera in Skype Windows 10? How to enable keyboard on screen in Windows 10?
General progress of work
Thus, the process of applying primer to a car consists of the following steps:
- pre-treatment of garage and car;
- selection of the necessary primer and tools;
- removing traces of paint and rust from the surface, cleaning and drying it;
- applying several layers of primer and letting them dry;
- grinding the surface of the body until there are no irregularities or scratches noticeable to the touch.
Once all these steps are completed, you can proceed directly to painting the car. Right before painting, it makes sense to remove the grease from the surface again: then the paint will adhere more firmly.
What materials are needed for a standard painting repair?
As a rule, painting some car parts yourself may be necessary if, for example, due to careless parking, scratches or abrasions appear on the bumper and doors. You don’t always need to immediately contact a service station; sometimes the situation can be corrected on your own. It will be enough to correctly assess the scale of the necessary repairs and choose high-quality materials for preparing the surface for painting and painting the car itself. If the damage is minor, you can limit yourself to a set of simple standard repair operations:
- Putty
- Ground leveler
- Finishing coating: synthetic, acrylic or polyurethane enamels
- Finishing coating: base paints under varnish