Operating principle of radiator fan
Before considering this issue, let us discuss in general what the water cooling system of an internal combustion engine is, shown in the figure below. It will allow us to remember the principle of its operation.
In cases where cold liquid passes through the motor jacket, it picks up excess heat, while the engine cools and the water heats up. Then it passes through the radiator, where it releases the resulting heat into the atmosphere, and again enters the engine.
The radiator design is a set of thin tubes that create a large cooling surface. The incoming air flow, passing through it, carries away excess heat that is stored in the liquid. In cases where there is no incoming air flow (engine idling, traffic jams and other similar situations), or it is not enough to cool the water to the desired temperature, the cooling radiator fan is provided for.
For this purpose, there is a special control circuit, the basis of which is the thermal switch of the radiator fan. It controls the temperature of the liquid. When it exceeds the established limits, the sensor is triggered and, based on its signal, the radiator fan is turned on, which creates the necessary air flow. This flow cools the heated water, and when its temperature reaches the required value, the sensor is triggered again and turns off the blowing.
This is how you can describe the basic principle by which the radiator fan works - it turns on when the water temperature exceeds the set temperature, and turns off after it drops to the desired value.
Operating principle and temperature characteristics of the device
The operating principle of the engine cooling radiator fan switch-on sensor is based on the difference in the linear expansion of metals. When the coolant heats up, the bimetallic plate of the device changes its position. At a certain moment, the contact group closes. A signal is transmitted to turn on the fan. In some sensors, when the engine overheats, the circuit breaks.
Depending on the model, the sensors have different temperature response limits. So, to turn on the fan of the VAZ 2114-2115, a temperature of 102-105 ° C is required. The shutdown signal comes when the engine temperature drops to 85-87°C. When choosing a new sensor for his car, the car owner should focus on the old device. In the absence of the original, previous device, the necessary information can be obtained from special catalogs.
Most modern fan control systems do not have sensor limits. It does not operate in relay mode, but constantly transmits information about the engine temperature to the electronic control unit. The ECU itself sets the limits for turning the fan on and off. Changing the operating range will require brain reprogramming.
What are the consequences if the radiator fan does not work?
An internal combustion engine is a complex device, and its performance is optimal when it operates at a certain temperature. As noted above, it depends on the correct operation of the cooling system. In the case when it is not possible to maintain the required temperature, the consequences will be quite sad - if the engine overheats, it may well jam and then, at a minimum, a major overhaul is guaranteed.
The stability of the entire system should be created by a fan, allowing the water temperature to be reduced in any conditions. But if it doesn’t work, especially when it’s hot, then you need to look for why the fan doesn’t turn on or doesn’t spin. Nowadays, such devices are usually electrical, and failure of the product itself is unlikely, and a possible reason for this is often the failure of its wiring (sensor, fuse, connecting wires, etc.).
This means that when figuring out the reasons why the radiator cooling fan is constantly running or why it doesn’t turn on or spin, you must first check the wiring of the device.
Procedure. Step-by-step instruction
If after completing the next step the problem goes away, further checks are stopped.
- Open the hood.
- Wait for the engine to cool down.
- Perform an initial visual inspection: integrity of the hoses, reliability of the clamps, absence of leaks or cracks.
- Make sure that the expander cover elements are in good condition. Remove scale, rust, clear holes, wipe, assemble. The absence of noticeable damage to parts gives hope that the product will work.
The valve design is elementary. The cover contains a spring. Functionally, it is designed to regulate the pressure in the cooling circuit. A hot engine increases it, a cold engine decreases it.
Compressing at a value of 1.1 atmospheres, the spring relieves excess pressure and prevents the destruction of hoses and the tank. As the motor cools, it creates a vacuum effect. The tank will begin to flatten. The valve equalizes the pressure.
The lid screws tightly on the thread, eliminating distortions. There should be a gap between it and the body. An overtightened valve will not work. It is difficult to test the device's operation in road conditions. You can check by replacing it with a known good one.
Inspect the electrical wiring elements to ensure a reliable connection
Possible factors for damage to electrical circuits:
- vibration;
- oxidation;
- burning;
- breakage, fraying of electrical wires;
- insulation aging, short circuit.
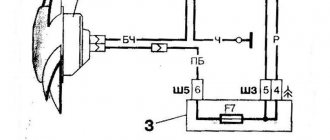
Switch the tester to resistance measurement mode. Remove it with special tweezers and ring the fuse link F7 located in the mounting block.
Fuse box diagram
Replace the burnt-out element with a serviceable one with a rating of 20A. Inspect and clean the nest. Insert fuse.
It was not possible to find out the reason, the protection triggered again - look for a short circuit.
Disconnect the fan plug. Use a tester to measure the circuit of the electric motor windings. Zero resistance or a break indicate the need to replace the radiator blower electric drive.
Interturn short circuits that cause multiple replacements of fuse links cannot be measured with the device.
Sensor check
Start the car. Pull out the coolant temperature sensor connector. The fan starts working - the sensor needs to be replaced. Secure the disconnected wire. Drive to a nearby service station.
Relay test
There is a hatch on the floor at the front passenger's feet.
Below it is a built-in panel with three relays of the same type:
- fan installation;
- fuel pump;
- ignition (main thing).
By replacing each other, try to start the airflow. The VAZ 2110 fan does not work - go to the next step.
Check the electric motor
Winding measurements did not reveal a malfunction. Apply voltage briefly from the battery using additional insulated conductors. The operation of the fan indicates a malfunction of the controller, which does not output a signal to the relay.
- The only correct solution is to turn on the airflow directly and urgently visit a service station.
- Prevention of breakdowns of the cooling system of the VAZ 2110 injector 16 valves.
- Periodically inspect the components of the cooling system.
- Monitor the cooling temperature on the device, listen to the operation of the fan.
- Maintain coolant level. Replace after 2 years or 30,000 km.
- Use the solution to remove rust and scale.
- Signs of a change in the properties of the coolant are a change in color, an increase in fluidity.
- Check the density with a hydrometer.
- Do not mix coolants.
- Every twelve months, rinse the expansion tank cap with water and check it on a stand with a pressure gauge.
- Avoid contact of aggressive liquids with electrical wiring and electric motor windings.
How to check a radiator fan
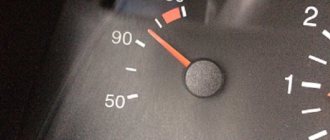
As we have already established, the radiator fan should turn on when the temperature of the water (antifreeze) exceeds the set value. This can be checked by the instrument readings on the front panel. If the fan does not turn on, then it is necessary to check the entire signal chain.
- Check the presence of supply voltage coming to the product. To do this, you can use a tester or a light bulb. The absence of voltage will indicate a possible blown fuse or poor contact in the wires.
- The serviceability of the fan itself can be checked by applying voltage to it directly from the battery. If it spins, then everything is fine with it, and the defect must be looked for in other devices. If not, and the fan does not spin, then this is the cause of the defect. In principle, you don’t have to stand still and move on, but you must constantly monitor the engine temperature. When the arrow approaches the red sector, you need to stop, open the hood and cool the engine. Two techniques will allow you to move in this case too. Maintain a speed of at least sixty km/h, then the constantly flowing oncoming air will cool the water passing through the radiator, and you will be able to drive as usual as long as you maintain speed. Another technique that allows you to partially replace a non-working fan is to use heating. Turn the stove to maximum heating mode, in this case some of the excess heat will escape through the heater. True, the cabin will be like a bathhouse, but you will be able to get to the nearest service station.
- To check the sensor, you need to disconnect the wires from it and short them together. If the fan turns on and spins, it means that the sensor itself is not working; it cannot be repaired, only replaced. However, if you leave the wires closed, you can move on; with this option, the fan spins constantly, although it is possible that the engine temperature will be lowered, but this is better than standing still.
Methods for checking DTOZH
How to check the TOZ index on your own? To do this, you can use one of several methods; diagnostics are performed using a multimeter.
- First, the negative probe of the tester should be connected to the cylinder head, and then activate the ignition by turning the key in the lock.
- Then, using a multimeter, you need to determine exactly what voltage appears at the output.
- If the controller is working, then the value of this parameter should be at least 12 volts, of course, if the battery is fully charged. If the diagnostics showed that the obtained values were lower, then you need to do repairs or change the regulator (the author of the video about diagnostics is the Mechanical Technician channel).
Another check option:
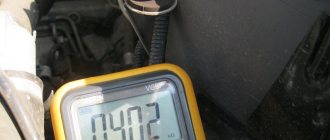
To implement it, you will need to configure the tester in voltmeter operating mode. The measurement procedure must be carried out in the operating range from 100 Ohm to 10 kOhm
In addition, for diagnosis you will need a thermometer, and it is important that it can determine a temperature value of more than 100 degrees. The controller itself is removed from its seat and lowered into a reservoir with refrigerant, which you will heat
This point must be taken into account when choosing a container for coolant. Now you will need to warm up the refrigerant in the system. When the temperature value increases, you need to carefully monitor the values produced by the tester and the thermometer placed in the container. Using a tester, you will need to check the fluid resistance level at different temperatures. The readings obtained as a result of the diagnosis must be compared with the normalized ones, which are indicated in the table.
Radiator fan runs constantly
This case is partially discussed above; the cause is a failure of the temperature sensor or a short circuit in the wires going to the fan. But if it is constantly spinning, then this may be caused by a stuck relay. This happens quite often, especially after the relay is triggered and the fan should turn on. Sticking relay contacts mean that they cannot open, which causes a constant voltage supply to the contacts, causing the electric motor to spin constantly. The consequences of sticking relay contacts include the fact that the radiator fan does not turn off.
Often the thermostat may be the reason why the fan shutoff does not work . The fact is that the sensor is located in the head of the unit; it determines when the fan should turn on. But the coolant can move in a large and small circle; when it moves in a small circle, it does not enter the radiator for cooling. The mode of water movement is determined by the thermostat.
If it is jammed in the position of water moving in a small circle, then it will continue to move and overheat, which will trigger the sensor and turn on the fan, but because... water does not enter the radiator, it will not cool, and the sensor will constantly signal a high temperature. As a result, the radiator fan does not turn off. This case can be determined simply - you need to touch the hoses going to the radiator. When the thermostat is stuck, they will be cold if the engine is overheated.
If the radiator fan does not turn off due to a jammed thermostat, then sometimes you can knock on the case to eliminate this phenomenon. Often this is enough and the defect disappears. If everything remains unchanged, then you will have to remove the thermostat, take out all the stuffing from it and then put the device itself back in place. Another option for the same defect would be the thermostat getting stuck in an intermediate position. This can also result in the radiator fan not turning off, but this situation is much more difficult to diagnose. Such difficulties are caused by the fact that a certain amount of water enters the radiator, but too little of it passes through, all the water does not have time to cool, which leads to overheating of the engine.
All of the above is not a complete description of the possible reasons why the radiator fan does not turn off. There can be many of them, sometimes quite strange and unexpected, but in each of these manifestations of malfunctions it is necessary to look for the reasons and conduct a thorough analysis.
How to determine that the DVV needs replacement?
It is generally accepted that the design of temperature sensors is reliable due to its simplicity. But it is not so. Failures can be caused by a violation of calibration, which leads to changes in resistance and causes malfunctions of the electronic unit.
When one sensor is used to regulate startup, a clear indication of its malfunction is when the fan stops working.
Modern cars are able to display information about a malfunction on the on-board computer display. However, these indicators do not always mean that it is time to replace the sensing element. The wiring may have been damaged or parts may have oxidized.
The operation of a damaged temperature sensor will soon affect the functioning of many devices: fuel consumption will increase, the idle speed will increase, and detonation will occur. It is likely that the car will become much more difficult to start after warming up, and the power plant may overheat.
Sometimes, drivers try to save money and are in a hurry to replace spare parts. Such actions can lead to even greater costs, since the failure of one part inevitably leads to the deterioration of many others. It is better to buy a new spare part in a modern way than to hastily solve even more complex problems later.
Radiator fan turns on early
The other extreme is the situation when the fan turns on early. In this case, you need to look again at the temperature sensor. Most likely it needs replacing. If, of course, you have the right sensor. The fact is that sensors are designed for different temperatures; they are also called summer and winter; each of them must turn on in its own temperature range. The latter work later. And if you have been using these all the time, then it may seem to you that the fan turns on early, although it is done on time and everything works correctly.
We need to really evaluate how early everything happens. If early switching is set according to the readings on the instrument cluster, then this is not an indicator. However, when such inclusion causes concern, connect the appropriate equipment via the diagnostic channel and look at the actual thresholds of the sensor.
Cooling the car engine is the most important task. If you allow the engine to overheat, then at best it will need a major overhaul. The ability to operate a vehicle in any conditions is ensured by the reliable operation of the cooling system, which is largely determined by the correct operation of all its components. » alt=»»>
The AliExpress portal, in partnership with AvtoFun, has prepared for our readers discounts of up to 60% on all automotive products:
A fan that comes on when the engine is cold and runs constantly while driving is a fairly common problem, despite its appearance. Its reasons are usually prosaic, but sometimes they involve significant costs. This error happened to our friend in a Chevrolet Aveo T300 equipped with the same 1.2 ECOTEC 86 HP engine as the Opel Corsa D or A12XER. We took the car to our workshop to find the source of the problem. See what caused this confusion and what the cost of this mistake is.
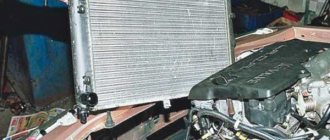
The radiator fan is one of the key elements of the engine cooling system. It causes intense airflow through the radiator core, drawing in air (the fan is located at the rear of the radiator on the engine side). Its operation is especially important when driving around the city, which is accompanied by frequent stops of the car, which makes it impossible to cool the coolant with the air blowing through the car. Fan designs have changed over the years, but the most common fans today are motor-driven. This type of design is usually controlled by a thermal relay screwed into the outlet (cooler) of the radiator tank. And it is this element that most often causes problems in fan operation. Sometimes, however, the cause of poor fan performance lies elsewhere.
At what engine temperature should the cooling fan operate?
Well, it’s okay to make fun of a person, the New Year seems to be over.
At what temperature should the thermal sensors on the radiator operate (the fan turn on)?
Rezo is right as always. At 92 degrees, the contact in the sensor on the radiator should close, and, accordingly, the fan should turn on. When the temperature drops to 87, the contact in the sensor opens and the fan turns off. This is what it says in the repair manuals.
I had a domestic sensor 92/87 in 21061. The engine seemed to be overheating in traffic jams. At some point I changed the sensor to Vernet with the same temperatures of 92/87. The engine overheated, just like with the domestic one. So I drove, suffered, adjusted the ignition, carburetor, nothing helped.
At some point, Vernet died, it started turning on at 60-70 degrees, the fan was spinning without stopping. I changed the sensor again to a domestic one. I thought it said 82/87. The fan started turning on at a lower temperature. Previously, the temperature gauge in warm weather in traffic was kept midway between 90 degrees and the red zone. After the replacement, the needle began to stabilize 1mm to the right of 90 degrees. So that’s what it’s all about, I decided and started shopping around in search of domestic 82/87 sensors. I decided that these are the sensors that are needed for the classics. Salespeople in stores looked at me like I was an idiot and explained that there were no 82/87 sensors. In short, I reviewed a lot of temperature sensors for the classics. All of them were stamped with 92/87 (or 87/92? I don’t remember). But, there were often those on which the number “9” was printed so that it looked like “8”. Maybe the one on my radiator is also 9, similar to 8. It’s hard to see now.
And the fact that after replacing the sensor my temperature regime became a little milder is apparently explained by the variation in switching temperatures. Perhaps my switching temperature is not 92, but, say, 90.
The moral is this: if the switching temperature is critical for someone (I suspect that in the summer this is important for many classicists), then you can try to select a specific copy from those available in the store. But you can try to do what I failed - find the 82/87 sensor.
Source
Engine fan runs constantly while driving
In the presented generation Chevrolet Aveo II, a problem with the fan appeared one morning. When the engine started, the fan immediately turned on, even if the engine was completely cold. The owner was further alarmed that the fan was running all the time while driving and a yellow engine light appeared on the clock. "Check the engine." He decided to return the car to our mechanic Pavel, who immediately began a basic check of the car's technical condition.
Procedure. Step-by-step instruction
If after completing the next step the problem goes away, further checks are stopped.
- Open the hood.
- Wait for the engine to cool down.
- Perform an initial visual inspection: integrity of the hoses, reliability of the clamps, absence of leaks or cracks.
- Make sure that the expander cover elements are in good condition. Remove scale, rust, clear holes, wipe, assemble. The absence of noticeable damage to parts gives hope that the product will work.
The valve design is elementary. The cover contains a spring. Functionally, it is designed to regulate the pressure in the cooling circuit. A hot engine increases it, a cold engine decreases it.
Compressing at a value of 1.1 atmospheres, the spring relieves excess pressure and prevents the destruction of hoses and the tank. As the motor cools, it creates a vacuum effect. The tank will begin to flatten. The valve equalizes the pressure.
The lid screws tightly on the thread, eliminating distortions. There should be a gap between it and the body. An overtightened valve will not work. It is difficult to test the device's operation in road conditions. You can check by replacing it with a known good one.
Inspect the electrical wiring elements to ensure a reliable connection
Possible factors for damage to electrical circuits:
- vibration;
- oxidation;
- burning;
- breakage, fraying of electrical wires;
- insulation aging, short circuit.
Switch the tester to resistance measurement mode. Remove it with special tweezers and ring the fuse link F7 located in the mounting block.
Replace the burnt-out element with a serviceable one with a rating of 20A. Inspect and clean the nest. Insert fuse.
It was not possible to find out the reason, the protection triggered again - look for a short circuit.
Disconnect the fan plug. Use a tester to measure the circuit of the electric motor windings. Zero resistance or a break indicate the need to replace the radiator blower electric drive.
Interturn short circuits that cause multiple replacements of fuse links cannot be measured with the device.
Sensor check
Start the car. Pull out the coolant temperature sensor connector. The fan starts working - the sensor needs to be replaced. Secure the disconnected wire. Drive to a nearby service station.
Relay test
There is a hatch on the floor at the front passenger's feet.
Below it is a built-in panel with three relays of the same type:
- fan installation;
- fuel pump;
- ignition (main thing).
By replacing each other, try to start the airflow. The VAZ 2110 fan does not work - go to the next step.
Check the electric motor
Winding measurements did not reveal a malfunction. Apply voltage briefly from the battery using additional insulated conductors. The operation of the fan indicates a malfunction of the controller, which does not output a signal to the relay.
- The only correct solution is to turn on the airflow directly and urgently visit a service station.
- Prevention of breakdowns of the cooling system of the VAZ 2110 injector 16 valves.
- Periodically inspect the components of the cooling system.
- Monitor the cooling temperature on the device, listen to the operation of the fan.
- Maintain coolant level. Replace after 2 years or 30,000 km.
- Use the solution to remove rust and scale.
- Signs of a change in the properties of the coolant are a change in color, an increase in fluidity.
- Check the density with a hydrometer.
- Do not mix coolants.
- Every twelve months, rinse the expansion tank cap with water and check it on a stand with a pressure gauge.
- Avoid contact of aggressive liquids with electrical wiring and electric motor windings.
Improvements to the fan start control circuit for the VAZ 2110 injector
The smooth functioning of the engine worries factory designers, auto mechanics, and car enthusiasts. Folk craftsmen change the design of valves and electrical circuits.
Installation of three position toggle switch:
- continuously on: the VAZ 2110 cooling fan does not work;
- constantly switched off: warming up the engine when starting in the cold season, automatic control is faulty;
- automatic mode: controlled by the controller, the equipment is working properly, the algorithm is executed correctly.
When choosing an installation location, consider the following conditions:
- prevent accidental switching;
- not to be confused with other controls.
It is important to remember when modifying the design about the safety of the changes made.
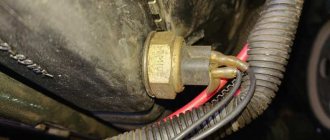
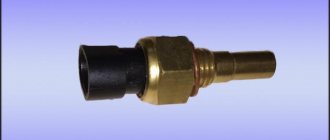
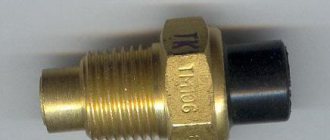
Location of the coolant temperature sensor and its replacement
Replacing the fluid temperature sensor is not a difficult task (although a lot depends on how the engine is installed in the chamber). Most often it is located in the engine head and should be looked for in its vicinity. When checking its condition, it is necessary to take into account the fact that the car may have a second, so-called Liquid Temperature Sensor located on the radiator itself.
Location of the coolant temperature sensor and its replacement
This was the case with the presented Aveo T300. However, the faulty sensor was located in the engine head and was very easy to access . This can be achieved manually without removing the motor housing. Although the Aveo T300 is more than the latest Opel Corsa design, it is still a car with good access to engine hardware. The second of the sensors, the so-called Controlled one, fortunately, was in good shape, but even the Aveo T300 has pretty good access to it.
When replacing the coolant temperature sensor, the coolant must be drained from the system, since the sensor is partially immersed in it. After replacing the sensor, fill the system with new coolant, drain it and warm up the engine.
Functions.
The element performs the function of a thermostat, but its main purpose is to protect the vehicle’s power unit from excessive heating. When the heating reaches a certain level, you need to send a signal to the ECU to turn on the ventilation device.
How does this system work? A significant amount of generated energy is transferred to the coolant. During this process, its gradual warming up becomes inevitable. The liquid heats up significantly; after reaching the t ° critical for the engine condition, the thermoelement sends a command to the electronic unit of the vehicle.
This will start the cooling process. Powerful air flows will flow to the radiator. The coolant will quickly return to normal.
Cost of replacing the coolant temperature sensor
The coolant temperature sensor is a relatively cheap component, although much depends on the popularity of the car model. In the case of the Chevrolet Aveo T300, the original part costs about 1,200 rubles. A replacement RIDEX can be purchased for about 400 rubles, and for ABS - 700 rubles.
To replace the sensor, an authorized service center charges a fee of approximately PLN 160. In an unauthorized workshop, the cost of the same service will be about 1,700 rubles. The difference is therefore clear, especially when you consider the relatively small amount of work required to complete the job.
Checking the functionality of the sensor
Checking the functionality of the device should begin with monitoring the response temperature. To do this you will need a thermometer and a multimeter. All actions can be performed independently, without resorting to a visit to the service center. If the multimeter is equipped with a thermocouple, then there is no need for a thermometer. To check the sensor, follow the instructions below:
If there is a critical deviation of the response limit, the sensor must be replaced. After purchasing a new device, you must check its suitability. Defective products are very common on sale, so checking whether the sensor turns on correctly is the responsibility of every car owner.
The engine fan turns on frequently - reasons
In the case of the Chevrolet Aveo 1.2 ECOTEC 86 HP, presented for the incorrect operation of its fan, corresponded to a simple and easy fix. Therefore, the owner of the vehicle can talk about great luck. It happens that a faulty fan module . And this, unfortunately, comes with a definitely higher cost of repair! The module is an integral part of the fan, and if it fails, the entire fan is replaced! In the case of the presented Aveo, this means costs of 30,000 rubles for the original part! And although this seems like a huge amount, compared to a fan for a BMW 520d E60, it costs up to 48,000 rubles at the dealership!
The engine fan turns on frequently - reasons
However, if we look for substitutes, we can clearly reduce this cost. POLCAR's offer includes a good replacement for the Aveo fan for 6,000 rubles (with housing). This means almost 5 times the difference in cost! It is not surprising that buyers very rarely decide to purchase an original part for this type of repair.
Many people wonder why the cooling fan constantly works or turns on frequently. After all, this is evidence of poor performance of the cooling system. This can lead to overheating of the motor and its failure. This problem is quite serious, in some cases, to eliminate it you will even have to partially disassemble the engine. The smooth operation of the power unit depends on how quickly you identify the malfunction. Inspection and repair do not require special skills; anyone can do it. The main thing is to know how to search for the reason for this behavior of the cooling system.
Why the cooling fan constantly works or turns on frequently becomes clear from the principle of its operation. It is activated by a sensor located at the bottom of the cooling radiator. This sensor reacts to an increase in coolant temperature, as a result, the fan turns on. It creates an additional air flow, which enhances the cooling of the liquid in the radiator and, accordingly, the engine itself. Based on this, it becomes clear that the fan is constantly running, only on overheating power units. To avoid engine failure, it is necessary to respond to the problem in a timely manner and fix it.
How to lower your scores
As a rule, most users begin to think about the temperature after the laptop begins to behave unstable: it reboots for no reason, turns off, and “brakes” appear in games and videos. By the way, these are the most basic manifestations of device overheating.
You can also notice overheating by how the PC starts to make noise: the cooler will spin at maximum, creating noise. In addition, the device body will become warm, sometimes even hot (at the air outlet, most often on the left side).
Let's look at the most basic causes of overheating. By the way, also consider the temperature in the room in which the laptop is working. In extreme heat 35-40 degrees. (as it was in the summer of 2010) - it will not be surprising if even a processor that was working normally before starts to overheat.
Eliminate surface heating
Few people know, much less look at, the operating instructions for the device. All manufacturers indicate that the device should be operated on a clean, level, dry surface. If, for example, you place your laptop on a soft surface that blocks air exchange and ventilation through special openings. It’s very easy to fix this - use a flat table or stand without tablecloths, napkins or other textiles.
water pump
In many cases, the reason for the increase in coolant temperature in the radiator is poor operation of the water pump. In this case, the antifreeze moves slowly through the system and heats up too much. Once it gets into the radiator, it does not have time to cool down to normal temperature, and goes around the next circle, heating up even more. If the pump at least works, then this problem is expressed only by the constant operation of the fan. If the pump fails completely, then the car will “boil” in a matter of minutes. This is an extremely dangerous condition that almost always leaves consequences in the form of engine problems.
Usually the water pump does not suddenly fail. First, it gives signals about its malfunction. The first warning sign is an increase in the frequency of operation of the radiator fan. The main cause of failure is destruction and jamming of the bearing. Therefore, a manifestation of a breakdown may be a howling noise from under the hood or a knocking sound that is clearly audible when idling. Often a knocking sound from the pump is mistaken for a camshaft fault. The breakdown is eliminated by replacing the pump; in some models it is possible to replace only the front part of the pump along with the bearing.
Where is?
It is important to regularly inspect the machine, paying attention to the condition of the temperature sensor. It is not difficult to detect, since it is fixed in the radiator. It is impossible to indicate a more specific location; there is variability depending on the car make, model, year of production of the car
For example, the element is sometimes built into the left or right compartment of the radiator tank, top or bottom
It is impossible to indicate a more specific location; there is variability depending on the car make, model, and year of production of the car. For example, the element is sometimes built into the left or right compartment of the radiator tank, top or bottom.
You can identify it in the radiator without much difficulty, since it is the only element to which the wires are connected.
A nut with a large head, which can be unscrewed using a 30mm wrench, will also help to distinguish.
Cooling system channels clogged
Quite often, overheating is caused by congestion in the cooling system. This problem is often quite difficult to identify. Therefore, at the first sign of the fan turning on more frequently for no particular reason, you should first flush the system. In many cases this is enough. Also, just in case, you can bleed out the radiator.
Typically, cleaning the radiator and cooling channels is carried out together with replacing the antifreeze. To flush, drain the coolant. Then pour in a strong solution of citric acid or water with special additives. Then let the car run for half an hour. The used cleaning agent is drained and fresh antifreeze is added. In most cases, such a procedure helps to ensure that contaminants in the cooling system are eliminated.
Checking the fan motor
table fan Vitek
Let us consider in detail how the fan motor is checked. As an example, an electric motor corresponding to the version of household table fans is shown.
The photograph shows the small electric motor of photo #1 of the table fan. To present this topic more clearly, the explanation will be accompanied by personal photographs of the diagnostics of the electric motor.
Carrying out diagnostics of electrical connections begins with a preliminary check of the device itself, photo No. 2.
Why is such a check necessary? — The check is carried out to ensure that the probe wires of the device do not have a break. That is, in practice, such a malfunction of the device often occurs as a break in the wire in connection with the probe or a metal pin in connection with the wire.
If there is a break, for a certain section of the electrical circuit, the display of the Multimeter device shows “one”. If two probes of the device are short-circuited with each other when the range of least resistance is set, the display of the device will show a zero resistance value. For this example, this will mean that the device is operational.
Radiator contamination
All car enthusiasts know that the radiator is located in front and is blown by the headwind. Therefore, it is he who gets all the dust and dirt that comes across on the road. Gradually, this dust collects between the radiator plates, significantly impairing heat transfer. Air flows, in this case, cool the liquid much worse. It gradually heats up to a high level and causes the fan to turn on.
The repair in this case is simple; you need to clean the radiator. On many modern cars you will have to remove it first, in some cases it is quite possible to get to it without even removing it from the car. It is recommended to rinse it with running water. The easiest way to do this is to use a hose. In some cases, it makes sense to clean the radiator with a soft, dry brush before washing. Often this procedure is combined with radiator purging.
Forced fan activation using the SpeedFan program
Another way to improve the performance of a cooler is to use special software, which includes the free SpeedFan utility. To overclock the fan using this application, you must:
- Download and install SpeedFan on your laptop. The installation file takes about 3 MB, so low-speed Internet is suitable for downloading.
- Launch the program via a shortcut on the desktop, and then in the “Settings” tab change the interface language to Russian.
- Go to the “Indicators” menu and set the fan power as a percentage. Here you can view data on the temperature of the hard drive, motherboard and all processor cores.
- In the “Temperature” window, located in the “Configuration” section, specify the temperature for the HDD, CPU and motherboard that the cooler will support. In the “Alarm” line, you can set the temperature value, when exceeded, the program will notify the user about system overheating. This will allow you to respond faster to critical situations.
There are other programs that allow you to force the laptop fan to start. Thus, using the AMD OverDrive utility, you can make changes to the operation of a PC cooler built on an AMD processor. The Riva Tunes application has been developed for Intel processors.
Air jams
It is no secret that the cause of excessive heating of the liquid is air locks. They appear due to errors when replacing antifreeze, as well as due to leaks in the cooling system. As a result, the liquid heats up unevenly, which leads to unstable operation of the fan, with frequent starts when hotter liquid enters the radiator.
Before troubleshooting, be sure to check the system for fluid leaks. Having eliminated them, they move on to clearing out the traffic jams. For this you will need a compressor. Unscrew one of the tubes supplying coolant to it from the throttle. Next, you need to connect a compressor to the neck of the expansion tank and supply compressed air to it. Usually a couple of minutes is enough to clear all existing traffic jams.
Sensor short circuit
. Quite often the sensor shorts out. In this case, the fan either threshes without stopping, or turns on much earlier than scheduled. If you have such suspicions, you need to pay attention to the time the fan turns on and compare the turn-on temperature with the standard one. If the temperature is lower, then you just need to change the sensor and everything will return to normal.
Insulation for the winter
. Many car enthusiasts install special insulation on the radiator in winter, this allows them to reduce the time it takes to warm up the car and save fuel. But during thaws the air temperature is quite high. If there is insulation, the motor does not cool enough, which forces the fan to work more intensely. To eliminate the cause, simply remove the insulation from the radiator.
Conclusion
. The cooling system of the machine must always be in good condition. Therefore, the driver needs to carefully monitor the condition of this system. It is especially important to correctly find the reason why the cooling fan constantly works or turns on frequently. This is certainly not a fatal problem, but ignoring this signal can lead to serious engine problems.
Replacement with draining antifreeze
If you discover that the device is not functioning correctly or is completely inoperable, you need to replace it with a new one. To perform dismantling, you must follow the instructions:
- If the engine is hot, it must be allowed to cool;
- De-energize the vehicle ground by disconnecting the negative terminal of the battery;
- Remove the expansion tank cap;
- Remove the radiator cap;
- To prevent contamination, it is necessary to place a container under the drain hole;
- Drain the antifreeze from the radiator. There is no need to drain antifreeze from the cylinder block. To unscrew the drain plug, just a hand is enough, so no tools are needed;
- When the liquid stops flowing out, you should return the plug to its place to avoid its loss;
- Remove the terminal with wires;
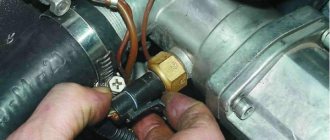
- Use a wrench to carefully unscrew the sensor.
To install a new sensor you must:
- Check the condition of the copper sealing washer. In most cases, it will require replacement with a new one. Using an old gasket is fraught with antifreeze leaks;
- Screw in the new sensor, making sure that the sealing washer fits evenly;
- Connect the terminals with wires;
- Pour antifreeze into the expansion tank. If the drained antifreeze is of good quality, you can return it. Otherwise, fresh fluid must be used;
- To eliminate air pockets in the cooling system, it is necessary to purge it;
- Replace the radiator cap;
- Close the expansion tank;
- Connect the negative terminal of the battery;
- Warm up the engine until the sensor responds.
If after these steps the fan does not turn on when the required temperature is reached, it is necessary to continue troubleshooting in other possible places. Before continuing to search for a breakdown, it is advisable to read the error log from the ECU using a diagnostic scanner.
Possible malfunctions and ways to eliminate them
The following symptoms may inform the car owner about the failure of the DVT:
- The quality of the exhaust gases is too low, which is associated with a violation of the combustible mixture in the cylinders.
- Fuel consumption has increased, and noticeably.
- Problems have arisen in the operation of the power unit. The dynamics of the vehicle may decrease, and the engine power as a whole will also deteriorate.
- Combinations of errors may appear on the dashboard, and the ECU may also send a signal to the dashboard about the need to check the performance of the motor.
- The power unit has become more difficult to start.
When they detect the first signs of problems, many motorists immediately drive their car into a garage or service station to change the controller. In practice, symptoms of DTOZ malfunctions are often associated with damage to the electrical circuit and poor contact of the device with the vehicle’s on-board network. Therefore, if you encounter a similar problem, we first recommend checking the condition of the wiring.