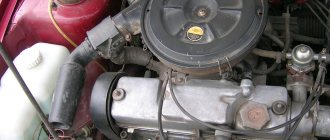
The majority of VAZ cars of the Samara family, and in particular the VAZ-2109, came off the assembly line with a carburetor power system, and only later a small series received injectors. The carburetor system has a simple design and is quite reliable, but its main component, the carburetor, requires periodic adjustment. The VAZ-2109 and other models of the family were equipped with Solex carburetors, characterized by a relatively simple adjustment technology that every car enthusiast can perform.
There are two main carburetor settings - the fuel level in the float chambers and the engine speed at idle (idle). These adjustments are carried out when the engine is unstable at idle and when certain symptoms of improper operation of the power system appear:
- The engine does not start well.
- The dynamics of speed gain have decreased.
- Dips appeared during intensive acceleration.
These problems indicate that the fuel level in the chamber is not normal.
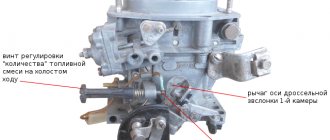
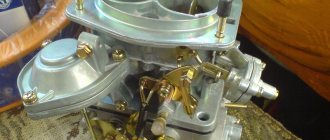
"Solex 21083"
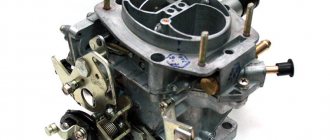
This carburetor consists of two parts. So, the first part is the main body of the device - there are diffusers, the main dosing system, a system for idling the engine, a power economizer and an accelerator pump.
The second part is the lid. It is equipped with an air damper, floats, a starting device, and a solenoid valve.
Cleaning and checking the technical condition of carburetor parts
Fuel filter
Wash the filter in gasoline and blow with compressed air.
Check the condition of the filter. If the filter or fuel supply pipe is damaged, replace it with a new one.
Float mechanism
Wash the parts in gasoline and check their condition.
The floats must not be damaged.
The sealing surface of the needle valve and its seat must not be damaged to impair the seal of the valve.
The valve should move freely in its seat and the ball should not hang up.
The weight of the floats should not be more than 6.23 g. Replace faulty parts with new ones.
Carburetor cover
Clean the cover and all holes and channels from dirt and oil.
Wash the lid in acetone or gasoline and blow with compressed air.
Inspect the sealing surfaces of the cover. If there is damage, replace the cover with a new one.
Semi-automatic starting device
In order not to disrupt the lubrication properties of bushings, axles and levers, it is forbidden to wash the device body and its parts.
Jets and emulsion tubes
Clean the jets and emulsion tubes from dirt and resinous compounds, rinse them with acetone or gasoline and blow with compressed air.
Do not clean the jets with a metal tool or wire, or wipe the jets and other carburetor parts with cotton wool, cloth or rags, as lint can clog the fuel emulsion path.
If the blockage is severe, you can clean the jets with a soft wood needle moistened with acetone.
Carburetor body
Clean the housing from dirt and oil.
Rinse its channels with acetone or gasoline and blow with compressed air.
If necessary, clean the channels and emulsion tubes with special reamers.
Inspect the sealing surfaces of the housing; if they are damaged or deformed, replace the housing with a new one.
Acceleration pump
Clean the pump parts, rinse them in gasoline and blow with compressed air.
Check the ease of movement of the ball in the sprayer and the movement of the moving elements of the pump (lever, diaphragm parts).
Jams are not allowed. the diaphragm must be intact and without damage.
Check the condition of sealing surfaces and gaskets. Replace damaged parts with new ones.
Power mode economizer
the diaphragm must be intact and without damage.
If the total length of the diaphragm pusher (including the head) is less than 6.0 mm, replace the diaphragm and pusher assembly.
Carburetor assembly
Assemble the carburetor in the reverse order of disassembly. In doing so, pay attention to the following points.
The float must rotate freely on its axis without touching the walls of the chamber.
The needle valve should slide freely in its seat, without distortion or jamming, the tightening torque of the needle valve seat should be 14.7 Nm (1.5 kgcm).
The tightening torque of the solenoid shut-off valve should be 3.68 Nm (0.4 kgcm).
To avoid mixing up the jets during assembly, pay attention to the markings of the jets.
When assembling the accelerator pump, tighten the screws securing the cover, press the drive lever all the way, tighten the screws and release the lever.
When tightening the throttle valve mounting screws, tap the screws along the contour using a special device to prevent deformation of the valve axes.
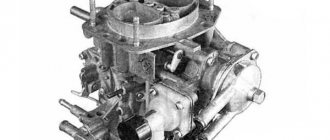
Device
Let's take a closer look at how this carburetor works. Before you start setting up the VAZ-2109 carburetor, you need to understand what and how it works. So, “Solex 21083” is an element consisting of two cameras. Jets for supplying fuel from the main metering system are installed in the middle of the chambers, deep in the main body.
On top, the fuel jets are covered with air elements of the gas pumping station. In the design of this carburetor, the developers have provided a fuel mixture heating system. Hoses through which hot coolant passes are connected to this block. Since there are two chambers in this carburetor, there are also two throttle valves. They are mechanical, and opening and closing is carried out using cables and levers.
The lid has pipes for supplying fuel and returning it back to the tank. The presence of the so-called return line allows you to reduce the pressure that is formed in the fuel system of the car during operation.
How to properly clean carburetor jets from plaque and dirt
If, while cleaning the jets, the basic standards for carrying out such an operation are violated, then significant deviations in engine operation are possible due to changes in the fuel dosage. The air jets of the Solex carburetor also need to be properly freed from dust contamination. It is also important to clean the lambda probe in a timely manner.
When setting up the carburetor metering system, superficial cleaning of the jets can be carried out. This method of removing contaminants will not take much time, but its use is only possible if there are relatively minor problems with the performance of this unit.
In case of significant contamination, a thorough cleaning of the jets is required, and if the performance of the products cannot be restored, then a new part is installed.
Surface cleaning of jets
Surface cleaning of jets can be carried out using special aerosols. A can of solvent will be inexpensive and can be easily found in specialized auto parts stores. The product has a long tube for supplying the active substance, which allows for precise spraying of liquid in the most economical way. The procedure for cleaning the jets of a Solex 21083 carburetor or other similar models is carried out in the following sequence:
- The air intake or air filter housing is removed (depending on the car model).
- The air and fuel jets of the main metering system are unscrewed (you need to remember the markings of the jets in order to correctly install them in place).
- The idle speed solenoid valve is removed.
- The aerosol is fed into the holes cleared of parts.
- Air and fuel jets are installed.
- The fuel choke lever is pulled out.
- The engine starts.
- A running engine warms up at idle and medium speeds.
- The engine turns off.
- The solenoid valve and air duct or filter housing are installed.
After connecting all the elements, start the engine again and check its operation in various modes.
Thorough cleaning of jets
If superficial cleaning of the jets did not bring a positive effect or the performance of the carburetor was restored only for a short time, then more thorough work will need to be done. In order to qualitatively restore the throughput of small parts, you will need to remove the carburetor from the car. This is not difficult to do, but first you need to disconnect the following elements:
- Air duct.
- Throttle rod or cable of the gas pedal.
- Control cable for the fuel suction system.
- Fuel hose.
- Solenoid valve wire.
Next, remove the carburetor from the intake pipe. In the carburetor, unscrew all the screws holding the lower part of the product. The device is disassembled into 2 halves. All internal jets are unscrewed and washed in acetone, and also blown with compressed air. In order not to confuse parts of similar size, they can be placed in plastic containers with inscriptions. The internal channels and fuel chamber are also thoroughly washed with solvent.
When the jets are dry, they are installed in place, the carburetor is assembled and installed on the inlet pipe. After connecting the controls, air supply and power, the engine is started and its operation is checked in various modes.
Operating principle
There is no point in examining in detail how a carburetor works, so let's study the basic principle of operation. A carburetor is a special device whose main task is to supply the engine with a fuel mixture in different operating modes.
When starting an internal combustion engine, many drivers open the air damper of the first chamber - this allows the mixture to be supplied to the cylinders as rich as possible. The engine should start. Then, as the engine warms up, the air damper is closed and the carburetor returns to its main operating mode.
The fuel mixture is supplied from the pump to the float chambers, which feed the first and second chambers. The gasoline level here is adjusted using a needle valve. Next, fuel is supplied from the chambers through special channels in the device body into the main jet and then into the first chamber. The mixture supply level is controlled by the accelerator pedal. The latter, in turn, regulates the throttle valve. The second camera will be activated if you press the gas pedal more than halfway.
When the engine is idling, the device does not use the main metering system. These carburetors have a separate idle design. Fuel and air are supplied through separate channels in the housing. XX jets are also present. Many owners have problems with setting the idle speed on VAZ-2109 carburetors.
Disassembly of the unit and the algorithm for its implementation
To completely clean the entire carburetor, you will have to not only remove it, but also disassemble it. Experienced users will put the part back together without any problems, but those who have not done such work may make several serious mistakes. Here are a couple of tips on what to do before disassembling the device:
- Unscrew all fasteners (including those inside the carburetor) only if absolutely necessary. In particular, the fastening of the dampers must not be touched. Incorrect reassembly of these parts, displacement and movement will lead to jamming of the mechanism, as a result - several new problems.
- Diffusers that are placed in air ducts should not be pulled out.
- Do not dismantle brass tubes unnecessarily.
- Also, do not remove the economizer fitting and valve. Any part that is misaligned or installed incorrectly will cause the carburetor to stop working altogether.
A very important point! The second chamber throttle adjustment screw has a protective cap; it does not need to be removed, and the screw itself should not be touched. Otherwise, the factory settings of the mechanism will be changed, which may lead to serious malfunctions in the operation of the entire unit. Without a special tool, the starting position of the damper cannot be returned.
If you plan to completely disassemble the unit, then this must be done very carefully, slowly, using the vehicle manual. In cases where it is enough to clean the external part of the device, it is better to limit it to this, otherwise you will then have to take the car for a comprehensive repair to the nearest service station. The most detailed description of working with Solex is in the publication “Solex Carburetors” authored by Erokhov. It is recommended to use it first, as many small nuances are described there.
Common faults
A well-maintained and properly tuned carb will not cause any problems to its owner. But often this does not happen. Elements break, and there are fewer and fewer carburetor specialists. Let's look at the main problems with these devices.
Most often, malfunctions occur with the accelerator pump. Its main function is to enrich the fuel mixture. During the operation of the car, as well as due to poor-quality fuel filters, the pump becomes clogged. As a result, dips appear and the car “does not move.” The situation can be corrected by disassembling and cleaning the carburetor (in particular, the accelerator pump).
Problems with idle speed also often occur. Usually the idle jet and solenoid valve are to blame. The EPHH unit also fails. The GDS jets also become clogged.
Video on setting up the carburetor VAZ 2109 Solex
If the carburetor is filled with oil, it is necessary to check the condition of the oil separating mesh, which is installed in the cylinder head covers. The Solex carburetor is connected to two supply hoses from the gas ventilation system in the engine crankcase. One of them is routed to the bottom of the housing, and the second pipe goes to the air filter. To avoid oil escaping from all crevices, experts recommend installing a carburetor fuel filter in the pipe.
Increased speed XX. If the fuel mixture is constantly enriched, while the choke handle is unstable and sometimes does not reach the stop, you should first check the position of the adjusting bolt. You will find it by its large head. Very often the bolt unscrews spontaneously, which leads to a skew of the lever during movement. Accordingly, in this situation it is impossible to correctly adjust the level of enrichment of the fuel mixture. Therefore, the XX speed will be increased.
If after tightening the adjusting bolt the problem is not resolved, you need to check the position of the air damper in the fuel filter. To do this, open the filter cover and look at how the damper is positioned. If it is not installed in a vertical position, you should remove the spring, which is designed to create additional resistance when closing the damper. After removing the spring, the damper will close completely.
Dismantling
Before setting up the VAZ-2109 carburetor with your own hands, you need to blow it out and rinse it. This process begins with dismantling the device. It's very easy to do. Simply turn off the ignition and remove the air filter housing. Then remove the spring that is installed on the air damper actuator.
After this, disconnect the throttle cable. The next step is to unscrew the fastening that holds the choke cable. All that remains is to unscrew the nuts that hold the device body in place. After this, you can completely remove the device.
Preparation for setting up the VAZ 2109 carburetor
To figure out how to adjust the carburetor on your VAZ 2109, you should start with preparatory measures. They include:
- Preparing a room for regulation, where there is constant access to fresh air;
- The machine must be horizontal and as level as possible;
- Do not use ordinary rags while working, as they produce lint that can damage the car;
- You should always have a flathead screwdriver on hand;
- Prepare cleaning products or gasoline. Compressed air cleans the system best.
Carburetor cleaning
You cannot adjust the carburetor on a VAZ 2109 with your own hands until you clean it.
Regular gasoline or compressed air, detergents and cleaners are suitable for this. Adjust the ignition pre-ignition. If it is early or late, then adjusting the carburetor will do absolutely nothing.
Carry out work only after the engine has reached operating temperatures. To do this, you need to start the car and keep it idling. You need to remove the linkage from the gas pedal, unscrew the crankcase ventilation, and check that there is no vacuum regulator in the tube. If there is a vacuum, then you did something wrong. Be sure to adjust the quality screws.
Step by step adjustment
You can make the adjustment yourself, but to do this you should follow a clear sequence of your actions.
Step 1: Adjust the throttle
- Check the cable tension level. It may be too tight or too tight.
- Use a 13 key to adjust the tension.
- Check your work. By pressing the pedal all the way, the damper should open completely, and by releasing the pedal, it should be completely closed.
- Using the same 13mm wrench, adjust the position of the locknut to achieve the ideal result.
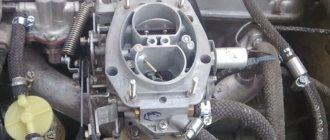
Step 2: Adjusting the air damper
Air damper
- Remove the cap from the filter and replace it if necessary.
- Check its functionality. Recess the choke handle completely, and then the damper should be completely open and located under the dashboard.
- Pull the damper lever to fully open it.
- Push the lever all the way in.
- Remove the cable from the insulation and press the traction adjustment bolt.
- Check the functionality of the damper again.
- Having achieved the desired result, fix the bolt on the lever and close the air filter cover.
Step 3: Starter
Adjustment is carried out by removing or not removing the carburetor. If you can't remove it, then use a tachometer. The air filter housing is removed, and the air damper lever is removed. Start the engine and watch what happens.
The air damper is opened a third with a flat screwdriver, and the adjustment bolt is adjusted with a 7 key. The tachometer should show 3100-3400 rpm. If the desired result is achieved, you can release the shutter.
Step 4: Adjusting the idle speed
- Charge the battery as fully as possible.
- Warm up the engine until it reaches its operating temperature.
- Turn on your lights, audio system, and other equipment that uses electricity. It is required to achieve maximum utilization of battery charge.
- Idle at maximum speed.
- By rotating the quality screw, reduce the speed by about 50-150.
Video
https://youtube.com/watch?v=-iYxxRFBWUo
Do not forget that constant adjustment of the carburetor, its proper cleaning and tuning will significantly extend the life of the device and avoid complex and expensive repairs. Plus, this has a positive effect on fuel consumption, which is reduced as a result of such procedures.
Now you know what to do if the carburetor on your VAZ 2109 malfunctions, failures during acceleration, inability to maintain idle speed and other troubles.
Of course, if the problem turns out to be serious and the carburetor needs repair, then it is better to entrust it to professionals. It is not recommended to undertake such a task on your own.
Loading …
Adjustment
This carburetor has several options for adjusting different parameters.
Typically, setting up a VAZ-2109 Solex carburetor includes several operations. You can adjust the fuel level in the float chamber, idle speed and idle speed itself. The quality of the fuel mixture is also adjusted.
Recommended Method
Level control technology includes a number of stages:
- We dismantle the housing of the air filter element. To do this, unscrew the fastening nut of the housing cover, unclip the latches, remove the cover, take out the filter and tighten the 4 nuts that secure the housing to the carburetor.
- Raise the body and disconnect the rubber pipes. We move the body to the side.
- Loosen the clamps securing the fuel pipes going to the carburetor and disconnect them.
- Remove the wire suitable for the idle speed solenoid valve;
- Disconnect the drive cable of the air damper (the “choke” handle);
- Unscrew the 5 screws securing the carburetor cover;
- Having removed the cover, we immediately determine the fuel level in the chambers by lowering a ruler or caliper into one of them until it stops (using its depth gauge). If the measurement shows a level of 25-26 mm, it corresponds to the norm and no adjustment is required;
If the amount of fuel in the chamber is lower or higher than normal, we perform a visual inspection and a series of measurements on the floats, and if necessary, we correct their position.
To carry out adjustment work, place the removed carburetor cover on a flat horizontal surface with the floats facing up.
First, we look at the position of the elements from above. The outer side surfaces of the floats are parallel to the special imprints on the gasket. Deviations can cause the floats to touch adjacent elements and surfaces, causing the fuel level to be incorrect. If necessary, adjust the position of the floats by bending their mounting arms. The next step is to measure the gap between the floats and the gasket. A rod with a diameter of 2 mm is useful here - this is how much the specified gap should be.
If it does not correspond, we bend the tongue of the floats, with which they act on the locking needle. After this adjustment, we check the total height of the floats, which is normally 34 mm. If this is not the case, check the gap again, adjust it if necessary and measure the height again.
The last stage of setup is determining the working stroke of the floats. To do this, place a caliper near the float, mark the distance from its lower corner to the surface of the cover, then lift the float with your hand and mark where the lower corner is.
A working stroke of 15 mm is considered normal; if it differs, it is adjusted by bending the tongue.
We set the quality of the fuel mixture
This carburetor adjustment on the VAZ-2109 can be done with your own hands and it is not necessary to visit specialists. The quality is very easy to set. To do this, the engine is thoroughly warmed up, and then using a screw to adjust the number of revolutions, the idle speed is set to about 900 per minute.
Next, the quality screw is tightened until the engine begins to operate intermittently. Then it is turned away again. It is recommended to unscrew until stable operation, namely until the speed stops increasing. In the position of the quality screw where the speed is highest, you need to stop and remove the high speed with the quantity screw.
Problems when setting idle speed
One of the common problems with these carburetors is idle. Owners are faced with the fact that independently adjusting the VAZ-2109 carburetor does not lead to anything. XX cannot be adjusted. When turning or unscrewing the fuel mixture quality screw, the engine speed does not change in any way.
Everything is simple here. The reason for this operation is that the idle jet, which is installed in the solenoid valve, is clogged. It is also possible that the channel located under the quality screw is clogged. Often everything is solved by replacing a non-functioning solenoid valve.
Checking the solenoid valve is also easy. When the engine is not running, remove the wire from the valve, unscrew the valve itself, and remove the jet. Next, turn on the ignition and connect the wire to the solenoid valve. In this case, the latter should click, and the rod will sink inward. If this click does not occur, then the valve is not working. It needs to be replaced.
You should also immediately blow out and clean the idle jet. Even a small grain of sand is enough for the hole to become clogged. It may not even be visible. But this is enough for the idle speed to disappear. If the channel located under the quality screw is clogged, then it will not be possible to blow it out.
Preliminary work
Although our primary task is to adjust the VAZ 2109 carburetor, we need to start cleaning the unit from carbon deposits and dirt. Often plaque is the cause of the problem, so you will need a good cleaning agent. In the auto supply store you can find various chemicals for such needs; You need to ask specifically for the carburetor. WD 40 is not suitable for cleaning due to the abundance of oil in the composition.
In addition to chemistry, the following items will also be useful to you:
- Small stiff brush. In extreme cases, a toothbrush or even toothpicks will do.
- Rubber and fabric gloves. You can take two pairs of rubber ones - just in case, because cleaning products are very aggressive.
- Set of keys and screwdrivers.
- User manual for VAZ 2109 with Solex circuit.
- A can of compressed air for blowing parts.
What is the spray can for? The fact is that the nozzle channels are very narrow, which is why mechanical cleaning using narrow tools will be useless, but a powerful directed air stream is suitable for such a task.
You need to carefully clean both the outside and inside of the carburetor. Fastenings - screws and bolts, put them in separate boxes, they should also be processed and blown out at the end.
Be sure to remove all rubber parts from the assembly, otherwise the chemical will simply dissolve them. The same should be done with plastic. Only metal parts need to be treated with the cleaner. This is done in two stages:
- The chemical is applied, after which you need to wait 10 minutes.
- When the coating has partially dissolved, you need to rinse the parts and housings under running water.
If any deposits remain, they can be easily removed with a toothpick, stick or brush. The last stage of cleaning is drying.
Setting the level in the float chamber
For stable and uninterrupted operation of the car, you need to adjust the float of the VAZ-2109 carburetor. This will ensure the correct fuel level in the float chamber. To do this, you need to remove the carburetor cover. Then, by bending the plate that holds the float, the position is adjusted.
How to exhibit? There are different opinions on this matter. Some argue that you need to achieve factory settings for the VAZ-2109 carburetor, while others prefer to configure it based on their own experience. It is better to measure the level with a caliper. The distance is determined between the top of the housing and the fuel level. It should be within 24-26 millimeters. Measurements must be taken as soon as the cover is removed. In books on Solex carburetors, there is a template that allows you to configure the floats as correctly as possible. This setting is carried out with the cover removed.
Setting the fuel level
Adjusting the amount of fuel in the chambers of Solex carburetors is a simple procedure and does not require specialized equipment. Although in the factory this adjustment is performed using a special template, which simplifies and speeds up the work. But at home you can do without this template. To carry out adjustment work yourself you need:
- screwdrivers (phillips, flat);
- ruler (preferably a caliper);
- round rod with a diameter of 2 mm (wire or drill will do).
With such equipment you can quickly complete all work.
Ignition settings
In order for the car to drive as efficiently as possible, adjustments to one carburetor are not enough. You also need to adjust the ignition. The VAZ-2109 carburetor should work well. Do you know that an incorrectly set ignition angle affects engine performance for the worse?
On front-wheel drive VAZ models, this should be taken very carefully. The ignition angle allows you to obtain normal characteristics such as power, idle speed, fuel consumption, and engine response.
Symptoms of an incorrect angle
What if the ignition setting is incorrect (the VAZ-2109 carburetor works perfectly)? In this case, you can observe high fuel consumption, a decrease in power, failures when pressing the gas pedal, problems with starting the engine, as well as detonation and overheating.
It often shoots at the muffler and carburetor. These are not all possible symptoms. But before you start ignition, you need to make sure that no valve adjustment is required. You already know how to adjust the VAZ-2109 carburetor.
Reasons why candles flood
This question worries owners of carburetor cars much more often than owners of injection cars. This happens especially often in winter. There are several reasons for this malfunction:
- In order to mix the working mixture in the winter, much more effort is required than in the summer. To avoid this problem, it is necessary to fill the engine with high-quality oil, keep the battery fully charged, and also monitor the serviceability of the starter;
- the engine is very worn out;
- Poor quality spark plugs or spark plug wires.
How to set the ignition angle?
Many people recommend using a strobe light for these purposes. But this is true for new cars. If the motor is already worn out, this angle set by the strobe will be incorrect. It is best to rely on the hearing and behavior of the car.
So, how do you set up the ignition yourself on a VAZ-2109? By the way, we have already examined the carburetor in full. The first step is to start and warm up the engine. Then you need to loosen the nuts holding the distributor and turn it in one direction or the other until the speed begins to increase and the engine starts running stably. Next, the nuts are tightened.
After this, you need to drive the car and look at its reaction. If the car “does not drive,” then the ignition is too early. Next, you need to accelerate to 50 kilometers per hour, engage fourth gear and press the accelerator pedal. If detonation sounds occur, then the ignition is set even later. If the detonation lasted a few seconds, then everything is in order. And if it is not there at all, then the ignition is too late.
It is recommended to set it again. But in this case, the ignition distributor should be rotated in the opposite direction. Please note: the slightest inaccuracy and an error of 1 degree are fraught with detonation. After successful setup, the car will begin to pick up speed normally and consume less fuel (but not below factory settings).
Replacing carburetor jets
If earlier during operation of the machine the rules for cleaning the jets were grossly violated, then the parts will need to be replaced. For example, if the owner of a car used metal wire or needles to clear calibrated holes from contamination, the diameter of the product could increase. If such a problem occurs on the fuel nozzle, then the engine will be filled with gasoline, and on the air nozzle, the car will run on a lean mixture. Both situations will not allow you to comfortably operate the vehicle, so you will have to replace damaged parts.
Sometimes, installation of a new carburetor jet is required as a result of the loss of an element during cleaning. For example, if a powerful compressor unit was used to blow through the product, the part may fly out a considerable distance if it was not properly fixed during the work.
To replace the jets you will need to buy a new repair kit. Then you should disassemble the carburetor, as when performing a thorough cleaning, unscrew the old ones and install new elements.
Options for modification and selection of jets on Solex carburetors
The Solex 21083 carburetor jets can be modified to change the dynamic and economic performance of the engine. A feature of such work is the need to change only fuel or only air dosing elements. If you need to increase power, then it is enough to slightly increase the diameter of the fuel elements; to increase engine efficiency, a similar operation is carried out with air jets.
Increasing the diameter by drilling is possible, but given the large error when performing such an operation, it is recommended to select a part with the required size from the jet table.