Print this article Font size 16
The switch, also known as the ignition switch, plays a huge role in the “starting” system of the VAZ 2114 car. It takes part in the operation of the starter, headlights, turn signals, power windows and other elements of electrical circuits. Today we will talk about the ignition switch of the VAZ 2114, the reasons for its replacement, the dismantling procedure and much more.
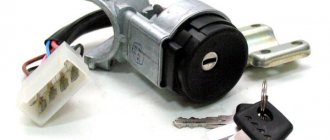
Egnition lock
When replacement is required
Ignition switch kit
There are several basic situations when a car owner may urgently need to replace a unit. The reasons for the malfunction of the VAZ 2114 ignition switch include:
- Mechanical failure of keys;
- Lost key;
- Damage to the lock as a result of an attempted theft;
- Broken ignition contacts.
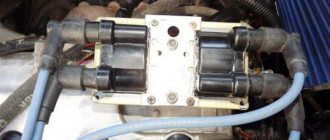
Possible reasons for failure of the ignition module
Before repairing the main part in the car’s ignition system, you need to understand the nature of the problem. To do this, the consumer must be aware of the signs of a malfunction, as well as the causes of the breakdown.
The main reasons for device failure
Causes of problems:
- The ignition system uses spark plugs that do not match the vehicle parameters. They may not have the gap specified by the manufacturer. Also, the spark plugs themselves may not be working or dirty; this can be determined by visual diagnostics. If there are traces of carbon deposits on the devices, they must be removed.
- Malfunctions in the operation of the MH can arise as a result of frequent spark checks. At the time of diagnosis, a high load is placed on the device. If it appears frequently, it will lead to equipment failure or incorrect operation.
- The ignition module in the VAZ 2114 operates with the high-voltage cables disconnected. This also leads to device failure. The products themselves may be damaged, which affects the functioning of the engine as a whole.
- The device operates under severe vibration conditions. Their impact may be due to poor quality fixation of the module in the seat. As a result of vibrations, the factory soldering inside the equipment structure is damaged. This leads to its incorrect operation.
- The contact inside the plug with the low-voltage cables is broken.
- Initial use of a defective device or module with poor build quality. This factory defect can only be eliminated by replacing the mechanism; repairing the equipment is pointless.
- Moisture getting inside the case. This problem is unlikely, but exposure of the device to liquid may cause it to short out and break.
Signs of coil malfunction
The main symptoms of a malfunction in the VAZ 2114 ignition module:
- Difficulties arise when trying to start the engine. Starting the car engine may be difficult due to the fact that there is no spark on a spark plug or several.
- When idling or parking with the internal combustion engine running, the speed of the power unit floats. Their change is not associated with pressing the gas pedal and other third-party factors. This happens randomly.
- There are dips in the power of the car's engine. This is especially felt when driving uphill or sharp acceleration. Problems can also occur when driving on a flat road.
- Several cylinders stopped working. Usually these devices operate in pairs, so elements 1-4 or 2-3 could fail. Non-working cylinders may be indicated by “triple movement” of the engine.
- A “Check Engine” warning light appeared on the dashboard.
If the ignition module malfunctions, problems will appear not only in engine operation, but also when starting it.
The “Simple Opinion” channel, using the Lada Priora car as an example, spoke in detail about the symptoms that appear in the operation of the ignition modules.
This is interesting: Replacing the VAZ-2112 fuel filter 16 valves - photo and video
Troubleshooting Methods
There are two methods for detecting faults:
- Visual;
- Diagnostic.
Ignition switch circuit
We suggest studying a visual method for determining a malfunction or breakdown of the contact elements of the ignition switch using the table.
| Action | The device is working properly | The device is faulty |
| Turn the key to the right position (ignition) | All electrical equipment turns on | All or part of the electrical equipment does not work |
| Turn the key to the second position | The starter is spinning | The starter does not work, the traction relay does not click under the hood |
But diagnostics allows you to get a more detailed answer. In addition, a visual inspection will not give you the opportunity to find all the reasons that could cause the ignition switch to break down.
To work, you will need a mini-tester and a multimeter in ohmmeter mode:
- Disconnect the power supply from the ignition switch. To do this, you need to remove the skin from the steering column;
- Switch your multimeter to an ohmmeter;
- On the block coming from the lock you need to find pins 7 and 4, which correspond to pins 15 and 30;
- Connect the multimeter probes to them;
- Turn the key to the “Ignition” position;
- On the block, find pins 7 and 3, corresponding to 50 and 30. Also connect a multimeter to them;
- Turn the key to the second position - Start the engine;
- If serviceability is present, the device will show zero resistance in both test cases.
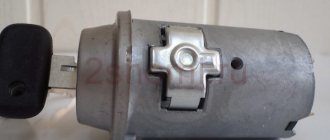
Purpose and principle of operation
The ignition switch is an electrical device responsible for both starting the engine and turning on the power in the on-board network. It has 3 different sector switch positions controlled by the ignition key.
Each of them is responsible for its own separate function, namely:
- Position “Off 0” - power is supplied to contacts 30 - all equipment is turned off.
- Position “Ignition 1” - power is supplied to contacts 30-15 - current goes to the ignition system, instruments, headlights, windshield wipers, stove, cigarette lighter, glass heater, turn signals.
- Position “Starter 2” - power is supplied to contacts 30-15 and 30-50 - all the same circuits are energized as in position “1”, as well as the starter.
It is worth noting that the car has a number of electrical circuits that can be turned on regardless of the position of the key, namely: interior lighting, hazard warning lights, high beams, brake light and horn.
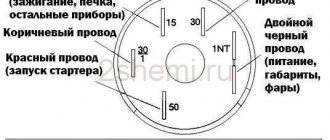
Pinout of the ignition switch
In turn, the pinout of the ignition switch of the VAZ 2114 looks like this (the legs of the lock connector are indicated):
- 1 - +12 volts for the key sensor;
- 2 - to ground (if the driver's door is open);
- 3 - +12 volts to the starter (aka contact 50);
- 4 - +12 volts with the ignition on (aka - pin 15);
- 5 - +12 volts with the key inside the lock;
- 6 - +12 volts for lock illumination;
- 7 - +12 volts from the battery (aka - pin 30);
- 8 - not applicable.
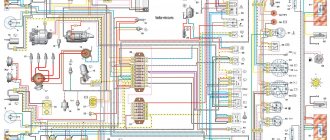
The VAZ 2114 ignition circuit, according to which the lock is connected to the on-board network in accordance with the pinout presented above, looks like this:
Preparation
At the preparation stage, you will need to collect the necessary tools near you, which will be useful in the process of dismantling and installing a new ignition switch. You will also have to remove the steering cover and steering column shifters. Doing this is quite difficult, but we will tell you step by step about all the nuances of these preparatory activities. So you can easily figure out for yourself how to remove the ignition switch on a VAZ 2114.
Replacement process
Tools you will need:
- Phillips strong screwdriver;
- Open-end wrench 10 millimeters;
- Chisel;
- Hammer;
- Pliers or pliers;
- New ignition switch assembly;
- Lock mounting screws (4 pieces).
Now let's move on to the casing and switches. For more convenient work, many advise removing the steering column switches and the steering wheel itself. Dismantling the casing is performed in the following sequence:
- Disconnect the negative cable from the battery. Nobody has yet canceled the requirements for personal safety and protection against electric shocks;
- Unscrew the three screws securing the two parts of the casing. A screwdriver is useful for this;
- Unscrew the screw that connects the housing to the connector of the steering column switches;
- Remove the two screws that hold the lower housing to the steering column;
- The lever that fixes the column at the corner leads down;
- The steering wheel also goes down;
- The lower casing is then removed;
- The power supply from the emergency lights must be disconnected;
- Now you can remove the top casing;
- To dismantle the steering column switches, you need to act one by one;
- Simultaneously press both latches and thereby remove the elements from their seats;
- Disconnect them from the power supply.
Withdrawal procedure
Depending on the reason, a complete or partial replacement is performed. It is not recommended for the average person to engage in reassembly, since there are too many nuances in this process, but almost anyone can replace the mechanism. Step-by-step instruction:
- Three screws are unscrewed. They are located on the inside of the handle. To do this, use a Phillips screwdriver to remove the cover.
- The front trigger glass position switch is removed along with the wiring harness block. To do this, the wires are first disconnected.
- The plug on the armrest handle is removed, the element is picked up with a thin corner of a screwdriver.
- Unscrew the 2 screws on the handle that hold the inner panel.
- The plastic clips are pressed out to remove the lining.
- 6 pistons are removed to remove the door card.
- The external fastenings are removed, the nuts are unscrewed with an 8mm wrench.
Removing a faulty lock
Unscrewing the ignition switch bolts with a chisel
In practice, replacing the ignition switch on a VAZ 2114 will be impossible until you get rid of the old one. This is not difficult to do, but you will have to spend some time on your car.
- Once you have gained access to the ignition switch, or rather its housing, you will notice that the lock is attached to the steering column with four bolts. The problem is that they don't have heads.
- This phenomenon is part of the “unique” factory anti-theft system manufactured by AvtoVAZ. In fact, such a system makes it somewhat more difficult for criminals who do not have a key to start the engine. So don't scold them too much.
- These bolts are loosened with a chisel and hammer, and their removal is done using pliers.
- Next, remove the bracket from the column;
- Be sure to unplug the power supply. In general, the wiring diagram for the VAZ 2114 ignition switch is simple if you buy the lock assembled. You don't have to solder anything or figure out which wire goes where. Everything is assembled into a block, so all that remains is to insert it into the appropriate connector. That's all.
- By disconnecting the power supply, you can now finally get rid of the failed ignition switch.
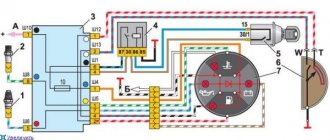
Connection diagram of the ignition switch to the electrical wiring of a VAZ-2114 car
In the technical documentation for the VAZ-2114 there is a separate section that specifically describes the design of the vehicle’s electrical equipment. So, all the elements are described in full. But, in this particular case, the issue of independently connecting the ignition wires will be considered.
So, let's look at the diagram to see how the contact connections of the ignition switch are connected.
Ignition switch pinout diagram
Regardless of the ignition being turned on, the following devices can operate: high beam, interior and instrument panel lighting, hazard lights, brake light, sound signal, as well as exterior lighting.
A separate item worth highlighting is additional equipment: a car radio (of any format), speakers, additional lighting devices are powered directly into the battery or on-board network, and much more.
Ignition switch device
Next, we will consider the switched circuits of various key positions in the ignition switch:
| Key position | Live contacts | Switched circuits |
| 0 (Disabled) | 30 | _ |
| 1 (Ignition) | 30-15 | Ignition system, generator excitation, headlights, turn signal, control devices, windshield and headlight cleaners and washers, heater fan motor, rear window defroster, cigarette lighter |
| II (Starter) | 30-15 | See Regulation I |
| 30-50 | Starter |
Ignition switch pinout
Product selection
There are several options for the ignition switch on the VAZ-2114. Let's look at each one separately:
- 2110-3704005 or KZ-881 – original catalog numbers of the ignition switch manufactured by AvtoVAZ. The wiring diagram is standard, that is, factory. Installation is quite easy. The average cost is 1000 rubles .
Installing a new device
Now you can finally proceed directly to replacing the broken or worn out ignition switch on your VAZ2114 car.
Removing the ignition switch
To do this, follow the following sequence of actions:
- Insert the key into the new lock and turn it to the first position. This will allow the latch, which is responsible for locking the steering shaft, to hide inside the housing structure;
- Insert the lock into place following the reverse dismantling sequence;
- Install the four retaining bolts and tighten them slightly.
Replacing the contact group
If you still decide to save money and not buy a whole lock, the best solution for a working “cylinder” would be to replace the contact group. It is produced as follows:
- Having dismantled the ignition switch, we remove the retaining ring from the end of its body, which holds the core of the device.
- We remove the contact group from the housing.
- We install a new part in place of the old one. In this case, the position of contacts “15” and “30” must correspond to the position of the rod that locks the steering shaft.
- Please note that the wide protrusion of the contact group is inserted into a wide groove on the housing.
- Install and check the device in the order described above.
How to replace all door locks, rods and cylinders on a VAZ 2113-VAZ 2115?
Removal: 1) First, let's start with the most important thing, without this you won't be able to replace the locks, but in general you won't be able to start the operation because all the work to replace all the things that are listed in the title is carried out with the trim removed from the door, it is removed quite easily and in more detail about how to do this, if you don’t already know, read the article: “Replacing a door on a VAZ” in paragraphs 1-8, and after the trim is removed, proceed to removal, let’s immediately note a couple of facts so that to replace the cylinder, the rods will need to be disconnected from it, but to replace the rods, you don’t need to remove or disconnect anything, the same with the door locks, the rods from them will also need to be disconnected and only after that unscrew the screws that secure the locks, so first Let's start with the rods themselves and explain how they are removed, firstly, you can start disconnecting them from absolutely any side and from any place, for example, start disconnecting the rod first from the internal lock as shown in photos 1 and 2 (Photo 1 shows disconnecting with a locking screwdriver the washer that holds the rod, and already in photo 2 the disconnection from the internal lock of the rod itself is shown), then using a screwdriver and your hands, disconnect the other rods and continue the entire operation until the rods on both sides are disconnected, as soon as they are disconnected on both sides , completely remove them from the car (there are several rods in the car and each one goes to the locks and there is even a rod to the cylinder, they are disconnected, as you already understood, with a screwdriver and your hands, in the beginning just disconnect all the lock washers or plastic clamps and pull them by hand by the rod, disconnect it from the lock or from the cylinder, etc., but the rod is not always secured with the help of clamps, sometimes it is hooked at one end to something, in this case, also disconnect its end with a screwdriver and then remove it completely rod), thus remove all rods from the car.
2) After the rods are removed or disconnected from those things that you are going to replace, proceed to removing these things themselves, first we will look at the removal of both door locks, the internal lock and the external one are removed together, that is, if you decide to change the external lock, then you the internal one will have to be touched (You don’t even have to replace the internal lock with a new one, but you’ll just have to tinker with it even if you only need to replace the external one) and vice versa, everything is the same, to remove the external lock you will need to loosen the two screws that it is secured (Please note, loosen, the impact screwdriver does not serve anything else, we recommend that you completely unscrew the screws with a regular screwdriver) these screws are also indicated by arrows in photo 1, as soon as the screws are unscrewed, go further and pull the lock, remove it from car (see photo 2) if you also need to replace the internal lock, then in this case remove the door opening handle (read how to do this in the article: “Replacing a window lifter on a car”, everything is described in the paragraphs) and then into the internal climb up part of the door and use a screwdriver and your hands to disconnect the two rods (Those rods that you will need to disconnect from the internal lock are shown in the photo below under number 1), as soon as the rods are disconnected, pull out the internal lock and as soon as it is removed, proceed to disassembling it, to do this, remove the lock washer from it using a screwdriver that secures the internal drive rod (see. photo 3, on it the lock washer is indicated by an arrow) and then disconnect the rod itself from the lock (see photo 4), disconnect the other rod in almost the same way, it is attached to the internal lock by a plastic retainer, you just need to move it and the rod can then be safely disconnected from the lock; see the video clip at the end of the article for more details.
3) Now we’ll talk about how to remove the cylinder from the outer handle, it is inserted into the handle itself and in order to remove it, you will have to first remove the handle from the door and then remove the cylinder, this is all done as follows, from the outer handle to the inside doors, both rods are disconnected (see photo 1) and after the rods are disconnected, unscrew the two nuts that secure the handle to the door (see photo 2) and by pulling the handle with your hand, remove it completely from the car, after the handle is removed (It By the way, it will be removed with the rods), take an awl in your hands and use it to push out the side pin that holds the cylinder and the cylinder leash (see photo 3, the leash is indicated by a red arrow, when the pin for its fastening is pushed out, remove the leash completely from the cylinder), then use a screwdriver pry up the spring that secures the same cylinder and remove it (see photo 4), and finally, when the leash and spring are removed, insert the key into the cylinder and turn it, thereby you will unlock the mechanism and you can easily pull the key to remove the cylinder from external handle.
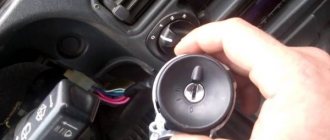
Checking the lock's functionality and steering wheel lock test
All that remains is to check the functionality of the new lock and the steering wheel lock. You should start by checking the lock, to do this you need to remove the key from the ignition and turn the steering wheel slightly.
If there is no lock, it is necessary to adjust the position of the lock. Be sure to make sure that it fits into the groove on the steering shaft.
If the steering lock works as expected, tighten the breakaway bolts until they stop.
After this, connect the power and try to start the engine. If successful and the ignition system is operating correctly, you can tear off the bolt heads and begin installing the steering column casing and steering column switches back into place.
An important nuance is the use of breakaway bolts. Many people use regular ones instead, because this simplifies the subsequent replacement of the lock when it breaks again. But do not forget that breakaway bolts are used primarily to make life difficult for attackers when trying to steal a car, so you should not neglect them.
If you carefully follow the instructions and do everything slowly, then replacing the ignition switch is not a difficult job. The most unpleasant stage will most likely be the first removal of the lock and unscrewing the breakaway bolts. Also, try to buy new spare parts only from trusted sources, so that later it does not turn out that the repair was carried out correctly, but despite this, nothing works and the car does not start.